


1 项目级
2 应用级
3 页面级
在开发过程中,我们会遇到各种各样的需求,如横竖屏切换。大多数的ipad应用都会做横竖屏适配,这样用户可以在任何一个方向操作应用,这对用户来说是一个很棒的用户体验。
本篇博文不具体教大家怎么横竖屏适配屏幕,而是给大家介绍横竖屏的设置和监听。
1 项目级
当你创建一个项目时,苹果是默认支持直立、向左和向右三个方向的。
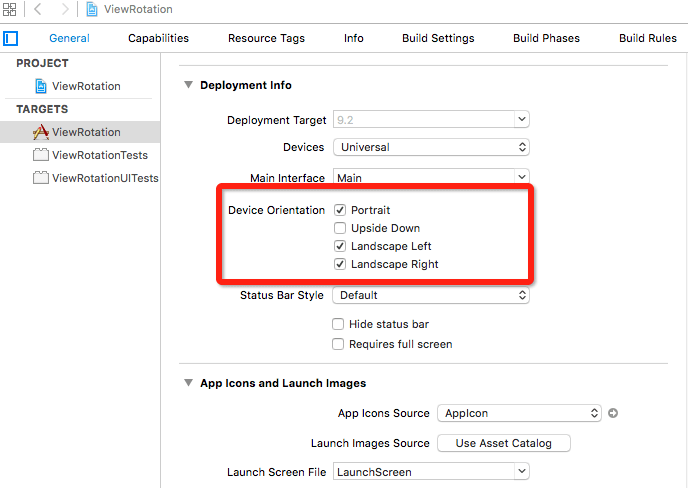
你可以在这里设置相关方向,不过这是写死到程序里面的。
2 应用级
当一个项目支持iPhone和iPad时,我们不得不考虑可旋转的方向。此时就不能修改项目设置了,而需要在AppDelegate.swift中配置相关方向。
// MARK: - 全局配置
func application(application: UIApplication, supportedInterfaceOrientationsForWindow window: UIWindow?) -> UIInterfaceOrientationMask {
    if let iOrientationMask = window?.rootViewController?.supportedInterfaceOrientations() {
        return iOrientationMask
    }
    return UIInterfaceOrientationMask.All
}
3 页面级
我们希望用户在使用过程中,不同的页面支持不同的方向。UIViewController也有方法支持相关设置。
3.1 UINavigationController
由于大多数时候我们是基于UINavigationController开发,故需要做一个自定义的UINavigationController通知每个VC自己控制界面方向。
//
//  YJNavigationController.swift
//  ViewRotation
//
//  CSDN:http://blog.csdn.net/y550918116j
//  GitHub:https://github.com/937447974/Blog
//
//  Created by yangjun on 15/12/25.
//  Copyright © 2015年 阳君. All rights reserved.
//

import UIKit

/// 横竖屏配置
class YJNavigationController: UINavigationController {

    // MARK: - Configuring the View Rotation Settings
    // MARK: 视图是否自动旋转
    override func shouldAutorotate() -> Bool {
        return self.viewControllers.last!.shouldAutorotate()
    }

    // MARK: 返回视图支持的旋转方向
    override func supportedInterfaceOrientations() -> UIInterfaceOrientationMask {
        return self.viewControllers.last!.supportedInterfaceOrientations()
    }

    // MARK: 上个界面跳转过来,支持的显示方向
    override func preferredInterfaceOrientationForPresentation() -> UIInterfaceOrientation {
        // 只支持UIViewController.presentViewController(viewControllerToPresent: UIViewController, animated flag: Bool, completion: (() -> Void)?)
        // 或 UINavigationController.showDetailViewController(vc, sender: nil)
        return self.viewControllers.last!.preferredInterfaceOrientationForPresentation()
    }

}
这样我们就可以在自己的VC中自定义方向了。
3.2 方向监听
当我们在做屏幕适配的时候,同样需要知道屏幕目前的状态,这样才能设计各种各样的界面。
//
//  YJDetailVC.swift
//  ViewRotation
//
//  CSDN:http://blog.csdn.net/y550918116j
//  GitHub:https://github.com/937447974/Blog
//
//  Created by yangjun on 15/12/25.
//  Copyright © 2015年 阳君. All rights reserved.
//

import UIKit

class YJDetailVC: UIViewController {

    override func viewDidLoad() {
        super.viewDidLoad()
        // 监听设备方向
        NSNotificationCenter.defaultCenter().addObserver(self, selector: "receivedRotation",
            name: UIDeviceOrientationDidChangeNotification, object: nil)
    }

    override func viewDidDisappear(animated: Bool) {
        super.viewDidDisappear(animated)
        NSNotificationCenter.defaultCenter().removeObserver(self)
    }

    //通知监听触发的方法
    func receivedRotation(){
        switch UIDevice.currentDevice().orientation { // 屏幕方向
        case UIDeviceOrientation.Unknown:
            print("方向未知")
        case .Portrait: // Device oriented vertically, home button on the bottom
            print("屏幕直立")
        case .PortraitUpsideDown: // Device oriented vertically, home button on the top
            print("屏幕倒立")
        case .LandscapeLeft: // Device oriented horizontally, home button on the right
            print("屏幕左在上方")
        case .LandscapeRight: // Device oriented horizontally, home button on the left
            print("屏幕右在上方")
        case .FaceUp: // Device oriented flat, face up
            print("屏幕朝上")
        case .FaceDown: // Device oriented flat, face down
            print("屏幕朝下")
        }
    }

}
3.3 补充
当我们从横屏的A跳转到竖屏的B时,可以通过如下方法跳转。
UIViewController.presentViewController(viewControllerToPresent: UIViewController, animated flag: Bool, completion: (() -> Void)?)

UINavigationController.showDetailViewController(vc, sender: nil)
其他
源代码
参考资料
UIViewController Class Reference
文档修改记录
| 时间 | 描述 |
|---|---|
| 2015-12-25 | 博文完成 |


 443
443


 被折叠的 条评论
为什么被折叠?
被折叠的 条评论
为什么被折叠?
 到【灌水乐园】发言


