


这个Demo使用Bmob实现了一个小的推送功能 ,顺便整理下学过的知识.
初始化Bmob请看这篇文章
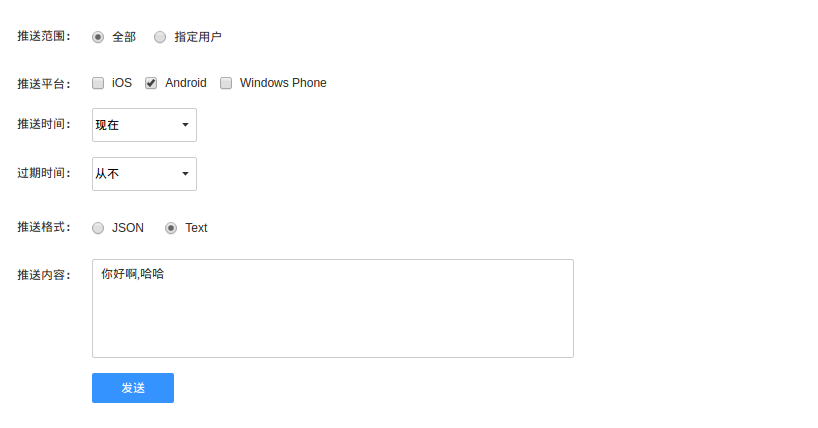
Bmob推送功能简介
通过云推送,你可以随时随地的向应用程序的用户推送通知或消息,与用户保持积极互动提升用户留存率,活跃度和用户体验度。
Bmob配置
- 先下载推送SDK,后将jar包放在libs目录下,然后添加到项目,ADT和AS配置过程一样.
- 添加权限
 <!-- BmobSDK所需的权限 -->
    <uses-permission android:name="android.permission.INTERNET" />
    <uses-permission android:name="android.permission.ACCESS_NETWORK_STATE" />
    <uses-permission android:name="android.permission.ACCESS_WIFI_STATE" />
    <uses-permission android:name="android.permission.READ_PHONE_STATE" />
    <uses-permission android:name="android.permission.WRITE_EXTERNAL_STORAGE" />
    <!--推送所需的权限-->
    <uses-permission android:name="android.permission.RECEIVE_USER_PRESENT" />
<uses-permission android:name="android.permission.RECEIVE_BOOT_COMPLETED" />- 配置Bmob的Service和BroadCast
<service
       android:label="PushService"
    android:name="cn.bmob.push.lib.service.PushService"
    android:process="cn.bmob.push"
    android:exported="true">
        <intent-filter>
            <action android:name="cn.bmob.push.lib.service.PushService"/>
        </intent-filter>
</service>

<receiver android:name="cn.bmob.push.PushReceiver">
    <intent-filter><!--优先级加最高-->
          <!-- 系统启动完成后会调用 -->
          <action android:name="android.intent.action.BOOT_COMPLETED"/>
          <!-- 解锁完成后会调用 -->
          <action android:name="android.intent.action.USER_PRESENT"/>
          <!-- 监听网络连通性 -->
          <action android:name="android.net.conn.CONNECTIVITY_CHANGE"/>
    </intent-filter>
</receiver>
这些都是文档上的内容,可以从官网上查看,Bmob使用一种心跳机制维持Socket的长连接,即每次定时会发送自定义结构体进行保活.
初始化Bmob及推送
/**
 * Created by yangtianrui on 16-6-10.
 * 初始化Bmob
 */
public class BaseActivity extends AppCompatActivity {
    @Override
    public View onCreateView(String name, Context context, AttributeSet attrs) {
        // 初始化BmobSDK
        Bmob.initialize(this, "887fb8cdafa392424a938a99673a1388");
        // 使用推送服务时的初始化操作
        BmobInstallation.getCurrentInstallation(this).save();
        // 启动推送服务
        BmobPush.startWork(this);
        // 向服务端发送推送请求,手动进行推送
//        BmobPushManager manager = new BmobPushManager(this);
//        manager.pushMessage("test");
        return super.onCreateView(name, context, attrs);
    }
}
自定义广播接收Bmob推送
/**
 * Created by yangtianrui on 16-6-10.
 * 接收Bmob发出的推送
 */
public class MyReceiver extends BroadcastReceiver {
    @Override
    public void onReceive(Context context, Intent intent) {
        if (intent.getAction().equals(PushConstants.ACTION_MESSAGE)) {
            // 收到广播时,发送一个通知
            String jsonStr = intent.getStringExtra(PushConstants.EXTRA_PUSH_MESSAGE_STRING);
            String content = null;
            try {
                // 处理JSON
                JSONObject jsonObject = new JSONObject(jsonStr);
                content = jsonObject.getString("alert");
            } catch (JSONException e) {
                e.printStackTrace();
            }

            NotificationManager manager = (NotificationManager) context.getSystemService(context.NOTIFICATION_SERVICE);
            Notification notify = new Notification.Builder(context)
                    .setSmallIcon(R.mipmap.ic_launcher)
                    .setContentTitle("收到一条推送")
                    .setContentText(content)
                    .build();
            manager.notify(1, notify);
        }
    }
}此处intent.getAction().equals(PushConstants.ACTION_MESSAGE即为收到的通知,使用广播对收到的信息进行过滤,解析出推送的消息.
ManiFest文件中配置
   <!-- 自定义消息接收器,对收到的消息进行处理 -->
        <receiver android:name=".MyReceiver">
            <intent-filter >
                <action android:name="cn.bmob.push.action.MESSAGE"/>
            </intent-filter>
        </receiver>
现在就可以在后台进行推送了
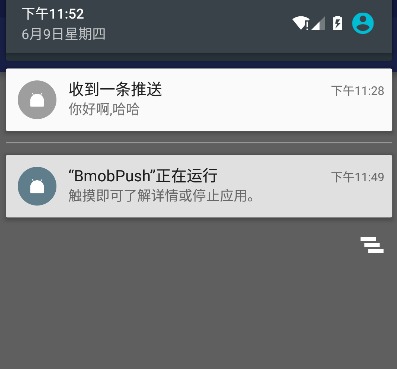
模拟机上看到的结果
顺便整理下Notification的知识吧
API 16 以上使用Notification.Builder构造通知对象
使用NotificationManager发送通知,该对象从SystemService中获取
构造Notification对象
使用PendingIntent创建点击时响应
一个简单的通知DEMO
public void text_notify(View view) {
        // 获取系统通知对象
        // 用于推送通知
        NotificationManager manager = (NotificationManager) getSystemService(NOTIFICATION_SERVICE);
        // 使用PendingIntent延时执行Intent
        PendingIntent intent = PendingIntent.getActivity(this, 0, new Intent(this, MainActivity.class), 0);
        // 使用Builder构造通知对象
        Notification notify = new Notification.Builder(this)
                .setSmallIcon(R.mipmap.ic_launcher) // 必须设置图片,否则无法正常推送
                .setContentInfo("Message Content")
                .setTicker("This is Ticker") // 直接在标题栏里显示的通知
                .setContentTitle("Content Title")
                .setContentIntent(intent)  // 点击事件
                .setOngoing(false) // 允许用户删除
//                .setNumber(1)
                .build();
        // 不会自动消失
        // notify.flags |= Notification.FLAG_NO_CLEAR;
        // FLAG的一些熟悉
        //FLAG_AUTO_CANCEL   该通知能被状态栏的清除按钮给清除掉
        //FLAG_NO_CLEAR      该通知不能被状态栏的清除按钮给清除掉
        //FLAG_ONGOING_EVENT 通知放置在正在运行
        //FLAG_INSISTENT     是否一直进行,比如音乐一直播放,知道用户响应
        // 点击通知时,自动清除
        notify.flags |= Notification.FLAG_AUTO_CANCEL;
        notify.defaults = Notification.DEFAULT_ALL;
        manager.notify(1, notify);
    }
Builder的一些其它属性
//              .setContent(RemoteViews)//自定义的remoteviews
//              .setFullScreenIntent(p, true)//不会再通知栏直接显示,但拉下后可以显示内容 Only for use with extremely high-priority notifications demanding the user's immediate attention, such as an incoming phone call or alarm clock that the user has explicitly set to a particular time.
//              .setDeleteIntent(null)// 通知消失时的动作
//              .setContentIntent(p)//点击的动作 相当于点击button
//              .setLights(new Color().BLACK, 1000, 1000)//俺的手机不支持..无反应
//              .setNumber(22)//
//              .setOngoing(true)//不能被用户x掉,会一直显示,如音乐播放等
//              .setPriority(2)//优先级
//              .setProgress(max, progress, indeterminate)//进度条
//              .setSound(uri)//声音提示
//              .setSound(sound, streamType)//科设置 streamtype
//              .setStyle(style)//style设置 http://developer.android.com/reference/android/app/Notification.Style.html
//              .setVibrate(long[])//设置震动
就先介绍这么多了,随后讲解其他功能


 647
647

 被折叠的 条评论
为什么被折叠?
被折叠的 条评论
为什么被折叠?
 到【灌水乐园】发言


