


提示:up全站之巅真是好阿婆,做的一样,只是我的数据库用mysql实现的
前言
前端:vue2+elementUI
后端:express+mysql
可以跟着b站up敲,仅记录最终代码和踩过的坑。
视频链接:https://www.bilibili.com/video/BV1t441187pL?share_source=copy_web
一、搭建环境、安装包
vue2搭配 vuex3,安装vue-router、 express、cors(解决跨域)、axios
前端文件夹下:
npm i vuex@3
vue create element-admin  //选router,其他一路下去
cd element-admin
npm init
vue add element   //我在这里使用element时候报了个缺css的错误,之后自建element.js(下文见)引入css就不报错了
后端文件夹下
npm i express@next cors axios //因为后端比较简单,就把前后端代码写一起了,在server文件夹下
安装mysql并配置密码
官网下载社区版zip包,添加/更改ini文件,启动mysql并修改文件
比较靠谱的几个文章供参考:
Mysql8.0.22安装配置步骤
另一篇靠谱教程
我Navicat没登陆也可以用,不知道能用多久 ,菜菜求抱 (T_T),各位珍重
二、CV工程师(>_<)
1.引入elementUI组件
App.vue代码如下:
<template>
  <el-container style="height: 100vh; border: 1px solid #eee">

    <el-aside width="200px" style="background-color: rgb(238, 241, 246)">
      <el-menu router :default-openeds="['1']">
        <el-submenu index="1">
          <template slot="title">
            <i class="el-icon-notebook-1"></i>内容管理
          </template>
          <el-menu-item index="/article/create">新建文章</el-menu-item>
          <el-menu-item index="/article/index">文章列表</el-menu-item>
        </el-submenu>
      </el-menu>
    </el-aside>

    <el-container>
      <el-header style="text-align: right; font-size: 12px">
        <span>王小虎</span>
      </el-header>

      <el-main>
        <router-view></router-view>
      </el-main>
    </el-container>
  </el-container>

</template>
<style>
  html,body{
    padding: 0;
    margin: 0;
  }
  .el-header {
    background-color: #B3C0D1;
    color: #333;
    line-height: 60px;
  }

  .el-aside {
    color: #333;
  }
</style>

<script>
  export default {
    data() {

      return {
        article:[]
      }
    }
  };
</script>
main.js
import Vue from 'vue'
import App from './App.vue'
import './plugins/element.js'
import router from './router'
import axios from 'axios'
Vue.config.productionTip = false

Vue.prototype.$http=axios.create({
  baseURL:'http://localhost:3001/api',
})

new Vue({
  render: h => h(App),
  router
}).$mount('#app')
plugins文件夹下element.js
import Vue from 'vue'
import Element from 'element-ui'
import 'element-ui/lib/theme-chalk/index.css'
Vue.use(Element)
2.创建组件
views文件夹下,
CreateArticle.vue
<template>
    <el-form @submit.native.prevent="saveArticle" ref="form" :model="article" label-width="80px">
        <el-form-item label="文章标题">
          <el-input v-model="article.title"></el-input>
        </el-form-item>

        <el-form-item label="文章内容">
          <el-input type="textarea" v-model="article.body"></el-input>
        </el-form-item>
        <el-form-item>
          <el-button type="primary" native-type="submit">立即创建</el-button>
          <el-button>取消</el-button>
        </el-form-item>
      </el-form>
</template>


  <script>
    export default {
        name:'createArticle',
        data() {
            return {
                article:{},
            }
        },
        methods: {
            saveArticle(){
              this.$http.post('article',this.article).then(()=>{
                //  console.log(res.data)
                this.$message({
                    message: '恭喜你,文章创建完成',
                    type: 'success'
                  });
                })
                this.$router.push('/article/index')
               //有bug,添加文章之后,跳转回到文章列表,最新的还没加上去
               //博主用的mogodb后端接口用了await,看看mysql有没有相似的解决方法
            }
        }
    }
  </script>
ListArticle.vue
<template>
    <div >
        <el-table :data="articles">
            <el-table-column prop="title" label="标题" width="140">
            </el-table-column>
            <el-table-column prop="body" label="内容" width="220">
            </el-table-column>
            <el-table-column
            fixed="right"
            label="操作"
            width="100">
            <template slot-scope="scope">
              <!-- "scope"表示当前这一行 -->
              <el-button @click="edit(scope.row)" type="text" size="small">编辑</el-button>
              <el-button @click="remove(scope.row)" type="text" size="small">删除</el-button>
            </template>
          </el-table-column>

          </el-table>
    </div>
</template>

<script>

export default {
    name: 'ListArticle',
    data() {
      return {
        articles:[]
      }
    },
methods: {
      fetch(){
        this.$http.get('article').then(res=>{
          this.articles=res.data
          // console.log(res.data)
        })
      },
      edit(row){
        // this.$router.push(`${row.id}/edit`) 意外发现这种也行
        this.$router.push(`/article/${row.id}/edit`)
      },
      remove(row){
        // console.log(row.title)
        this.$http.delete(`/article/${row.id}`).then(()=>{
            this.$message({
                    message: '恭喜你,删除成功',
                    type: 'success'
            });
            this.fetch()
        })
      }
    },
    created(){
      this.fetch()
    }
  };
</script>

<style scoped>

</style>
EditArticle.vue
<template>
    <el-form @submit.native.prevent="saveArticle" ref="form" :model="article" label-width="80px">
        <el-form-item label="文章标题">
          <el-input v-model="article.title"></el-input>
        </el-form-item>

        <el-form-item label="文章内容">
          <el-input type="textarea" v-model="article.body"></el-input>
        </el-form-item>
        <el-form-item>
          <el-button type="primary" native-type="submit">立即创建</el-button>
          <el-button>取消</el-button>
        </el-form-item>
      </el-form>
</template>
  <script>
    export default {
        name:'editArticle',
        data() {
            return {
                article:{}
            }
        },
                methods: {
            fetch(){
                this.$http.get(`article/${this.$route.params.id}`).then(res=>{
                this.article=res.data[0]
                  // console.log('edit,fetch',this.article,res.data,this.$route.params.title)
              })
            },
            saveArticle(){
               this.$http.put(`article/${this.$route.params.id}`,this.article).then(()=>{
                this.$message({
                    message: '恭喜你,文章更新成功',
                    type: 'success'
                  });
                  this.$router.push('/article/index')
                })
            },
        },
        created(){
            this.fetch()
        }
    }
  </script>
3.设置路由
./router/index.js
import Vue from 'vue'
import Router from 'vue-router'
import ListArticle from '../views/ListArticle'
import CreateArticle from '../views/CreateArticle'
import EditArticle from '../views/EditArticle'
Vue.use(Router)


export default new Router({
    // mode: 'history',
    routes:[
        {
            path:'/',
            name:'home',
            redirect:'/article/index'
        },
        {
            path:'/article/create',
            name:'create-article',
            component: CreateArticle,

        },
        {
            path:'/article/index',
            name:'list-article',
            component: ListArticle,

        },
        {
            path:'/article/:id/edit',
            name:'edit-article',
            component: EditArticle,
        }

    ]
})
4.编写后端逻辑(这里和up不同,用的是Mysql)
server文件夹下index.js(因为这里后端代码比较简单,所以和前端就写在同一个目录下了)
const express=require('express')
// const mysql = require("mysql");
const db2=require('./db')

const app =express()

app.get('/', async (req,res)=>{
    res.send('index')
})
app.use(express.json())
app.use(require('cors')())  //跨域

/* var db = mysql.createConnection({
    host: 'localhost', //数据库地址
    port: '3306',//端口号
    user: 'root',//用户名
    password: '123456',//密码
    database: 'article'//数据库名称
});
db.connect()*/

//新增文章
app.post('/api/article',async(req,res)=>{
    // console.log(req.body)
    data=req.body
    // db.connect();//用参数与数据库进行连接
    var insert = `INSERT INTO article (title,body )VALUES('${data.title}','${data.body}');`
    // console.log(insert)
    db2(insert, function(err, result) { //连接数据库 传入sql语句 回调函数得到结果
        try {
            console.log('插入成功')
            res.send(JSON.stringify(result))
        } catch (err) {
            console.log("查询失败",err);
        }

    });
} )
//展示文章
//地址一样,启动方法不一样,也算不一样
app.get('/api/article',async(req,res)=>{
    sql= 'SELECT * FROM article';
    db2(sql,(err,result)=>{
        if(err){
            console.log("查询失败",err);
        }else{
            // console.log(result)

            res.send(result)
        }
    })
})

//删除某篇文章
app.delete('/api/article/:id',async(req,res)=>{
    id=req.params.id
    console.log('delete id',id)
    dltsql='DELETE FROM article WHERE id="'+id+'"'
    db2(dltsql,(err,result)=>{
        if(err){
            console.log("查询失败",err);
        }else{
            res.send({
                status:true
            })
        }
    })
})
//某篇文章的详情
app.get('/api/article/:id',async(req,res)=>{
    sql= 'SELECT * FROM article where id="'+req.params.id+'"';
    db2(sql,(err,result)=>{
        if(err){
            console.log("查询失败",err);
        }else{
            // console.log(result)
            res.send(result)
        }
    })
})
//更新表
app.put('/api/article/:id',async(req,res)=>{
    // console.log('req.body',req.body,'\nreq.params:',req.params)
    sql= "update article set title='"+req.body.title+"',body='"+req.body.body+"' where id='"+req.params.id+"';";
    db2(sql,(err,result)=>{
        if(err){
            console.log("更新失败",err);
        }else{
            res.send(result)
        }
    })
})


app.listen(3001, ()=>{
    console.log('http://localhost:3001')
})
app.listen(3001, ()=>{
    console.log('http://localhost:3001')
})
数据库配置:db.js和dbcfg.json
数据库连接池(写的并不完善,只是发现在每个请求中链接、关闭会出问题,百度了一段代码,仅能用而已)
db.js:
//导入所需模块
var mysql=require("mysql");
//导入配置文件
var cfg  =require("./dbcfg");
var pool = mysql.createPool({
    host:      cfg.host,
    user:      cfg.user,
    password:  cfg.password,
    database:  cfg.dbname ,
    port:      cfg.port
});
//导出查询相关
var query=function(sql,callback){
    pool.getConnection(function(err,conn){
        if(err){
            callback(err,null,null);
        }else{
            conn.query(sql,function(qerr,vals,fields){
                //释放连接
                conn.release();
                //事件驱动回调
                callback(qerr,vals,fields);
            });
        }
    });
};

module.exports=query;
dbcfg.json
{
    "host": "localhost",
    "port": 3306,
    "user": "root",
    "password": "你自己的密码",
    "dbname": "article",
    "maxConnLimit": 60
}
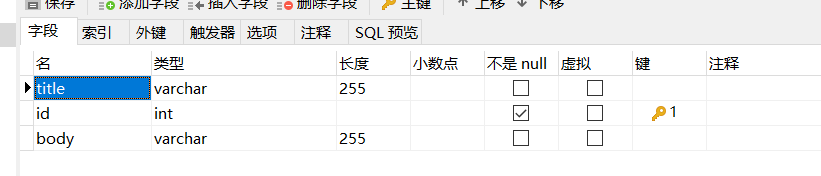
好啦,如果你已经在mysql中建好表、安装好nodemon的话,开启两个终端,
终端1执行:(element-admin文件夹下)
npm run serve
终端2执行:
nodemon server
开启第一个全栈小玩意儿吧!
nodemon插件:
自动寻找server入口代码、更改后自动更新服务器代码,省的重启
总结
以上是按照文件写的,免得宝们下载资源了,这里对前后端开发步骤进行总结:
大致思路:前端组件通过绑定函数,在函数中调用axios接口,(即前端发起http请求)
后端服务器响应对应路由的函数,完成数据处理(后端按需访问数据库返回查询/执行结果)
服务器(server/index.js:执行相关路径的具体数据处理
组件:发起请求、处理服务器返回的数据、页面跳转
前端路由(router/index.js):
- 安装包,main.js中引入并配置包、组件
axios :nodejs特有,前后端用一个包 - 新建组件(参考elementUI的样式)
- 路由文件中(/route/index)配置路由规则(见router/index.js)
- 组件间的跳转(我只写了这次用到的两种,才疏学浅,不知道一共有多少种)
仅前端:
方式一:
Vue文件中指定组件和配置对应路径,指定组件展示区域+组件
“指定组件和配置对应路径 ”对应代码:
App.vue中:
   <el-menu-item index="/article/create">新建文章</el-menu-item>
   <el-menu-item index="/article/index">文章列表</el-menu-item>
指定组件位置对应代码:
<router-view></router-view>
方式二:
执行完http请求后直接跳转到页面(router+模板字符串跳转到其他路由)
this.$router.push('/article/index')
tip:这段代码在*this.$http().then{}*中
- 实现组件功能(前后端配合)
ListArticle.vue为例:
list组件展示文章列表,每一项右侧有“编辑、删除”两个按钮,路径指定是通过按钮绑定函数,在函数中调用axios接口配合后端服务器实现的,在后端服务器(server/index.js中)实现访问数据库和结果返回,前端http.then()处理返回结果。
现存BUG
1.(解决)express+mysql数据库还没整明白,像insert,update这种数据库执行返回值不是期待的值,然后又跳回文章列表时候会有数据更新延迟,得再刷新一下才能看到最新列表(惭愧),不晓得是不是数据库连接池那块没搞明白。
async fetch() {}
2.(解决)添加文章成功后自动跳转到文章列表页面,但是左侧栏高亮还是停留再“新建文章”那栏
el-menu那栏,属性绑定
:default-activate="$route.path"
都是后台看到的解决方法,没在代码中加,读者要自己加一下或者采用其他解决办法。(懒)
其他(推荐)
照着尚硅谷的视频(推荐)学到vue2,讲的蛮好,但是我想先练手在接着vue3.
https://www.bilibili.com/video/BV1Zy4y1K7SH?p=38&share_source=copy_web
最近听的歌,就是敲代码时候脑子会飘歌词的那种:《我用什么把你留住》floruitsShow


 2484
2484


 被折叠的 条评论
为什么被折叠?
被折叠的 条评论
为什么被折叠?
 到【灌水乐园】发言


