


系列文章目录
一、简单的CQRS实现与原始SQL和DDD
二、使用EF的领域模型的封装和持久化透明(PI)
三、REST API数据验证
四、领域模型验证
五、如何发布和处理领域事件
六、处理领域事件:缺失的部分
七、发件箱模式(The Outbox Pattern)
八、.NET Core中的旁路缓存模式(Cache-Aside Pattern)
前言
通常情况下,我们需要专注于优化应用程序的性能。有很多方法可以做到这一点,其中一种方法是缓存一些数据。在这篇文章中,我将简要描述旁路缓存模式(Cache-Aside Pattern)及其在 .NET Core中的简单实现。
旁路缓存模式
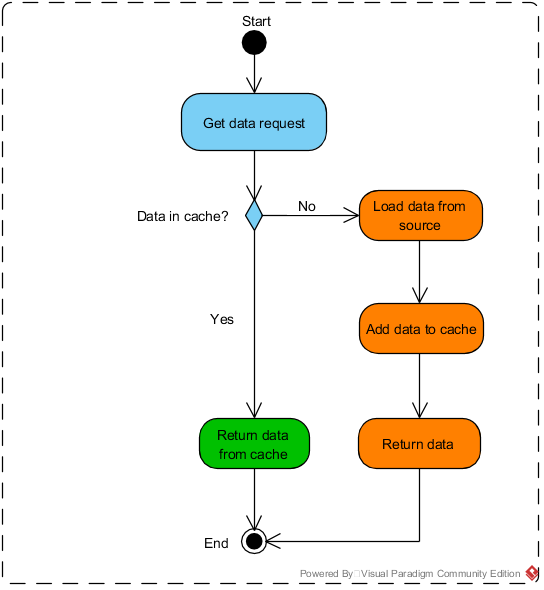
这个模式非常简单和直接。当我们需要特定的数据时,我们首先尝试从缓存中获取它。如果数据不在缓存中,则从源中获取数据,将其添加到缓存中并返回。得益于此,在下一个查询中,数据将从缓存中获得。在向缓存添加数据时,我们需要确定数据应该在缓存中存储多长时间。下面是算法框图:
第一个实现
在 .NET Core中实现这个模式就像它的理论部分一样简单。首先,我们需要注册IMemoryCache接口:
public void ConfigureServices(IServiceCollection services)
{
    services.AddMemoryCache();
}
然后,我们需要添加 Microsoft.Extensions.Caching.Memory NuGet包。
就这些。假设我们想要缓存用户的基本信息,该模式的实现如下所示:
[Route("api/[controller]")]
[ApiController]
public class UsersController : ControllerBase
{
    private readonly IMemoryCache _memoryCache;

    public UsersController(IMemoryCache memoryCache)
    {
        _memoryCache = memoryCache;
    }

    [HttpGet]
    [Route("{userId:int}")]
    public ActionResult<UserInfo> Get(int userId)
    {
        UserInfo userInfo;

        if (!this._memoryCache.TryGetValue($"UserInfo_{userId}", out userInfo))
        {
            userInfo = this.GetFromDatabase(userId);

            this._memoryCache.Set($"UserInfo_{userId}", userInfo, new TimeSpan(0, 5, 0));
        }

        return userInfo;
    }
}
首先,我们正在注入 .NET Core框架的IMemoryCache接口实现。然后在第18行中,我们检查数据是否在缓存中。如果它不在缓存中,我们从源(即数据库)获取它,添加到缓存并返回。
代码异味(Code smells)
这种实现方式你可以在MSDN网站上找到。我可以在这里实现这篇文章,但我必须承认,这段代码有一些地方我不喜欢。
首先,我认为接口IMemoryCache不够抽象。它建议数据保存在应用程序内存中,但客户端代码不应该关心数据存储在哪里。此外,如果我们希望将来将缓存保留在数据库中,则该接口的名称将不正确。
其次,客户端代码不应该负责命名缓存键的逻辑。这违反了单一责任原则。它应该只提供创建这个键名所需的数据。
最后,客户端代码不应该关心缓存过期。它应该在其他地方配置——应用程序配置
在下一节中,我将介绍如何消除这3种代码异味。
改进的实现
第一步也是最重要的一步是定义一个新的、更抽象的接口:ICacheStore
public interface ICacheStore
{
    void Add<TItem>(TItem item, ICacheKey<TItem> key);

    TItem Get<TItem>(ICacheKey<TItem> key) where TItem : class;
}
然后我们需要为我们的缓存键类定义接口:
public interface ICacheKey<TItem>
{
    string CacheKey { get; }
}
这个接口有CacheKey字符串属性,用于在MemoryCacheStore实现中解析缓存键:
public class MemoryCacheStore : ICacheStore
{
    private readonly IMemoryCache _memoryCache;
    private readonly Dictionary<string, TimeSpan> _expirationConfiguration;

    public MemoryCacheStore(
        IMemoryCache memoryCache,
        Dictionary<string, TimeSpan> expirationConfiguration)
    {
        _memoryCache = memoryCache;
        this._expirationConfiguration = expirationConfiguration;
    }

    public void Add<TItem>(TItem item, ICacheKey<TItem> key)
    {
        var cachedObjectName = item.GetType().Name;
        var timespan = _expirationConfiguration[cachedObjectName];

        this._memoryCache.Set(key.CacheKey, item, timespan);
    }

    public TItem Get<TItem>(ICacheKey<TItem> key) where TItem : class
    {
        if (this._memoryCache.TryGetValue(key.CacheKey, out TItem value))
        {
            return value;
        }

        return null;
    }
}
最后,我们需要配置IoC容器,将MemoryCacheStore实例解析为ICacheStore,并从应用程序配置中获取过期配置:
var children = this.Configuration.GetSection("Caching").GetChildren();
Dictionary<string, TimeSpan> configuration =
children.ToDictionary(child => child.Key, child => TimeSpan.Parse(child.Value));

services.AddSingleton<ICacheStore>(x => new MemoryCacheStore(x.GetService<IMemoryCache>(), configuration));
新实现结构如下:
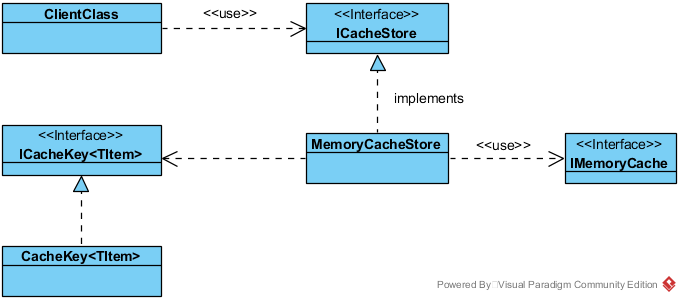
在此设置之后,我们终于可以在客户端代码中使用这个实现了。每当我们想要存储新对象到缓存中,我们需要:
1)添加过期配置
"Caching": {
  "UserInfo": "00:05:00"
}
2)定义缓存键的类
public class UserInfoCacheKey : ICacheKey<UserInfo>
{
    private readonly int _userId;
    public UserInfoCacheKey(int userId)
    {
        _userId = userId;
    }

    public string CacheKey => $"UserId_{this._userId}";
}
最后,新的客户端代码是这样的:
[Route("api/[controller]")]
[ApiController]
public class Users2Controller : ControllerBase
{
    private readonly ICacheStore _cacheStore;

    public Users2Controller(ICacheStore cacheStore)
    {
        _cacheStore = cacheStore;
    }

    [HttpGet]
    [Route("{userId:int}")]
    public ActionResult<UserInfo> Get(int userId)
    {
        var userInfoCacheKey = new UserInfoCacheKey(userId);
        UserInfo userInfo = this._cacheStore.Get(userInfoCacheKey);

        if (userInfo == null)
        {
            userInfo = this.GetFromDatabase(userId);

            this._cacheStore.Add(userInfo, userInfoCacheKey);
        }

        return userInfo;
    }
}
在上面的代码中,我们使用了更抽象的ICacheStore接口,不关心缓存键的创建和过期配置。这是更优雅的解决方案,更不容易出错。
总结
在这篇文章中,我描述了旁路缓存模式及其在 .NET Core中的主要实现。我还提出了增强设计,以少量的工作实现更优雅的解决方案。缓存快乐!🙂


 2317
2317


 被折叠的 条评论
为什么被折叠?
被折叠的 条评论
为什么被折叠?
 到【灌水乐园】发言


