


红茶一杯话Binder
(初始篇)
侯 亮
1 什么是Binder?
简单地说,Binder是Android平台上的一种跨进程交互技术。该技术最早并不是由Google公司提出的,它的前身是Be Inc公司开发的OpenBinder,而且在Palm中也有应用。后来OpenBinder的作者Dianne Hackborn加入了Google公司,并负责Android平台的开发工作,所以把这项技术也带进了Android。
我们知道,在Android的应用层次上,基本上已经没有过去的进程概念了。然而在实现层次,它毕竟还是要建构在一个个进程之上的。实际上,在Android内部,那些支撑应用的组件往往会身处于不同的进程,那么应用的底层必然会牵涉大量的跨进程通信。为了保证通信的高效性,Android提供了Binder机制。
Binder机制具有两层含义:
1) 是一种跨进程通信手段(IPC,Inter-Process Communication)。
2) 是一种远程过程调用手段(RPC,Remote Procedure Call)。
从实现的角度来说,Binder核心被实现成一个Linux驱动程序,并运行于内核态。这样它才能具有强大的跨进程访问能力。
1.1 简述Binder的跨进程机制
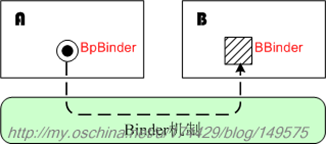
为了理解Binder,我们可以先画一张最简单的跨进程通信示意图:

 ,表示“Binder代理方”,主要用于向远方发送语义,而B侧的方形块
 则表示“Binder响应方”,主要用于响应语义。需要说明的是,这种图形表示方法是我自己杜撰的,并没有正规的出处。我个人觉得这种图形非常简便,所以在分析Android架构时,会经常使用这种表示法。
在后文中,我们可以看到,Binder代理方大概对应于C++层次的BpBinder对象,而Binder响应方则对应于BBinder对象。这两个对象在后文会详细阐述,此处不必太细究。
然而,上图的Binder代理方主要只负责了“传递信息”的工作,并没有起到“远程过程调用”的作用,如果要支持远程过程调用,我们还必须提供“接口代理方”和“接口实现体”。这样,我们的示意图就需要再调整一下,如下:

从图中可以看到,A进程并不直接和BpBinder(Binder代理)打交道,而是通过调用BpInterface(接口代理)的成员函数来完成远程调用的。此时,BpBinder已经被聚合进BpInterface了,它在BpInterface内部完成了一切跨进程的机制。另一方面,与BpInterface相对的响应端实体就是BnInterface(接口实现)了。需要注意的是,BnInterface是继承于BBinder的,它并没有采用聚合的方式来包含一个BBinder对象,所以上图中B侧的BnInterface块和BBinder块的背景图案是相同的。
这样看来,对于远程调用的客户端而言,主要搞的就是两个东西,一个是“Binder代理”,一个是“接口代理”。而服务端主要搞的则是“接口实现体”。因为binder是一种跨进程通信机制,所以还需要一个专门的管理器来为通信两端牵线搭桥,这个管理器就是Service Manager Service。不过目前我们可以先放下Service Manager Service,以后再详细研究。
2 Binder相关接口和类
Android的整个跨进程通信机制都是基于Binder的,这种机制不但会在底层使用,也会在上层使用,所以必须提供Java和C++两个层次的支持。
2.1 Java层次的binder元素
Java层次里并没有我们前文图中所表示的BpBinder、BpInterface、BBinder等较低层次的概念,取而代之的是IBinder接口、IInterface等接口。Android要求所有的Binder实体都必须实现IBinder接口,该接口的定义截选如下:
【frameworks/base/core/java/android/os/IBinder.java】
-
public
interface
IBinder
-
{
-
. . . . . .
-
public String getInterfaceDescriptor() throws RemoteException;
-
public boolean pingBinder();
-
public boolean isBinderAlive();
-
public IInterface queryLocalInterface(String descriptor);
-
public void dump(FileDescriptor fd, String[] args) throws RemoteException;
-
public void dumpAsync(FileDescriptor fd, String[] args) throws RemoteException;
-
public boolean transact(int code, Parcel data, Parcel reply, int flags)
-
throws RemoteException;
-
-
public
interface
DeathRecipient
-
{
-
public void binderDied();
-
}
-
public void linkToDeath(DeathRecipient recipient, int flags)throws RemoteException;
-
public boolean unlinkToDeath(DeathRecipient recipient, int flags);
-
}
另外,不管是代理方还是实体方,都必须实现IInterface接口:
-
public
interface
IInterface
-
{
-
public IBinder asBinder();
-
}
Java层次中,与Binder相关的接口或类的继承关系如下:
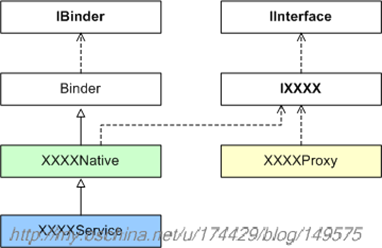
在实际使用中,我们并不需要编写上图的XXXXNative、XXXXProxy,它们会由ADT根据我们编写的aidl脚本自动生成。用户只需继承XXXXNative编写一个具体的XXXXService即可,这个XXXXService就是远程通信的服务实体类,而XXXXProxy则是其对应的代理类。
关于Java层次的binder组件,我们就先说这么多,主要是先介绍一个大概。就研究跨进程通信而言,其实质内容基本上都在C++层次,Java层次只是一个壳而已。以后我会写专文来打通Java层次和C++层次,看看它们是如何通过JNI技术关联起来的。现在我们还是把注意力集中在C++层次吧。
2.2 C++层次的binder元素
在C++层次,就能看到我们前文所说的BpBinder类和BBinder类了。这两个类都继承于IBinder,IBinder的定义截选如下:
【frameworks/native/include/binder/IBinder.h】
-
class
IBinder :
public
virtual
RefBase
-
{
-
public:
-
. . . . . .
-
IBinder();
-
virtual sp<IInterface> queryLocalInterface(const String16& descriptor);
-
virtual
const String16& getInterfaceDescriptor()
const =
0;
-
-
virtual bool isBinderAlive() const =
0;
-
virtual status_t pingBinder() =
0;
-
virtual status_t dump(int fd, const Vector<String16>& args) =
0;
-
virtual status_t transact(uint32_t code, const Parcel& data,
-
Parcel* reply, uint32_t flags = 0) =
0;
-
-
class
DeathRecipient :
public
virtual
RefBase
-
{
-
public:
-
virtual void binderDied(const wp<IBinder>& who) =
0;
-
};
-
virtual status_t linkToDeath(const sp<DeathRecipient>& recipient,
-
void* cookie = NULL, uint32_t flags =
0) =
0;
-
virtual status_t unlinkToDeath(const wp<DeathRecipient>& recipient,
-
void* cookie = NULL, uint32_t flags = 0,
-
wp<DeathRecipient>* outRecipient = NULL) =
0;
-
-
virtual bool checkSubclass(const void* subclassID) const;
-
-
typedef void (*object_cleanup_func)(const void* id, void* obj, void* cleanupCookie);
-
virtual void attachObject(const void* objectID, void* object,
-
void* cleanupCookie, object_cleanup_func func) =
0;
-
virtual
void* findObject(
const
void* objectID)
const =
0;
-
virtual void detachObject(const void* objectID) =
0;
-
-
virtual BBinder* localBinder();
-
virtual BpBinder* remoteBinder();
-
-
protected:
-
virtual ~IBinder();
-
private:
-
};
C++层次的继承关系图如下:

- BpBinder
- BpInterface
- BBinder
- BnInterface
它们扮演着很重要的角色。
2.2.1 BpBinder
BpBinder的定义截选如下:
-
class
BpBinder :
public
IBinder
-
{
-
public:
-
BpBinder(int32_t handle);
-
inline int32_t handle() const {
return mHandle; }
-
-
virtual
const String16& getInterfaceDescriptor()
const;
-
virtual bool isBinderAlive() const;
-
virtual status_t pingBinder();
-
virtual status_t dump(int fd, const Vector<String16>& args);
-
-
virtual status_t transact(uint32_t code, const Parcel& data,
-
Parcel* reply, uint32_t flags = 0);
-
virtual status_t linkToDeath(const sp<DeathRecipient>& recipient,
-
void* cookie = NULL, uint32_t flags =
0);
-
virtual status_t unlinkToDeath(const wp<DeathRecipient>& recipient,
-
void* cookie = NULL, uint32_t flags = 0,
-
wp<DeathRecipient>* outRecipient = NULL);
-
. . . . . .
-
. . . . . .
作为代理端的核心,BpBinder最重要的职责就是实现跨进程传输的传输机制,至于具体传输的是什么语义,它并不关心。我们观察它的transact()函数的参数,可以看到所有的语义都被打包成Parcel了。其他的成员函数,我们先不深究,待我们储备了足够的基础知识后,再回过头研究它们不迟。
2.2.2 BpInterface
另一个重要的类是BpInterface,它的定义如下:
-
template<typename INTERFACE>
-
class
BpInterface :
public
INTERFACE,
public
BpRefBase
-
{
-
public:
-
BpInterface(
const sp<IBinder>& remote);
-
-
protected:
-
virtual IBinder* onAsBinder();
-
};
其基类BpRefBase的定义如下:
-
class
BpRefBase :
public
virtual
RefBase
-
{
-
protected:
-
BpRefBase(
const sp<IBinder>& o);
-
virtual ~BpRefBase();
-
virtual void onFirstRef();
-
virtual void onLastStrongRef(const void* id);
-
virtual bool onIncStrongAttempted(uint32_t flags, const void* id);
-
inline IBinder* remote() {
return mRemote; }
-
inline IBinder* remote()
const {
return mRemote; }
-
-
private:
-
BpRefBase(
const BpRefBase& o);
-
BpRefBase&
operator=(
const BpRefBase& o);
-
IBinder*
const mRemote;
-
RefBase::weakref_type* mRefs;
-
volatile int32_t mState;
-
};
BpInterface使用了模板技术,而且因为它继承了BpRefBase,所以先天上就聚合了一个mRemote成员,这个成员记录的就是前面所说的BpBinder对象啦。以后,我们还需要继承BpInterface<>实现我们自己的代理类。
在实际的代码中,我们完全可以创建多个聚合同一BpBinder对象的代理对象,这些代理对象就本质而言,对应着同一个远端binder实体。在Android框架中,常常把指向同一binder实体的多个代理称为token,这样即便这些代理分别处于不同的进程中,它们也具有了某种内在联系。这个知识点需要大家关注。
2.2.3 BBinder
Binder远程通信的目标端实体必须继承于BBinder类,该类和BpBinder相对,主要关心的只是传输方面的东西,不太关心所传输的语义。
-
class
BBinder :
public
IBinder
-
{
-
public:
-
BBinder();
-
virtual
const String16& getInterfaceDescriptor()
const;
-
virtual bool isBinderAlive() const;
-
virtual status_t pingBinder();
-
virtual status_t dump(int fd, const Vector<String16>& args);
-
-
virtual status_t transact(uint32_t code, const Parcel& data,
-
Parcel* reply, uint32_t flags = 0);
-
-
virtual status_t linkToDeath(const sp<DeathRecipient>& recipient,
-
void* cookie = NULL, uint32_t flags =
0);
-
-
virtual status_t unlinkToDeath(const wp<DeathRecipient>& recipient,
-
void* cookie = NULL, uint32_t flags = 0,
-
wp<DeathRecipient>* outRecipient = NULL);
-
-
virtual void attachObject(const void* objectID, void* object,
-
void* cleanupCookie, object_cleanup_func func);
-
virtual
void* findObject(
const
void* objectID)
const;
-
virtual void detachObject(const void* objectID);
-
-
virtual BBinder* localBinder();
-
-
protected:
-
virtual ~BBinder();
-
-
virtual status_t onTransact(uint32_t code, const Parcel& data,
-
Parcel* reply, uint32_t flags = 0);
-
private:
-
BBinder(
const BBinder& o);
-
BBinder&
operator=(
const BBinder& o);
-
-
class
Extras;
-
Extras* mExtras;
-
void* mReserved0;
-
};
我们目前只需关心上面的transact()成员函数,其他函数留待以后再分析。transact函数的代码如下:
【frameworks/native/libs/binder/Binder.cpp】
-
status_t BBinder::transact(uint32_t code,
const Parcel& data,
-
Parcel* reply, uint32_t flags)
-
{
-
data.setDataPosition(
0);
-
status_t err = NO_ERROR;
-
switch (code)
-
{
-
case PING_TRANSACTION:
-
reply->writeInt32(pingBinder());
-
break;
-
default:
-
err = onTransact(code, data, reply, flags);
-
break;
-
}
-
-
if (reply != NULL)
-
{
-
reply->setDataPosition(
0);
-
}
-
return err;
-
}
看到了吗,transact()内部会调用onTransact(),从而走到用户所定义的子类的onTransact()里。这个onTransact()的一大作用就是解析经由Binder机制传过来的语义了。
2.2.4 BnInterface
远程通信目标端的另一个重要类是BnInterface<>,它是与BpInterface<>相对应的模板类,比较关心传输的语义。一般情况下,服务端并不直接使用BnInterface<>,而是使用它的某个子类。为此,我们需要编写一个新的BnXXX子类,并重载它的onTransact()成员函数。
BnInterface<>的定义如下:
-
template<typename INTERFACE>
-
class
BnInterface :
public
INTERFACE,
public
BBinder
-
{
-
public:
-
virtual sp<IInterface> queryLocalInterface(const String16& _descriptor);
-
virtual
const String16& getInterfaceDescriptor()
const;
-
-
protected:
-
virtual IBinder* onAsBinder();
-
};
如上所示,BnInterface<>继承于BBinder,但它并没有实现一个默认的onTransact()成员函数,所以在远程通信时,前文所说的BBinder::transact()调用的onTransact()应该就是BnInterface<>的某个子类的onTransact()成员函数。
2.3 几个重要的C++宏或模板
为了便于编写新的接口和类,Android在C++层次提供了几个重要的宏和模板,比如我们在IInterface.h文件中,可以看到DECLARE_META_INTERFACE、IMPLEMENT_META_INTERFACE的定义。
2.3.1 DECLARE_META_INTERFACE()
DECLARE_META_INTERFACE()的定义如下:
-
#define DECLARE_META_INTERFACE(INTERFACE) \
-
static
const android::String16 descriptor; \
-
static android::sp<I
##INTERFACE> asInterface( \
-
const android::sp<android::IBinder>& obj); \
-
virtual
const android::String16& getInterfaceDescriptor()
const; \
-
I
##INTERFACE(); \
-
virtual ~I
##INTERFACE(); \
我们举个实际的例子,来说明如何使用这个宏:
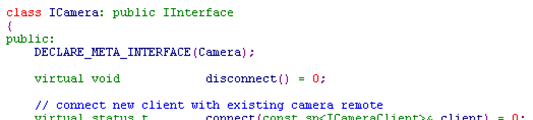
上例中ICamera内部使用了DECLARE_META_INTERFACE(Camera),我们把宏展开后,可以看到ICamera类的定义相当于:
-
class
ICamera:
public
IInterface
-
{
-
public:
-
-
static
const android::String16 descriptor;
-
static android::
sp<ICamera> asInterface( const android::sp<android::IBinder>& obj);
-
virtual
const android::String16& getInterfaceDescriptor()
const;
-
ICamera();
-
virtual ~ICamera();
-
-
virtual void disconnect() =
0;
-
. . . . . .
宏展开的部分就是中间那5行代码,其中最关键的就是asInterface()函数了,这个函数将承担把BpBinder打包成BpInterface的职责。
2.3.2 IMPLEMENT_META_INTERFACE()
与DECLARE_META_INTERFACE相对的就是IMPLEMENT_META_INTERFACE宏。它的定义如下:
-
#define IMPLEMENT_META_INTERFACE(INTERFACE, NAME) \
-
const android::String16 I
##INTERFACE::descriptor(NAME); \
-
const android::String16& \
-
I
##INTERFACE::getInterfaceDescriptor() const { \
-
return I
##INTERFACE::descriptor; \
-
} \
-
android::sp<I
##INTERFACE> I##INTERFACE::asInterface( \
-
const android::sp<android::IBinder>& obj) \
-
{ \
-
android::sp<I
##INTERFACE> intr; \
-
if (obj != NULL) { \
-
intr = static_cast<I
##INTERFACE*>( \
-
obj->queryLocalInterface( \
-
I
##INTERFACE::descriptor).get()); \
-
if (intr == NULL) { \
-
intr =
new Bp
##INTERFACE(obj); \
-
} \
-
} \
-
return intr; \
-
} \
-
I
##INTERFACE::I##INTERFACE() { } \
-
I
##INTERFACE::~I##INTERFACE() { } \
其中,实现了关键的asInterface()函数。
实际使用IMPLEMENT_META_INTERFACE时,我们只需把它简单地写在binder实体所处的cpp文件中即可,举例如下:
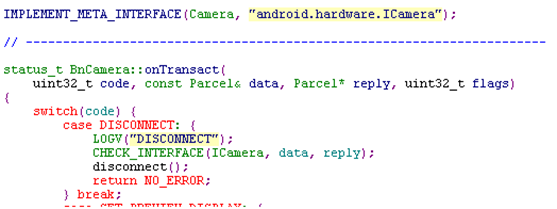
其中的IMPLEMENT_META_INTERFACE(Camera, “android.hardware.ICamera”);一句相当于以下这段代码:
-
const android::String16 ICamera::descriptor(“android.hardware.ICamera”);
-
const android::String16& ICamera::getInterfaceDescriptor()
const
-
{
-
return ICamera::descriptor;
-
}
-
-
android::sp<ICamera> ICamera::asInterface(
const android::sp<android::IBinder>& obj)
-
{
-
android::sp<ICamera > intr;
-
if (obj != NULL)
-
{
-
intr = static_cast<ICamera*>(obj->queryLocalInterface(
-
ICamera::descriptor).
get());
-
if (intr == NULL)
-
{
-
intr =
new BpCamera(obj);
-
}
-
}
-
return intr;
-
}
-
-
ICamera::ICamera() { }
-
ICamera::~ICamera () { }
看来,其中重点实现了asInterface()成员函数。请注意,asInterface()函数中会先尝试调用queryLocalInterface()来获取intr。此时,如果asInterface()的obj参数是个代理对象(BpBinder),那么intr = static_cast<ICamera*>(obj->queryLocalInterface(...)一句得到的intr基本上就是NULL啦。这是因为除非用户编写的代理类重载queryLocalInterface()函数,否则只会以默认函数为准。而IBinder类中的默认queryLocalInterface()函数如下:
【frameworks/native/libs/binder/Binder.cpp】
-
sp<IInterface> IBinder::queryLocalInterface(
const String16& descriptor)
-
{
-
return NULL;
-
}
另一方面,如果obj参数是个实现体对象(BnInterface对象)的话,那么queryLocalInterface()函数的默认返回值就是实体对象的this指针了,代码如下:
【frameworks/native/include/binder/IInterface.h】
-
template<typename INTERFACE>
-
inline sp<IInterface> BnInterface<INTERFACE>::queryLocalInterface(
const String16& _descriptor)
-
{
-
if (_descriptor == INTERFACE::descriptor)
-
return
this;
-
return NULL;
-
}
在我们所举的Camera例子中,我们要研究的是如何将BpBinder转成BpInterface,所以现在我们只阐述obj参数为BpBinder的情况。此时asInterface()函数中obj->queryLocalInterface()的返回值为NULL,于是asInterface()会走到new BpCamera(obj)一句,这一句是最关键的一句。我们知道,BpCamera继承于BpInterface<ICamera>,所以此时所创建的BpCamera对象正是可被App使用的BpInterface代理对象。
BpCamera的定义如下:
-
class
BpCamera:
public
BpInterface<
ICamera>
-
{
-
public:
-
BpCamera(
const sp<IBinder>& impl)
-
: BpInterface<ICamera>(impl)
-
{
-
}
-
-
// disconnect from camera service
-
void disconnect()
-
{
-
LOGV(
"disconnect");
-
Parcel data, reply;
-
data.writeInterfaceToken(ICamera::getInterfaceDescriptor());
-
remote()->transact(DISCONNECT, data, &reply);
-
}
-
. . . . . .
至此,IMPLEMENT_META_INTERFACE宏和asInterface()函数的关系就分析完毕了。
2.3.3 interface_cast
不过,我们经常使用的其实并不是asInterface()函数,而是interface_cast(),它简单包装了asInterface():
-
template<typename INTERFACE>
-
inline sp<INTERFACE> interface_cast(const sp<IBinder>& obj)
-
{
-
return INTERFACE::asInterface(obj);
-
}
以上就是关于C++层次中一些binder元素的介绍,下面我们再进一步分析其他细节。
3 ProcessState
前文我们已经提到过,在Android的上层架构中,已经大幅度地弱化了进程的概念。应用程序员能看到的主要是activity、service、content provider等概念,再也找不到以前熟悉的main()函数了。然而,底层程序(C++层次)毕竟还是得跑在一个个进程之上,现在我们就来看底层进程是如何运用Binder机制来完成跨进程通信的。
在每个进程中,会有一个全局的ProcessState对象。这个很容易理解,ProcessState的字面意思不就是“进程状态”吗,当然应该是每个进程一个ProcessState。ProcessState的定义位于frameworks/native/include/binder/ProcessState.h中,我们只截选其中的一部分:
-
class
ProcessState :
public
virtual
RefBase
-
{
-
public:
-
static sp<ProcessState> self();
-
. . . . . .
-
void startThreadPool();
-
. . . . . .
-
void spawnPooledThread(bool isMain);
-
status_t setThreadPoolMaxThreadCount(size_t maxThreads);
-
-
private:
-
friend
class
IPCThreadState;
-
. . . . . .
-
-
struct handle_entry
-
{
-
IBinder* binder;
-
RefBase::weakref_type* refs;
-
};
-
handle_entry* lookupHandleLocked(int32_t handle);
-
int mDriverFD;
-
void* mVMStart;
-
mutable Mutex mLock;
// protects everything below.
-
-
Vector<handle_entry> mHandleToObject;
-
. . . . . .
-
KeyedVector<String16, sp<IBinder> > mContexts;
-
. . . . . .
-
};
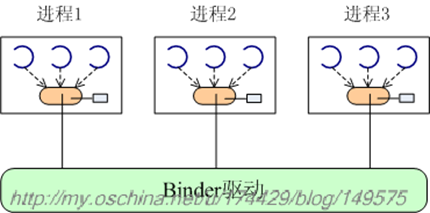
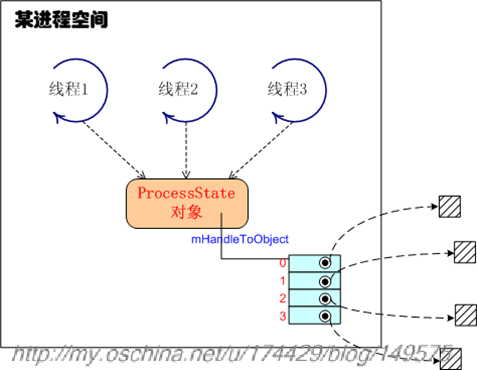
我们知道,Binder内核被设计成一个驱动程序,所以ProcessState里专门搞了个mDriverFD域,来记录binder驱动对应的句柄值,以便随时和binder驱动通信。ProcessState对象采用了典型的单例模式,在一个应用进程中,只会有唯一的一个ProcessState对象,它将被进程中的多个线程共用,因此每个进程里的线程其实是共用所打开的那个驱动句柄(mDriverFD)的,示意图如下:

每个进程基本上都是这样的结构,组合起来的示意图就是:
我们常见的使用ProcessState的代码如下:
-
int main(int argc, char** argv)
-
{
-
sp<ProcessState> proc(ProcessState::self());
-
. . . . . .
-
. . . . . .
-
ProcessState::self()->startThreadPool();
-
IPCThreadState::self()->joinThreadPool();
-
}
因为ProcessState采用的是单例模式,所以它的构造函数是private的,我们只能通过调用ProcessState::self()来获取进程中唯一的一个ProcessState对象。self()函数的代码如下:
-
sp<ProcessState> ProcessState::self()
-
{
-
Mutex::Autolock _l(gProcessMutex);
-
if (gProcess != NULL) {
-
return gProcess;
-
}
-
gProcess =
new ProcessState;
-
return gProcess;
-
}
ProcessState对象构造之时,就会打开binder驱动:
-
ProcessState::ProcessState()
-
: mDriverFD(open_driver())
// 打开binder驱动。
-
, mVMStart(MAP_FAILED)
-
, mManagesContexts(
false)
-
, mBinderContextCheckFunc(NULL)
-
, mBinderContextUserData(NULL)
-
, mThreadPoolStarted(
false)
-
, mThreadPoolSeq(
1)
-
{
-
. . . . . .
-
mVMStart = mmap(
0, BINDER_VM_SIZE, PROT_READ, MAP_PRIVATE | MAP_NORESERVE, mDriverFD,
0);
-
. . . . . .
-
}
注意上面那句mDriverFD(open_driver()),其中的open_driver()就负责打开“/dev/binder”驱动:
-
static int open_driver()
-
{
-
int fd = open(
"/dev/binder", O_RDWR);
-
. . . . . .
-
status_t result = ioctl(fd, BINDER_VERSION, &vers);
-
. . . . . .
-
size_t maxThreads =
15;
-
result = ioctl(fd, BINDER_SET_MAX_THREADS, &maxThreads);
-
. . . . . .
-
return fd;
-
}
ProcessState中另一个比较有意思的域是mHandleToObject:
Vector<handle_entry> mHandleToObject;
它是本进程中记录所有BpBinder的向量表噢,非常重要。我们前文已经说过,BpBinder是代理端的核心,现在终于看到它的藏身之处了。在Binder架构中,应用进程是通过“binder句柄”来找到对应的BpBinder的。从这张向量表中我们可以看到,那个句柄值其实对应着这个向量表的下标。这张表的子项类型为handle_entry,定义如下:
-
struct handle_entry
-
{
-
IBinder* binder;
-
RefBase::weakref_type* refs;
-
};
其中的binder域,记录的就是BpBinder对象。
Ok,有关Binder的初步知识,我们就先说这么多。我也不想一下子把所有的信息都塞到一篇文章中,所以打算把更多技术细节安排到其他文章中阐述,呵呵,这需要一点儿时间。
如需转载本文内容,请注明出处。
谢谢
(本文也发布在我的oschina博客上)
</article>


 317
317


 被折叠的 条评论
为什么被折叠?
被折叠的 条评论
为什么被折叠?
 到【灌水乐园】发言


