


一、原理
1、定义:
### --- 定义:

~~~     PXE(Pre-boot Execution Environment)是由Intel设计的协议,
~~~     它可以使计算机通过网络启动,协议分为client和server两端,
~~~     PXE client在网卡的ROM中,当计算机引导时,BIOS把PXE client调入内存执行,
~~~     并显示出命令菜单,经用户选择后,
~~~     PXEclient将放置在远端的操作系统通过网络下载到本地运行
~~~     网卡必须支持集群装机,才会在BIOS中显示集群装机设置。
### --- C/S结构:
~~~ S:需要构建的PXE服务,C:客户端
~~~ 并不是所有的机器都支持集群装机,只有你的网卡支持集群装机才支持。
2、安装过程图解
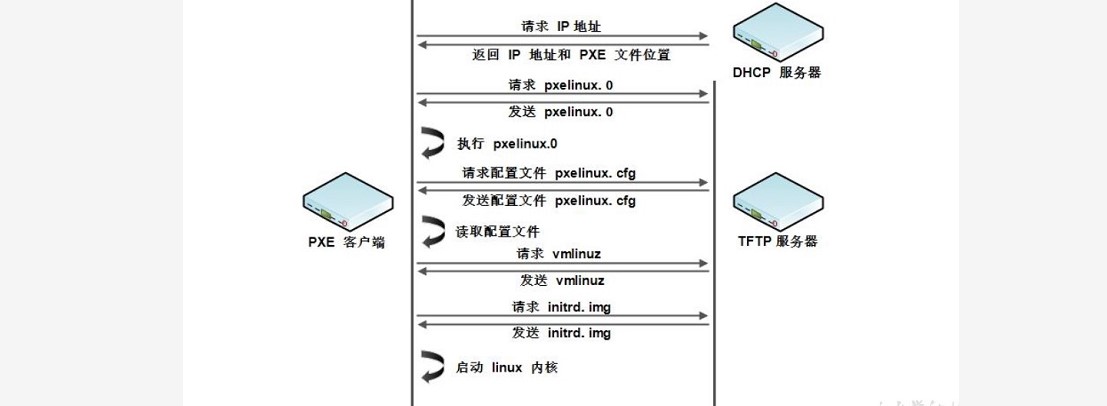
### --- DHCP:
~~~     动态获取地址;可以请求对应的浮动IP;这样就可以让PXE去获取一个合法身份;
~~~     DHCP是有客户端的,客户端在网卡的扉页存储器里。

### --- TFTP:
~~~     下载二进制执行文件,能够自己运行得到安装界面,选择项,走的是UDP协议。

### --- VSFTP:
~~~     共享真正的镜像。TFTP在共享大的软件包是不够的
### --- 工作流程:
~~~ 首先在等待安装操作系统的这台PXE客户端把它的网卡启动项调整为第一位,
~~~ PXE的相关客户端会加载到内存中执行,执行完成之后会 进行第一步DHCP获取,
~~~ 若是在机器里没有放入镜像它会接到这个步骤,当前的DHCP服务会给它返回一个IP地址。
~~~ 并且会返回一个PXE文件的位置,或者TFTP服务的文件位置,以及下载镜像的文件名。
~~~ 获取上述后会主动连接TFTP服务器,下载一个二进制执行文件是pexlinux.0,
~~~ 这个文件只有在网络装机的操作系统里才可以见得到。
~~~ 目的自我执行生成安装界面以及可选的操作系统的界面。
~~~ 执行完成之后在服务器这里会选择到底从哪一个服务去安装,
~~~ 选择完成之后就会下载对应的pxelinux.0.cfg的文件:
~~~ 这个文件写的是vmlinuz类以及initrd.img相关对应信息。
~~~ vmlinuz:虚拟内存linux操作系统,并且是压缩的。
~~~ 为了减少空间占用;在内存里运行的linux环境
~~~ initrd.img:基础文件系统
~~~ 运行后进行按住操作系统。
二、PXE服务构建
### --- 注意事项

~~~     虚拟环境中注意是否将自带DHCP功能关闭
~~~     注意测试安装机器是否将网络与PXE服务器网络对齐
三、安装流程记录
### --- PXE构建
### --- 实验环境:

~~~     HA-server1:10.10.10.11:centos8.x
~~~     网卡:编辑——>虚拟网络编辑器——>使用本地DHCP服务将IP地址分配给虚拟机:
~~~     关掉(因为需要指定对应的DHCP服务的文件位置,若是开启就不可以实现)图形化下配置。
### --- 安装环境
~~~ vsftpd:通过ftp协议给客户端共享相关的软件包或者镜像;(可选的)很多应用的服务用Apache或者nginx做为文件共享的服务。
~~~ dhcp :给客户端分配一个IP地址并且告诉他TFTP服务的地址以及pxelinux.0
~~~ tftp :传输引导的二进制文件以及相关的配置文件。
~~~ syslinux: 告诉它当前操作系统安装的相关的配置
~~~ tftp-server:tftp服务器的服务端
[root@server11 ~]# yum -y install vsftpd dhcp tftp syslinux tftp-server### --- 拷贝镜像文件至ftp服务器目录
[root@server11 ~]# cd /var/ftp/pub/
[root@server11 pub]# mkdir dvd
[root@server11 pub]# chown ftp:ftp dvd/
[root@server11 pub]# cp -rf /mnt/cdrom/* dvd/### --- 配置DHCP服务
cp /usr/share/doc/dhcp-4.1.1/dhcp.conf.sample /etc/dhcp/dhcpd.conf
[root@server11 ~]# vim /etc/dhcp/dhcpd.conf
subnet 10.10.10.0 netmask 255.255.255.0 { // 网段
range 10.10.10.100 10.10.10.200; // 分配的地址
option routers 10.10.10.11; // 当前的路由或者网关,指定自己,没有真实的物流
next-server 10.10.10.11; // 当前服务器的IP地址:tftp server的ip
filename "pxelinux.0"; // 连接到这个服务器之后要下载的文件名
}### --- 开启tftp服务
[root@server11 ~]# vim /etc/xinetd.d/tftp
service tftp
{
socket_type = dgram
protocol = udp
wait = yes
user = root
server = /usr/sbin/in.tftpd
server_args = -s /tftpboot // 设置默认工作目录
disable = no // 设置开机不启
per_source = 11
cps = 100 2
flags = IPv4
}### --- 创建相关目录并拷贝所需文件
[root@server11 ~]# mkdir -p /tftpboot/pxelinux.cfg // 这个目录作用:当pxelinux.0去执行的话,默认就会到这个目录下寻找对应的引导参数或者引导配置文件。
[root@server11 ~]# cp /var/ftp/pub/dvd/isolinux/isolinux.cfg /tftpboot/pxelinux.cfg/default //pxelinux.0默认寻找的配置文件default
[root@server11 ~]# cp /usr/share/syslinux/pxelinux.0 /tftpboot/ // 这是默认下载目录
[root@server11 ~]# chmod 644 /tftpboot/pxelinux.cfg/default
[root@server11 ~]# cp /var/ftp/pub/dvd/isolinux/* /tftpboot/ // pxelinux.0执行是所需要的的执行文件### --- 开启相关服务并设置为自动启动
[root@server11 ~]# service dhcpd start
[root@server11 ~]# chkconfig dhcpd on
[root@server11 ~]# service xinetd restart
[root@server11 ~]# chkconfig xinetd on
[root@server11 ~]# service vsftpd start
[root@server11 ~]# chkconfig vsftpd on
~~~ 验证:在vmware workstations下新建虚拟机器实验验证,可以正常通过网络装机。### --- 配置kisckstart无人值守安装脚本
[root@server11 ~]# yum install -y system-config-kickstart~~~ int 5进入图形化界面:Open in Terminal——>[root@server11 ~]# system-config-kickstart
~~~ 基本配置:进入图形界面配置——>根口令:空格;确认根口令:空格——>选择:安装重启引导系统
~~~ 安装方式:选择:执行新的安装——>安装方式:FTP:FTP服务器:10.10.10.11——>FTP目录:pub/dvd——>若不是匿名用户需要告诉用户名和密码
~~~ 引导装在程序选项:选择:安装新引导装载程序——>选择:在主引导记录(MBR)上安装引导装载程序
~~~ 分区信息:选择:清除主引导记录——>选择:删除所有现存分区——>选择:初始化磁盘标签——>添加:挂载点:/boot:ext4:600MB——>swap:4G——>/:ext4:使用磁盘全部未使用空间
~~~ 验证:认证功能
~~~ 防火墙:Linux安全增强版:禁用——>安全级别:禁用防火墙
~~~ 显示配置:安装图形环境
~~~ 软件包选择:选择一些适用的程序包
~~~ 预安装脚本:在安装操作系统之前需要执行的脚本,一般用的比较少
~~~ 安装后脚本:安装操作系统后自动执行的脚本。选择:适用解释器:/bin/bash——>在下面键入您的%post脚本:touch /root/1.txt/ echo "This is the PXE.sh >>/root/1.txt
~~~ 文件——>保存——>root目录下——>/root/ks.cfg文件:存在说明配置成功。
[root@server11 ~]# ls
anaconda-ks.cfg ks.cfg // 生成两个ks文件### --- 修改配置文件
[root@server11 ~]# cp ks.cfg /var/ftp/
[root@server11 ~]# vim /tftpboot/pxelinux.cfg/default // 配置参数目录
default linux // default改写为linux,进入之后自动执行label的linux而不会等待600秒的时间。
#prompt 1
timeout 600 // 操作时间600s
label linux
menu label ^Install or upgrade an existing system
menu default
kernel vmlinuz
append initrd=initrd.img ks=ftp://10.10.10.11/ks.cfg### --- 验证:打开FTP-client执行自动化安装;不需要执行任何操作就完成系统安装,并执行安装后脚本操作。
[root@localhost ~]# ip addr
inet 10.10.10.101/24
[root@localhost ~]# cat 1.txt // 且部署后执行脚本生成。
this is the PXE.sh
四、KS 文件模板展示
### --- KS 文件模板展示

[root@server11 ~]# vim ks.cfg
#platform=x86, AMD64, or Intel EM64T
#version=DEVEL
# Firewall configuration
firewall --disabled
# Install OS instead of upgrade
install
# Use network installation
url --url="ftp://10.10.10.11/pub/dvd"
# Root password
rootpw --iscrypted $1$HoalKfwn$tvNDxIcaVBDeIt5qRHgMM1
# System authorization information
auth  --useshadow  --passalgo=sha512
# Use graphical install
graphical
firstboot --disable
# System keyboard
keyboard us
# System language
lang en_US
# SELinux configuration
selinux --disabled
# Installation logging level
logging --level=info
# Reboot after installation
reboot
# System timezone
timezone  Africa/Abidjan
# System bootloader configuration
bootloader --location=mbr
# Clear the Master Boot Record
zerombr
# Partition clearing information
clearpart --all --initlabel
# Disk partitioning information
part /boot --fstype="ext4" --size=1024
part swap --fstype="swap" --size=4096
part / --fstype="ext4" --grow --size=1

%post --interpreter=/bin/bash
touch /root/1.txt                                                           # 安装后执行的脚本;若是脚本比较复杂的话,可以设置一个占位符,后期更改即可。
echo "this is the PXE.sh" >> /root/1.txt
%end

%packages                                                                   # 安装个软件包,做一个占位符,后期更改自己想要的软件包。
@internet-applications
@internet-browser
@base
@core
@debugging
@basic-desktop
@desktop-debugging
@desktop-platform
@directory-client
@fonts
@general-desktop
@graphical-admin-tools
@input-methods
@internet-applications
@internet-browser
@java-platform
@legacy-x
@network-file-system-client
@office-suite
@print-client
@remote-desktop-clients
@server-platform
@server-policy
@workstation-policy
@x11
mtools
pax
python-dmidecode
oddjob
wodim
sgpio
genisoimage
device-mapper-persistent-data
abrt-gui
samba-winbind
certmonger
pam_krb5
krb5-workstation
libXmu
%end
五、 anaconda-ks.cfg 的ks文件
### --- anaconda-ks.cfg 的ks文件

[root@server11 ~]# vim anaconda-ks.cfg
# Kickstart file automatically generated by anaconda.

#version=DEVEL
install
cdrom
lang en_US.UTF-8
keyboard us
network --onboot no --device eth0 --bootproto dhcp --noipv6
network --onboot no --device eth1 --bootproto dhcp --noipv6
network --onboot no --device eth2 --bootproto dhcp --noipv6
network --onboot no --device eth3 --bootproto dhcp --noipv6
rootpw  --iscrypted $6$2iLPW.5lOvcLseZk$9KZoeWtOSIprV8PNsE0cTrLLbcQIWJb3eUB8OKJLPwa/3UNLRvyubre3mmYknW1DyLMaRMqt1OiFqvjcg2RnO/
firewall --service=ssh
authconfig --enableshadow --passalgo=sha512
selinux --enforcing
timezone --utc Asia/Shanghai
bootloader --location=mbr --driveorder=sda,sdb --append="crashkernel=auto rhgb quiet"
# The following is the partition information you requested
# Note that any partitions you deleted are not expressed
# here so unless you clear all partitions first, this is
# not guaranteed to work
#clearpart --none

#part /boot --fstype=ext4 --size=1024
#part /home --fstype=ext4 --size=46080
#part swap --size=4096

#part / --fstype=ext4 --grow --size=1


repo --name="CentOS"  --baseurl=cdrom:sr0 --cost=100

%packages
@base
@core
@debugging
@basic-desktop
@desktop-debugging
@desktop-platform
@directory-client
@fonts
@general-desktop
@graphical-admin-tools
@input-methods
@internet-applications
@internet-browser
@java-platform
@legacy-x
@network-file-system-client
@office-suite
@print-client
@remote-desktop-clients
@server-platform
@server-policy
@workstation-policy
@x11
mtools
pax
python-dmidecode
oddjob
wodim
sgpio
genisoimage
device-mapper-persistent-data
abrt-gui
samba-winbind
certmonger
pam_krb5
krb5-workstation
libXmu
%end


 1756
1756

 被折叠的 条评论
为什么被折叠?
被折叠的 条评论
为什么被折叠?
 到【灌水乐园】发言


