


 本文详细介绍如何在Windows 32位操作系统环境下安装Bugzilla缺陷跟踪系统,包括MySQL数据库、Perl环境及Apache服务器的具体配置步骤。
Bugzilla的Win32安装
1 Bugizlla体系结构
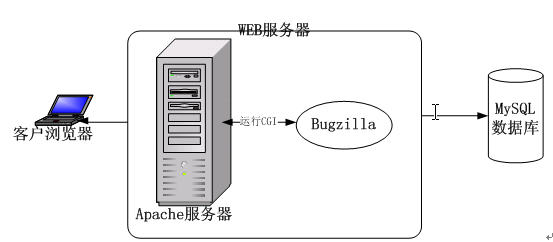
图 1
上图是Bugzilla的运行体系结构,可以从图中看到Bugzilla的系统结构是个典型的B/S的系统结构。客户通过浏览器与Apache服务器进行HTTP通信;而Apache服务器则通过Perl运行CGI脚本来执行Bugzilla程序模块;最后Bugzilla的数据信息是存储在MySQL数据库中的。当然,读者也可以选择自己习惯的WEB服务器和数据库服务器;本文主要介绍的是上述模型中的Apache服务器和MySQL数据库,最后Bugzilla是可以运行多种操作系统平台的,而本文则着重介绍Windows 32位操作系统的安装和部署(注:本文的Windows32是选用的Windows XP SP2版本的)。
2 安装版本参考
我目前的安装版本如下表:
| 软件 | 版本 |
| MySQL | 5.2 |
| Perl | ActivePerl-5.8.9.825 (注:5.10会出现安装问题) |
| Bugzilla | bugzilla-3.0.8 |
| Apache | 2.2 |
| Windows | XP SP2 |
3 MySQL的安装
MySQL是一个常用的开源数据库可以在其官方网站上下载。在Windows下面可以下载安装文件也可以下载免安装版。可以独立运行也可以作为Windows服务进程管理。在安装完毕之后可以在其客户端中输入:
set password for 'bugs'@'localhost' = OLD_PASSWORD('bugs');
建立一个Bugzilla的用户bugs,以便之后Bugzilla通过该账户访问数据库。并建立一个Bugzilla的数据库:
create database bugs;
如上所建数据库名称为bugs。
4 Perl的安装
由于Bugzilla是Perl编写的CGI程序,因此,必须安装Perl的运行环境,在Windows下常用的Perl运行环境是ActivePerl。可以到如下URL地址去下载ActivePerl(注:建议5.08)
http://activestate.com/Products/Download/Download.plex?id=ActivePerl
下载安装后通常会安装在C:/Perl目录下,并建立C:/Temp目录。
在安装完ActivePerl之后,就可以安装运行Bugzilla所需要的一些Perl的模块,这些模块是运行Bugzilla所必须的库。针对与不同版本的Perl可以选择如下URL来下载这些模块:
Perl 5.8.x :http://theoryx5.uwinnipeg.ca/ppms/
Perl 5.10.x :http://cpan.uwinnipeg.ca/PPMPackages/10xx/
下载相应的压缩文件解压至C:/PPM目录(注:读者可自选其他目录)。之后,可通过CMD命令行,进入该目录,并通过ppm(注:即Perl Package Management Perl的模块管理器)安装解压后的ppd文件如下:
cd c:/ppm
ppm install XXXX. ppd
5 Bugzilla的安装
做好上述安装工作后,就可以安心的安装Bugzilla了。首先,依然是到Bugzilla的官方网站下载Bugzilla。
Bugzilla的官方网站: www.bugzilla.org/
解压后到D:/bugzilla-3.0.8目录(注:读者可任选其它目录解压),同样通过CMD命令行进入该目录,并执行checksetup.pl Perl脚本。如下:
cd d:/bugzilla-3.0.8
perl checksetup.pl
若执行正常可见到如下:
D:/bugzilla-3.0.8>perl checksetup.pl
Checking perl modules ...
Checking for AppConfig (v1.52) ok: found v1.55
Checking for CGI (v2.93) ok: found v3.10
Checking for Data::Dumper (any) ok: found v2.121_04
Checking for Date::Format (v2.21) ok: found v2.22
Checking for DBI (v1.38) ok: found v1.48
Checking for File::Spec (v0.84) ok: found v3.05
Checking for File::Temp (any) ok: found v0.16
Checking for Template (v2.08) ok: found v2.13
Checking for Text::Wrap (v2001.0131) ok: found v2001.09293
Checking for Mail::Mailer (v1.65) ok: found v1.67
Checking for Storable (any) ok: found v2.13
The following Perl modules are optional:
Checking for GD (v1.20) ok: found v2.16
Checking for Chart::Base (v1.0) ok: found v2.3
Checking for XML::Parser (any) ok: found v2.34
Checking for GD::Graph (any) ok: found v1.43
Checking for GD::Text::Align (any) ok: found v1.18
Checking for PatchReader (v0.9.4) ok: found v0.9.5
Most ActivePerl modules are available at Apache's ppm repository.
A list of mirrors is available at
http://www.apache.org/dyn/closer.cgi/perl/win32-bin/ppms/
You can add the repository with the following command:
ppm rep add apache http://www.apache.org/dist/perl/win32-bin/ppms/
Checking user setup ...
Creating data directory (./data) ...
Creating graphs directory...
Creating .htaccess...
Creating Bugzilla/.htaccess...
Creating ./data/.htaccess...
Creating ./template/.htaccess...
Creating ./data/webdot/.htaccess...
Precompiling templates ...
Checking for MySQL Server (v3.23.41) ok: found v5.2.20
Creating table user_group_map ...
Creating table series_data ...
Creating table longdescs ...
Creating table dependencies ...
Creating table components ...
Creating table keywords ...
Creating table cc ...
Creating table duplicates ...
Creating table groups ...
Creating table flagtypes ...
Creating table profiles ...
Creating table products ...
Creating table bugs_activity ...
Creating table series_categories ...
Creating table keyworddefs ...
Creating table fielddefs ...
Creating table group_control_map ...
Creating table profiles_activity ...
Creating table group_group_map ...
Creating table user_series_map ...
Creating table bugs ...
Creating table series ...
Creating table versions ...
Creating table flagexclusions ...
Creating table logincookies ...
Creating table watch ...
Creating table bug_group_map ...
Creating table votes ...
Creating table attachments ...
Creating table flags ...
Creating table milestones ...
Creating table tokens ...
Creating table flaginclusions ...
Creating table quips ...
Creating table namedqueries ...
Creating initial dummy product 'TestProduct' ...
Populating duplicates table...
Creating duplicates directory...
Migrating old chart data into database ...
Adding group tweakparams ...
Adding group editusers ...
Adding group creategroups ...
Adding group editcomponents ...
Adding group editkeywords ...
Adding group admin ...
Adding group editbugs ...
Adding group canconfirm ...
Looks like we don't have an administrator set up yet. Either this is your
first time using Bugzilla, or your administrator's privileges might have
accidently been deleted.
Enter the e-mail address of the administrator: youremail@XXX.com
You entered 'byron@example.com'. Is this correct? [Y/n] y
Enter the real name of the administrator: your name
Enter a password for the administrator account: your password
Please retype the password to verify: your password
'byron@example.com' is now set up as an administrator account.
D:/bugzilla-3.0.8>
在上述过程中,读者可自己配置自己进入Bugzilla的Email、真实姓名及密码(注:最终登录到Bugzilla采用Email作为账户)。
正常执行后(注:若出现no found则根据没找到的模块重新通过ppm安装相应模块)在同一目录下找到localconfig文件,并编辑该文件如下条目:
#
# How to access the SQL database:
#
$db_host = "localhost"; # 数据库所在主机地址
$db_port = 3306; # 访问端口
$db_name = "bugs"; # 数据库名称
$db_user = "bugs"; # 访问该数据库的用户
#
# Enter your database password here. It's normally advisable to specify
# a password for your bugzilla database user.
# If you use apostrophe (') or a backslash (/) in your password, you'll
# need to escape it by preceding it with a / character. (/') or (//)
#
$db_pass =" bugs"; #访问密码(注:若反复连接不上可以把数据库密码改为空,并至该处为空串)
6 Apache服务器的安装
可到Apache的官方网站下载并安装Apache服务器,地址为:
服务进程管理。配置Apache的主要目的是让Apache服务器可以找到Bugzilla并通过CGI地方方式运行Bugzilla,因此要修改httpd.conf文件(注:若读者安装的目录在C盘,则可能安装目录在C:/Program Files/Apache Software Foundation/Apache2.2/conf/httpd.conf)。具体修改如下:
1) 修改Apache的运行端口:
#
# Listen: Allows you to bind Apache to specific IP addresses and/or
# ports, instead of the default. See also the <VirtualHost>
# directive.
#
# Change this to Listen on specific IP addresses as shown below to
# prevent Apache from glomming onto all bound IP addresses (0.0.0.0)
#
#Listen 12.34.56.78:80
Listen 80
2) 修改Apache的访问路径,以便能找到Bugzilla并运行
#
# DocumentRoot: The directory out of which you will serve your
# documents. By default, all requests are taken from this directory, but
# symbolic links and aliases may be used to point to other locations.
#
DocumentRoot " D:/bugzilla-3.0.8"
#
# Each directory to which Apache has access can be configured with respect
# to which services and features are allowed and/or disabled in that
# directory (and its subdirectories).
#
# First, we configure the "default" to be a very restrictive set of
# features.
#
<Directory />
Options FollowSymLinks
AllowOverride None
</Directory>
#
# Note that from this point forward you must specifically allow
# particular features to be enabled - so if something's not working as
# you might expect, make sure that you have specifically enabled it
# below.
#
#
# This should be changed to whatever you set DocumentRoot to.
#
<Directory " D:/bugzilla-3.0.8">
3) CGI配置
## AddHandler allows you to map certain file extensions to "handlers":
# actions unrelated to filetype. These can be either built into the server
# or added with the Action directive (see below)
#
# To use CGI scripts outside of ScriptAliased directories:
# (You will also need to add "ExecCGI" to the "Options" directive.)
#
AddHandler cgi-script .cgi
## This should be changed to whatever you set DocumentRoot to.
#
<Directory "C:/Bugzilla">
#
# Possible values for the Options directive are "None", "All",
# or any combination of:
# Indexes Includes FollowSymLinks SymLinksifOwnerMatch ExecCGI MultiViews
#
# Note that "MultiViews" must be named *explicitly* --- "Options All"
# doesn't give it to you.
#
# The Options directive is both complicated and important. Please see
# http://httpd.apache.org/docs/2.2/mod/core.html#options
# for more information.
#
Options Indexes FollowSymLinks ExecCGI
#
# AllowOverride controls what directives may be placed in .htaccess files.
# It can be "All", "None", or any combination of the keywords:
# Options FileInfo AuthConfig Limit
#
AllowOverride All
#
# Controls who can get stuff from this server.
#
Order allow,deny
Allow from all
#
# Tell Apache to use Perl to execute .cgi
#
ScriptInterpreterSource Registry-Strict
</Directory>
## DirectoryIndex: sets the file that Apache will serve if a directory
# is requested.
#
# The index.html.var file (a type-map) is used to deliver content-
# negotiated documents. The MultiViews Option can be used for the
# same purpose, but it is much slower.
#
DirectoryIndex index.html index.html.var index.cgi
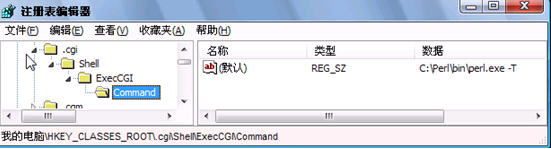
4) 最后修改注册表
在HKEY_CLASSES_ROOT/.cgi/Shell/ExecCGI/Command中加入值C:/Perl/bin/perl.exe –t,如下图:
7 运行Bugzilla
最后在一切准备工作都就绪之后,待启动MySQL服务器和Apache服务器之后,就可以打开浏览器输入:http://localhost 或 http://127.0.0.1 或其它所在主机的地址,便可见到如下画面:

见到此画面就大功告成了,证明已经安装完毕。


 728
728

 被折叠的 条评论
为什么被折叠?
被折叠的 条评论
为什么被折叠?
 到【灌水乐园】发言


