


操作实践bean直接的引用,具体流程如下。此时省略了pom.xml设置,和之前一样。主要实现实例依赖外部bean、内部bean的配置。
1、建立两个类,分别Bag类,Person类,在person类中会引用bag类。
bag类:
package com.yefeng.spring.spring3;
/**
 * @author yefengzhichen
 * 2016年7月3日
 */
public class Bag {
	private String brand;
	private String country;
	private double price;
	private int capacity;

	public Bag() {
		super();
	}

	public Bag(String brand, String country, double price) {
		super();
		this.brand = brand;
		this.country = country;
		this.price = price;
	}

	public Bag(String brand, String country, double price, int capacity) {
		super();
		this.brand = brand;
		this.country = country;
		this.price = price;
		this.capacity = capacity;
	}

	public String getBrand() {
		return brand;
	}

	public void setBrand(String brand) {
		this.brand = brand;
	}

	public String getCountry() {
		return country;
	}

	public void setCountry(String country) {
		this.country = country;
	}

	public double getPrice() {
		return price;
	}

	public void setPrice(double price) {
		this.price = price;
	}

	public int getCapacity() {
		return capacity;
	}

	public void setCapacity(int capacity) {
		this.capacity = capacity;
	}

	@Override
	public String toString() {
		return "Bag [brand=" + brand + ", country=" + country + ", price="
				+ price + ", capacity=" + capacity + "]";
	}
}
package com.yefeng.spring.spring3;
/**
 * @author yefengzhichen
 * 2016年7月4日
 */
public class Person {
	private String name;
	private int age;
	private Bag bag;

	public Person() {
		super();
	}
	public Person(String name, int age, Bag bag) {
		super();
		this.name = name;
		this.age = age;
		this.bag = bag;
	}
	public String getName() {
		return name;
	}
	public void setName(String name) {
		this.name = name;
	}
	public int getAge() {
		return age;
	}
	public void setAge(int age) {
		this.age = age;
	}
	public Bag getBag() {
		return bag;
	}
	public void setBag(Bag bag) {
		this.bag = bag;
	}
	@Override
	public String toString() {
		return "Person [name=" + name + ", age=" + age + ", bag=" + bag + "]";
	}
}
2、建立bean配置文件,其中设置person依赖与bag实例,其中分别依赖外部bean、内部bean,最后一个是用给依赖对象赋值为null。
<?xml version="1.0" encoding="UTF-8"?>
<beans xmlns="http://www.springframework.org/schema/beans"
	xmlns:xsi="http://www.w3.org/2001/XMLSchema-instance"
	xsi:schemaLocation="http://www.springframework.org/schema/beans http://www.springframework.org/schema/beans/spring-beans.xsd">

	<bean id="ata" class="com.yefeng.spring.spring3.Bag">
		<constructor-arg value="ata" type="java.lang.String"></constructor-arg>
		<constructor-arg value="China"></constructor-arg>
		<constructor-arg value="120"></constructor-arg>
		<constructor-arg value="5"></constructor-arg>
	</bean>

	<!-- 引用外部bean -->
	<bean id="Jack" class="com.yefeng.spring.spring3.Person">
		<property name="name" value="Jack"></property>
		<property name="age" value="20"></property>
		<property name="bag" ref="ata"></property>
	</bean>

	<bean id="Tom" class="com.yefeng.spring.spring3.Person">
		<property name="name" value="Tom"></property>
		<property name="age" value="15"></property>
		<!-- 内部bean -->
		<property name="bag">
			<bean class="com.yefeng.spring.spring3.Bag">
				<constructor-arg value="nike"></constructor-arg>
				<constructor-arg value="America"></constructor-arg>
				<constructor-arg value="200"></constructor-arg>
				<constructor-arg value="10"></constructor-arg>
			</bean>
		</property>
	</bean>

	<!-- 用null赋值 -->
	<bean id="Lucy" class="com.yefeng.spring.spring3.Person">
		<constructor-arg value="Lucy"></constructor-arg>
		<constructor-arg value="18"></constructor-arg>
		<constructor-arg>
			<null />
		</constructor-arg>
	</bean>

</beans>
3、app运行代码:
package com.yefeng.spring.spring3;

import org.springframework.context.ApplicationContext;
import org.springframework.context.support.ClassPathXmlApplicationContext;
/**
 * Hello world!
 *
 */
public class App
{
    public static void main( String[] args )
    {
        ApplicationContext context = new ClassPathXmlApplicationContext("applicationContext.xml");
        Person jack = (Person) context.getBean("Jack");
        System.out.println(jack);

        Person tom = (Person) context.getBean("Tom");
        System.out.println(tom);

        Person lucy = (Person) context.getBean("Lucy");
        System.out.println(lucy);
    }
}
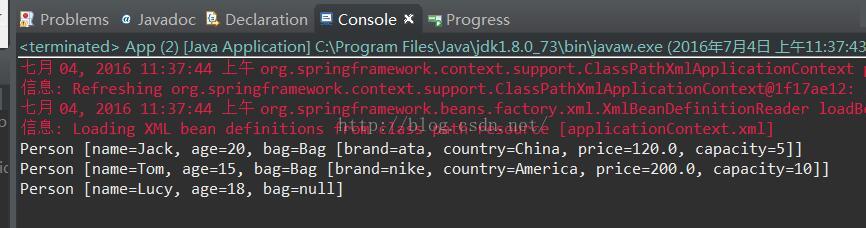
4、运行结果如下:


 728
728


 被折叠的 条评论
为什么被折叠?
被折叠的 条评论
为什么被折叠?
 到【灌水乐园】发言


