


参与公司项目开发一段时间了,项目用到了很多新的技术(vite,vue3,ts等等),但是框架都是别人搭好的,然后就想说如果是自己的话,会从零搭建一个吗,于是就有了这篇文章。
目录
一、涉及到的相关依赖
"dependencies": {
    "@ant-design/icons-vue": "^7.0.1",
    "ant-design-vue": "^3.2.15",
    "vue": "^3.3.8",
    "vue-router": "^4.2.5",
    "vuex": "^4.1.0"
  },
  "devDependencies": {
    "@types/node": "^20.10.3",
    "@typescript-eslint/eslint-plugin": "^6.13.2",
    "@typescript-eslint/parser": "^6.13.2",
    "@vitejs/plugin-vue": "^4.5.0",
    "@vitejs/plugin-vue-jsx": "^3.1.0",
    "consola": "^3.2.3",
    "eslint": "^8.55.0",
    "eslint-config-prettier": "^9.1.0",
    "eslint-plugin-prettier": "^5.0.1",
    "eslint-plugin-vue": "^9.19.2",
    "less": "^4.2.0",
    "less-loader": "^11.1.3",
    "prettier": "^3.1.0",
    "typescript": "^5.2.2",
    "vite": "^5.0.0",
    "vite-plugin-style-import": "^2.0.0",
    "vite-require": "^0.2.3",
    "vue-tsc": "^1.8.22"
  }
二、项目创建
本人用的node版本是16.10.0的,根据vite官方文档运行如下命令,然后根据提示创建即可:

然后进入项目,安装依赖,就可以直接运行了。
安装完的项目目录结构如下:
│  ├─public # 静态资源目录
│  │      favicon.ico
│  │
│  ├─src
│  │  │  App.vue # 入口vue文件
│  │  │  main.ts # 入口文件
│  │  │  shims-vue.d.ts # vue文件模块声明文件
│  │  │  vite-env.d.ts # vite环境变量声明文件
│  │  │
│  │  ├─assets # 资源文件目录
│  │  │      logo.png
│  │  │
│  │  └─components # 组件文件目录
│  │         HelloWorld.vue
│  │
│  │ .gitignore
│  │ index.html # Vite项目的入口文件
│  │ package.json
│  │ README.md
│  │ tsconfig.json # tsconfig配置文件
│  │ vite.config.ts # vite配置文件
这样的配置显然是不够的,下面就需要我们进行其他的项目配置了。
三、项目配置
3.1、Tsx支持
首先需要安装官方维护的vite插件@vitejs/plugin-vue-jsx,这个插件其实核心还是@vue/babel-plugin-jsx,只是在这个插件上封装了一层供vite插件调用。vue jsx语法规范
$ npm install @vitejs/plugin-vue-jsx -D
# or
$ yarn add @vitejs/plugin-vue-jsx -D
安装完之后在vite.config.ts进行插件使用,代码如下:
import { defineConfig } from "vite";
import vue from "@vitejs/plugin-vue";
import vueJsx from "@vitejs/plugin-vue-jsx";

export default defineConfig({
  plugins: [
    vue(),
    vueJsx() //插件使用
  ],
});
后面就可以把目录中的app.vue、HelloWorld.vue以及shims.vue.d.ts这三个文件删除了,因为后面我们就只需要写tsx文件了。
然后src目录下新增App.tsx文件,写入如下代码:
import { defineComponent } from 'vue'

export default defineComponent({
  setup() {
    return () => {
      return (
        <div>
          <h1>Vue3 + tsx + ts + ant-design-vue</h1>
        </div>
      )
    }
  }
})
然后运行npm run dev就可以看到app.tsx中的内容了。
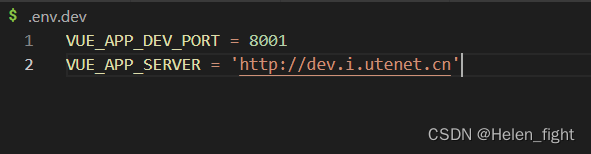
这里做个小优化:一般项目都会有开发环境,测试环境,线上环境等,所以我们可以在项目根目录下新增三个文件:.env.dev,.env.alpha,.env.prod,分别代表上面三个环境,然后在文件中配置各自的端口号和服务地址:
然后在vite.config.ts里做如下配置:
import { defineConfig, loadEnv } from 'vite'
import vue from '@vitejs/plugin-vue'
import vueJsx from '@vitejs/plugin-vue-jsx'

// https://vitejs.dev/config/
const envPrefix = ['VITE', 'VUE']
export default defineConfig(({ mode }) => {
  const envConfig = loadEnv(mode, process.cwd(), envPrefix)
  console.log('envConfig', envConfig)
  return {
    base: './',
    envPrefix: envPrefix,
    server: {
      port: Number(envConfig.VUE_APP_DEV_PORT),
      proxy: {
        '/server-api': {
          target: envConfig.VUE_APP_SERVER,
          changeOrigin: true
        }
      }
    },
    define: {
      'process.env': envConfig
    },
    plugins: [vue(), vueJsx()]
  }
})
最后在package.json中增加三条命令:
"scripts": {
    "serve:dev": "vite --host --mode dev",
    "serve:alpha": "vite --host --mode alpha",
    "serve:prod": "vite --host --mode prod",
  },
然后就可以通过运行对应命令,在本地快速启动并代理到各自的环境,而不用每次修改服务地址。
3.2、路径别名配置
路径别名同样需要在vite.config.ts中配置,此时具体配置如下:
import { resolve } from 'path' // 此处如果报错则安装 node/path依赖
import { defineConfig, loadEnv } from 'vite'
import vue from '@vitejs/plugin-vue'
import vueJsx from '@vitejs/plugin-vue-jsx'

// https://vitejs.dev/config/
const envPrefix = ['VITE', 'VUE']
export default defineConfig(({ mode }) => {
  const envConfig = loadEnv(mode, process.cwd(), envPrefix)
  console.log('envConfig', envConfig)
  return {
    base: './',
    envPrefix: envPrefix,
    server: {
      port: Number(envConfig.VUE_APP_DEV_PORT),
      proxy: {
        '/server-api': {
          target: envConfig.VUE_APP_SERVER,
          changeOrigin: true
        }
      }
    },
    resolve: {
      alias: [
        { find: '@', replacement: resolve(__dirname, 'src') },
        { find: /^~/, replacement: '' }
      ]
    },
    define: {
      'process.env': envConfig
    },
    plugins: [vue(), vueJsx()]
  }
})
此时在项目中就可以直接使用新的路径别名了,使用vscode可能会没有路径提示,这个时候只需要在jsconfig.json/tsconfig.json配置paths和baseUrl就会出现路径提示了,具体如下:
{
  "compilerOptions": {
    // ...
    "baseUrl": ".",
    "paths": {
      "@/*": ["src/*"],
    },
  // ...
}
3.3、less配置
Vite 提供了对 .scss, .sass, .less, .styl 和 .stylus 文件的内置支持。因此没有必要为它们安装特定的 Vite 插件,但必须安装相应的预处理器依赖,依赖安装完项目就可以直接解析less文件了。
$ npm install less less-loader -D
# or
$ yarn add less less-loader -D
注意这里有个坑,less 和 less-loader 需要写到 devDependencies 里面,否则运行会报错。
使用:
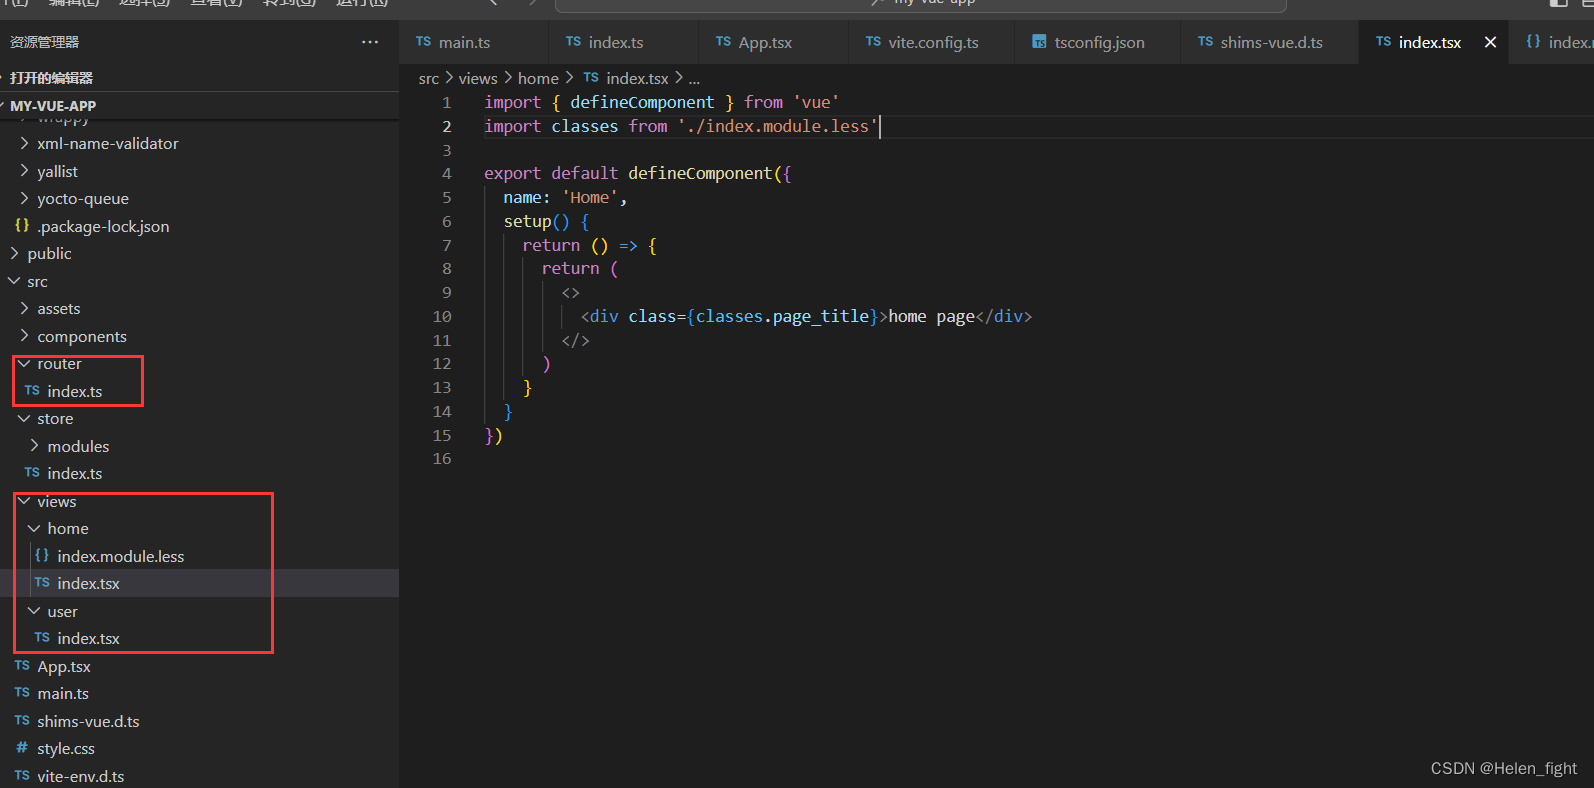
可以在tsx文件下新建index.module.less文件然后tsx页面中引入直接使用,如下:
.page_title {
  font-size: 16px;
  color: pink;
}
3.4、router配置
请注意,路由一定得安装4.0.0以上版本,最好直接安装当前最新版本。
查看 vue-router 版本:
$ npm info vue-router versions
安装最新版本:
$ npm install vue-router@4.2.5
# or
$ yarn add vue-router@4.2.5
然后在src下新建router和view等文件和文件夹
在router文件夹下的index.ts配置对应路由:
import { createRouter, createWebHistory, RouteRecordRaw } from 'vue-router'

const routes: RouteRecordRaw[] = [
  {
    path: '/',
    name: 'Home',
    component: () => import('@/views/home'),
    meta: {
      title: '首页'
    }
  },
  {
    path: '/user',
    name: 'User',
    component: () => import('@/views/user'),
    meta: {
      title: '个人中心'
    }
  }
]

const router = createRouter({
  history: createWebHistory('/'),
  routes: routes,
  scrollBehavior(to, from, savedPosition) {
    // 始终滚动到顶部
    console.log(to, from, savedPosition)
    return { top: 0 }
  }
})

export default router as typeof router & { refresh?: () => string }
接着在main.ts这个入口文件中插件的方式通过vue引入就可以了
import { createApp } from 'vue'
import './style.css'
import router from './router'
import App from './App'

createApp(App).use(router).mount('#app')
最后在app.tsx中引入ruter-view进行如下配置:
import { defineComponent } from 'vue'
import { RouterView, RouterLink } from 'vue-router'

export default defineComponent({
  setup() {
    return () => {
      return (
        <div>
          <h1>Vue3 + tsx + ts + ant-design-vue</h1>
          <div>
            <RouterLink to={'/'} style={{ marginRight: '20px' }}>
              首页
            </RouterLink>
            <RouterLink to={'/user'}>用户中心</RouterLink>
          </div>
          <RouterView />
        </div>
      )
    }
  }
})
从新运行项目就可以使用路由跳转切换页面了
3.5、vuex配置
请注意,vuex也得安装4.0.0及以上版本,最好直接安装当前最新版本。跟上面router一样查看下最新版本,然后直接安装:
$ npm install vuex@4.1.0
# or
$ yarn add vuex@4.1.0
创建目录结构:
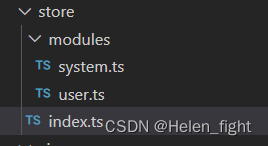
代码如下:
system.ts
import { Module } from 'vuex'

export interface SystemState {
  showLogin: boolean
}

export const system: Module<SystemState, any> = {
  state: {
    showLogin: false
  },
  getters: {
    getLoginVisible(state) {
      return state.showLogin
    }
  },
  mutations: {
    SET_SHOW_LOGIN(state, visible) {
      state.showLogin = visible
    }
  },
  actions: {
    showLoginAction({ commit }, visible) {
      commit('SET_SHOW_LOGIN', visible)
    }
  }
}
user.ts
import { Module } from 'vuex'

interface UserInfoProperties {
  username: string
  age: number
}

export interface UserState {
  userInfo: UserInfoProperties
}

export const user: Module<UserState, any> = {
  state: {
    userInfo: {
      username: 'helen',
      age: 32
    }
  }
}
index.ts
import { createStore, useStore as useRawStore } from 'vuex'
import { user, UserState } from './modules/user'
import { system, SystemState } from './modules/system'

export interface StoreState {
  user: UserState
  system: SystemState
}

export const STORE_KEY = 'store'

const store = createStore<StoreState>({
  modules: {
    user,
    system
  },
  plugins: []
})

export function useStore() {
  return useRawStore(STORE_KEY) as typeof store
}

export default store
然后在main.ts中引入:
import { createApp } from 'vue'
import './style.css'
import router from './router'
import App from './App'
import store, { STORE_KEY } from './store'

createApp(App).use(store, STORE_KEY).use(router).mount('#app')
最后就可以在页面中直接引入使用了:

遇到的问题:
1、引入使用vuex时报错:无法找到模块声明文件vuex
解决方法:在vite.env.d.ts里面声明vuex导出其声明文件路径
declare module 'vuex' {
  export * from 'vuex/types/index.d.ts'
  export * from 'vuex/types/helpers.d.ts'
  export * from 'vuex/types/logger.d.ts'
  export * from 'vuex/types/vue.d.ts'
}
3.6、ant-design-vue框架配置使用
安装框架和图标库
$ npm install ant-desing-vue @ant-design/icons-vue -D
# or
$ yarn add ant-design-vue @ant-design/icons-vue -D
安装vite样式引入插件
$ npm install vite-plugin-style-import -D
# or
$ yarn add vite-plugin-style-import -D
在vite.config.ts中进行配置
import { resolve } from 'path' // 此处如果报错则安装 node/path依赖
import { defineConfig, loadEnv } from 'vite'
import vue from '@vitejs/plugin-vue'
import vueJsx from '@vitejs/plugin-vue-jsx'
import { viteRequire } from 'vite-require'
import { createStyleImportPlugin, AndDesignVueResolve } from 'vite-plugin-style-import'

// https://vitejs.dev/config/
const envPrefix = ['VITE', 'VUE']
export default defineConfig(({ mode }) => {
  const envConfig = loadEnv(mode, process.cwd(), envPrefix)
  console.log('envConfig', envConfig)
  return {
    base: './',
    envPrefix: envPrefix,
    server: {
      port: Number(envConfig.VUE_APP_DEV_PORT),
      proxy: {
        '/server-api': {
          target: envConfig.VUE_APP_SERVER,
          changeOrigin: true
        }
      }
    },
    // 依赖优化-预构建
    optimizeDeps: {
      include: ['vue', 'vuex', 'vue-router', 'ant-design-vue', '@ant-desgin/icons-vue']
    },
    resolve: {
      alias: [
        { find: '@', replacement: resolve(__dirname, 'src') },
        { find: /^~/, replacement: '' }
      ]
    },
    define: {
      'process.env': envConfig
    },
    css: {
      preprocessorOptions: {
        less: {
          javascriptEnabled: true
        }
      }
    },
    plugins: [
      vue(),
      vueJsx(),
      // 兼容vite不支持require
      viteRequire(),
      createStyleImportPlugin({
        resolves: [AndDesignVueResolve()]
      })
    ]
  }
})
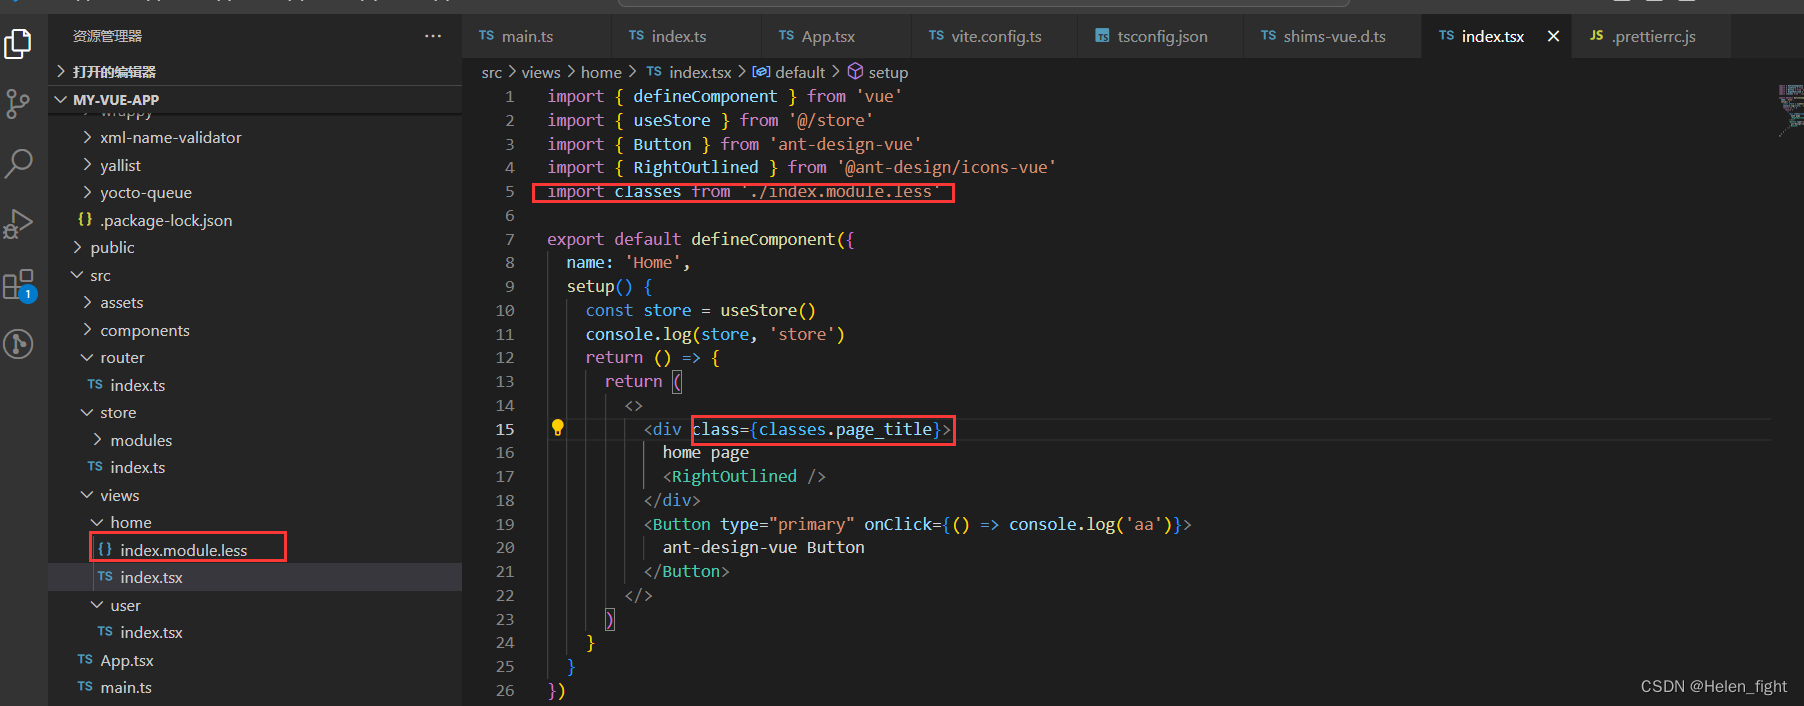
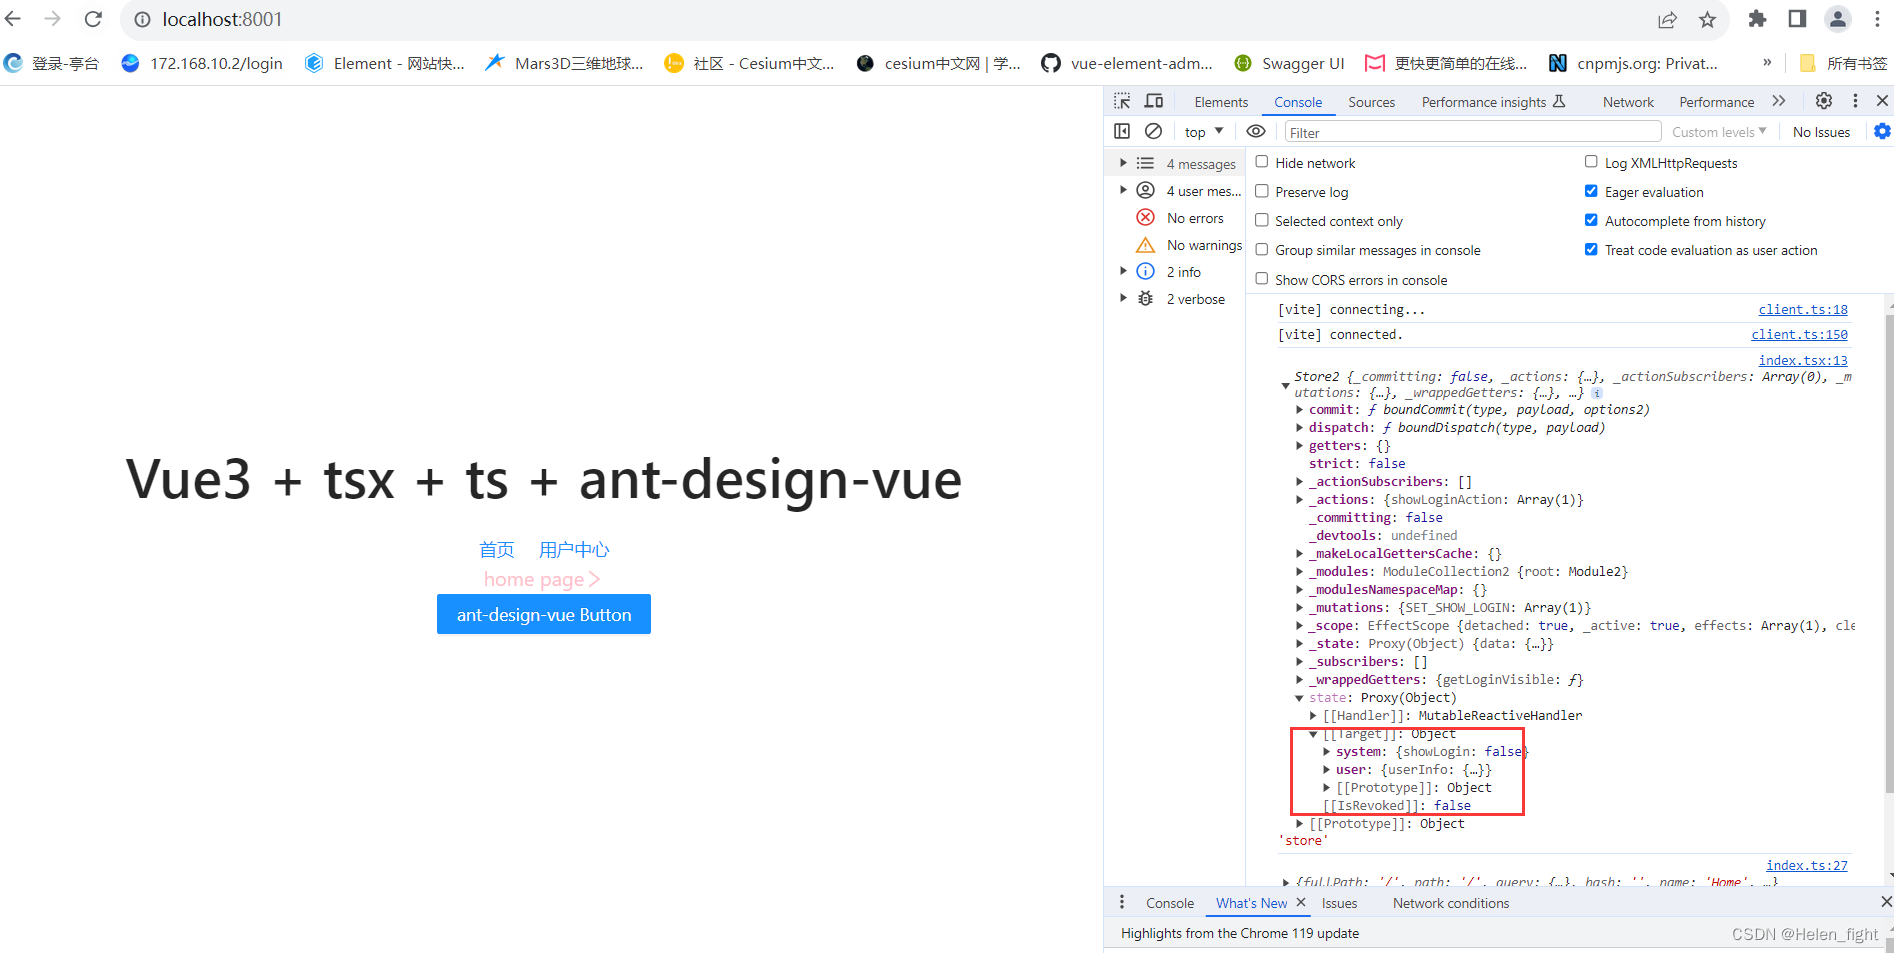
然后就可以在home的index.tsx页面中引入使用了:
import { defineComponent } from 'vue'
import { useStore } from '@/store'
import { Button } from 'ant-design-vue'
import { RightOutlined } from '@ant-design/icons-vue'
import classes from './index.module.less'

export default defineComponent({
  name: 'Home',
  setup() {
    const store = useStore()
    console.log(store, 'store')
    return () => {
      return (
        <>
          <div class={classes.page_title}>
            home page
            <RightOutlined />
          </div>
          <Button type="primary" onClick={() => console.log('aa')}>
            ant-design-vue Button
          </Button>
        </>
      )
    }
  }
})
遇到问题:
1、引入antd-design-vue组件后点击按钮报错Uncaught TypeError: Cannot read properties of undefined (reading ‘value‘)
解决方法:看博客说是vue3.2.13和antd4.0.7版本不兼容,然后就把4换成3了;antd换成3的后运行又报错了,原来按需加载样式vite-plugin-style-import配置后,还要在vite.cofing.ts里面配置css
css: {
      preprocessorOptions: {
        less: {
          javascriptEnabled: true
        }
      }
    },
3.7、配置eslint
增加eslint用来规范Typescript以及vue代码,首先安装相关依赖:
npm i eslint eslint-plugin-vue @typescript-eslint/parser @typescript-eslint/eslint-plugin -D这三个依赖的作用分别是:
- eslint: ESLint的核心代码
- eslint-plugin-vue:ESLint关于检测vue代码规范的插件
- @typescript-eslint/parser:ESLint的解析器,用于解析typescript,从而检查和规范Typescript代码
- @typescript-eslint/eslint-plugin:这是一个ESLint插件,包含了各类定义好的检测Typescript代码的规范
结合Prettier和Eslint
npm i prettier eslint-config-prettier eslint-plugin-prettier -D其中:
- prettier:prettier插件的核心代码
- eslint-config-prettier:解决ESLint中的样式规范和prettier中样式规范的冲突,以prettier的样式规范为准,使ESLint中的样式规范自动失效
- eslint-plugin-prettier:将prettier作为ESLint规范来使用
依赖装好之后便可以开始相关文件的配置工作了,首先在项目根目录新增.eslintrc.js文件
这个地方遇到了一个坑,如果
eslint-config-prettier版本号在8.0.0以上,则在.eslintrc.js配置extends中不需要再新增 'prettier/@typescript-eslint' 这个配置,否则执行eslint会报错
module.exports = {
  parser: 'vue-eslint-parser',
  parserOptions: {
    parser: '@typescript-eslint/parser', // Specifies the ESLint parser
    ecmaVersion: 2020, // Allows for the parsing of modern ECMAScript features
    sourceType: 'module', // Allows for the use of imports
    ecmaFeatures: {
      // Allows for the parsing of JSX
      jsx: true
    }
  },
  extends: [
    'plugin:vue/vue3-recommended',
    'plugin:@typescript-eslint/recommended',
    'plugin:prettier/recommended'
  ],
  rules: {
    '@typescript-eslint/no-explicit-any': 'off',
    'vue/multi-word-component-names': 'off',
  }
}紧接着增加prettier配置,再在项目根目录中新增.prettierrc.js文件
// 具体配置可以参考 https://prettier.io/docs/en/options.html
const base = {
  printWidth: 100,
  tabWidth: 2,
  useTabs: false,
  semi: false, // 未尾逗号
  vueIndentScriptAndStyle: true,
  singleQuote: true, // 单引号
  quoteProps: 'as-needed',
  bracketSpacing: true,
  trailingComma: 'none', // 未尾分号
  jsxBracketSameLine: false,
  jsxSingleQuote: false,
  arrowParens: 'always',
  insertPragma: false,
  requirePragma: false,
  proseWrap: 'preserve',
  htmlWhitespaceSensitivity: 'strict',
  endOfLine: 'auto',
  embeddedLanguageFormatting: 'auto',
}
module.exports = {
  ...base,
  overrides: [
    {
      files: ['*.js', '*.jsx', '*.mjs', '*.ts', '*.tsx'],
      options: base
    },
    {
      files: ['*.vue'],
      options: base
    },
    {
      files: '*.md',
      options: {
        ...base,
        tabWidth: 4,
        proseWrap: 'never'
      }
    }
  ]
};做到这里,eslint除了脚本配置之外就配置完成了,现在只需在package.json中配置好脚本命令就完成了整个eslint的配置工作了。
{
  ...
  "scripts": {
    "dev": "vite",
    "build": "vue-tsc --noEmit --skipLibCheck && vite build", // 增加skipLibCheck可以跳过引入库的ts检查
    "serve": "vite preview",
    "lint": "eslint src",
    "lint:fix": "eslint src --fix --ext .ts,.tsx"
  },
}
遇到的问题:
1、运行 npm run lint的时候直接报错了:[ERR_REQUIRE_ESM]: require() of ES Module,
解决方法:把.eslintrc.js后缀改成cjs;
2、从新运行又报错:ReferenceError: module is not defined in ES module scope This file is being;
解决方法:把package.json的type去掉;方案参考https://www.cnblogs.com/tudou1179006580/p/17698047.html
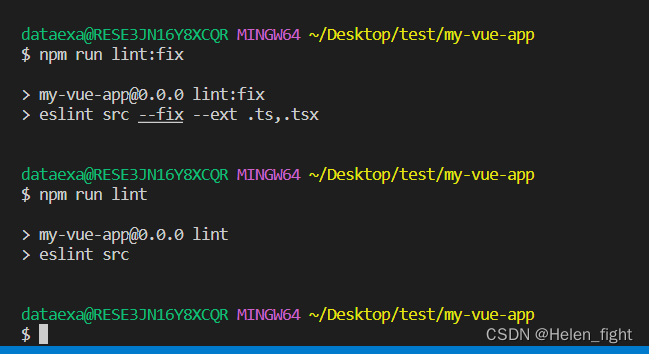
从新执行npm run lint
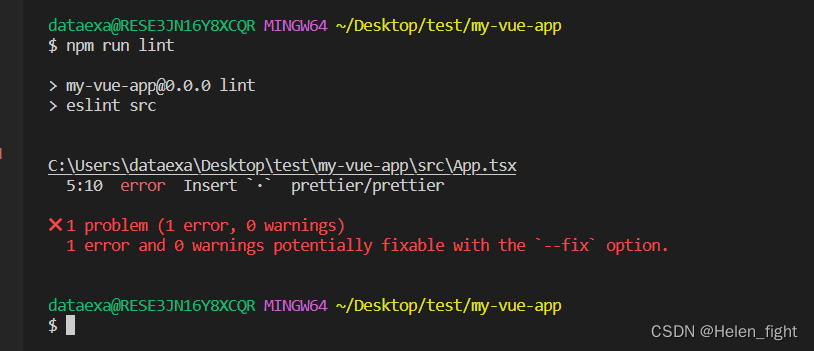
发现app.tsx有个错误,执行npm run lint:fix修复错误后就可以提交代码了。
这样一个项目框架就搭建好了:


 1540
1540


 被折叠的 条评论
为什么被折叠?
被折叠的 条评论
为什么被折叠?
 到【灌水乐园】发言


