


基于
jgraphpad
构建工作流建模的图像编辑器
基于
jgraphpad
构建工作流建模的图像编辑器
下文中注意用词:
JGraph
和
JGraphpad
是两个概念。后者是基于前者的一个应用。
在
JGraph
中讨论的问题是基于
JGraph
的应用,包括
JGraphpad
,都会遇到的,体现了基本的原理。
问题1:如何实现多种形状的vertex?
解决:
com.jgraph.pad.graph.JGraphpadVertexRenderer
提供对多种
shape
的支持。
另外,如何自定义新的
vertex
:
1.
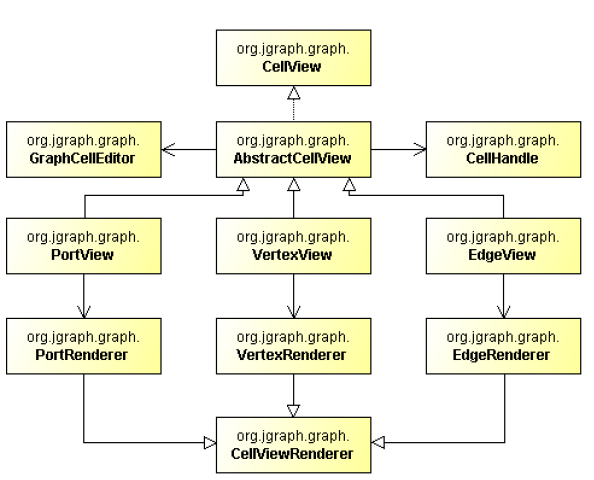
首先说明
cell view
和
render
的机制:
JGraph
默认实现了三个
cell view
:
VertexView,EdgeView and PortView
。
VertextView
最简单。
Its
update
method ensures
that the vertex view has a bounds and the
getRenderer
and
getPerimeterPoint
just
defer to the vertex renderer.
PortView has a size hard-coded into the final variable SIZE and returned in the
getBounds() method
。默认实现不能调整大小,即没有
handles
。(
If you would like variable sized ports you
might subclass PortView and implement getBounds to return the bounds attribute of the
port's attribute map instead
)
其中有
shouldInvokePortMagic
()
:
make it
possible to have interactively movable ports as well as the local optimization of adjusting a ports
position on a vertex in order to straighten an edge or edges connecting to it
。
EdgeView
最复杂,因为
Edge
的可变化性很强。比如:

不详细叙述。
2.
Subclassing Renderers
If you want finer control over the rendering, you can subclass one of the default
renderers, and override its
paint
-method. A renderer is a
Component
-extension that
paints a cell based on its attributes. Thus, neither JGraph nor its look-and-feel-specific
implementation actually contain the code that paints a cell. Instead, JGraph uses the
cell renderer’s painting code. A new renderer may be associated with a cell by overriding
the
getRendererComponent
method of the corresponding
CellView
, or the
getRenderer
method for extensions of the
AbstractCellView
class.
Adding new Cell Types to a Graph
The following code was taken from JGraphpad
(http://jgraph.sourceforge.net/pad/jgraphpad.jnlp) to illustrate
how to add new cell types and renderers. The code adds an oval vertex to the graph.
The easiest way to do this is by extending JGraph. Since JGraph implements the
CellViewFactory
interface, it is in charge of creating views.
When creating a view, JGraph assumes a cell is a vertex if it is not an instance of
Edge
or
Port
, and calls the
createVertexView
method. Thus, we only need to override
this method to identify an oval vertex (based on a typetest) and return the corresponding
view.
// Overrides JGraph.createVertexView
protected VertexView createVertexView(Object v,
GraphModel model,
CellMapper cm) {
// Return an EllipseView for EllipseCells
if (v instanceof EllipseCell)
return new EllipseView(v, model, cm);
// Else Call Superclass
return super.createVertexView(v, model, cm);
}
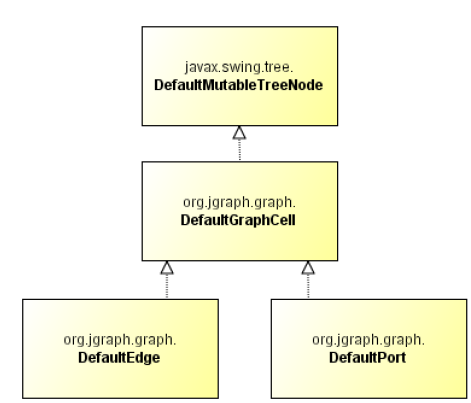
The oval vertex is represented by the
EllipseCell
class, which is an extension of
the
DefaultGraphCell
class, and offers no additional methods. It is only used to
distinguish oval vertices from normal vertices.
// Define EllipseCell
public class EllipseCell extends DefaultGraphCell {
// Empty Constructor
public EllipseCell() {
this(null);
}
// Construct Cell for Userobject
public EllipseCell(Object userObject) {
super(userObject);
}
}
The
EllipseView
is needed to define the special visual aspects of an ellipse. It contains
an inner class which serves as a renderer that provides the painting code. The
view and renderer are extensions of the
VertexView
and
VertexRenderer
classes,
respectively. The methods that need to be overridden are
getPerimeterPoint
to return
the perimeter point for ellipses,
getRenderer
to return the correct renderer, and
the renderer’s
paint
method.
// Define the View for an EllipseCell
public class EllipseView extends VertexView {
static EllipseRenderer renderer = new EllipseRenderer();
// Constructor for Superclass
public EllipseView(Object cell, GraphModel model,
CellMapper cm) {
super(cell, model, cm);
}
// Returns Perimeter Point for Ellipses
public Point getPerimeterPoint(Point source, Point p) { ...
}
// Returns the Renderer for this View
protected CellViewRenderer getRenderer() {
return renderer;
}
// Define the Renderer for an EllipseView
static class EllipseRenderer extends VertexRenderer {
public void paint(Graphics g) { ... }
}
}
The reason for overriding
getRenderer
instead of
getRendererComponent
is that
the
AbstractCellView
class, from which we inherit, already provides a default implementation
of this method that returns a configured
CellViewRenderer
, which in
turn is retrieved through the method that was overridden.
3.
参见
IconExample.java
。
4.
JGraphpad
If the shape is not a rectangle, then the local code is in charge of painting the background and border.
When the paint method is called, the paintBackground method is first invoked, which is in charge of
painting the background for non-rectangular shapes. The method also prepares some general geometry
objects which are used later in the code.
Next, the clipping area is set to the area of the shape, so that all subsequent painting is limited to the
shape area. The clipping region is kept until after the super call and painting of the rich text content.
The background image is then painted if image scaling is used and the object is prepared for the supercall
of the paint method by setting the border, label and image property accordingly. For example, the
following code is used to block the painting of the border, background and selection border if the shape
is non-rectangular:
if (shape != SHAPE_RECTANGLE) {
setBorder(null);
setOpaque(false);
selected = false;
}
The border of the shape is then painted using the paintShapeBorder method. In the case of a selection
cell, the method is called twice to render the shape and selection border, respectively. The paint method
then paints the folding icon which is used to implement one-click-folding in the graph.
问题2:如何自定义model?
问题3:如何定制cell的编辑方式?
如题,即希望双击
cell
时能弹出属性对话框来编辑
cell
的信息(
user object
)。
1.
In graphs that display complex structures, it is quite common to offer a property dialog
instead of the simple in-place editing. To do this, the BasicGraphUI’s
startEditing
and completeEditing methods must be overridden. Then, in order
to use this UI in a graph, the graph’s updateUI method must be overridden, too:
// Define a Graph with a Custom UI
public class DialogGraph extends JGraph {
// Sets the Custom UI for this graph object
public void updateUI(){
// Install a new UI
setUI(new DialogUI());
invalidate();
}
}
2.
例子
com.jgraph.example
.
EditorGraph
3.
又例
Tutorial.java
public class Tutorial extends JGraph {
...
//
// Customizing In-Place Editing
//
public void updateUI(){
// Install a new UI
setUI(new DialogUI());
invalidate();
}
public class DialogUI extends BasicGraphUI {
protected CellEditorListener cellEditorListener;
protected JFrame editDialog = null;
protected void completeEditing(boolean messageStop,
boolean messageCancel,
boolean messageGraph) {
if(stopEditingInCompleteEditing && editingComponent != null &&
editDialog != null) {
Component oldComponent = editingComponent;
Object oldCell = editingCell;
GraphCellEditor oldEditor = cellEditor;
Object newValue = oldEditor.getCellEditorValue();
Rectangle2D editingBounds = graph.getCellBounds(editingCell);
boolean requestFocus = (graph != null &&
(graph.hasFocus() || editingComponent.hasFocus()));
editingCell = null;
editingComponent = null;
if(messageStop)
oldEditor.stopCellEditing();
else if(messageCancel)
oldEditor.cancelCellEditing();
editDialog.dispose();
if(requestFocus)
graph.requestFocus();
if (messageGraph) {
Map map = new Hashtable();
GraphConstants.setValue(map, newValue);
Map insert = new Hashtable();
insert.put(oldCell, map);
graphLayoutCache.edit(insert, null, null, null);
}
updateSize();
// Remove Editor Listener
if(oldEditor != null && cellEditorListener != null)
oldEditor.removeCellEditorListener(cellEditorListener);
cellEditor = null;
editDialog = null;
}
}
protected boolean startEditing(Object cell, MouseEvent event) {
completeEditing();
if(graph.isCellEditable(cell) && editDialog == null) {
CellView tmp = graphLayoutCache.getMapping(cell, false);
cellEditor = tmp.getEditor();
editingComponent = cellEditor.getGraphCellEditorComponent(graph, cell,
graph.isCellSelected(cell));
if(cellEditor.isCellEditable(event)) {
editingCell = cell;
Dimension editorSize = editingComponent.getPreferredSize();
editDialog = new JFrame("Edit "+graph.convertValueToString(cell));
//new JDialog(myFrame, "Edit "+graph.convertValueToString(cell), true);
editDialog.setSize(editorSize.width, editorSize.height);
editDialog.getContentPane().add(editingComponent);
editingComponent.validate();
editDialog.pack();
editDialog.show();
// Add Editor Listener
if(cellEditorListener == null)
cellEditorListener = createCellEditorListener();
if(cellEditor != null && cellEditorListener != null)
cellEditor.addCellEditorListener(cellEditorListener);
if(cellEditor.shouldSelectCell(event)) {
stopEditingInCompleteEditing = false;
try {
graph.setSelectionCell(cell);
} catch (Exception e) {
System.err.println("Editing exception: " + e);
}
stopEditingInCompleteEditing = true;
}
if(event instanceof MouseEvent) {
/* Find the component that will get forwarded all the
mouse events until mouseReleased. */
Point componentPoint = SwingUtilities.convertPoint
(graph, new Point(event.getX(), event.getY()),
editingComponent);
/* Create an instance of BasicTreeMouseListener to handle
passing the mouse/motion events to the necessary
component. */
// We really want similiar behavior to getMouseEventTarget,
// but it is package private.
Component activeComponent = SwingUtilities.
getDeepestComponentAt(editingComponent,
componentPoint.x, componentPoint.y);
if (activeComponent != null) {
new MouseInputHandler(graph, activeComponent, event);
}
}
return true;
}
else
editingComponent = null;
}
return false;
}
}
...
}
4.
在
JGraphpad
中的
editing
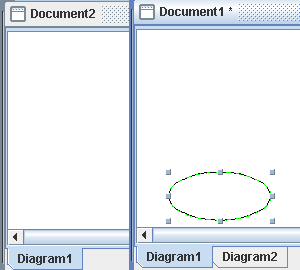
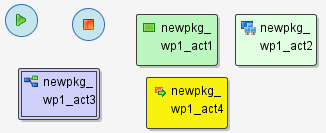
问题4:如何实现单文档模式?
默认的
JGrahppad
是多文档模式的。且每个文档又可以绘制多个
diagram
,如下:
问题5:如何灵活实现user object的property设置?
问题6:如何创建新的cell类型
理论:
利用
CellViewFactory
来创建新的
CellView
:
为每个
Cell
创建一个
View
,然后将它们关联,是件麻烦的事情,所以使用
CellViewFactory
来简化这种创建过程。
CellViewFactory
利用
createView()
来创建
view
。
GraphLayoutCache
关联了
CellViewFactory
,并有
setter
和
getter
。
如果创建
GraphLayoutCache
的时候没有指定
CellViewFactory
的话,默认使用
DefaultCellViewFactory
。
下面是一个新的
CellViewFactory
的片断:
|
public CellView createView(GraphModel model, Object cell) {
CellView view = null;
if (model.isPort(cell))
view = createPortView(cell);
else if (model.isEdge(cell))
view = createEdgeView(cell);
else
view = createVertexView(cell);
return view;
}
protected VertexView createVertexView(Object cell) {
if (cell instanceof MyVertex) {
return new MyVertexView(cell);
}
return new VertexView(cell);
}
protected EdgeView createEdgeView(Object cell) {
return new EdgeView(cell);
}
protected PortView createPortView(Object cell) {
return new PortView(cell);
}
|
注意:每个
cell
类型由
cell
,
cell view
,
cell render
三部分组成。
CellView接口中存在getRenderComponent()方法。
问题的解决:
其实我对问题的理解有问题,我的问题其实不是新的cell,而是新的cell view。
因为我想创建如下所示的效果(来自jawe),

其实用JGraphpad提供的VertextTool已经可以支持:
不同的border+不同的icon+不同的image
利用icon可以在不增加cell类型的基础上,表达很多的情况。
如果要创建一个外形如uml活动图中的同步条的情况,就需要从创建新的cell开始了。
至于如何创建全新的cell,我觉得关键还是在新的cell render上,但上面的相关叙述还不完整。
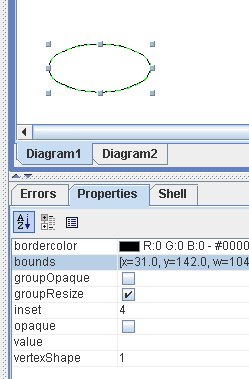
问题7:重建JGraphpad的bottom部分
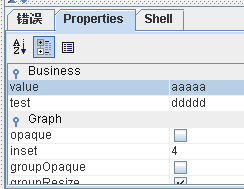
如上,“错误”部分可以保留,并加以利用。“shell”部分可以去掉。
“Properties”部分要根据需要做改造。
Console,即“错误”部分,是由JGraphpadConsole类中FactoryMethod内部类创建的,因此要继承并override。
Properites是由L2FProd plugin(com.jgraph.l2fplugin.JGraphpadL2FPlugin)创建,利用
JGraphpadL2FPlugin的内部类ExtendedBottomTabFactoryMethod
L2FProd plugin基于项目L2FProd(http://www.l2fprod.com/rw/default/)之
common components(
http://common.l2fprod.com/,
https://l2fprod-common.dev.java.net/ )(基于swing,支持更强大的ui效果)
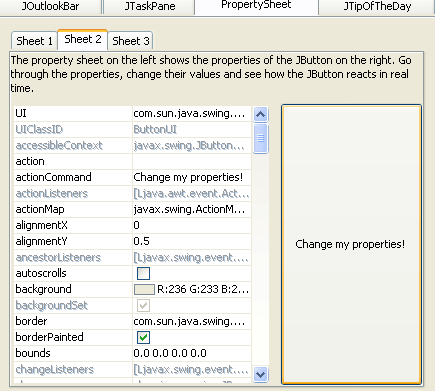
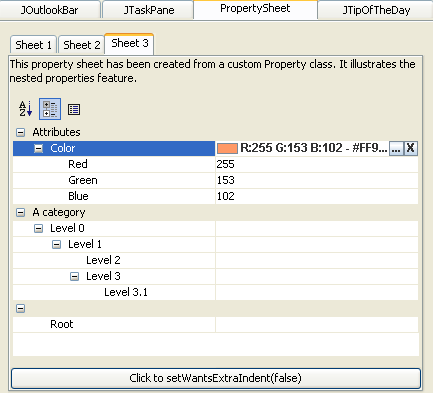
演示
http://common.l2fprod.com/jnlp/demo.jnlp 之PropertySheet部分:

Shell是由bean shell plugin(com.jgraph.bshplugin.JGraphpadBshPlugin)创建。
Plugin的创建由JGraphpad的createApplication方法之createPlugins方法控制。
Build your Application in 4 Easy Steps with JGraphpad
- Configure the default user interface and add custom components
- Implement special shapes and business objects for the diagrams
- Connect the graph model to a backend or plug in your own I/O
- Fine-tune the user interface using a UI- or docking-framework
Step1:Configure the default user interface and add custom components
com.jgraph.pad.factory.JGraphpadPane
的作用:
应用的主
panel
,由
a menubar and toolbar, two tabbed panes,(one on the left and one on the bottom), a desktop pane in the center, and a status bar
组成。
所有要构建自己的应用,需要
override
该类,尤其是
com.jgraph.pad.factory;.JGraphpadPane
内部类
FactoryMethod
。
该类的
creatInstance()
的结构:
public
Component createInstance(Node configuration) {
final
JFrame frame =
new
JFrame();
frame.setIconImage(JGraphEditorResources.getImage(
JGraphEditorResources.getString(
"logo.icon"
)).getImage());
frame.getContentPane().setLayout(
new
BorderLayout());
// Fetches
the menu bar
configuration and constructs
// the menubar for the frame.
Node menuBarConfiguration = JGraphEditorSettings.getNodeByName(
configuration.getChildNodes(),
NODENAME_MENUBAR
);
frame.setJMenuBar((JMenuBar)
editor
.getFactory().createMenuBar(
menuBarConfiguration));
// Creates
container for multiple toolbars
and
// adds it to the main window.
JPanel toolbars =
new
JPanel(
new
GridLayout(2, 1));
frame.getContentPane().add(toolbars, BorderLayout.
NORTH
);
// Fetches the
toolbar
configuration and create the toolbar
Node toolbarConfiguration = JGraphEditorSettings.getNodeByName(
configuration.getChildNodes(),
NODENAME_TOOLBAR
);
JToolBar toolbar =
editor
.getFactory().createToolBar(
toolbarConfiguration);
toolbars.add(toolbar);
// Fetches the
toolbox
configuration and creates the toolbox
Node toolboxConfiguration = JGraphEditorSettings.getNodeByName(
configuration.getChildNodes(),
NODENAME_TOOLBOX
);
final
JGraphEditorToolbox toolbox =
editor
.getFactory()
.createToolbox(toolboxConfiguration);
toolbars.add(toolbox);
// Creates and adds the
editor pane
and adds a
diagram tracker
to
// listen to the model and update the internal frames and tabs in
// the editor pane.
final
JGraphpadPane editorPane =
new
JGraphpadPane(
editor
);
frame.getContentPane().add(editorPane, BorderLayout.
CENTER
);
editor
.getModel().addTreeModelListener(
new
DocumentTracker(editorPane));
// Adds the
status bar
using its factory method
Component statusBar =
editor
.getFactory().executeMethod(
JGraphpadStatusBar.FactoryMethod.
NAME
);
if
(statusBar !=
null
)
frame.getContentPane().add(statusBar, BorderLayout.
SOUTH
);
// Updates the frame title on focus traversal and various
// other changes (selection, model, cache, properties...)
// and keeps the installed graph in the toolbox up-to-date.
JGraphpadFocusManager focusedGraph = JGraphpadFocusManager
.getCurrentGraphFocusManager();
focusedGraph
.addPropertyChangeListener(
new
PropertyChangeListener() {
public
void
propertyChange(PropertyChangeEvent e) {
frame.setTitle(getWindowTitle(editorPane));
// Updates the installed graph in the toolbox
String prop = e.getPropertyName();
if
(prop
.equals(JGraphpadFocusManager.
FOCUSED_GRAPH_PROPERTY
)
&& e.getNewValue()
instanceof
JGraph) {
toolbox.setGraph((JGraph) e.getNewValue());
}
}
});
// Additionally updates the window title on all changes
// to the global focus owner.
KeyboardFocusManager focusManager = KeyboardFocusManager
.getCurrentKeyboardFocusManager();
focusManager
.addPropertyChangeListener(
new
PropertyChangeListener() {
/*
* (non-Javadoc)
*/
public
void
propertyChange(PropertyChangeEvent e) {
String prop = e.getPropertyName();
if
(prop.equals(
"permanentFocusOwner"
))
frame.setTitle(getWindowTitle(editorPane));
}
});
// On an any document model changes
editor
.getModel().addTreeModelListener(
new
TreeModelListener() {
/*
* (non-Javadoc)
*/
public
void
treeNodesChanged(TreeModelEvent e) {
frame.setTitle(getWindowTitle(editorPane));
}
/*
* (non-Javadoc)
*/
public
void
treeNodesInserted(TreeModelEvent e) {
frame.setTitle(getWindowTitle(editorPane));
}
/*
* (non-Javadoc)
*/
public
void
treeNodesRemoved(TreeModelEvent e) {
frame.setTitle(getWindowTitle(editorPane));
}
/*
* (non-Javadoc)
*/
public
void
treeStructureChanged(TreeModelEvent e) {
frame.setTitle(getWindowTitle(editorPane));
}
});
return
frame;
}
分析:
[1]
ui
的创建原理:
com.jgraph.editor.JGraphEditorFactory
利用
com.jgraph.editor.factory
包的类和
com.jgraph.editor.JGraphEditorSettings
类中对
UI
的描述
通过从
editor kit
获取已知的元素,
比如
menu items, toolbar buttons and toolboxes and placing actionsand tools from the editor kit
,
来创建
UI
。
创建新的元素的方法是通过注册
factory methods
,而不是扩展为子类。
Factory methods
是实现
JGraphEditorFactoryMethod
接口的对象,该接口只有一个方法:
public abstract Component createInstance(Node configuration);
其注册机制:
factory.addMethod(JGraphEditorFactoryMethod method){
以
JGraphEditorFactoryMethod
的
getName()
为
key
,
method
为
value
,注册到类型为
Map
的
factoryMethods
。
}
被注册的
factory methods
的调用机制:
public Component executeMethod(String factoryMethod,
Node configuration)
{
JGraphEditorFactoryMethod method = getMethod(factoryMethod);
if (method != null)
return method.createInstance(configuration);
return null;
}
factory methods
隐式调用,也可以显式调用,
显式调用其方式是:
在
UI
描述中,用
factory methods
的名字作为
key
:
<menubar>
<item key="createOpenRecentMenu"/>
</menubar>
Component c = factory.executeFactoryMethod("createOpenRecentMenu");
例子如下,下面列举的
JGraphEditorNavigator
和
JGraphEditorComboBox
在默认情况下没有添加,但是已实现
:
factory.addMethod(new JGraphEditorNavigator
.FactoryMethod(editor));
factory.addMethod(new JGraphEditorComboBox
.BorderComboFactoryMethod());
factory.addMethod(new JGraphEditorComboBox
.LineDecorationComboFactoryMethod());
factory.addMethod(new JGraphEditorComboBox
.LineWidthComboFactoryMethod());
factory.addMethod(new JGraphEditorComboBox
.DashPatternComboFactoryMethod());
连接
factory methods
和
actions
:
前者创建组件,后者创建功能,现在要把它们连在一起。
因为所有的
actions
和
factory methods
在运行前就被注册了,
所以当
factory methods
运行时,
action
已注册,可引用。
Factory methods
有个问题:创建的组件不能被保存,如下:
public Component createInstance(Node configuration) {
JMenu menu = new JGraphpadWindowMenu();
editor.getSettings().putObject("windowMenu", menu);
return menu;
}
为了保存创建的
menu
,用了
editor.getSettings().putObject("windowMenu", menu);
Step2:Implement special shapes and business objects for the diagrams
Step3:Connect the graph model to a backend or plug in your own I/O
Step4:Fine-tune the user interface using a UI- or docking-framework
★★★★★★★★★★★★★★★★★★★★★★★★★★★★★★★★★★★★★★★★★★★★
程序按如下顺序启动
启动顺序:
1. Static Initialization — Adds resource bundles and modifies bean information for encoding
2. Editor Construction — Creates and configures objects
(
ui factory
,
editor kit
,
document model
,
settings
等)
that make up the editor
3. Plugins Initialization — Initializes plugins which may alter the existing configuration
4. UI Construction —
用
ui factory Creates the user interface based on the final configuration
★★★★★★★★★★★★★★★★★★★★★★★★★★★★★★★★★★★★★★★★★★★★
根据上面的顺序来分析
init
的主要方法
createApplication
,这也是创建基于
JGraphpad
应用的主线。
1.
Checks the lookandfeel argument
2.
Constructs the editor
:
createEditor(args)
在
createEditor
中先
new JGraphEditor()
,然后配置
editor
的
kit
,
factory
,
plugins
configureEditor(editor, args);
配置代码如下:
editor.setSettings(createSettings(args));//
根据
args
创建新的
JGraphEditorSettings
并配置
editor.setModel(createModel());
//
创建并配置
model
,配置即为各种类设置
persistence delegate
。
// JGraphEditorModel model =
new
JGraphEditorModel();
// configureModel(model);
editor.setKit(createKit(editor));
editor.setFactory(createFactory(editor));
//
将
JGraphEditorFactoryMethod
对象注册到一个
Map
对象
factoryMethods
,
//
包括创建主窗口的名为
createFrame
的
JGraphEditorFactoryMethod
对象。
上面的代码中有些资源添加的部分,涉及到
国际化
问题。
3.
创建
plugin
4.
通过
createMainWindow
创建
ui
:以
ui
描述文档为根据,调用名为“
createFrame
”的
JGraphEditorFactoryMethod
对象(
JGraphpadPane
的内部类)完成
ui
的创建。
该对象不但创建了组件,而且完成了组件的布局问题。
其中,
toolbar
等以指向
<toolbar>
的结点为参数,在
JGraphFactoryMethod
的
createToolBar
方法中创建并配置
toolbar
。
Toolbox
类似。
5.
利用
settings
里的用户
properties
对界面再进行一次配置
,
即调整。
★★★★★★★★★★★★★★★★★★★★★★★★★★★★★★★★★★★★★★★★★★★★
按上面的顺序来改造
JGraphpad
,以构建自己的应用。
JGraphpadPane
的
FactoryMethod
内部类主要负责
ui
的创建。因此,为了构建自己的应用的
ui
,
1.
从
JGraphpadPane
扩展一个子类
,并首先
override
FactoryMethod
内,
LeftTabFactoryMethod
,
BottomTabFactoryMethod
部类的
createInstance
方法:按新的需要重建
ui
。定制
ui
,就是定制前面三个内部类(主要是
createInstance
方法)
定制
toolbox
,
toolbar
:
另外,因为创建
ui
是以
ui.xml
为依据,所以可以通过修改
ui.xml
来控制
ui
的创建:比如去掉某些结点,就不会某些组件。
上面定制
ui
的行为是利用已有方法,做裁剪。
另外,为了使用自定义的
ui.xml,action.properties
等属性文件,需要重定义这些文件的位置。
Ui.xml
的位置在
JGraphpad
一个静态的字段中定义:
public static String
PATH
_UICONFIG = "/com/jgraph/pad/resources/ui.xml";
actions
等属性文件在
JGraphpad
一个静态初始化块中定义:
JGraphEditorResources.addBundles(new String[] {
"com.jgraph.pad.resources.actions",
"com.jgraph.pad.resources.menus",
"com.jgraph.pad.resources.strings",
"com.jgraph.pad.resources.tools" });
更多信息见:本地化问题。
2.
★★★★★★★★★★★★★★★★★★★★★★★★★★★★★★★★★★★★★★★★★★★★
方法分析:
1. JGraphEditorFactory.
createToolBar
/**
*
Returns
a
new
{@link JToolBar}
configured
using
*
{@link #configureToolBar(Container, Node)}
.
*
*
@param
configuration
*
The
configuration
to
create
the
toolbar
with.
*
@return
Returns
a
new
toolbar.
*/
public JToolBar createToolBar(Node configuration)
createToolBar
à
new toolbar
à
配置
toolbar
à
获取
<toolbar>
所有子节点
创建一个
Component
。
à
对每个子节点
à
根据
key
,调用相应的
factory method
à
创建一个
toolbar button
创建一个
seperator
2. JGraphpad.addAtions():如何注册actions:
kit.addBundle(new JGraphpadFileAction.AllActions(editor));
为例
bundle
对象
à
AllActions
的构造函数,创建所有与文件相关的
actions
,并保存
editor
的引用
kit.addBundle(bundle)
à
依次读取
bundle
中的
ations
,
在kit中注册到List类型的bundles中(action名,action)
本地化问题:
根据标准的java的本地化知识,
且JGraphpad使用的properties文件保存本地化信息,
所以只要自定义自己的本地化资源文件
并在如下初始化块中
JGraphEditorResources.addBundles(new String[] {
"com.jgraph.pad.resources.actions",
"com.jgraph.pad.resources.menus",
"com.jgraph.pad.resources.strings",
"com.jgraph.pad.resources.tools" });
代码中重新定义资源文件位置,即可。
然,有个诡异的问题,始终不知道为何:
configureKit方法中有个addActions方法,该方法包括多条语句,对kit添加bundles,但在
kit.addBundle(new JGraphpadViewAction.AllActions());
执行之后,JGraphEditorResources的bundles也跟着增加了一次(增加了四个:actions,menus,strings,tools),且还是指向com.jgraph.pad.resources的位置。
因为不知道为什么,且尽管在前面的代码中定义自己的本地化文件的新的位置,
在这个位置新增加的资源文件的定义会使程序在最后读取资源文件时,会读到新增的资源文件(即默认的资源文件),从而无法实现本地化。(至于为什么读资源文件时,读到的是新增的,而不是在初始化块中定义的那组文件,看源码可以清楚,不叙述)。
因此,为了实现本地化,采用如下方法:
对JGraphpad重新打包,且在默认的资源文件存放位置,即com.jgraph.pad.resources加入本地化资源文件,如
actions_zh.properties。


 被折叠的 条评论
为什么被折叠?
被折叠的 条评论
为什么被折叠?
 到【灌水乐园】发言


