


目录
下面就是读取邮件的配置文件.properties的工具类ReadPropertieFile:
不多说,直接进入主题。
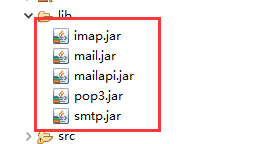
首先需要的.jar;如下图所示:
package com.cmp.utils;

import org.apache.logging.log4j.LogManager;
import org.apache.logging.log4j.Logger;

import java.io.File;
import java.io.IOException;
import java.util.Properties;

import javax.activation.CommandMap;
import javax.activation.DataHandler;
import javax.activation.DataSource;
import javax.activation.FileDataSource;
import javax.activation.MailcapCommandMap;
import javax.mail.Authenticator;
import javax.mail.BodyPart;
import javax.mail.Message;
import javax.mail.MessagingException;
import javax.mail.Multipart;
import javax.mail.PasswordAuthentication;
import javax.mail.Session;
import javax.mail.Transport;
import javax.mail.internet.InternetAddress;
import javax.mail.internet.MimeBodyPart;
import javax.mail.internet.MimeMessage;
import javax.mail.internet.MimeMultipart;


public class Jmail {
    public static final Logger logger = LogManager.getLogger(Jmail.class);

    private String host;
    private String from;
    private String to;

    private String userName;
    private String passWord;

    /**
     * 构造函数,初始化参数
     *
     * @param host     指定的smtp服务器    eg: smtp.163.com
     * @param from     邮件发送人的邮件地址
     * @param to       邮件接收人的邮件地址
     * @param userName 发件人的邮件帐户
     * @param passWord 发件人的邮件授权登陆密码 ,授权登陆密码 ,授权登陆密码 ,不是邮箱登陆密码
     * @author Justin Zeng 2019/08/17
     */
    public Jmail(String host, String from, String to, String userName, String passWord) {
        this.host = host;
        this.from = from;
        this.to = to;
        this.userName = userName;
        this.passWord = passWord;
    }

    public Jmail(String host, String from, String to) {
        this.host = host;
        this.from = from;
        this.to = to;
    }

    /**
     * 创建邮件的会话对象,Properties,session,message
     *
     * @return message 返回一个message对象供填充邮件内容
     */
    public MimeMessage createContent() {
        // 创建Properties 对象
        Properties props = System.getProperties();
        // 添加smtp服务器属性
//        props.put("mail.smtp.host", host);
           props.put("mail.smtp.auth", "true");   //163,126等的stmp不是免费的也不公用的,需要验证
        // 创建邮件会话
        Session session = Session.getDefaultInstance(props, new Authenticator() {  //验账账户
            @Override
            public PasswordAuthentication getPasswordAuthentication() {
                return new PasswordAuthentication(userName, passWord);
            }
        });
//        Session session = Session.getDefaultInstance(props, null);
        // 定义邮件信息
        MimeMessage message = new MimeMessage(session);
        try {
            //设定发送邮件的地址
            message.setFrom(new InternetAddress(from));
            message.setFrom();
            //设定接收邮件的地址
            message.addRecipient(Message.RecipientType.TO, new InternetAddress(to));
        } catch (MessagingException e) {
            logger.error("createContent error:{}", e.getMessage());
            return null;
        }
        return message;
    }


    /**
     * 发送文本邮件(只包含文字)
     *
     * @param subJect 邮件标题
     * @param content 邮件内容(此方法只支持文本!)
     * @author Justin Zeng 2019/08/17
     */
    public boolean sendText(String subJect, String content) {
        MimeMessage message = createContent();
        if (message == null) {
            return false;
        }
        try {
            //设定邮件主题
            message.setSubject(subJect);
            message.setText(content); // 这样只是发送文本对象
            message.saveChanges();
            send(message);
        } catch (MessagingException e) {
            logger.error("sent text error:{}", e.getMessage());
            return false;
        }
        return true;
    }

    /**
     * @param subJect 邮件标题
     * @param content 邮件内容text/html(可以加入html元素,图片,超链接等!)
     * @author Justin Zeng 2019/08/17
     */
    public void sendHtml(String subJect, String content) {
        try {
            MimeMessage message = createContent();
            message.setSubject(subJect);//设定邮件主题
            //设定邮件内容
            BodyPart mdp1 = new MimeBodyPart();//新建一个存放信件内容的BodyPart对象
            mdp1.setContent(content, "text/html;charset=UTF-8");//给BodyPart对象设置内容和格式/编码方式
            Multipart mm = new MimeMultipart();//新建一个MimeMultipart对象用来存放BodyPart对象(事实上可以存放多个)
            mm.addBodyPart(mdp1);//将BodyPart加入到MimeMultipart对象中(可以加入多个BodyPart)
            message.setContent(mm);//把mm作为消息对象的内容
            message.saveChanges();
            send(message);
        } catch (MessagingException e) {
            logger.error("sent html error:{}", e.getMessage());
        }
    }

    /**
     * 发送带有附件的email邮件
     *
     * @param subJect  邮件标题
     * @param content  邮件内容text/html(可以加入html元素,图片,超链接等!)
     * @param fileName 发送的文件名
     * @param file     发送的文件
     * @author Justin Zeng 2019/08/17
     */
    public void sendAttachment(String subJect, String content, String fileName, File file) {
        try {
            MimeMessage message = createContent();
            //设定邮件主题
            message.setSubject(subJect);

            //设定邮件内容
            BodyPart mdp1 = new MimeBodyPart();//新建一个存放信件内容的BodyPart对象
            mdp1.setContent(content, "text/html;charset=UTF-8");//给BodyPart对象设置内容和格式/编码方式

            BodyPart mdp2 = new MimeBodyPart();//新建一个存放新建附件的BodyPart对象
            DataSource source = new FileDataSource(file);//这三行是上传附件用的,由页面表单提交附件到后台。
            mdp2.setDataHandler(new DataHandler(source));
            mdp2.setFileName(fileName);

            Multipart mm = new MimeMultipart();//新建一个MimeMultipart对象用来存放BodyPart对象(事实上可以存放多个)
            mm.addBodyPart(mdp1);//将BodyPart加入到MimeMultipart对象中(可以加入多个BodyPart)
            mm.addBodyPart(mdp2);
            message.setContent(mm);//把mm作为消息对象的内容
            message.saveChanges();
            send(message);
        } catch (MessagingException e) {
            logger.error("sent attachment error:{}", e.getMessage());
        }
    }

    /**
     * 定义协议,发送邮件
     *
     * @param message
     */
    private void send(MimeMessage message) {
        //设置邮件接收协议
        MailcapCommandMap mc = (MailcapCommandMap) CommandMap.getDefaultCommandMap();
        mc.addMailcap("text/html;; x-Java-content-handler=com.sun.mail.handlers.text_html");
        mc.addMailcap("text/xml;; x-java-content-handler=com.sun.mail.handlers.text_xml");
        mc.addMailcap("text/plain;; x-java-content-handler=com.sun.mail.handlers.text_plain");
        mc.addMailcap("multipart/*;; x-java-content-handler=com.sun.mail.handlers.multipart_mixed");
        mc.addMailcap("message/rfc822;; x-java-content-handler=com.sun.mail.handlers.message_rfc822");
        CommandMap.setDefaultCommandMap(mc);
        // 发送消息
        //session.getTransport("smtp").send(message);  //也可以这样创建Transport对象
        try {
            Transport.send(message);
        } catch (MessagingException e) {
            logger.error("sent process error:{}", e.getMessage());
        }
    }

}
下面就是读取邮件的配置文件.properties的工具类ReadPropertieFile:
package com.util;

import java.util.HashMap;
import java.util.Map;
import java.util.Properties;

import org.springframework.core.io.ClassPathResource;
import org.springframework.core.io.Resource;
import org.springframework.core.io.support.PropertiesLoaderUtils;

public class ReadPropertieFile {

	//读取.properties 结尾的配置文件用,getP, getParam
	public static Map<String,String> getPropertieFile(String path) throws Exception{
		Resource resource = new ClassPathResource(path);
		Properties props = PropertiesLoaderUtils.loadProperties(resource);
		Map<String,String> param = new HashMap<String,String>((Map) props);
		return param;
	}

}
邮件配置:
#email
mail.host = 邮箱服务器ip地址或者域名都可以
mail.username = 邮箱发送的账户名
mail.password = 邮箱发送的密码
下边直接进入使用测试:
Map<String, String> app = ReadPropertieFile.getPropertieFile("mail.properties");
  /*邮箱ip或者域名*/
  String sendHost = app.get("mail.host");
  /*邮箱账户*/
  String sendAccount = app.get("mail.username");
  /*邮箱密码*/
  String sendPassWord = app.get("mail.password");
  logger.info("Mail service information===》sendHost:{},sendAccount:{},sendPassWord:{}"+sendHost,sendAccount,sendPassWord);
  /*初始化邮件Jmail的对象*/
  Jmail jmail = new Jmail(sendHost, “发送人的邮箱地址”, “接收人的邮箱地址”, sendAccount, sendPassWord);
  /*发送基本文本邮件*/
  jmail.sendText(“邮件标题”, “邮件内容”);


 2889
2889


 被折叠的 条评论
为什么被折叠?
被折叠的 条评论
为什么被折叠?
 到【灌水乐园】发言


