如何调试Angular typescript

How to debug Angular 2 with WebStorm

WebStorm is my favorite choice when it comes to develop web applications especially with Angular 2. Most of the time I have a fullscreen WebStorm on my primary and Chrome on my secondary screen. When it comes to debugging, I spin up my Chrome Developer Tools and debug along. But sometimes there are cases, where I want to use WebStorm for debugging. Most of the time, all necessary files are already open in my IDE, since I'm currently working on them. I've got a "debug stack" in my head which is visually presented by all open files in WebStorm making it much more easy to jump around in the source code.

Prerequirements

To start using WebStorm as your debugger, you need to install a Chrome extension called JetBrains IDE Support. After installing, you get a fancy new icon within Chrome.

Fancy Icon!

Right click it and click Options. Alternatively go to chrome://extensions, scroll to JetBrains IDE Support and click Options there. A new page will open, showing you Host and Port. Especially the port should be noted (which defaults to 63342).

A left click on the fancy JetBrains icon will switch to your IDE, if it is open.

WebStorm settings

Now switch to your beloved WebStorm and open the project you want to debug. Since we want to debug Angular 2, which uses TypeScript, we need to create source maps, too. So if the build process of your web app does not create source maps yet, you need to do this first.

For this demo I'm using the BoardZ! Cross Platform Sample Application which fortunately already creates source maps. Within WebStorm, go to Run -> Edit configurations... A new dialog will open, where you click on the little plus icon at the top left and select JavaScript Debug.

JavaScript Debug

At next you need to set some settings on the newly opened right side. Choose whatever name you like. In my case it's BoardZ. In URL you put in the URL where you web application is hosted. Per default, BoardZ! is hosted on http://localhost:8000/, so I put http://localhost:8000/ into the URL field. If everything is running smoothly, as it should, WebStorm automatically populates the list of Remote URLs of local files. There should now be an entry pointing to your project.

JavaScript Debug Settings

Now click OK. Start all the scripts you need to run your web application. For BoardZ that's a simple npm run watch. If done, click on that little Bug icon in WebStorm (and be sure, that the correct configuration is selected). WebStorm will now attach itself to the installed Chrome extension (or opens a browser at first, if it is not open yet). If WebStorm complains that it cannot find a running JetBrains IDE Support then the port it tries to reach is wrong. WebStorm will tell you which port it uses for the connection to the extension. You need to go to the extension and change the port to whatever WebStorm wants.

Bug Icon

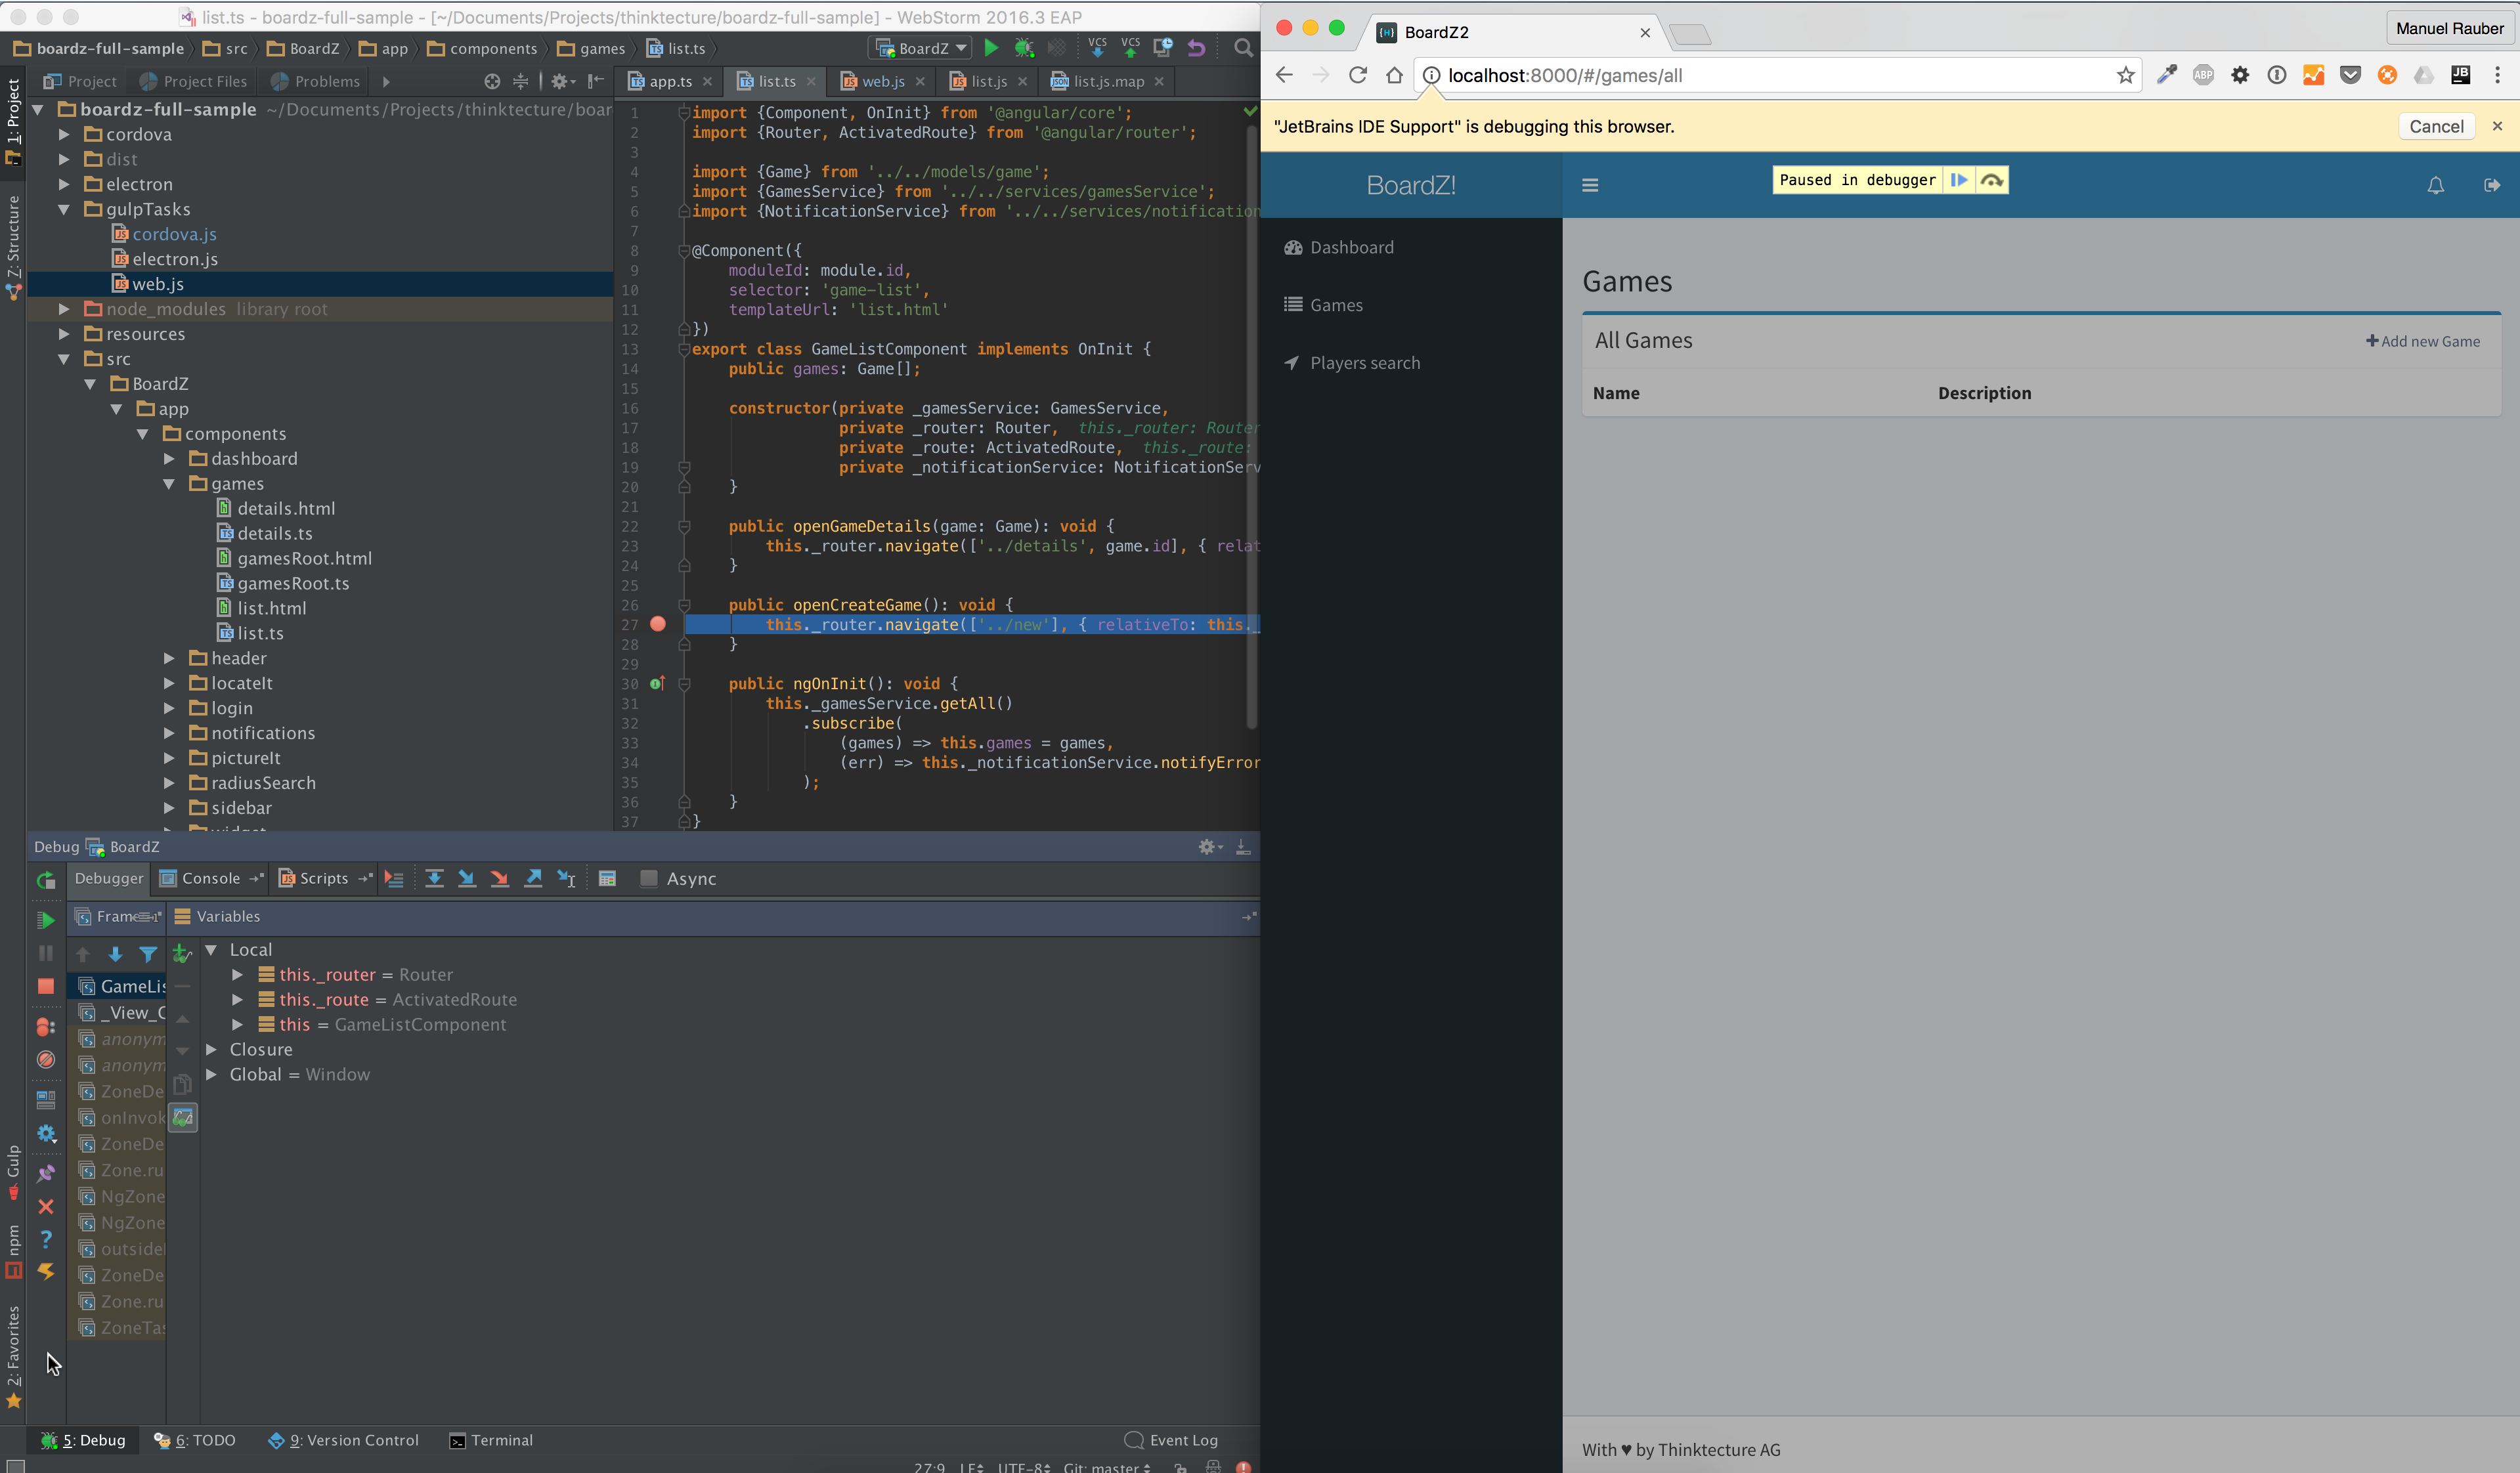
If everything works, Chrome shows a little note at the top of the page, that JetBrains IDE Support is debugging this browser. You can now add a breakpoint in your TypeScript files and start debugging! Cool, eh? ;-)

Debugging

In case your WebStorm/Chrome does not stop at your set breakpoint, your source root of your source maps points to the wrong folder. If you use gulp-sourcemaps you can use the sourceRootattribute to set the correct folder, like we did in BoardZ.

This approach is not only working for Angular 2, but for other JavaScript applications, too. Happy debugging!

  • 0
    点赞
  • 1
    收藏
    觉得还不错? 一键收藏
  • 0
    评论
1. 安装必要的依赖 使用 Angular 框架实现高德地图需要安装 @types/amap-js-api 和 @types/amap-js-sdk 两个依赖。 ```bash npm install @types/amap-js-api @types/amap-js-sdk --save-dev ``` 2. 配置 highCharts API Key 在 app.module.ts 中配置高德地图的 API Key: ```typescript import { AMapLoaderService, LoaderOptions } from '@delon/theme'; // ... const options: LoaderOptions = { key: '你的高德地图 API Key', }; // ... @NgModule({ imports: [ // ... ], declarations: [ // ... ], providers: [ // ... AMapLoaderService, { provide: 'DA_STORE_TOKEN', useValue: {}, }, { provide: 'HIGHCHARTS_MODULES', useFactory: () => [more, exporting], }, { provide: HIGHCHARTS_MODULES, useFactory: () => [highcharts], } ], }) export class AppModule {} ``` 3. 创建地图的 wrapper 服务类 我们需要创建一个 wrapper 类,封装高德地图的调用,以便在内部进行维护和扩展。 ```typescript import { Injectable } from '@angular/core'; @Injectable({ providedIn: 'root' }) export class MapService { private AMap: any; constructor() { this.loadMapScript(); } private loadMapScript() { const script = document.createElement('script'); script.type = 'text/javascript'; script.async = true; script.src = `https://webapi.amap.com/maps?v=1.4.15&key=${environment.amapApiKey}&callback=initAMap`; script.onerror = () => { console.error('Could not load map script!'); }; document.body.appendChild(script); } public getMapInstance() { return new Promise<any>((resolve, reject) => { if (this.AMap) { resolve(this.AMap); } else { const callbackName = `initAMap${Math.floor(Math.random() * 10000)}`; window[callbackName] = () => { this.AMap = window.AMap; resolve(this.AMap); delete window[callbackName]; }; const script = document.createElement('script'); script.type = 'text/javascript'; script.async = true; script.src = `https://webapi.amap.com/maps?v=1.4.15&key=${environment.amapApiKey}&callback=${callbackName}`; script.onerror = () => { console.error('Could not load map script!'); delete window[callbackName]; reject(); }; document.body.appendChild(script); } }); } } ``` 在上面的代码中,我们加载了高德地图 SDK 并在异步加载结束后返回 AMap 实例。 4. 在组件中使用地图查询服务 现在我们可以在组件中使用地图查询服务了。让我们创建一个 search.component.ts 文件实现这个服务。 ```typescript import { Component, OnInit } from '@angular/core'; import { MapService } from '../services/map.service'; @Component({ selector: 'app-search', templateUrl: './search.component.html', styleUrls: ['./search.component.scss'] }) export class SearchComponent implements OnInit { constructor(private mapService: MapService) {} ngOnInit() {} searchPlace(query: string) { this.mapService.getMapInstance().then(AMap => { const placeSearch = new AMap.PlaceSearch({ pageSize: 10, pageIndex: 1, city: '全国', map: new AMap.Map('map', { zoom: 15, resizeEnable: true, }), panel: 'panel' }); placeSearch.search(query, function (status: any, result: any) { // 处理查找结果 }); }); } } ``` 这里我们定义了一个 `searchPlace` 方法,用来查询地点。当我们调用 `searchPlace(query)` 的时候,它将使用 `MapService` 实例来获取 AMap 实例,然后使用 AMap 的 `PlaceSearch` 类查询地点。 5. 在 HTML 模板中添加搜索输入框和地图 最后,我们将在 HTML 模板中创建搜索输入框和地图。 ```html <div class="search-container"> <input type="text" [(ngModel)]="searchQuery" placeholder="请输入地点名称"> <button (click)="searchPlace(searchQuery)">搜索</button> </div> <div id="map" style="height: 400px;"></div> <div id="panel"></div> ``` 现在我们已经实现了一个简单的搜索地点页面,它可以通过高德地图查询地点并在地图上展示出来。

“相关推荐”对你有帮助么?

  • 非常没帮助
  • 没帮助
  • 一般
  • 有帮助
  • 非常有帮助
提交
评论
添加红包

请填写红包祝福语或标题

红包个数最小为10个

红包金额最低5元

当前余额3.43前往充值 >
需支付:10.00
成就一亿技术人!
领取后你会自动成为博主和红包主的粉丝 规则
hope_wisdom
发出的红包
实付
使用余额支付
点击重新获取
扫码支付
钱包余额 0

抵扣说明:

1.余额是钱包充值的虚拟货币,按照1:1的比例进行支付金额的抵扣。
2.余额无法直接购买下载,可以购买VIP、付费专栏及课程。

余额充值