


一、基本了解
LAMP架构介绍:
- lamp是由Linux+Apache+Mysql/MariaDB+Php/Perl/Python的一组动态网站或者服务器的开源软件。
- LAMP指Linux(操作系统)、Apache(HTTP服务器)、MySQL(也指MariaDB,数据库软件)和PHP(有时也是指Perl或Python)的第一个字母,一般用来建立web应用平台。
cgi与fastcgi概念:
- CGI(Common Gateway Interface,通用网关接口),CGI是外部应用程序(CGI程序)与WEB服务器之间的接口标准,是在CGI程序和Web服务器之间传递信息的过程。CGI规范允许Web服务器执行外部程序,并将它们的输出发送给Web浏览器,CGI将web的一组简单的静态超媒体文档变成一个完整的新的交互式媒体。
- FastCGI(Fast Common Gateway Interface)是CGI的改良版,CGI是通过启用一个解释器进程来处理每个请求,耗时且耗资源,而FastCGI则是通过master-worker形式来处理每个请求,即启动一个master主进程,然后根据配置启动几个worker进程,当请求进来时,master会从worker进程中选择一个去处理请求,这样就避免了重复的生成和杀死进程带来的频繁cpu上下文切换而导致耗时
静态资源和动态资源:
- 静态资源指静态内容,客户端从服务器获得的资源的表现形式与原文件相同。简单说就是直接存储于文件系统中的资源。
- 动态资源则通常是程序文件,需要在服务器执行之后,将执行的结果返回给客户端。
web服务器工作流程:
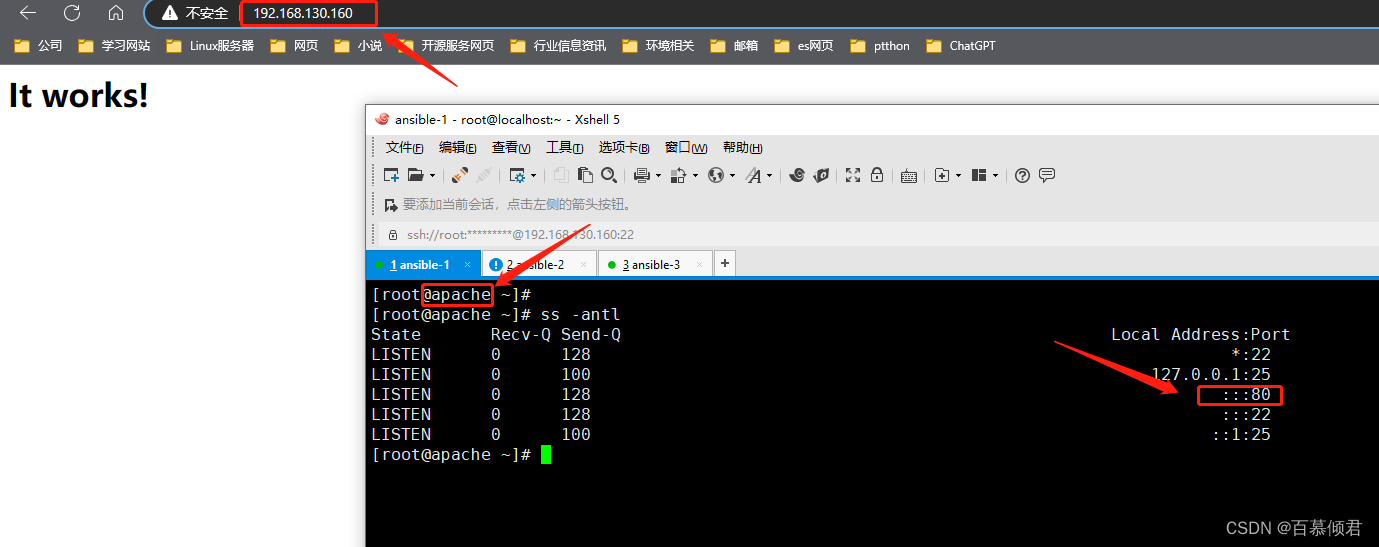
- ①显示的是httpd服务器(即apache)和php服务器通过FastCGI协议进行通信,且php作为独立的服务进程运行阶段。
- ②显示的是php程序和mysql数据库间通过mysql协议进行通信。php与mysql本没有什么联系,但是由php语言写成的程序可以与mysql进行数据交互。同理perl和python写的程序也可以与mysql数据库进行交互。
- 步骤一:客户端通过http/https协议请求web服务器资源。
- 步骤二:web服务器收到请求后判断客户端请求的资源是静态资源或是动态资源。
- 若是静态资源则直接从本地文件系统取之返回给客户端。
- 若为动态资源则通过FastCGI协议与php服务器联系,通过CGI程序的master进程调度worker进程来执行程序以获得客户端请求的动态资源,并将执行的结果通过FastCGI协议返回给httpd服务器,httpd服务器收到php的执行结果后将其封装为http响应报文响应给客户端。在执行程序获取动态资源时,若需要获得数据库中的资源时,由php服务器通过mysql协议与MySQL/MariaDB服务器交互,取之而后返回给httpd,httpd将从php服务器收到的执行结果封装成http响应报文响应给客户端。
httpd与php结合的三种方式:
- modules:php将以httpd的扩展模块形式存在,需要加载动态资源时,httpd可以直接通过php模块来加工资源并返回给客户端。
- httpd prefork:libphp5.so(多进程模型的php)
- httpd event or worker:libphp5-zts.so(线程模型的php)
- CGI:httpd需要加载动态资源时,通过CGI与php解释器联系,获得php执行的结果,此时httpd负责与php连接的建立和断开等。
- FastCGI:利用php-fpm机制,启动为服务进程,php自行运行为一个服务,https通过socket与php通信,推荐。
三种方式的特点:
- CGI方式:极耗资源。由于CGI是非常驻内存集,每次Webserver接受客户端的HTTP请求,然后建立进程执行CGI程序,客户端的请求被传递给CGI程序,CGI执行后结果再返回Webserver。 每次浏览页面都要重复上面的动作,会有非常大的消耗。
- mod_php方式:效率较高。此种方式运行意味着php是作为apache的一个模块来启动的,因此只有在apache启动的时候会加载扩展模块,在apache运行期间是不会再去读取和加载扩展模块的。使用mod_php的方式运行PHP效率比CGI方式更高。
- FastCGI方式:使用php-fpm单独管理php进程池,PHP-FPM简单可靠的 FastCGI 进程管理器(FastCGI Process Manager),FastCGI是一个常驻型的CGI,可以一直执行,只要激活后,而且还支持分布式运算(使得php程序解释执行可以单独交给php服务器),即可以在网站服务器以外的主机上执行并且接受来自其它网站服务器来的请求。而mod_php与fastcgi相比,俩者都有进程池的概念,但是,fastcgi将服务器端动、静态请求更好的分离。php进程除了问题不会将web服务器也当掉。

二、单机部署LAMP
| 系统平台 | IP | 需要安装的服务 |
|---|---|---|
| centos7 redhat7 | 192.168.130.160 | httpd-2.4 mysql-5.7 php php-mysql |
- lamp平台软件安装次序:httpd ——> mysql ——> php。
- 注意,php要求httpd使用prefork MPM。
2.1 安装httpd
1.配置yum源。
//配置CentOS源。
wget -O /etc/yum.repos.d/CentOS-Base.repo https://mirrors.aliyun.com/repo/Centos-7.repo
sed -i -e '/mirrors.cloud.aliyuncs.com/d' -e '/mirrors.aliyuncs.com/d' /etc/yum.repos.d/CentOS-Base.repo

//配置epel源。
wget -O /etc/yum.repos.d/epel.repo https://mirrors.aliyun.com/repo/epel-7.repo
sed -i 's|^#baseurl=https://download.example/pub|baseurl=https://mirrors.aliyun.com|' /etc/yum.repos.d/epel*
sed -i 's|^metalink|#metalink|' /etc/yum.repos.d/epel*
2.安装开发工具包。
yum groups mark install "Development Tools"
3.创建apache服务的用户和组。
useradd -r -M -s /sbin/nologin apache
4.安装依赖包。
yum -y install make openssl-devel pcre-devel expat-devel libtool gcc gcc-c++
5.下载和安装apr以及apr-util,官网地址。
cd /usr/src/
wget https://downloads.apache.org/apr/apr-1.7.4.tar.gz
wget https://downloads.apache.org/apr/apr-util-1.6.3.tar.gz
wget https://downloads.apache.org/httpd/httpd-2.4.57.tar.gz
6.解压安装包,修改配置文件,开始编译安装。
//解压安装包。
tar zxf apr-1.7.4.tar.gz
tar zxf apr-util-1.6.3.tar.gz
tar zxf httpd-2.4.57.tar.gz

//修改配置文件,编译安装apr。
cd apr-1.7.4
sed -i '/$RM "$cfgfile"/d' configure
./configure --prefix=/usr/local/apr
make
make install

//编译安装apr-util。
cd ../apr-util-1.6.3
./configure --prefix=/usr/local/apr-util --with-apr=/usr/local/apr
make
make install

//编译安装httpd。
cd ../httpd-2.4.57
./configure --prefix=/usr/local/apache \
 --sysconfdir=/etc/httpd24 \
 --enable-so \
 --enable-ssl \
 --enable-cgi \
 --enable-rewrite \
 --with-zlib \
 --with-pcre \
 --with-apr=/usr/local/apr \
 --with-apr-util=/usr/local/apr-util/ \
 --enable-modules=most \
 --enable-mpms-shared=all \
 --with-mpm=prefork
make
make install
7.配置环境变量。
echo 'export PATH=/usr/local/apache/bin:$PATH' > /etc/profile.d/httpd.sh
source /etc//profile.d/httpd.sh
8.做软连接。
ln -s /usr/local/apache/include /usr/include/apache
9.取消配置文件注释,避免出现提示信息。
sed -i '/#ServerName/s/#//g' /etc/httpd24/httpd.conf
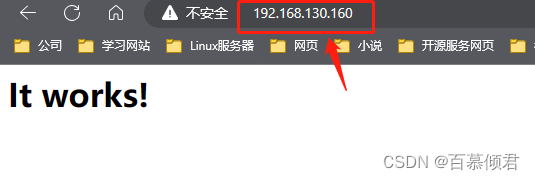
10.关闭防火墙和selinux,启动服务,访问网页。
apachectl start

systemctl  stop firewalld
systemctl  disable firewalld
setenforce 0
2.2 安装mysql
1.安装依赖包。
yum -y install ncurses-devel openssl-devel openssl cmake mariadb-devel libncurses.so.5*
2.创建系统用户。
useradd -r -M -s /sbin/nologin mysql
3.官网下载安装包,上传服务器解压,官网。
wget  https://downloads.mysql.com/archives/get/p/23/file/mysql-5.7.41-linux-glibc2.12-x86_64.tar.gz --no-check-certificate
tar xf mysql-5.7.41-linux-glibc2.12-x86_64.tar.gz -C /usr/local/
4.做软连接,修改属主属组,设置环境变量。
cd /usr/local/
ln -s mysql-5.7.41-linux-glibc2.12-x86_64 mysql

echo 'export PATH=/usr/local/mysql/bin:$PATH' > /etc/profile.d/mysql.sh
source /etc/profile.d/mysql.sh
5.建立数据存放目录。
mkdir /opt/data
chown -R mysql.mysql /opt/data
6.初始化数据库,编辑生成的配置文件内容。
mysqld --initialize-insecure --datadir=/opt/data --user=mysql

//先备份配置文件。
mv /etc/my.cnf{,-bak}

//配置文件内容。
[root@localhost ~]# vim /etc/my.cnf
[mysqld]
basedir = /usr/local/mysql
datadir = /opt/data
socket = /tmp/mysql.sock
port = 3306
pid-file = /opt/data/mysql.pid
user = mysql
skip-name-resolve
7.做软连接。
//include做软连接。
ln -s /usr/local/mysql/include /usr/include/mysql

//lib做软连接。
echo '/usr/local/mysql/lib' > /etc/ld.so.conf.d/mysql.conf
ldconfig
8.配置服务启动脚本。
cd /usr/local/mysql/support-files
cp mysql.server /etc/init.d/mysqld

cat >> /etc/init.d/mysqld << EOF
basedir=/usr/local/mysql
datadir=/opt/data
EOF
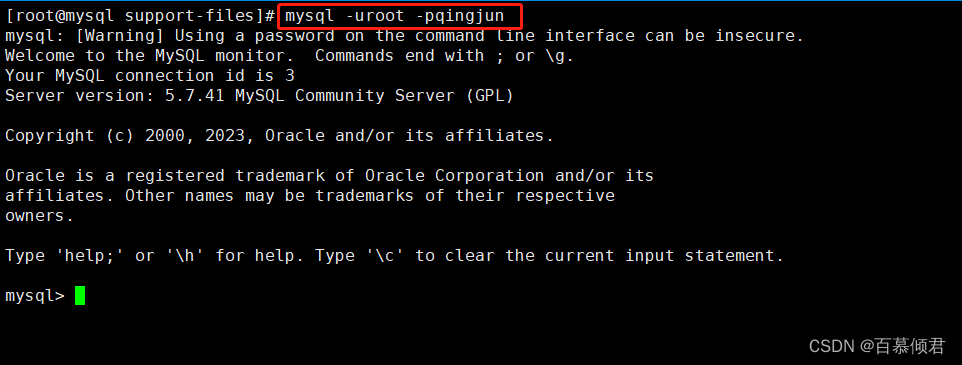
9.启动服务,设置密码。
service mysqld start
mysql -e 'set password=password("qingjun");'
2.3 安装php环境
1.安装依赖包。
//先安装普通依赖包。
yum -y install libxml2 libxml2-devel openssl openssl-devel bzip2 bzip2-devel libcurl libcurl-devel libicu-devel libjpeg libjpeg-devel libpng libpng-devel openldap-devel  pcre-devel freetype freetype-devel gmp gmp-devel libmcrypt libmcrypt-devel readline readline-devel libxslt libxslt-devel mhash mhash-devel   gcc gcc-c++

//再安装php-mysqlnd依赖包。
yum -y install php-mysqlnd

//若服务器环境默认yum源缺少依赖包,可以使用下面这个源。
wget http://rpms.remirepo.net/enterprise/remi-release-7.rpm
rpm -Uvh remi-release-7.rpm
yum makecache --enablerepo=remi-php74
2.下载php安装包,官网。
cd /usr/src/
wget https://www.php.net/distributions/php-7.2.8.tar.gz --no-check-certificate
3.解压,编译安装。
tar zxf php-7.2.8.tar.gz
cd php-7.2.8

//进入解压目录,先检查环境是否具备编译安装条件。
./configure --prefix=/usr/local/php7  \
--with-config-file-path=/etc \
--enable-fpm \
--enable-inline-optimization \
--disable-debug \
--disable-rpath \
--enable-shared \
--enable-soap \
--with-openssl \
--enable-bcmath \
--with-iconv \
--with-bz2 \
--enable-calendar \
--with-curl \
--enable-exif  \
--enable-ftp \
--with-gd \
--with-jpeg-dir \
--with-png-dir \
--with-zlib-dir \
--with-freetype-dir \
--with-gettext \
--enable-json \
--enable-mbstring \
--enable-pdo \
--with-mysqli=mysqlnd \
--with-pdo-mysql=mysqlnd \
--with-readline \
--enable-shmop \
--enable-simplexml \
--enable-sockets \
--enable-zip \
--enable-mysqlnd-compression-support \
--with-pear \
--enable-pcntl \
--enable-posix

//开始编译安装。
make
make install
4.配置环境变量。
echo 'export PATH=/usr/local/php7/bin:$PATH' > /etc/profile.d/php.sh
source /etc/profile.d/php.sh
5.配置php-fpm。
cp php.ini-production /etc/php.ini
cp sapi/fpm/init.d.php-fpm /etc/init.d/php-fpm
chmod +x /etc/rc.d/init.d/php-fpm

cd /usr/local/php7/etc/
cp php-fpm.conf.default php-fpm.conf
cp php-fpm.d/www.conf.default php-fpm.d/www.conf
6.修改配置文件,添加如下参数。
cat >> /usr/local/php7/etc/php-fpm.conf << EOF
pm.max_children = 50
pm.start_servers = 5
pm.min_spare_servers = 2
pm.max_spare_servers = 8
EOF

pm.max_children = 50  //最多同时提供50个进程提供50个并发服务
pm.start_servers = 5   //启动时启动5个进程
pm.min_spare_servers = 2    //最小空闲进程数
pm.max_spare_servers = 8    //最大空闲进程数
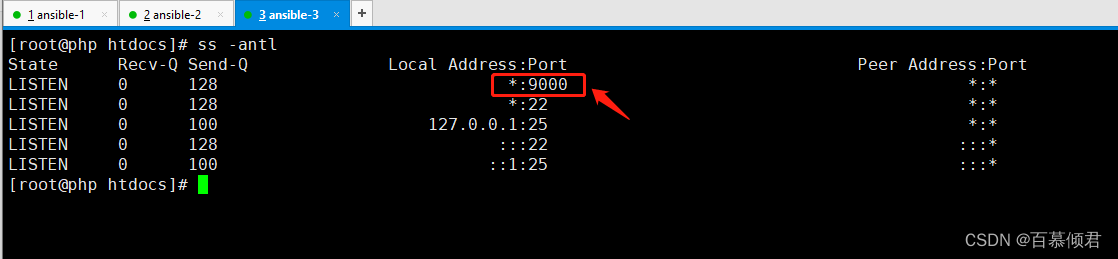
7.启动php-fpm,查看9000端口。
service php-fpm start

2.4 配置apache
1.启用代理模块。
//配置文件取消两个注释。
[root@localhost ~]# vim /etc/httpd24/httpd.conf
LoadModule proxy_module modules/mod_proxy.so
LoadModule proxy_fcgi_module modules/mod_proxy_fcgi.so
2.配置虚拟主机。
- 配置反向代理,ProxyPassMatch ^/(.*.php)$ fcgi://127.0.0.1:9000/usr/local/apache/htdocs/$1
- 表示把以.php结尾的文件请求,通过fcgi协议发送到本地拥有9000端口的进程,也就是php-fpm进程。php前端文件存在位置在/usr/local/apache/htdocs目录,$1表示前面括号里的内容,括号里传递的时$1,则这里就是$1;前面括号里传递的是$2,则这里是$2。
//取消注释,指定读取虚拟主机的配置文件。
[root@localhost ~]# vim /etc/httpd24/httpd.conf
Include /etc/httpd24/extra/httpd-vhosts.conf

//配置虚拟主机。
vim /etc/httpd24/extra/httpd-vhosts.conf
<VirtualHost *:80>
    DocumentRoot "/usr/local/apache/htdocs"    //前端文件存放目录。
    ServerName www.baimu.com       //域名。
    ServerAlias www.baimu.com
    ErrorLog "logs/www.baimu.com-error_log"   //错误日志。
    CustomLog "logs/www.baimu.com-access_log" common
    ProxyRequests Off                         //关闭正向代理。
    ProxyPassMatch ^/(.*\.php)$ fcgi://127.0.0.1:9000/usr/local/apache/htdocs/$1  //配置反向代理。
    <Directory "/usr/local/apache/htdocs">
        Require all granted     //允许读写。
    </Directory>
</VirtualHost>
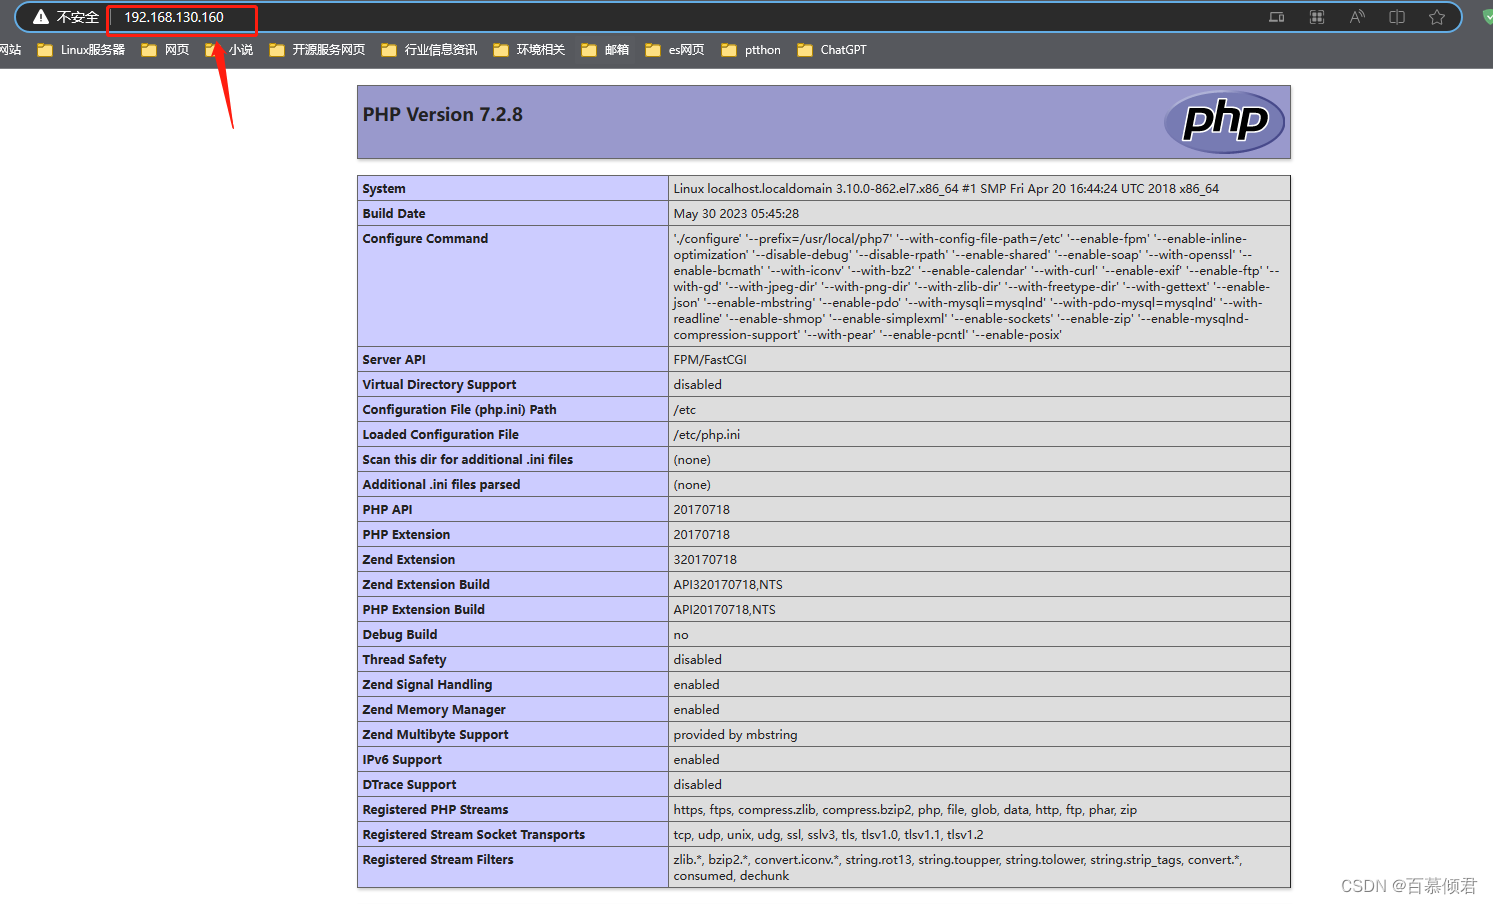
3.生成php前端文件。
[root@localhost htdocs]# vim index.php
<?php
  phpinfo();
?>

//修改前端文件属主属组。
[root@localhost htdocs]# cd ..
[root@localhost apache]# chown -R apache.apache htdocs/
4.修改配置文件,指定访问的前端文件为php的。
vim /etc/httpd24/httpd.conf
//搜索AddType,添加如下2行
......
 AddType application/x-compress .Z
    AddType application/x-gzip .gz .tgz
    AddType application/x-httpd-php .php        #添加此行
    AddType application/x-httpd-php-source .phps        #添加此行

//搜索index.html
  DirectoryIndex index.php index.html    添加index.php
5.重启服务,访问网页。
apachectl restart
三、分离部署
| 主机IP | 服务环境 |
|---|---|
| 192.168.130.160 | httpd |
| 192.168.130.161 | mysql |
| 192.168.130.162 | php |
1.安装httpd,参考上文。
2.安装mysql,参考上文。
3.安装php,参考上文。提供网站文件,并修改配置文件。
mkdir -p   /usr/local/php7/htdocs/
cd /usr/local/php7/htdocs/
[root@php htdocs]# vim index.php
<?php
    phpinfo();
?>

useradd -r -M -s /sbin/nologin apache
chown -R apache.apache /usr/local/php7/htdocs/
sed -i 's/listen = 127.0.0.1:9000/listen = 0.0.0.0:9000/g' /usr/local/php7/etc/php-fpm.d/www.conf
service  php-fpm restart
4.修改httpd配置文件。
//启用代理模块,将如下内容注释取消。
[root@apache131 ~]# vim /etc/httpd24/httpd.conf
LoadModule proxy_module modules/mod_proxy.so
LoadModule proxy_fcgi_module modules/mod_proxy_fcgi.so
Include /etc/httpd24/extra/httpd-vhosts.conf

//搜索AddType,添加以下内容。
    AddType application/x-httpd-php .php
    AddType application/x-httpd-php-source .phps

//找到index.html ,添加index.php
 <IfModule dir_module>
    DirectoryIndex  index.php index.html
</IfModule>
5.配置httpd虚拟主机。
//配置虚拟主机
vim /etc/httpd24/extra/httpd-vhosts.conf
<VirtualHost *:80>
DocumentRoot "/usr/local/apache/htdocs"
ServerName www.baimu.com
ServerAlias www.baimu.com
ErrorLog "logs/www.baimu.com-error_log"
CustomLog "logs/www.baimu.com-access_log" common
ProxyRequests Off
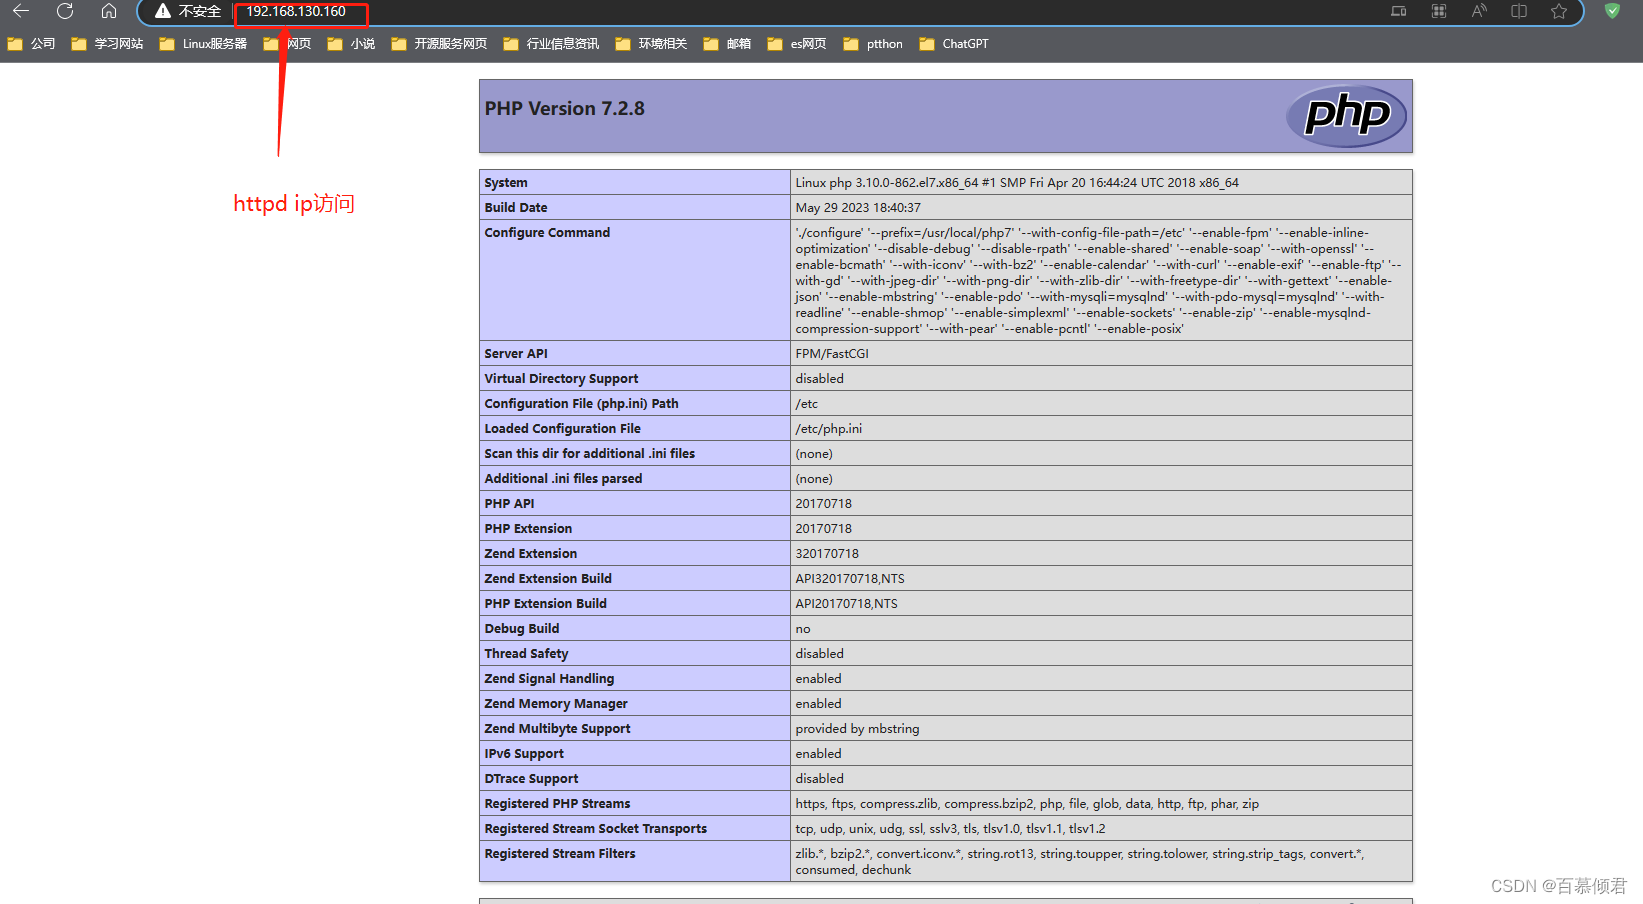
ProxyPassMatch ^/(.*\.php)$ fcgi://192.168.130.162:9000/usr/local/php7/htdocs/$1
<Directory "/usr/local/apache/htdocs">
Require all granted
</Directory>
</VirtualHost>
//重启服务
apachectl restart
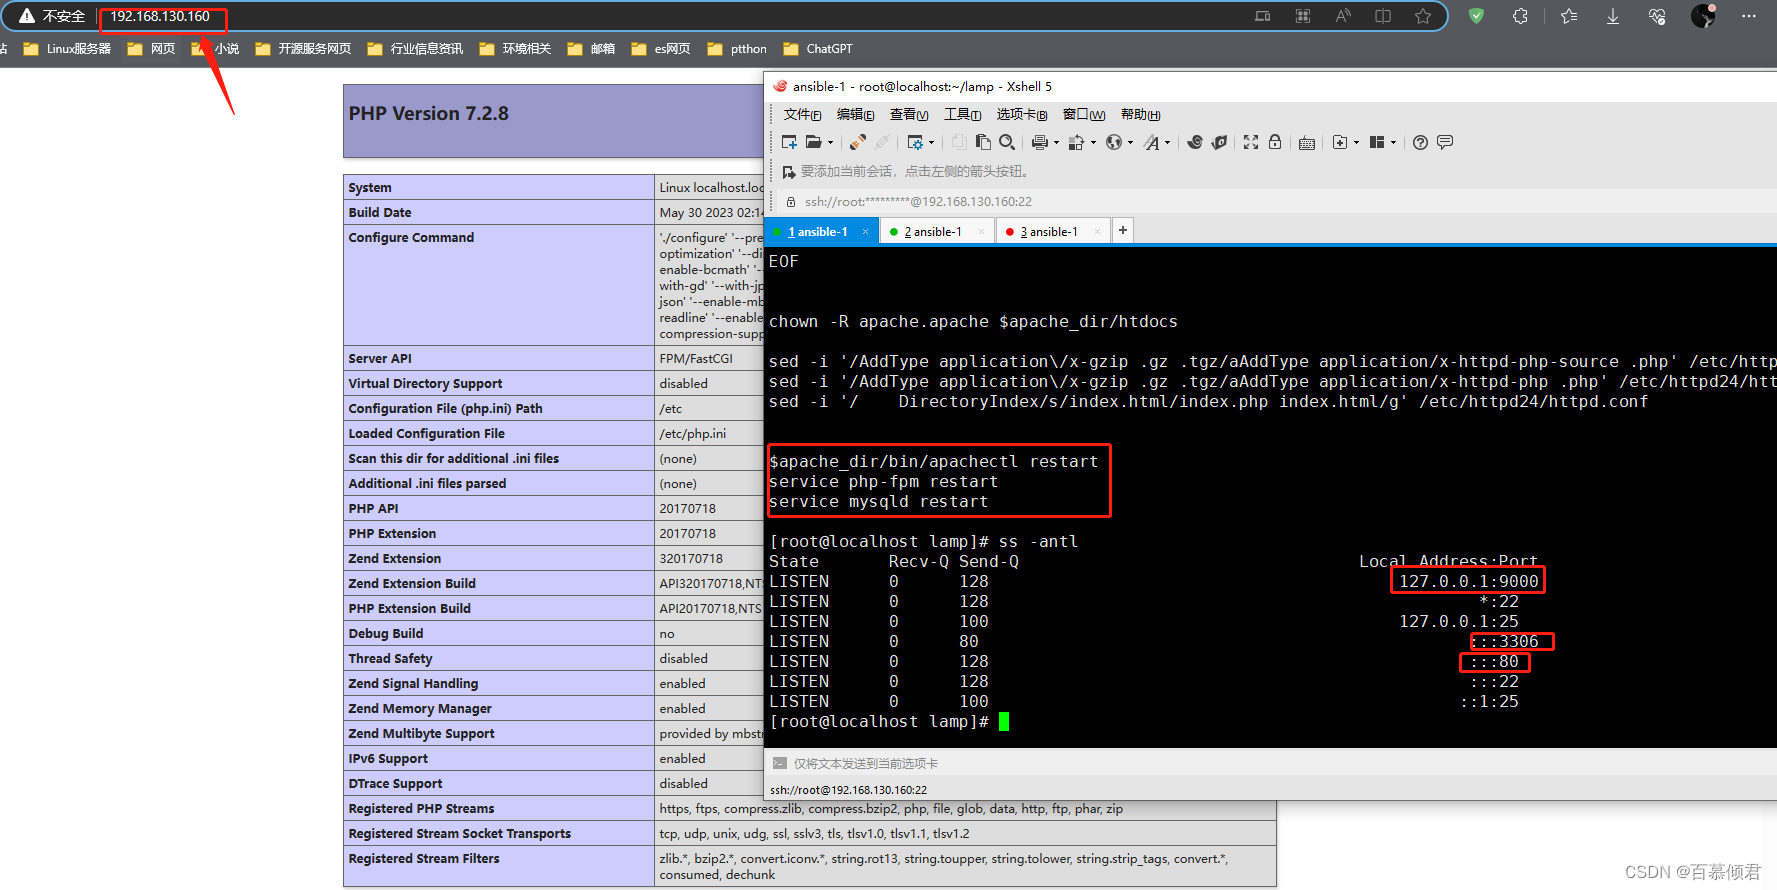
6.所有服务器关闭防火墙和selinux,访问apache ip。
四、脚本单机部署
1.需先准备如下离线包。
2.脚本安装。
[root@localhost lamp]# cat install.sh
#!/bin/bash
##################################################
##自定义变量。
file_name_1=apr-1.7.4
file_name_2=apr-util-1.6.3
file_name_3=httpd-2.4.57
file_name_4=php-7.2.8
kernel_count=$(grep processor /proc/cpuinfo |wc -l)
apache_dir=/usr/local/apache
mysql_untar=$(echo  mysql-5.7.41-linux-glibc2.12-x86_64.tar.gz|awk -F'.tar' '{print $1}')
mysql_basedir=/usr/local
datadir=/opt/data
read -p "请输入您的密码:" mysql_pass

##################################################
##配置yum源。
mv /etc/yum.repos.d/* /tmp/
cp soft/{CentOS-Base.repo,epel.repo} /etc/yum.repos.d/


##################################################
##安装依赖包。
yum -y groups mark install "Development Tools" &>/dev/null
yum -y install make openssl-devel pcre-devel expat-devel libtool gcc gcc-c++ ncurses-devel openssl cmake mariadb-devel libxml2 libxml2-devel bzip2 bzip2-devel libcurl libcurl-devel libicu-devel libjpeg libjpeg-devel libpng libpng-devel openldap-devel pcre-devel freetype freetype-devel gmp gmp-devel libmcrypt libmcrypt-devel readline readline-devel libxslt libxslt-devel mhash mhash-devel php-mysqlnd libncurses.so.5*


###################################################
##安装httpd服务。
id apache &>/dev/null
if [ $? -ne 0 ];then
    useradd -r -M -s /sbin/nologin apache
fi

rm -rf apr* httpd*
tar xf soft/${file_name_1}.tar.gz
tar xf soft/${file_name_2}.tar.gz
tar xf soft/${file_name_3}.tar.gz
cd ${file_name_1}
sed -i '/$RM "$cfgfile"/d' configure
if [ ! -d /usr/local/apr ];then
    ./configure --prefix=/usr/local/apr && \
    make -j $kernel_count && make install
fi
cd ../${file_name_2}
if [ ! -d /usr/local/apr-util ];then
    ./configure --prefix=/usr/local/apr-util --with-apr=/usr/local/apr && make -j $kernel_count && make install
fi
cd ../${file_name_3}
if [ ! -d $apache_dir ];then
    ./configure --prefix=$apache_dir \
            --sysconfdir=/etc/httpd24 \
            --enable-so \
            --enable-ssl \
            --enable-cgi \
            --enable-rewrite \
            --with-zlib \
            --with-pcre \
            --with-apr=/usr/local/apr \
            --with-apr-util=/usr/local/apr-util/ \
            --enable-modules=most \
            --enable-mpms-shared=all \
            --with-mpm=prefork && \
    make -j $kernel_count && make install
    echo "export PATH=$apache_dir/bin:\$PATH" > /etc/profile.d/httpd.sh
    ln -s $apache_dir/include /usr/include/httpd
    sed -i '/#ServerName/s/#//g' /etc/httpd24/httpd.conf
    $apache_dir/bin/apachectl start
fi

####################################################
##安装mysql。
cd ../
id mysql &>/dev/null
if [ $? -ne 0 ];then
    useradd -r -M -s /sbin/nologin mysql
fi

if [ ! -d $mysql_basedir/$mysql_untar ];then
    echo "正在解压mysql安装包!!!"
    tar xf soft/$mysql_untar.tar.gz -C $mysql_basedir && \
    ln -s $mysql_basedir/$mysql_untar $mysql_basedir/mysql &>/dev/null
    chown -R mysql.mysql $mysql_basedir/mysql*
    echo "export PATH=$mysql_basedir/mysql/bin:\$PATH" > /etc/profile.d/mysql.sh
    mkdir -p $datadir
    chown -R mysql.mysql $datadir
    $mysql_basedir/mysql/bin/mysqld --initialize-insecure --datadir=$datadir --user=mysql && \
    ln -s $mysql_basedir/mysql/include /usr/include/mysql &>/dev/null
    echo "$mysql_basedir/mysql/lib" > /etc/ld.so.conf.d/mysql.conf
    ldconfig
cat > /etc/my.cnf <<EOF
[mysqld]
basedir = $mysql_basedir/mysql
datadir = $datadir
socket = /tmp/mysql.sock
port = 3306
pid-file = $datadir/mysql.pid
user = mysql
skip-name-resolve
EOF

    cp -a $mysql_basedir/mysql/support-files/mysql.server /etc/init.d/mysqld
    sed -ri "s#^(basedir=).*#\1$mysql_basedir/mysql#g" /etc/init.d/mysqld
    sed -ri "s#^(datadir=).*#\1$datadir#g" /etc/init.d/mysqld
    service mysqld start
    sleep 5
    $mysql_basedir/mysql/bin/mysql -uroot -e "set password=password('$mysql_pass');"
fi

############################################
##安装php。
tar zxf soft/${file_name_4}.tar.gz
cd ${file_name_4}
if [ ! -d /usr/local/php7 ];then
    ./configure --prefix=/usr/local/php7  \
        --with-config-file-path=/etc \
        --enable-fpm \
        --enable-inline-optimization \
        --disable-debug \
        --disable-rpath \
        --enable-shared \
        --enable-soap \
        --with-openssl \
        --enable-bcmath \
        --with-iconv \
        --with-bz2 \
        --enable-calendar \
        --with-curl \
        --enable-exif  \
        --enable-ftp \
        --with-gd \
        --with-jpeg-dir \
        --with-png-dir \
        --with-zlib-dir \
        --with-freetype-dir \
        --with-gettext \
        --enable-json \
        --enable-mbstring \
        --enable-pdo \
        --with-mysqli=mysqlnd \
        --with-pdo-mysql=mysqlnd \
        --with-readline \
        --enable-shmop \
        --enable-simplexml \
        --enable-sockets \
        --enable-zip \
        --enable-mysqlnd-compression-support \
        --with-pear \
        --enable-pcntl \
        --enable-posix && \
    make -j $kernel_count && make install
    echo 'export PATH=/usr/local/php7/bin:$PATH' > /etc/profile.d/php.sh
    mv /etc/php.ini{,-bak}
    cp php.ini-production /etc/php.ini
    cp sapi/fpm/init.d.php-fpm /etc/init.d/php-fpm
    chmod a+x /etc/init.d/php-fpm
    cp /usr/local/php7/etc/php-fpm.conf.default /usr/local/php7/etc/php-fpm.conf
    cp /usr/local/php7/etc/php-fpm.d/www.conf.default /usr/local/php7/etc/php-fpm.d/www.conf
    service php-fpm start
fi


#####################################
##配置虚拟主机。
sed -i '/proxy_module/s/#//g' /etc/httpd24/httpd.conf
sed -i '/proxy_fcgi_module/s/#//g' /etc/httpd24/httpd.conf

vhosts_status=$(grep "Include .*vhosts.conf" /etc/httpd24/httpd.conf |grep -v '^#'|wc -l)
if [ $vhosts_status -eq 0 ];then
    echo "Include /etc/httpd24/extra/vhosts.conf" >> /etc/httpd24/httpd.conf
fi

cat > /etc/httpd24/extra/vhosts.conf << EOF
<VirtualHost *:80>
    DocumentRoot "$apache_dir/htdocs"
    ServerName www.example.com
    ProxyRequests Off
    ProxyPassMatch ^/(.*\.php)$ fcgi://127.0.0.1:9000$apache_dir/htdocs/$1
    <Directory "$apache_dir/htdocs>
        Require all granted
    </Directory>
</VirtualHost>
EOF
cat > $apache_dir/htdocs/index.php <<EOF
<?php
   phpinfo();
?>
EOF


chown -R apache.apache $apache_dir/htdocs

sed -i '/AddType application\/x-gzip .gz .tgz/aAddType application/x-httpd-php-source .php' /etc/httpd24/httpd.conf
sed -i '/AddType application\/x-gzip .gz .tgz/aAddType application/x-httpd-php .php' /etc/httpd24/httpd.conf
sed -i '/    DirectoryIndex/s/index.html/index.php index.html/g' /etc/httpd24/httpd.conf


$apache_dir/bin/apachectl restart
service php-fpm restart
service mysqld restart
3.关闭防火墙和selinux,访问网页。


 2555
2555


 被折叠的 条评论
为什么被折叠?
被折叠的 条评论
为什么被折叠?
 到【灌水乐园】发言


