


本demo是基于公司需要提供接口给第三方平台调用获取数据,所以采用客户端模式来写的一个基本架构,还有很多细节暂未处理.如果有其他模式需要需自己进行调试.
整体架构分为

parent 为父工程.
common-core为共用核心工具包
eureka:注册中心
zuul:网关
oauth-console:认证授权中心
baseinfo-console:基本信息微服务 demo只做了一个测试接口
parent中pom.xml主要引入一些spring-boot,spring的核心包及一些项目中所使用的工具包
其下子模块 comon-core 配置maven环境变量及配置各环境的参数配置文件. eureka做为注册中心也没有多余的其他配置 这里就不做 过多的描述
首先我们来看下oauth 这个项目
首先看下他的pom文件
<?xml version="1.0" encoding="UTF-8"?>
<project xmlns="http://maven.apache.org/POM/4.0.0" xmlns:xsi="http://www.w3.org/2001/XMLSchema-instance"
         xsi:schemaLocation="http://maven.apache.org/POM/4.0.0 https://maven.apache.org/xsd/maven-4.0.0.xsd">
    <modelVersion>4.0.0</modelVersion>
    <parent>
        <groupId>com.instai.open</groupId>
        <artifactId>instai-open-parent</artifactId>
        <version>0.0.1-SNAPSHOT</version>
        <relativePath>../instai-open-parent</relativePath>
    </parent>
    <artifactId>instai-open-api-oauth-console</artifactId>
    <version>0.0.1-SNAPSHOT</version>
    <name>instai-open-api-oauth-console</name>
    <description>OAUTH服务</description>
    <dependencies>
        <dependency>
            <groupId>org.springframework.cloud</groupId>
            <artifactId>spring-cloud-starter-oauth2</artifactId>
        </dependency>
        <dependency>
            <groupId>com.instai.open</groupId>
            <artifactId>instai-open-common-core</artifactId>
            <version>0.0.1-SNAPSHOT</version>
        </dependency>
    </dependencies>
    <build>
        <plugins>
            <plugin>
                <groupId>org.springframework.boot</groupId>
                <artifactId>spring-boot-maven-plugin</artifactId>
            </plugin>
        </plugins>
    </build>

</project>
这里引入了common-core 和 oauth2的核心包
启动类加入注解
import org.mybatis.spring.annotation.MapperScan;
import org.springframework.boot.SpringApplication;
import org.springframework.boot.autoconfigure.SpringBootApplication;
import org.springframework.cloud.netflix.eureka.EnableEurekaClient;
import org.springframework.context.annotation.PropertySource;
import org.springframework.core.annotation.Order;

@SpringBootApplication
@EnableEurekaClient
@PropertySource(value = { "classpath:instai.properties" })
@MapperScan("com.instai.open.oauth.mapper")
@Order(6)
public class InstaiOpenApiOauthConsoleApplication {

    public static void main(String[] args) {
        SpringApplication.run(InstaiOpenApiOauthConsoleApplication.class, args);
    }

}
由于我们需要从数据库中查询所以定义了mapper文件的扫描以及eureka的注册
下面是oauth的核心类 授权验证服务的配置类
import org.springframework.beans.factory.annotation.Autowired;
import org.springframework.context.annotation.Bean;
import org.springframework.context.annotation.Configuration;
import org.springframework.security.oauth2.config.annotation.configurers.ClientDetailsServiceConfigurer;
import org.springframework.security.oauth2.config.annotation.web.configuration.AuthorizationServerConfigurerAdapter;
import org.springframework.security.oauth2.config.annotation.web.configuration.EnableAuthorizationServer;
import org.springframework.security.oauth2.config.annotation.web.configurers.AuthorizationServerEndpointsConfigurer;
import org.springframework.security.oauth2.config.annotation.web.configurers.AuthorizationServerSecurityConfigurer;
import org.springframework.security.oauth2.provider.ClientDetailsService;
import org.springframework.security.oauth2.provider.approval.ApprovalStore;
import org.springframework.security.oauth2.provider.approval.JdbcApprovalStore;
import org.springframework.security.oauth2.provider.client.JdbcClientDetailsService;
import org.springframework.security.oauth2.provider.code.AuthorizationCodeServices;
import org.springframework.security.oauth2.provider.code.JdbcAuthorizationCodeServices;
import org.springframework.security.oauth2.provider.token.DefaultTokenServices;
import org.springframework.security.oauth2.provider.token.TokenStore;
import org.springframework.security.oauth2.provider.token.store.JdbcTokenStore;

import javax.sql.DataSource;

@Configuration
@EnableAuthorizationServer
public class AuthorizationServerConfiguration extends AuthorizationServerConfigurerAdapter {
    //配置数据源
    @Autowired
    DataSource dataSource;
    //由于我们使用的是JDBC来存取token,需要配置tokenStore为jdbc类型
    @Bean
    public TokenStore tokenStore() {
        return new JdbcTokenStore(dataSource);
    }
    @Bean // 声明 ClientDetails实现
    public ClientDetailsService clientDetailsService() {
        return new JdbcClientDetailsService(dataSource);
    }
    @Bean
    public ApprovalStore approvalStore() {
        return new JdbcApprovalStore(dataSource);
    }
    @Bean
    public AuthorizationCodeServices authorizationCodeServices() {
        return new JdbcAuthorizationCodeServices(dataSource);
    }
    @Override
    public void configure(ClientDetailsServiceConfigurer clients) throws Exception {
        clients.withClientDetails(clientDetailsService());
    }

    @Override
    public void configure(AuthorizationServerEndpointsConfigurer endpoints) throws Exception {

        endpoints
                .approvalStore(approvalStore())
                .authorizationCodeServices(authorizationCodeServices())
                .tokenStore(tokenStore());

        // 配置tokenServices参数
        DefaultTokenServices tokenServices = new DefaultTokenServices();
        tokenServices.setTokenStore(endpoints.getTokenStore());
        tokenServices.setSupportRefreshToken(false);
        tokenServices.setClientDetailsService(endpoints.getClientDetailsService());
        tokenServices.setTokenEnhancer(endpoints.getTokenEnhancer());
        tokenServices.setAccessTokenValiditySeconds(7200); // 7200
        endpoints.tokenServices(tokenServices);
    }
    @Override
    public void configure(AuthorizationServerSecurityConfigurer security) throws Exception {
        // 允许表单认证
        security.allowFormAuthenticationForClients()
                .checkTokenAccess("permitAll()")
                .checkTokenAccess("permitAll()");
    }
}
Security的认证配置以及自定义密码加密类
import org.springframework.context.annotation.Bean;
import org.springframework.context.annotation.Configuration;
import org.springframework.security.config.annotation.web.builders.HttpSecurity;
import org.springframework.security.config.annotation.web.configuration.EnableWebSecurity;
import org.springframework.security.config.annotation.web.configuration.WebSecurityConfigurerAdapter;
import org.springframework.security.crypto.password.PasswordEncoder;

@Configuration
@EnableWebSecurity
public class SecurityConfiguration extends WebSecurityConfigurerAdapter {

    @Bean
    PasswordEncoder passwordEncoder() {
//        return PasswordEncoderFactories.createDelegatingPasswordEncoder();
          return  new CustomPasswordEncoder();
    }

    @Override
    protected void configure(HttpSecurity http) throws Exception {
        http.requestMatchers().anyRequest()
                .and()
                .authorizeRequests()
                .antMatchers("/auth/**").permitAll();
    }
}

//自定义加密方式类
import org.springframework.security.crypto.password.PasswordEncoder;

public class CustomPasswordEncoder implements PasswordEncoder {

    @Override
    public String encode(CharSequence charSequence) {
        return charSequence.toString();
    }

    @Override
    public boolean matches(CharSequence charSequence, String s) {
        return s.equals(charSequence.toString());
    }
}
由于我的想法是在oauth中也有资源服务,所以我们把auth也定义成一个资源服务器
import org.springframework.context.annotation.Configuration;
import org.springframework.security.config.annotation.web.builders.HttpSecurity;
import org.springframework.security.oauth2.config.annotation.web.configuration.EnableResourceServer;
import org.springframework.security.oauth2.config.annotation.web.configuration.ResourceServerConfigurerAdapter;
import org.springframework.security.oauth2.config.annotation.web.configurers.ResourceServerSecurityConfigurer;

import javax.servlet.http.HttpServletResponse;

@Configuration
@EnableResourceServer
public class ResourceServerConfig extends ResourceServerConfigurerAdapter {

    @Override
    public void configure(HttpSecurity http) throws Exception {
        http
                .csrf().disable()
                .exceptionHandling()
                .authenticationEntryPoint((request, response, authException) -> response.sendError(HttpServletResponse.SC_UNAUTHORIZED))
                .and()
                .authorizeRequests()
                .anyRequest().authenticated()
                .and()
                .httpBasic();
    }
    @Override
    public void configure(ResourceServerSecurityConfigurer resources) throws Exception {
        resources.resourceId("oauth-server"); //重点,设置资源id
    }
}
配置文件yml如下
server:
  port: 7032
spring:
  application:
    name: oauth-server
  redis:
    database: 0
    host: ${redis.host}
    password: ${redis.password}
    port: ${redis.port}
mapper:
  mappers: com.instai.open.model.MyMapper
  not-empty: false
  identity: MYSQL

logging:
  level.com.instai.open.oauth.mapper: debug
eureka:
  client:
    registry-fetch-interval-seconds: 5
    service-url:
      defaultZone: ${eureka.url}
  instance:
    prefer-ip-address: true
    ip-address: 127.0.0.1
security:
  oauth2:
    authorization:
      check-token-access: true
至此 整个oauth的dmeo就已经完成了.
下面我们来配置一下baseinfo的服务类
pom文件同样引入 引入了common-core 和 oauth2的核心包
<?xml version="1.0" encoding="UTF-8"?>
<project xmlns="http://maven.apache.org/POM/4.0.0" xmlns:xsi="http://www.w3.org/2001/XMLSchema-instance"
         xsi:schemaLocation="http://maven.apache.org/POM/4.0.0 http://maven.apache.org/xsd/maven-4.0.0.xsd">
    <modelVersion>4.0.0</modelVersion>

    <artifactId>instai-open-api-baseinfo-console</artifactId>
    <packaging>jar</packaging>

    <name>instai-open-api-baseinfo-console</name>

    <parent>
        <groupId>com.instai.open</groupId>
        <artifactId>instai-open-parent</artifactId>
        <version>0.0.1-SNAPSHOT</version>
        <relativePath>../instai-open-parent</relativePath>
    </parent>

    <dependencies>

        <dependency>
            <groupId>com.instai.open</groupId>
            <artifactId>instai-open-common-core</artifactId>
            <version>0.0.1-SNAPSHOT</version>
        </dependency>
        <dependency>
            <groupId>org.springframework.cloud</groupId>
            <artifactId>spring-cloud-starter-oauth2</artifactId>
        </dependency>
    </dependencies>

    <build>
        <finalName>instai-open-api-baseinfo-console</finalName>
        <plugins>
            <plugin>
                <groupId>org.springframework.boot</groupId>
                <artifactId>spring-boot-maven-plugin</artifactId>
            </plugin>
        </plugins>
    </build>


</project>
配置yml文件
server:
  port: 7033
spring:
  application:
    name: baseinfo-server
  redis:
    database: 0
    host: ${redis.host}
    password: ${redis.password}
    port: ${redis.port}
  mapper:
    mappers: com.instai.open.model.MyMapper
    not-empty: false
    identity: MYSQL

  logging:
    level.com.instai.open.oauth.mapper: debug
eureka:
  client:
    registry-fetch-interval-seconds: 5
    service-url:
      defaultZone: ${eureka.url}
  instance:
    prefer-ip-address: true
    ip-address: 127.0.0.1
security:
  oauth2:
    resource:
      id: baseinfo-server
      token-info-uri: http://localhost:7031/auth/oauth/check_token
在这里遇见一个问题. 如果我使用 user-info-uri 这个配置,跟踪源码发现使用这个配置导致验证token跳转到userinfoTokenService中 而不会使用defaultTokenService中,导致调用baseinfo接口时 一直返回invalid_token,这是由于他取用户信息取不到导致验证otken失败,后来更改为check_token中去认证token.
如果有对security的属性配置不了解的可以看下下面这条博文
https://www.cnblogs.com/austinspark-jessylu/p/8065248.html
而后配置服务资源,以及编写测试接口
import org.springframework.context.annotation.Configuration;
import org.springframework.security.config.annotation.web.builders.HttpSecurity;
import org.springframework.security.oauth2.config.annotation.web.configuration.EnableResourceServer;
import org.springframework.security.oauth2.config.annotation.web.configuration.ResourceServerConfigurerAdapter;
import org.springframework.security.oauth2.config.annotation.web.configurers.ResourceServerSecurityConfigurer;

import javax.servlet.http.HttpServletResponse;

@Configuration
@EnableResourceServer
public class ResourceServerConfig  extends ResourceServerConfigurerAdapter {

    @Override
    public void configure(HttpSecurity http) throws Exception {
        http
                .csrf().disable()
                .exceptionHandling()
                .authenticationEntryPoint((request, response, authException) -> response.sendError(HttpServletResponse.SC_UNAUTHORIZED))
                .and()
                .authorizeRequests()
                .anyRequest().authenticated()
                .and()
                .httpBasic();
    }
    @Override
    public void configure(ResourceServerSecurityConfigurer resources) throws Exception {
        resources.resourceId("baseinfo-server"); //重点,设置资源id
    }
}


import org.springframework.web.bind.annotation.PostMapping;
import org.springframework.web.bind.annotation.RequestMapping;
import org.springframework.web.bind.annotation.RestController;

import java.util.HashMap;
import java.util.Map;

@RestController
@RequestMapping("test")
public class TestController {

    @PostMapping("getName")
    public Map<String, String> getName(){
        Map<String,String> map = new HashMap<>();
        map.put("test","test");
        return map;
    }

}
下面是整合zuul,对于zuul的yml配置如下
server:
  port: 7031   # 端口号
spring:
  application:
    name: zuul-server   # 网关服务名称
  redis:
    database: 0
    host: ${redis.host}
    password: ${redis.password}
    port: ${redis.port}
#网关路由配置
zuul:
  routes:
    baseInfo:
      path: /api/baseInfo/**
      serviceId: baseinfo-server
    oauth:
      path: /auth/**
      serviceId: oauth-server
  semaphore:
    max-semaphores: 2000

  #  因为zuul是整合ribbon和hystrix的另一个客户端,所以我们需要自己导入spring-retry坐标,并且开启服务
  retryable: true
#整合oauth2 认证配置
security:
  oauth2:
    client:
      access-token-uri: http://localhost:7031/auth/oauth/token
      user-authorization-uri: http://localhost:7031/auth/oauth/authorize
      client-id: webapp
    resource:
      token-info-uri: http://localhost:7031/auth/oauth/check_token
#服务注册配置
eureka:
  client:
    registry-fetch-interval-seconds: 5    # 获取注册列表的周期
    service-url:
      #    eureka注册中心地址
      defaultZone: ${eureka.url}
  instance:
    prefer-ip-address: true   # 返回ip地址而不是hostname
    ip-address: 127.0.0.1      # 本机地址
ribbon:
  ConnectTimeout: 250 # 连接超时时间(ms),默认值为250ms
  ReadTimeout: 2000 # 通信超时时间(ms),默认值为2000ms
  OkToRetryOnAllOperations: true # 是否对所有操作都进行重试
  MaxAutoRetriesNextServer: 2 # 对同一服务不同实例重试次数(同一服务下集群个数的重试次数)
  MaxAutoRetries: 2 # 对同一实例重试的次数(单个集群节点服务重试的次数)
# 开启熔断机制,超过六秒即开启熔断机制,网关内的时间排序:zuul的通信时间 > hystrix熔断时间 > retry重试时间
hystrix:
  command:
    default:
      execution:
        isolation:
          thread:
            timeoutInMilliseconds: 6000
其中关于整合OAUTH2的主要配置为
#整合oauth2 认证配置
security:
  oauth2:
    client:
      access-token-uri: http://localhost:7031/auth/oauth/token
      user-authorization-uri: http://localhost:7031/auth/oauth/authorize
      client-id: webapp
    resource:
      token-info-uri: http://localhost:7031/auth/oauth/check_token
这里我们可以看到. 配置验证token的认证方式也是check_token 而非user-info-uri. 客户端模式不需要用户信息.只需要clientDetails..经过defaultTokenService中进行jdbc的查询认证token
下面进行zuul的认证配置
关闭csrf.
import org.springframework.boot.autoconfigure.security.oauth2.client.EnableOAuth2Sso;
import org.springframework.context.annotation.Configuration;
import org.springframework.security.config.annotation.web.builders.HttpSecurity;
import org.springframework.security.config.annotation.web.configuration.WebSecurityConfigurerAdapter;

@Configuration
@EnableOAuth2Sso
public class SecurityConfig extends WebSecurityConfigurerAdapter {
    @Override
    protected void configure(HttpSecurity http) throws Exception {

        http.csrf().disable();

    }

}
这样 这个demo就完成了.
下面是测试情况
获取token
返回结果
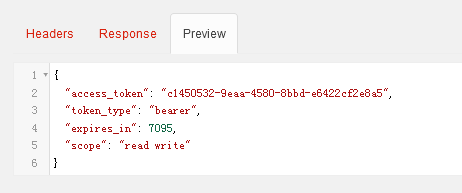
然后拿到token访问baseinfo中的测试接口
首先. 我们访问一遍不带token的接口,或携带错误的token访问
http://127.0.0.1:7031/api/baseInfo/test/getName
返回401错误

http://127.0.0.1:7031/api/baseInfo/test/getName?access_token=c1450532-9eaa-4580-8bbd-e6422cf2e8a6
返回 invalid_token

下面携带正确的token访问
http://127.0.0.1:7031/api/baseInfo/test/getName?access_token=c1450532-9eaa-4580-8bbd-e6422cf2e8a5
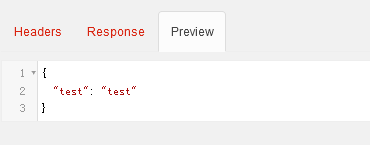
成功返回数据
至此 全部的demo完成.


 1万+
1万+


 被折叠的 条评论
为什么被折叠?
被折叠的 条评论
为什么被折叠?
 到【灌水乐园】发言


