


这篇文档是苹果官网对证书描述的解释的文章原文地址(https://developer.apple.com/library/content/documentation/IDEs/Conceptual/AppStoreDistributionTutorial/CreatingYourTeamProvisioningProfile/CreatingYourTeamProvisioningProfile.html)
感兴趣的朋友可以读一下
Creating Your Team Provisioning Profile
If you enter information about your app and assign a team to your app, Xcode creates the necessary signing identities and provisioning profiles for you. Specifically, Xcode creates a team provisioning profile that allows your app to run on all your devices and use app services. For iOS and tvOS apps, you also connect the device to the Mac that you want to use for testing. For watchOS apps, connect an iPhone that is paired with an Apple Watch.
Mac Note: If you only enable App Sandbox, you’re not required to use a development provisioning profile to code sign. However, it’s more convenient and less error-prone to use the team provisioning profile that Xcode manages for you than to set the code signing build settings yourself.
About Team Provisioning Profiles
Provisioning is the process of preparing and configuring an app to launch on devices and to use app services. During development, you choose which devices can run your app and which app services your app can access. A provisioning profile is downloaded from your developer account and embedded in the app bundle, and the entire bundle is code-signed. The embedded provisioning profile is installed on the device before the app is launched. If the information in the provisioning profile doesn’t match certain criteria, your app won’t launch. You indirectly configure a development provisioning profile by choosing options in Xcode.
To save you time, Xcode creates and manages a type of development provisioning profile, called a team provisioning profile, for you. The team provisioning profile allows all your apps to be signed and run by all team members on all your team’s devices. For an individual, the team provisioning profile allows all your apps to run on all your devices. Xcode also performs configuration steps for each app service you enable that requires some type of provisioning. Although Xcode simplifies this process, it helps to understand your code signing and provisioning assets and to know where they reside.
Xcode creates a team provisioning profile and its components as needed in your developer account. Xcode requests a development certificate for you if it’s missing. The development certificate is used in the team provisioning profile to identify you. A device must be registered to create a provisioning profile, so Xcode may ask you to connect an iOS or tvOS device. For Mac apps, Xcode automatically registers the Mac that is running Xcode.

Xcode creates an App ID to match your bundle ID, which is a unique identifier for your app stored in the app bundle. An App ID is used to identify one or more of your apps. An App ID is compared to the app’s bundle ID to determine if it matches. It can be an explicit App ID, which matches a single app, or a wildcard App ID, which matches multiple apps. Xcode initially creates a wildcard App ID and an explicit App ID only if needed. For example, if you enable an app service that requires an explicit App ID, Xcode creates and uses an explicit App ID in a new team provisioning profile it also creates. Therefore, you may have one team provisioning profile used by all your apps or multiple app-specific team provisioning profiles in your developer account. Xcode creates separate team provisioning profiles for iOS, tvOS, and Mac apps.
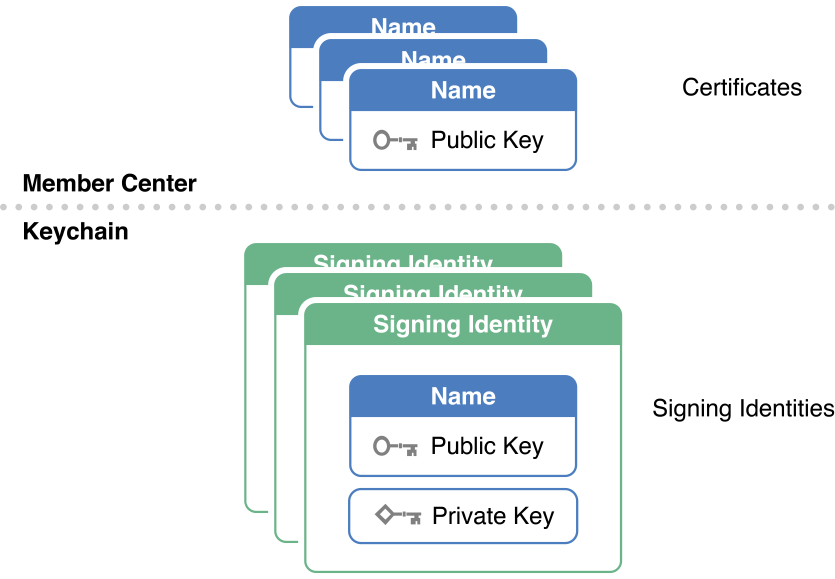
You use a signing identity to code sign your app. When Xcode requests your development certificate, the certificate with its public key is stored in your developer account, and the signing identity—the certificate with its public and private key—is stored in your keychain. You can’t code sign without this private key.
Set the Bundle ID
After an app is available on the store, its bundle ID can’t be changed. Verify it now, and change it if necessary. If you don’t belong to the Apple Developer Program, you can perform this step later.
The store and services use the bundle ID to uniquely identify an app. The bundle ID string should be in reverse DNS format. To create the default bundle ID for a new project, Xcode concatenates the company identifier with the product name—for example, it concatenates com.example.ajohnson with MyFirstApp to create com.example.ajohnson.MyFirstApp. Unlike domain names, bundle IDs are case-sensitive. You may prefer to use a lowercase bundle ID or a different prefix.
To change the bundle ID, replace the company identifier prefix in the bundle ID. Alternatively, replace the entire bundle ID in the Info.plist file or in the project editor Info pane. Later, you’ll enter the same bundle ID in iTunes Connect.
watchOS Note: If you change the bundle ID, make sure the WatchKit app and WatchKit extension targets have the same bundle ID prefix as the iOS target. The WatchKit app bundle ID must end with .watchkitapp and the WatchKit extension must end with .watchkitextension.
To change the bundle ID prefix in Xcode
- To display the project navigator, choose View > Navigators > Show Project Navigator.
- Choose the target from the Project/Targets pop-up menu or in the Targets section of the second sidebar if it appears.
- Click General, and if necessary, click the disclosure triangle next to Identity to reveal the settings.
- In the Bundle Identifier field, replace the bundle ID prefix.

Assign Your App to a Team
You can join multiple teams using the same Apple ID—for example, you can enroll as an individual and later join another team. Therefore, the Xcode project needs to be assigned to a specific team so that Xcode knows where to create your code signing and provisioning assets. If you don’t belong to the Apple Developer Program, you are automatically a member of your personal team.
To assign the Xcode project to a team
In the project navigator, view the Identity settings.
If necessary, select the target, click General, and click the disclosure triangle next to Identity to reveal the settings.For Mac apps, select a signing identity.
If you want to submit your app to the store, select Mac App Store. If you want to distribute your app outside of the store or you aren’t a member of the Apple Developer Program, select Developer ID or Apple ID.
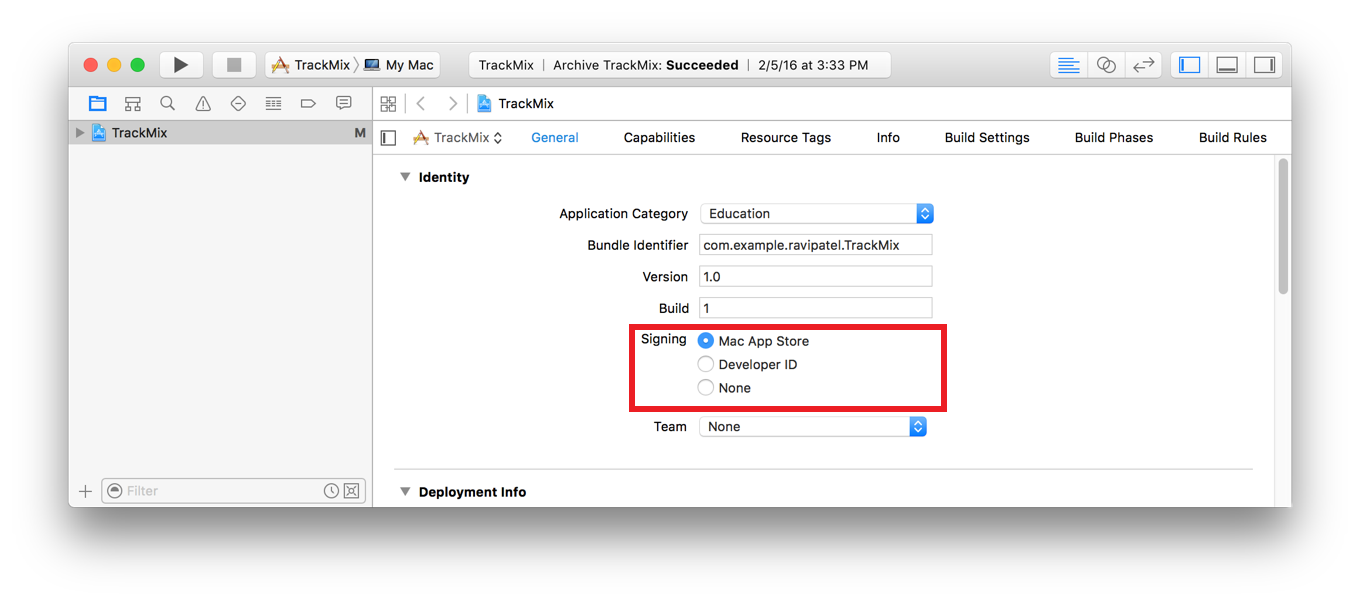
- Choose your team from the Team pop-up menu.
If you’re an individual, choose your name from the pop-up menu. If you don’t belong to the Apple Developer Program, choose your personal team.
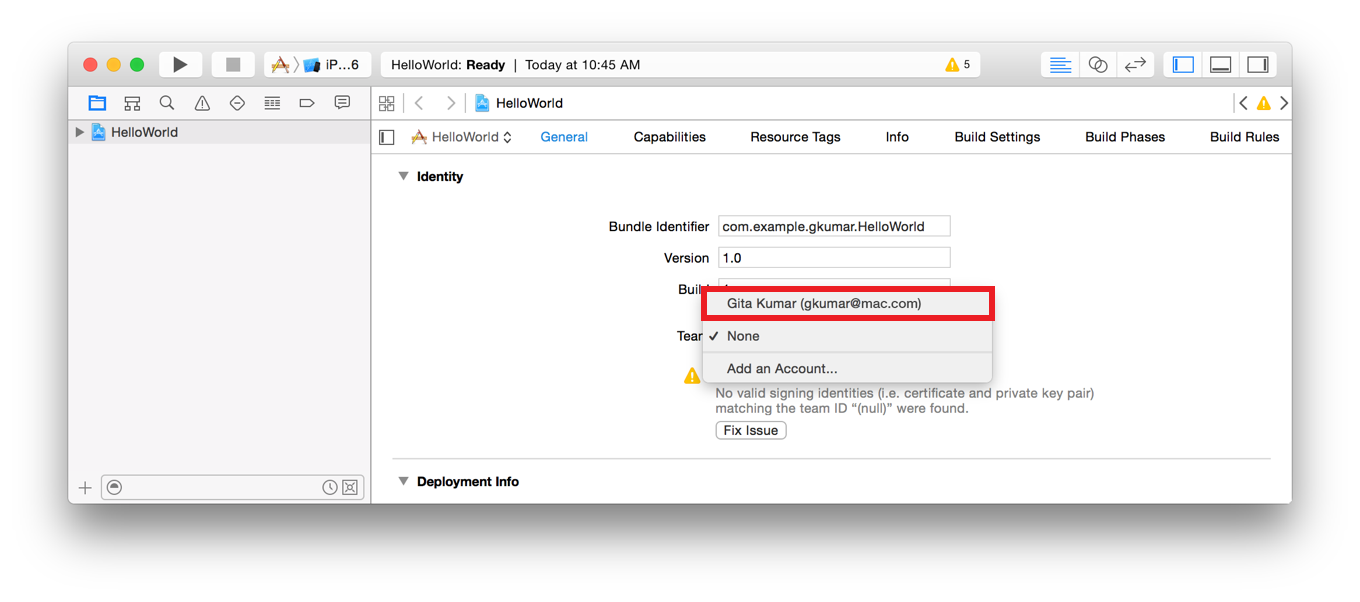
Xcode may attempt to create a team provisioning profile if you have a device connected or have previously registered a device. The warning message under the Team pop-up menu may change. You’ll resolve any issues in the next section.
Create the Team Provisioning Profile
Xcode saves you time by performing multiple steps on your behalf to create the team provisioning profile. For example, Xcode automatically registers your device and requests your development certificate, both of which are needed to create a team provisioning profile. Xcode performs these steps when you click the Fix Issue button below the Team pop-up menu. Xcode may also perform these steps when you assign a team to your project or refresh provisioning profiles in the Accounts preferences.
Note: If no warning message and Fix Issue button appear below the Team pop-up menu, Xcode already created your team provisioning profile and you can skip these steps.
To create a team provisioning profile
- In the project navigator, if necessary, select the target, click General, and click the disclosure triangle next to Identity to reveal the settings.
- For iOS, watchOS, and tvOS apps, connect a device that you want to use for development to your Mac, and select it from the Scheme pop-up menu.
A device is eligible to be registered if you can select it from the Scheme pop-up menu.
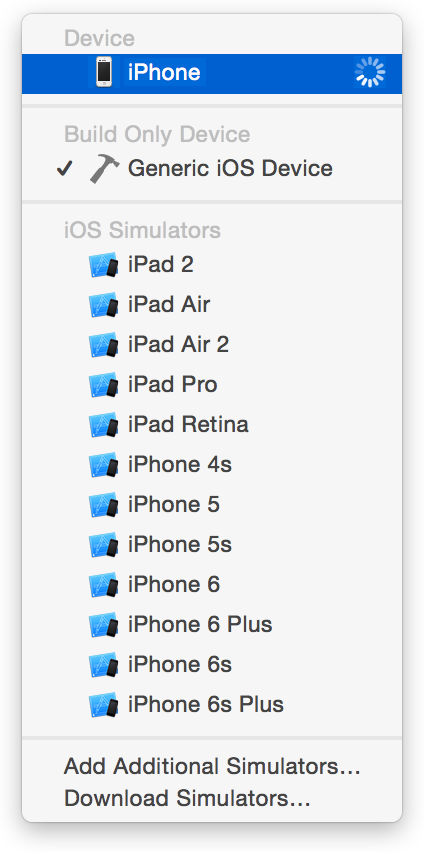
If your device is ineligible, fix the issue before continuing. For example, if the device doesn’t match the deployment target, upgrade the operating system on the device or choose the target version from the Deployment Target pop-up menu in the Deployment Info section. Then select the device from the Scheme pop-up menu.
3. Choose your team from the Team pop-up menu.
For Mac apps, Mac App Store, Developer ID, or Apple ID must be selected as the type of signing identity before you can choose a team.
- If a Fix Issue button appears below the Team pop-up menu, click it.
If Xcode successfully creates your team provisioning profile, the warning message under the Team pop-up menu in the General pane disappears.
The screenshot below shows the General pane for an iOS app when Xcode successfully creates the team provisioning profile.

Export Your Signing Identities To Back Up Private Keys
After you create the team provisioning profile, export your signing identities to back up your private keys. Xcode exports all your signing identities and provisioning profiles to a file. The signing identities include your public and private keys so that you can import the file on another Mac and continue code signing your app. You primarily export your assets to back up your private keys. Because your signing identities represent your store credentials, the file is encrypted and should be stored in a safe place. If you delete the private key from your keychain and lose this backup file, you need to re-create the associated certificate.
To export your signing identities
- Choose Xcode > Preferences.
- At the top of the window, click Accounts.
- Select the team you want to view, and click View Details.
- Click the Action button (the gear icon to the right of the Delete button) in the lower-left corner, and choose Export Developer Accounts from the pop-up menu.

5. Enter a filename in the Save As field, and enter a password in both the Password and Verify fields.
The file is encrypted and password protected.
6. Click Save.
The file is saved to the location you specified with a .developerprofile extension.
Recap
In this chapter, you learned how to enter identity information about your app in Xcode and create your team provisioning profile. You also learned how to back up your signing identities to keep them safe. In the next chapter, you’ll learn how to code sign and launch your app on a device through Xcode.


 4565
4565

 被折叠的 条评论
为什么被折叠?
被折叠的 条评论
为什么被折叠?
 到【灌水乐园】发言


