


1、html
情况一:不走后端代码,直接资源访问html放置所在图如下:
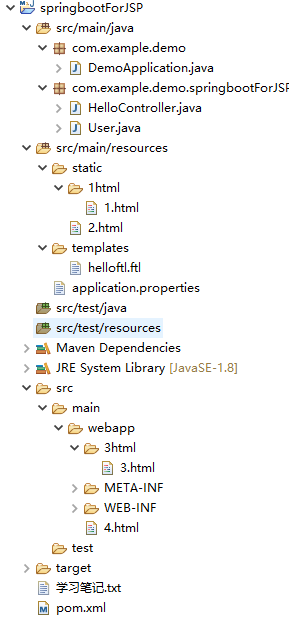
方式一:放在src/main/resource/static下,注意一定是static包,不能随便取文件夹名
方式二:放在main/webapp下
启动项目后,访问路径如下:
1.html:localhost:8080/1html/1.html
2.html:localhost:8080/2.html
3.html:localhost:8080/3html/3.html
4.html:localhost:8080/4.html
情况二:走后端代码,访问html方法
第一步:pom.文件增加一个依赖:
	<!--引入thymeleaf的依赖 -->
		<dependency>
			<groupId>org.springframework.boot</groupId>
			<artifactId>spring-boot-starter-thymeleaf</artifactId>
		</dependency>
第二步:application.properties配置
##############################################
#
# thymeleaf配置
#
##############################################
spring.thymeleaf.prefix=classpath:/templates/
spring.thymeleaf.suffix=.html
spring.thymeleaf.encoding=UTF-8
spring.thymeleaf.content-type=text/html
spring.thymeleaf.cache=false
第三步:新建一个html文件,放在/resource/templates/helloRes.html下,取名即为helloRes.html
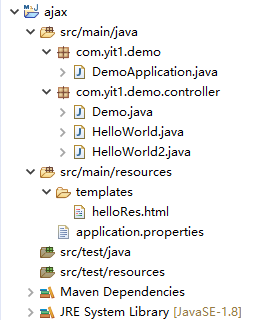
第四步:编写controller类,return的string为html的文件名
package com.yit1.demo.controller;
import org.springframework.stereotype.Controller;
import org.springframework.web.bind.annotation.RequestMapping;

  @Controller
  public class HelloWorld2{


	@RequestMapping("/getDemohtml")
	public String getDemo() {

		return "helloRes";
	}

}
jsp文件的访问路径为:localhost:8080/getDemohtml
第一步:pom.文件增加两个依赖:
<dependency>
			<groupId>org.springframework.boot</groupId>
			<artifactId>spring-boot-starter-tomcat</artifactId>
			<scope>provided</scope>
		</dependency>
		<dependency>
			<groupId>org.apache.tomcat.embed</groupId>
			<artifactId>tomcat-embed-jasper</artifactId>
			<scope>provided</scope>
		</dependency>
第二步:application.properties增加前缀和后缀配置
spring.mvc.view.prefix=/WEB-INF/jsp/
spring.mvc.view.suffix=.jsp
第三步:新建一个jsp文件,放在/WEB-INF/jsp/下,取名若为hello1.jsp
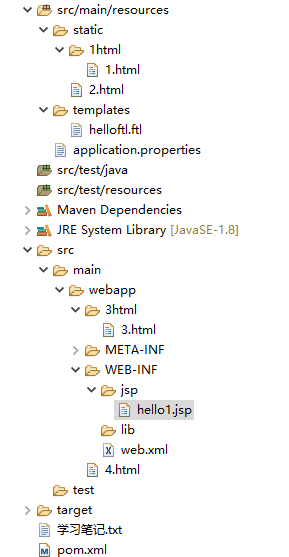
第四步:编写controller类,return的string为jsp的文件名
import java.util.Map;
import org.springframework.stereotype.Controller;
import org.springframework.web.bind.annotation.RequestMapping;
@Controller
public class HelloController {
	@RequestMapping("/getHello")
	public String getHello(Map< String, String> map){
		map.put("name", "yit6661");
		map.put("liuweiage", "25");
		return "hello1";
	}
}
jsp文件的访问路径为:localhost:8080/getHello
3、ftl
略,以后有机会加


 399
399


 被折叠的 条评论
为什么被折叠?
被折叠的 条评论
为什么被折叠?
 到【灌水乐园】发言


