


众所周知,表单、工作流是企业业务系统的核心,而一个通用的表单设计器能为开发节省很多的编码工作。
接下来,我将用几篇文章,介绍如何用CKeditor定制简单的表单设计器。
一、安装CKEditor
从 CKEditor 网站:http://ckeditor.com/download 下载最新版本的 CKEditor 。
将下载的文档解压到你的 website 根目录下的 ckeditor 目录中。你可以将文档放在你的 website 的任意路径中。ckeditor 目录是缺省目录。
二、加载CKEditor
CKEditor 是 JavaScript 应用程序。要加载它,需要在页面中包含一个简单的文件引用。
如果已在站点根目录下的 ckeditor 目录中安装了 CKEditor , 你需要将下面的代码片段插入到
页面的<head>部分:
<head>
...
<script src="/ckeditor/ckeditor.js"></script>
</head>
当上述文件加载后,就可以使用 CKEditor JavaScript API。
三、生成编辑框
CKEditor 的工作就像页面中的文本域元素。编辑器提供了用户界面,可以容易在编写、格式化,并可与富文本一起处理,但是可以用<textarea>元素完成同样的事情(尽管不是那么容易) ,需要用户在其中输入 HTML 代码。
实际上,CKEditor 使用文本域将其数据传给服务器。对于终端用来来说,文本域是不可见的。
为了生成编辑器的实例,必须首先将<textarea>元素加入到 HTML 页面的源代码中。
<textarea name="editor1"></textarea>
插入文本域后,就可以使用 CKEditor JavaScript API 将 HTML 元素替换为编辑器的实例。
调用简单的 CKEDITOR.replace 方法:
<script>
CKEDITOR.replace( 'editor1' );
</script>
全部代码:
- <%@ page language="java" contentType="text/html; charset=UTF-8"
- pageEncoding="UTF-8"%>
- <!DOCTYPE html PUBLIC "-//W3C//DTD HTML 4.01 Transitional//EN" "http://www.w3.org/TR/html4/loose.dtd">
- <html>
- <head>
- <meta http-equiv="Content-Type" content="text/html; charset=UTF-8">
- <title>Insert title here</title>
- <%@ include file="/page/common/common.jsp"%>
- <script src="${contextPath}/ckeditor_standard/ckeditor/ckeditor.js"></script>
- </head>
- <body>
- <form method="post" action="${contextPath}/editor/test1">
- <p>
- My Editor:<br>
- <textarea name="editor1"><p>Initial value.</p></textarea>
- <script>
- CKEDITOR.replace('editor1');
- </script>
- </p>
- <p>
- <input type="submit">
- </p>
- </form>
- </body>
- </html>
效果
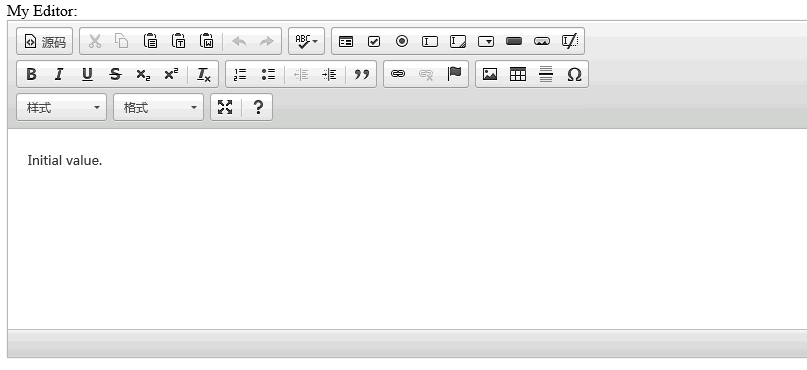
可以把上面的界面集成到自己的项目中。
CKEditor的安装,加载和集成都已经说完了,下篇将介绍如果扩展自己的插件。
一、配置CKEditor
CKEditor 具有丰富的一组配置选项,可以定制其外观、功能和行为。主配置文件名字为config.js。此文件可以在 CKEditor 安装文件夹的根目录中找到。
可用的配置选项在 API 文档中可以找到所有可用的配置选项。参考 CKEDITOR.config 对象的定义。
API文档:http://docs.ckeditor.com/#
给大家看看我的config配置:
- CKEDITOR.editorConfig = function( config ) {
- //定义工具栏显示按钮
- config.toolbar_ths =
- [
- { name: 'document', items: ['Source', '-', 'DocProps', 'Print', '-', 'Templates'] },
- { name: 'clipboard', items: ['Cut', 'Copy', 'Paste', 'PasteText', 'PasteFromWord', '-', 'Undo', 'Redo'] },
- { name: 'editing', items: ['Find', 'Replace', '-', 'SelectAll', '-', 'SpellChecker', 'Scayt'] },
- { name: 'links', items: ['Link', 'Unlink', 'Anchor'] },
- '/',
- { name: 'basicstyles', items: ['Bold', 'Italic', 'Underline', 'Strike', 'Subscript', 'Superscript', '-', 'RemoveFormat'] },
- { name: 'paragraph', items: ['NumberedList', 'BulletedList', '-', 'Outdent', 'Indent', '-', 'Blockquote', '-', 'JustifyLeft', 'JustifyCenter', 'JustifyRight', 'JustifyBlock', '-', 'BidiLtr', 'BidiRtl'] },
- { name: 'insert', items: ['Image', 'Flash', 'HorizontalRule', 'Smiley', 'SpecialChar', 'PageBreak', 'Iframe'] },
- '/',
- { name: 'styles', items: ['Styles', 'Format', 'Font', 'FontSize'] },
- { name: 'colors', items: ['TextColor', 'BGColor'] },
- { name: 'tools', items: ['Maximize', 'ShowBlocks'] },
- //自定义插件在工具栏上的位置
- { name: 'extent', items: ['Table','-','ths_form','-','ths_div','-','ths_label','-','ths_textfield','-','ths_select','-','ths_radio','-','ths_checkbox','-','ths_hiddenfield','-','ths_textarea','-','ths_button', '-','Preview']}
- ];
- //使用哪个工具栏
- config.toolbar = 'ths';
- //加载自定义插件
- config.extraPlugins += (config.extraPlugins ? ',ths_textfield,ths_select,ths_radio,ths_checkbox,ths_hiddenfield,ths_textarea,ths_button,ths_div,ths_label,ths_form' : 'ths_textfield,ths_select,ths_radio,ths_checkbox,ths_hiddenfield,ths_textarea,ths_button,ths_div,ths_label,ths_form');
- //移除不需要的插件
- config.removePlugins = 'forms,elementspath';
- //移除不需要的工具栏按钮
- config.removeButtons = 'CreateDiv';
- //去掉回车添加p标签,使用br
- config.enterMode = CKEDITOR.ENTER_BR ;
- config.shiftEnterMode =CKEDITOR.ENTER_BR;
- //config.startupMode = 'source'; (默认进入源代码编辑)
- //取消内容过滤
- config.allowedContent = true;
- //工具栏是否可以被收缩
- config.toolbarCanCollapse = true;
- config.contentsCss = ['../assets/css/bootstrap.min.css'];
- //工具栏的位置
- config.toolbarLocation = 'top';//可选:bottom
- //工具栏默认是否展开
- config.toolbarStartupExpanded = true;
- config.pasteFromWordRemoveStyles = false;
- };
这个配置,基本上囊括了CKEditor的最常用配置,注意注释部分。
config中每一项的意思,请参照http://docs.ckeditor.com/#!/api/CKEDITOR.config
注意到config中,我们加入了自己的插件
- ths_textfield,ths_select,ths_radio,ths_checkbox,ths_hiddenfield,ths_textarea,ths_button,ths_div,ths_label,ths_form
那么最终,我们的表单设计器是什么样子?
看看效果:
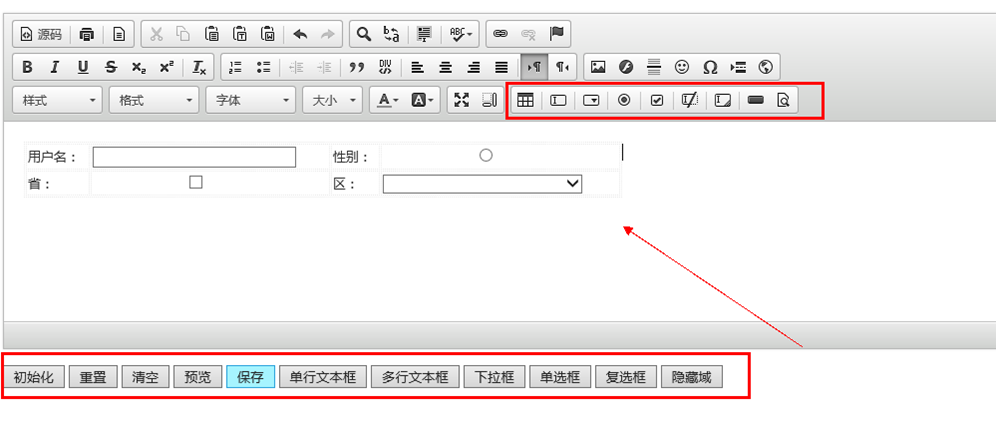
看到这,熟悉.NET的同学,有没有想起VS中的可视化页面设计器?其实要实现的表单设计器,就是运行在浏览器中类似vs这种设计器的Javascript富文本编辑器。
下节终于可以介绍重头戏,自定义插件的开发了。
前面基本环境都做得差不多了,这篇我们来介绍自定义插件的开发。
我们以"文本框“为例,
先来看效果:
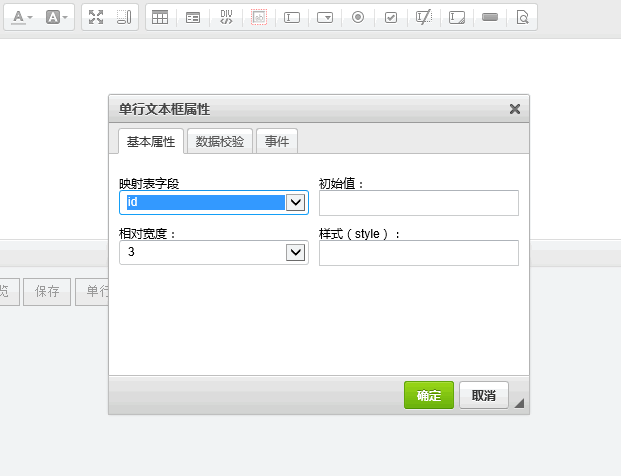
点击确定,即可插入一个文本框
实现方式:
1、在ckeditor目录下 plugins文件夹下,新建如下结构:
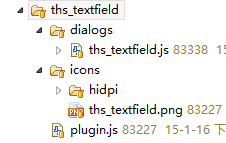
plugin.js
- CKEDITOR.plugins.add( 'ths_textfield', {
- icons: 'ths_textfield',
- init: function( editor ) { //初始化
- var pluginName = 'ths_textfield'; //控件名称
- editor.addCommand( pluginName, new CKEDITOR.dialogCommand( pluginName ) ); //给编辑器注册一个打开弹出窗命令
- editor.ui.addButton(pluginName, { //在工具栏上增加一个按钮,绑定按钮事件
- label: '单行文本框',
- command: pluginName
- });
- if ( editor.contextMenu ) { //为文本框加右键属性菜单
- editor.addMenuGroup( 'textFieldGroup' );
- editor.addMenuItem( 'textFieldItem', {
- label: '文本框属性',
- command:pluginName,
- group: 'textFieldGroup'
- });
- //右键菜单的监听器,判断是否显示菜单
- editor.contextMenu.addListener( function( element ) {
- if ( element && !element.isReadOnly() ) {
- var name = element.getName();
- if ( name == 'input' ) {
- var type = element.getAttribute( 'type' ) || 'text';
- if ( type=='text' ){
- return { textFieldItem: CKEDITOR.TRISTATE_OFF };
- }
- }
- }
- });
- }
- //增加弹出窗
- CKEDITOR.dialog.add( pluginName, this.path + 'dialogs/'+pluginName+'.js' );
- //为文本框双击事件绑定一个事件,即显示弹出窗
- editor.on( 'doubleclick', function( evt ) {
- var element = evt.data.element;
- if ( element.is( 'input' ) ) {
- var type = element.getAttribute( 'type' ) || 'text';
- if ( type=='text' ){
- evt.data.dialog =pluginName;
- }
- }
- })
- }
- });
代码不过多解释,请看注释
不喜欢讲代码,大家结合文档看注释
ths_textfield.js
- CKEDITOR.dialog.add( 'ths_textfield', function( editor ) {
- return {
- title: '单行文本框属性',
- minWidth: 400,
- minHeight: 200,
- //弹出窗上显示的内容
- contents: [
- {
- id: 'tab-basic',
- label: '基本属性',
- elements:[ {
- type: 'hbox',
- widths: [ '50%', '50%' ],
- children:
- [
- ths_editor_field(editor),
- ths_editor_value(editor)
- ]
- },
- {
- type: 'hbox',
- widths: [ '50%', '50%' ],
- children:
- [ths_editor_relative_width(editor) ,
- ths_editor_style(editor)
- ]
- }
- ]
- },
- {
- id: 'tab-validate',
- label: '数据校验',
- elements: [
- {
- type: 'checkbox',
- id: 'required',
- label: '必填',
- setup: function( element ) {
- if(element.getAttribute( "required" )){
- this.setValue(true);
- }
- },
- commit: function ( element ) {
- var required = this.getValue();
- if ( required )
- element.setAttribute( 'required', 'true' );
- else if ( !this.insertMode )
- element.removeAttribute( 'required' );
- }
- }
- ]
- },
- {
- id: 'tab-event',
- label: '事件',
- elements: [
- ths_editor_onblur(editor),
- ths_editor_onfocus(editor),
- ths_editor_onclick(editor),
- ths_editor_onchange(editor)
- ]
- }
- ],
- //弹出窗显示事件
- onShow: function() {
- var selection = editor.getSelection();
- var element = selection.getStartElement();
- if ( !element || element.getName() != 'input' || element.getAttribute( 'type' )!='text' ) {
- this.insertMode = true;
- }else{
- this.insertMode = false;
- }
- this.element = element;
- if ( !this.insertMode ){
- this.setupContent( this.element );
- }
- },
- //弹出窗确定按钮事件
- onOk: function() {
- submitElement(this,editor,'text');
- }
- };
- });
补充js函数
这是针对所有表单组件的js
- function submitElement(dialog,editor,type){
- if ( dialog.insertMode ){ //如果是新建状态
- var div=editor.document.createElement( 'div' );
- var label;
- var element;
- //为不同的元素赋值
- switch ( type ) {
- case 'select':
- element = editor.document.createElement( 'select' );
- if(dialog.getValueOf( 'tab-basic', 'dictionary')){element.setAttribute( 'dictionary', dialog.getValueOf( 'tab-basic', 'dictionary') )};
- break;
- case 'textarea':
- element = editor.document.createElement( 'textarea' );
- if(dialog.getValueOf( 'tab-basic', 'value')){element.setAttribute( 'value', dialog.getValueOf( 'tab-basic', 'value') )};
- break;
- case 'text':
- element = editor.document.createElement( 'input' );
- element.setAttribute( 'type', type );
- //if(dialog.getValueOf( 'tab-basic', 'size')!='default'){element.addClass( dialog.getValueOf( 'tab-basic', 'size') )};
- if(dialog.getValueOf( 'tab-basic', 'value')){element.setAttribute( 'value', dialog.getValueOf( 'tab-basic', 'value') )};
- break;
- case 'checkbox':
- label=editor.document.createElement( 'label' );
- label.addClass( 'checkbox-inline' );
- element = editor.document.createElement( 'input' );
- element.setAttribute( 'type', type );
- if(dialog.getValueOf( 'tab-basic', 'dictionary')){element.setAttribute( 'dictionary', dialog.getValueOf( 'tab-basic', 'dictionary') )};
- break;
- case 'radio':
- label=editor.document.createElement( 'label' );
- label.addClass( 'radio-inline' );
- element = editor.document.createElement( 'input' );
- element.setAttribute( 'type', type );
- if(dialog.getValueOf( 'tab-basic', 'dictionary')){element.setAttribute( 'dictionary', dialog.getValueOf( 'tab-basic', 'dictionary') )};
- break;
- case 'hidden':
- element = editor.document.createElement( 'input' );
- element.setAttribute( 'type', type );
- element.setAttribute( 'name', dialog.getValueOf( 'tab-basic', 'name' ) );
- if(dialog.getValueOf( 'tab-basic', 'value')){element.setAttribute( 'value', dialog.getValueOf( 'tab-basic', 'value') )};
- editor.insertElement( element );
- return;
- }
- element.addClass( 'form-control' );
- element.setAttribute( 'name', dialog.getValueOf( 'tab-basic', 'name' ) );
- if(dialog.getValueOf( 'tab-basic', 'style' )){
- element.setAttribute( 'style', element.getAttribute('style') ? element.getAttribute('style')+dialog.getValueOf( 'tab-basic', 'style' ):dialog.getValueOf( 'tab-basic', 'style' ) )
- };
- if(dialog.getValueOf( 'tab-basic', 'width' )) {div.addClass(dialog.getValueOf( 'tab-basic', 'width'))};
- if(dialog.getValueOf( 'tab-event', 'onclick')){element.setAttribute( 'onclick', dialog.getValueOf( 'tab-event', 'onclick') )};
- if(dialog.getValueOf( 'tab-event', 'onfocus')){element.setAttribute( 'onfocus', dialog.getValueOf( 'tab-event', 'onfocus') )};
- if(dialog.getValueOf( 'tab-event', 'onblur')){element.setAttribute( 'onblur', dialog.getValueOf( 'tab-event', 'onblur') )} ;
- if(dialog.getValueOf( 'tab-event', 'onchange')){element.setAttribute( 'onchange', dialog.getValueOf( 'tab-event', 'onchange') )} ;
- if(dialog.getValueOf( 'tab-validate', 'required' )){element.setAttribute( 'required', dialog.getValueOf( 'tab-validate', 'required' ) )};
- if(label){
- label.append(element);
- div.append(label);
- }else{
- div.append(element);
- }
- editor.insertElement( div );
- }else{
- dialog.commitContent( dialog.element );
- }
- }
弹出窗中,显示文本域的示例:
- function ths_editor_size(editor){
- var editor_size={
- type : 'select',
- id: 'size',
- label: '大小:',
- style: 'width:190px',
- 'default' : 'default',
- items :
- [
- [ '大', 'input-lg' ],
- [ '默认', 'default' ],
- [ '小', 'input-sm' ]
- ],
- setup: function( element ) { //弹出窗初始化时会调用
- var classStr=element.getAttribute( "class" ) ? element.getAttribute( "class" ) : 'default';
- if(classStr.indexOf('input')>=0){
- classStr=classStr.substring(classStr.indexOf('input'),classStr.indexOf('input')+8);
- this.setValue(classStr);
- }else{
- return;
- }
- },
- commit: function( element ) { //提交时会调用
- var classStr = this.getValue();
- if(element.hasClass('input-lg')) element.removeClass('input-lg');
- if(element.hasClass('input-sm')) element.removeClass('input-sm');
- if ( classStr && classStr!='default'){
- element.addClass(classStr);
- }
- }
- }
- return editor_size;
- }
不想贴代码,感觉代码真的很无力,但想说明白一件事,似乎代码来得更直接些,上面代码均为核心代码。
随后会把代码开源,请留意
如果你英文比较好,推荐看如下两篇文章:
http://docs.ckeditor.com/#!/guide/plugin_sdk_sample_1
http://docs.ckeditor.com/#!/guide/plugin_sdk_sample_2
上篇,我们介绍了表单域的开发,那么针对一键初始化,保存,重置,清空,预览,这些操作如何做呢?
看看效果:
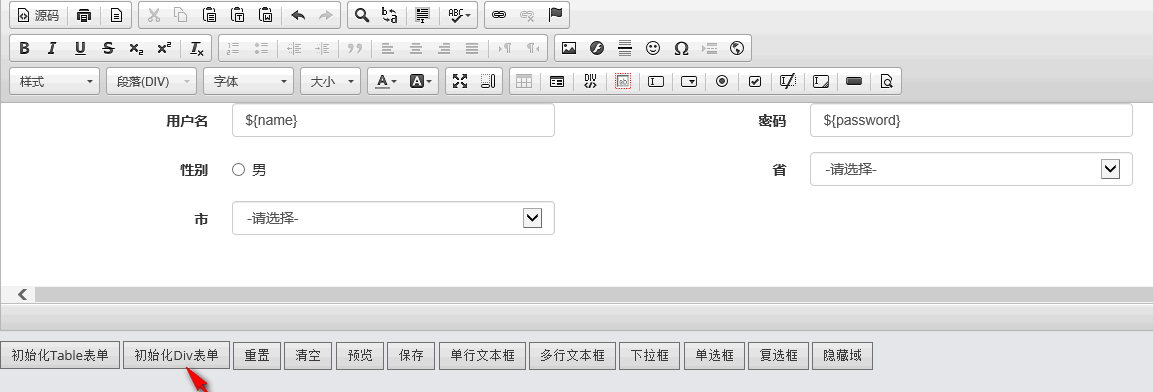
点击初始化,直接初始化一个完整的表单,当然初始化规则,需要你自己定义。

点击预览,即可弹出新窗口,预览设计好的表单。
其他操作不再一一截图。
这些效果,其实不难实现,参照Ckeditor提供的api,我们定义好自己的规则即可,完整代码如下:
- <%@ page language="java" contentType="text/html; charset=UTF-8"
- pageEncoding="UTF-8"%>
- <%@ include file="/page/common/common.jsp"%>
- <!DOCTYPE html PUBLIC "-//W3C//DTD HTML 4.01 Transitional//EN" "http://www.w3.org/TR/html4/loose.dtd">
- <html>
- <head>
- <meta http-equiv="X-UA-Compatible" content="IE=edge,chrome=1" />
- <meta charset="utf-8" />
- <title>Insert title here</title>
- <meta name="description" content="Static & Dynamic Tables" />
- <meta name="viewport"
- content="width=device-width, initial-scale=1.0, maximum-scale=1.0" />
- <!-- bootstrap & fontawesome -->
- <link rel="stylesheet"
- href="${contextPath}/assets/css/bootstrap.min.css" />
- <link rel="stylesheet"
- href="${contextPath}/assets/css/font-awesome.min.css" />
- <!-- page specific plugin styles -->
- <!-- text fonts -->
- <link rel="stylesheet" href="${contextPath}/assets/css/ace-fonts.css" />
- <!-- ace styles -->
- <link rel="stylesheet" href="${contextPath}/assets/css/ace.min.css"
- id="main-ace-style" />
- <!--[if lte IE 9]>
- <link rel="stylesheet" href="${contextPath}/assets/css/ace-part2.min.css" />
- <![endif]-->
- <link rel="stylesheet"
- href="${contextPath}/assets/css/ace-skins.min.css" />
- <link rel="stylesheet" href="${contextPath}/assets/css/ace-rtl.min.css" />
- <!--[if lte IE 9]>
- <link rel="stylesheet" href="${contextPath}/assets/css/ace-ie.min.css" />
- <![endif]-->
- <link rel="stylesheet" href="${contextPath}/assets/css/ths.content.css" />
- <link rel="stylesheet" type="text/css" href="${contextPath}/assets/css/easyui.css">
- <!-- ace settings handler -->
- <script src="${contextPath}/assets/js/ace-extra.min.js"></script>
- <!-- HTML5shiv and Respond.js for IE8 to support HTML5 elements and media queries -->
- <!--[if lte IE 8]>
- <script src="${contextPath}/assets/js/html5shiv.min.js"></script>
- <script src="${contextPath}/assets/js/respond.min.js"></script>
- <![endif]-->
- <script src="${contextPath}/assets/js/jquery.min.js"></script>
- <script src="${contextPath}/ckeditor/ckeditor.js"></script>
- <script src="${contextPath}/ckeditor/ths_editor.js"></script>
- </head>
- <body>
- <form id="editor_form" method="post" action="${contextPath}/editor/submit">
- <input type="hidden" id="formid" value="user_form" />
- <input type="hidden" id="listid" value="user_list" />
- <input type="hidden" id="formurl" value="${contextPath}/editor/formjson" />
- <input type="hidden" id="formjson" value="" />
- <p>
- <textarea name="ths_editor"></textarea>
- <script>
- //初始化ckeditor
- var ths_editor=CKEDITOR.replace('ths_editor');
- //执行ckeditor插件
- function ths_exec_cmd(cmd){
- CKEDITOR.instances['ths_editor'].execCommand(cmd);
- }
- function ths_editor_init(flag){
- if(flag=='table'){
- var url="${contextPath}/editor/tableform"
- }else{
- var url="${contextPath}/editor/divform"
- }
- var param = "formid=" + $('#formid').val()+ "&listid="
- + $('#listid').val();
- $.ajax({
- type : 'post',
- url :url,
- data : param,
- async : false,//这里必须是同步请求
- success : function(response) {
- CKEDITOR.instances['ths_editor'].insertHtml(response);
- },
- error:function (XMLHttpRequest, textStatus, errorThrown) {
- alert(textStatus);
- }
- });
- }
- function ths_editor_preview(){
- var data = CKEDITOR.instances.ths_editor.getData();
- $('#preview').html(data);
- $('#preview').show()
- }
- function ths_editor_reset(){
- CKEDITOR.instances.ths_editor.setData( '', function() {
- //this.checkDirty(); // true
- ths_editor_init();
- });
- }
- function ths_editor_clear(){
- CKEDITOR.instances.ths_editor.setData('');
- $('#preview').html("");
- $('#preview').hidden()
- }
- function ths_editor_save(){
- var param = "formid=" + $('#formid').val()+ "&listid="
- + $('#listid').val()+"&ths_editor="+CKEDITOR.instances.ths_editor.getData();
- $.ajax({
- type : 'post',
- url : $('#editor_form').attr('action'),
- data : param,
- async : false,//这里必须是同步请求
- success : function(response) {
- alert(response);
- },
- error:function (XMLHttpRequest, textStatus, errorThrown) {
- alert(textStatus);
- }
- });
- }
- </script>
- </p>
- <p>
- <!-- <input type="submit"> -->
- </p>
- </form>
- <input id="btn_inittable" type="button" value="初始化Table表单" onclick="ths_editor_init('table')"></input>
- <input id="btn_initdiv" type="button" value="初始化Div表单" onclick="ths_editor_init('div')"></input>
- <input id="btn_reset" type="button" value="重置" onclick="ths_editor_reset()"></input>
- <input id="btn_clear" type="button" value="清空" onclick="ths_editor_clear()"></input>
- <input id="btn_preview" type="button" value="预览" onclick="ths_editor_preview()"></input>
- <input id="btn_save" type="button" value="保存" onclick="ths_editor_save()"></input>
- <input id="btn_ths_textfield" type="button" value="单行文本框" onclick="ths_exec_cmd('ths_textfield')"></input>
- <input id="btn_ths_textarea" type="button" value="多行文本框" onclick="ths_exec_cmd('ths_textarea')"></input>
- <input id="btn_ths_select" type="button" value="下拉框" onclick="ths_exec_cmd('ths_select')"></input>
- <input id="btn_ths_radio" type="button" value="单选框" onclick="ths_exec_cmd('ths_radio')"></input>
- <input id="btn_ths_checkbox" type="button" value="复选框" onclick="ths_exec_cmd('ths_checkbox')"></input>
- <input id="btn_ths_hiddenfield" type="button" value="隐藏域" onclick="ths_exec_cmd('ths_hiddenfield')"></input>
- <div id="preview" style="padding:10px;margin-top:10px;display:none">
- </div>
- </body>
- </html>
这几篇文章更多地是介绍使用CKeditor来定制自己的表单设计器的一个思路,其中包括了CKeditor的初始化,配置,插件开发,扩展功能等。
不要拘泥于每一行代码,重要的是思路。
随后会把代码公开到CSDN CODE,不要急着跟我要代码哈。


 3845
3845

 被折叠的 条评论
为什么被折叠?
被折叠的 条评论
为什么被折叠?
 到【灌水乐园】发言


