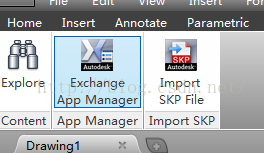
在上一篇关于AutoCAD的文章中,我将很多关于CAD的博客相关资源进行了说明,这一篇文章我将介绍如何在AutoCAD中的ribbon中添加相应的按钮。就是下面这种按钮:
PS:在开发中我们最好使用中英文两个版本同时进行,因为有些时候那些接口或类中的命名和英文版中的名称一样的,这样方便理解!
-----------------------------------------------------分割线------------------------------------------------
开发工具 :VS2010
开发环境 :.Net Framework4.5
开发语言 :C#
AutoCAD版本:2014中/EN
-----------------------------------------------------分割线-----------------------------------------------
第一种:利用.cuix配置文件
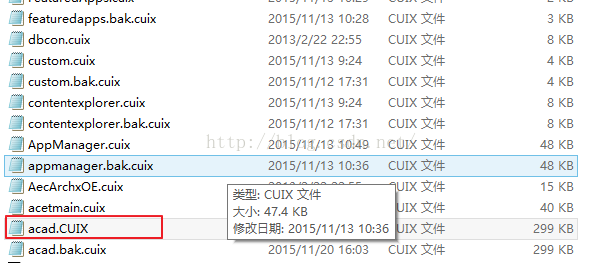
如果你是一个CAD的老用户,你会知道这个配置文件,以前是.cui后缀的,新版本从2013开始是.cuix,不过本质上是一个东西;每当你打开AutoCAD的时候,它根据lisp加载的一大堆配置文件就在.cuix中,一般这些配置文件在C盘的隐藏文件夹里面,C:\Users\当前用户名(Administrator?)\AppData\Roaming\Autodesk\AutoCAD 2014\R19.1\chs\Support,不过最重要的是红色方框那个:
这里我们可以自定义一个自己的.cuix文件,然后再CAD中输入cui命令,打开用户自定义窗体,然后你可以将你的自定义文件cuix添加进去:

这里的mycui文件就是我们自定义的啦,未融入就是之前添加现在路经找不到文件咯!你需要在这个文件中新建自己的按钮:
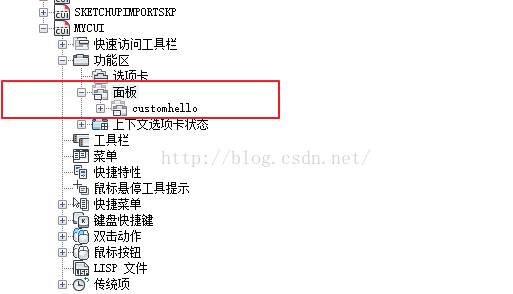
就是这个东西,多试试你就知道怎么做了,然后给你自定义的按钮添加一个命令宏,也就是你在CAD之中点击这个按钮需要使用的命令,这个命令可以是自己代码写在DLL中加载到CAD中的,也可以是CAD内置的,自定义按钮当然一般是自定义命令啦!
当然你以为这样就行啦,那就错了,现在只是配置文件做好了,下一步我们需要将配置文件刚才弄好的按钮功能添加到ACAD下的功能区—》选项卡—》插件:
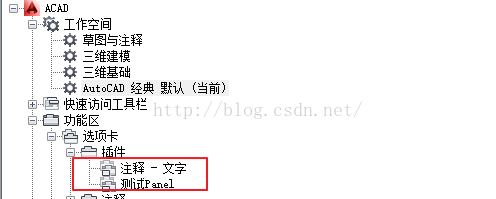
接下来你还需要选择工作空间,然后右键选择自定义工作空间(一般我们使用默认工作空间,当然也可以代码设置工作空间),然后将刚才的编辑好的插件添加进去

这样我们就配置好了我们的插件按钮了,最后我们需要输入‘netload’将我们的写好的dll命令添加进来就可以实现按钮互操作了,这里我们每次加载自定义的.cuix之后的操作也可以使用代码实现,我们在VS中安装了AutoCAD的插件开发环境后Autodesk新建项目,在myPlugin.cs这个文件的void IExtensionApplication.Initialize()方法中写入加载.cuix文件的代码,这样每次加载dll就会预先加载cuix文件,那么就不会出现cuix未融入的状态了;然后就是将我们写在cuix中的配置好的按钮添加到主功能区中去!
-
-
-
-
- private void AddRibbonButtonByCustomCui()
- {
- string mainCuiFile = (string)Application.GetSystemVariable("MENUNAME");
- mainCuiFile += ".cuix";
- CustomizationSection csLoad = new CustomizationSection(mainCuiFile);
- PartialCuiFileCollection pPartialCuiFileCollection = csLoad.PartialCuiFiles;
- if (pPartialCuiFileCollection.Contains("mycui.cuix"))
- {
- System.Windows.Forms.MessageBox.Show("已加载插件!");
- Application.UnloadPartialMenu(strCuipath);
-
- }
-
- bool isOK = Application.LoadPartialMenu(strCuipath);
-
- if (!isOK)
- {
- System.Windows.Forms.MessageBox.Show("加载自定义配置文件失败!");
- return;
- }
-
-
-
-
-
-
- CustomizationSection cs = new CustomizationSection(mainCuiFile);
- PartialCuiFileCollection cuiFiles = cs.PartialCuiFiles;
-
- if (cuiFiles.Contains("mycui.cuix"))
- {
- string strPartialCui = cuiFiles.GetFileNameByIndex(cuiFiles.IndexOf("mycui.cuix"));
- CustomizationSection csCustom = new CustomizationSection(strPartialCui);
- RibbonPanelSource pRibbonPanelSource = csCustom.MenuGroup.RibbonRoot.FindPanel("RBNU_191_C0DED");
- RibbonPanelSource pCloneRibbonPanelSource = pRibbonPanelSource.Clone() as RibbonPanelSource;
- cs.MenuGroup.RibbonRoot.RibbonPanelSources.Add(pCloneRibbonPanelSource);
-
- RibbonTabSource pRibbonTableSource2 = cs.MenuGroup.RibbonRoot.FindTab("RBN_00012112");
- RibbonPanelSourceReference pRibbonPanelSourceRefrence = new RibbonPanelSourceReference(pRibbonTableSource2);
-
- pRibbonPanelSourceRefrence.PanelId = pCloneRibbonPanelSource.ElementID;
- pRibbonTableSource2.Items.Add(pRibbonPanelSourceRefrence);
-
- cs.Save();
- Application.ReloadAllMenus();
- }
- }
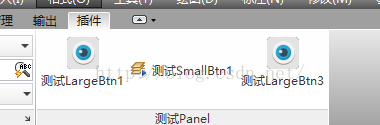
最后的按钮效果啦。。。
这一篇主要讲了太多关于配置的流程,大多可以使用手动配置实现,核心是需要自定义的配置文件cuix,然后读取他的命令按钮添加到我们主ribbon中,下两篇将从纯代码开始添加按钮,但是不同的命名空间!
上一篇相关文章主要借助了cuix配置文件来制作插件按钮,但是对于纯码农来说还是喜欢以代码来说话,今天这篇文章就来讲讲纯代码添加按钮。
开发IDE:VS2010
环境:.Net Framework4.0
AutoCAD版本:2014中/EN
今天介绍的代码主要借助的是AcCui.dll这个动态链接库,因为在我的了解中,CAD的开发库中有很多类似的类,又没有相关的介绍API的文档(你不是专业人员真是心累~),都是自己尝试或者在AutoDesk社区中找到的相关内容。
下面先说说思路,再添加核心代码,如果你有需要,欢迎关注我或者联系我,我很愿意与你共享资源与共同学习进步 。
。
1.首先还是要找到相关的主cuix文件,就是AutoCAD二次开发三种添加插件按钮的方法之一中介绍的acad.cuix文件(我觉得添加图片排版太不方便了,所以尽量减少图片~);
-
- CustomizationSection cs = new CustomizationSection((string)Application.GetSystemVariable("MENUNAME"));
- string strCurWorkspace = (string)Application.GetSystemVariable("WSCURRENT");
-
- Workspace curWorkspace = cs.getWorkspace(strCurWorkspace);
- if (IsExistPluginTab(ed, curWorkspace))
- {
-
- InitialRibbonBtn(ed, cs);
- }
2.由于我们是需要将按钮添加到‘插件’这个Tab中,而这个Tab是在Ribbon中的(而AutoCAD又是可以自定义是否显示Ribbon的,而且不同的工作空间显示的Ribbon还不同,所以我这里尽量简化了,不讨论那些了),这个Tab的ElementID叫做RBN_00012112,我们可以根据此判断这个Tab是否存在还是被删掉了(默认安装时存在的);这里只讨论存在的咯。
3.如果存在,我们直接获取到这个Tab,在其中在其中添加一个Panel按钮;
-
-
-
-
-
-
-
-
- private Autodesk.AutoCAD.Customization.RibbonPanelSource AddRibbonPanelToTab(CustomizationSection cs, string tabName,string tabEnName, string panelName)
- {
- RibbonRoot root = cs.MenuGroup.RibbonRoot;
- Autodesk.AutoCAD.Customization.RibbonPanelSourceCollection panels = root.RibbonPanelSources;
- RibbonTabSource rts = root.FindTab("RBN_00012112");
- if (rts == null)
- {
- Application.DocumentManager.MdiActiveDocument.Editor.WriteMessage("未找到指定的插件Tab");
- }
- if (rts.Name == tabName || rts.Name == tabEnName)
- {
-
- Autodesk.AutoCAD.Customization.RibbonPanelSource panelSrc = new Autodesk.AutoCAD.Customization.RibbonPanelSource(root);
- panelSrc.Text = panelSrc.Name = panelName;
- panelSrc.ElementID = panelSrc.Id = panelName + "_PanelSourceID";
- panels.Add(panelSrc);
-
- RibbonPanelSourceReference ribPanelSourceRef = new RibbonPanelSourceReference(rts);
- ribPanelSourceRef.PanelId = panelSrc.ElementID;
- rts.Items.Add(ribPanelSourceRef);
-
- return panelSrc;
- }
- return null;
- }
4.在这个自定义的Panel直接添加按钮,最后重新加载所有menu。
- private void InitialRibbonBtn(Editor ed, CustomizationSection cs)
- {
- Autodesk.AutoCAD.Customization.RibbonPanelSource panelSrc = AddRibbonPanelToTab(cs, "插件", "Plug-ins","测试Panel");
- MacroGroup macGroup = cs.MenuGroup.MacroGroups[0];
-
-
-
-
-
- RibbonRow row = new RibbonRow();
- panelSrc.Items.Add((Autodesk.AutoCAD.Customization.RibbonItem)row);
-
- RibbonCommandButton button1 = new RibbonCommandButton(row);
- button1.Text = "测试LargeBtn1";
- MenuMacro menuMac1 = macGroup.CreateMenuMacro("Button1_Macro", "^C^CButton1_Command ", "Button1_Tag", "Button1_Help",
- MacroType.Any, "RibbonImages//test16.png", "RibbonImages//test32.png", "Button1_Label_Id");
- button1.MacroID = menuMac1.ElementID;
- button1.ButtonStyle = RibbonButtonStyle.LargeWithText;
- button1.KeyTip = "Button1 Key Tip";
- button1.TooltipTitle = "Button1 Tooltip Title!";
- row.Items.Add((Autodesk.AutoCAD.Customization.RibbonItem)button1);
-
- RibbonCommandButton button2 = new RibbonCommandButton(row);
- button2.Text = "测试SmallBtn1";
- MenuMacro menuMac2 = macGroup.CreateMenuMacro("Button2_Macro", "^C^CButton2_Command ", "Button2_Tag", "Button2_Help",
- MacroType.Any, "RibbonImages//test16.png", "RibbonImages//test32.png", "Button2_Label_Id");
- button2.MacroID = menuMac2.ElementID;
- button2.ButtonStyle = RibbonButtonStyle.SmallWithText;
- button2.KeyTip = "Button2 Key Tip";
- button2.TooltipTitle = "Button2 Tooltip Title!";
- row.Items.Add((Autodesk.AutoCAD.Customization.RibbonItem)button2);
-
- RibbonCommandButton button3 = new RibbonCommandButton(row);
- button3.Text = "测试LargeBtn3";
- MenuMacro menuMac3 = macGroup.CreateMenuMacro("Button3_Macro", "^C^CButton3_Command ", "Button3_Tag", "Button3_Help",
- MacroType.Any, "RibbonImages//test16.png", "RibbonImages//test32.png", "Button3_Label_Id");
- button3.MacroID = menuMac3.ElementID;
- button3.ButtonStyle = RibbonButtonStyle.LargeWithText;
- button3.KeyTip = "Button3 Key Tip";
- button3.TooltipTitle = "Button3 Tooltip Title!";
- row.Items.Add((Autodesk.AutoCAD.Customization.RibbonItem)button3);
-
- cs.Save();
-
- Application.ReloadAllMenus();
- ed.WriteMessage("Add buttons successed!");
- }

最后,效果和第一篇最后的效果是一样的哦!~
再之前两篇的介绍中,无论是第一篇还是第二篇都需要依赖于AutoCAD中的acad.cuix文件,这是写插件所不能容忍的啊!所以这一篇我们不依赖任何的配置,直接加载dll并输入相应的命令即可实现添加命令按钮的操作!这次我们需要使用的dll是AcWindows.dll!~
逻辑如下:
1.如果没有打开Ribbon,控制命令行打开
2.判断当前的Tabs中是否存在同title的Tab,初次加载不会存在的
3.添加Panel并在panel中添加button
- private const string New_Tab_ID = "New_Tab_ID";
- private bool PluginAdded = false;
- [CommandMethod("addplugin")]
- public void AddPlugIn()
- {
- if (Autodesk.Windows.ComponentManager.Ribbon == null)
- {
- Application.DocumentManager.MdiActiveDocument.SendStringToExecute("_.ribbon\r", true, false, false);
- }
- if (PluginAdded)
- {
- System.Windows.Forms.MessageBox.Show("自定义插件已加载!");
- return;
- }
- bool TabExist = false;
- Autodesk.Windows.RibbonControl pRibbonControl = Autodesk.Windows.ComponentManager.Ribbon;
- foreach (RibbonTab itemTab in pRibbonControl.Tabs)
- {
- if (itemTab.Title == "自定义插件Tab")
- {
- AddNewPanel(itemTab);
- TabExist = true;
- }
- }
- if (!TabExist)
- {
- RibbonTab newTab = new RibbonTab();
- newTab.Title = "自定义插件Tab";
- newTab.Id = New_Tab_ID;
- pRibbonControl.Tabs.Add(newTab);
-
- AddNewPanel(newTab);
-
- newTab.IsActive = true;
- }
- }
-
- private void AddNewPanel(RibbonTab newTab)
- {
- try
- {
- Autodesk.Windows.RibbonPanelSource panelSource = new Autodesk.Windows.RibbonPanelSource();
- panelSource.Title = "自定义插件Panel";
-
- RibbonPanel newRibbonPanel = new RibbonPanel();
- newRibbonPanel.Source = panelSource;
- newTab.Panels.Add(newRibbonPanel);
-
- Autodesk.Windows.RibbonButton pButton = new Autodesk.Windows.RibbonButton();
- pButton.Text = "自定义插件button";
- pButton.ToolTip = "自定义的button1测试";
- pButton.ShowToolTipOnDisabled = true;
- pButton.IsToolTipEnabled = true;
- pButton.Size = RibbonItemSize.Large;
- pButton.LargeImage = LoadImage(AutoCAD_CSharp_plug_in1_2010.Resource1.test32);
- pButton.Image = LoadImage(AutoCAD_CSharp_plug_in1_2010.Resource1.test16);
- pButton.Orientation = System.Windows.Controls.Orientation.Vertical;
- pButton.ShowText = true;
- pButton.ShowImage = true;
- pButton.CommandParameter = "plugincommand ";
- pButton.CommandHandler = new TestCommandHandler();
-
- Autodesk.Windows.RibbonButton pRemovePluginButton = new Autodesk.Windows.RibbonButton();
- pRemovePluginButton.Text = "删除插件按钮";
- pRemovePluginButton.ToolTip = "自定义的button2测试";
- pRemovePluginButton.ShowToolTipOnDisabled = true;
- pRemovePluginButton.IsToolTipEnabled = true;
- pRemovePluginButton.Size = RibbonItemSize.Standard;
- pRemovePluginButton.LargeImage = LoadImage(AutoCAD_CSharp_plug_in1_2010.Resource1.test32);
- pRemovePluginButton.Image = LoadImage(AutoCAD_CSharp_plug_in1_2010.Resource1.test16);
- pButton.Orientation = System.Windows.Controls.Orientation.Vertical;
- pRemovePluginButton.ShowImage = true;
- pRemovePluginButton.ShowText = true;
- pRemovePluginButton.CommandParameter = "removeplugin ";
- pRemovePluginButton.CommandHandler = new RemovePluginCommandHandler();
-
-
- panelSource.Items.Add(pButton);
- panelSource.Items.Add(pRemovePluginButton);
- }
- catch (System.Exception ex)
- {
- Application.DocumentManager.MdiActiveDocument.Editor.WriteMessage( Environment.NewLine,ex.Message);
- }
- }
-
- private System.Windows.Media.Imaging.BitmapImage LoadImage(System.Drawing.Bitmap bitmap)
- {
- System.IO.MemoryStream ms = new System.IO.MemoryStream ();
- bitmap.Save(ms, System.Drawing.Imaging.ImageFormat.Png);
- System.Windows.Media.Imaging.BitmapImage bitImage = new BitmapImage();
- bitImage.BeginInit();
- bitImage.StreamSource = ms;
- bitImage.EndInit();
- return bitImage;
- }
每个
button都有一个CommandHandler属性,这个就是我们写我们自定义的触发按钮事件的类,继承于System.Windows.Input.ICommand!
至此,三种方式都写完了,这里小结一下。
总体来说这三种方式前两种依赖性较强,依赖于acad.cuix文件,第三种非要说依赖性的话,依赖于Ribbon一定要是打开状态的;第一种的配置文件做好了的话,甚至可以不写代码添加按钮代码就可以实现按钮(但是自定义CommandMethod还是要写的);第二种代码添加按钮写起来较为简便,条理也比较清晰;第三种完全基于代码实现,比较适合纯码农们!也比较适合插件开发的真正实施!亲们喜欢哪种就自己选吧!~


 1109
1109

 被折叠的 条评论
为什么被折叠?
被折叠的 条评论
为什么被折叠?
 到【灌水乐园】发言


