Centos7 搭建 GitLab

Centos7 搭建 GitLab

一:安装sshd

1.1 安装sshd

yum install -y curl policycoreutils-python openssh-server
2.2 接下来我们启用并启动 sshd:
systemctl enable sshd
systemctl start sshd
2.3 接下来我们配置下防火墙:
2.3.1 打开 /etc/sysctl.conf 文件,在文件最后添加新的一行
net.ipv4.ip_forward = 1
vim /etc/sysctl.conf
2.3.2 启用并启动防火墙
systemctl enable firewalld
systemctl start firewalld
2.3.4 防火墙对http放行
firewall-cmd --permanent --add-service=http
2.3.5 重启防火墙
systemctl reload firewalld

二:安装 postfix

GitLab 需要使用 postfix 来发送邮件。当然,也可以使用 SMTP 服务器。

2.1 安装postfix

yum install -y postfix

打开 /etc/postfix/main.cf 文件,在第 119 行附近找到 inet_protocols = all,将 all 改为 ipv4

vim /etc/postfix/main.cf
inet_protocols = ipv4

2.2 启用并启动postfix

systemctl enable postfix 
systemctl start postfix

2.3 配置 swap 交换分区

由于 GitLab 较为消耗资源,我们需要先创建交换分区,以降低物理内存的压力。 在实际生产环境中,如果服务器配置够高,则不必配置交换分区。

2.4 新建 2 GB 大小的交换分区:

dd if=/dev/zero of=/root/swapfile bs=1M count=2048

2.5 接下来我们对其格式化

mkswap /root/swapfile
swapon /root/swapfile

添加自启用。打开 /etc/fstab 文件,在文件最后添加新的一行

vim /etc/fstab
/root/swapfile swap swap defaults 0 0

三: 安装GitLab

3.1 创建git安装配置文件

将软件源修改为国内源 由于网络环境的原因,将 repo 源修改为清华大学 。

在 /etc/yum.repos.d 目录下新建 gitlab-ce.repo 文件并保存。内容如下:

[gitlab-ce]
name=Gitlab CE Repository
baseurl=https://mirrors.tuna.tsinghua.edu.cn/gitlab-ce/yum/el$releasever/
gpgcheck=0
enabled=1

3.2 修改完 yum 源,因此先重新生成缓存:

(此步骤执行时间较长,一般需要 3~5 分钟左右,请耐心等待)

yum makecache

四: 初始化GitLab

4.1 配置 GitLab 的域名(非必需)

打开 /etc/gitlab/gitlab.rb 文件,在第 13 行附近找到 external_url 'http://gitlab.example.com’,将单引号中的内容改为自己的域名(带上协议头,末尾无斜杠)

external_url 'http://119.29.102.85'

4.2 初始化 GitLab 特别重要!

使用如下命令初始化 GitLab:

(此步骤执行时间较长,一般需要 5~10 分钟左右,请耐心等待)

sudo gitlab-ctl reconfigure

初始化GitLab

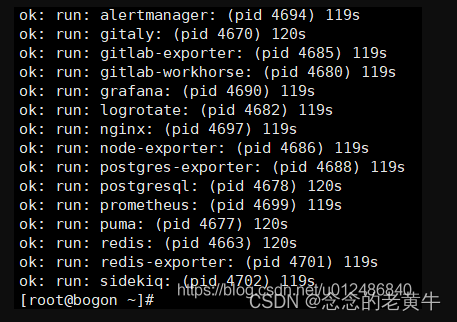
当看到这个就说明我们gitlab已经安装成功了

gitlab 启停相关操作

启动服务:gitlab -ctl start
查看状态:gitlab -ctl status
停掉服务:gitlab -ctl stop
重启服务:gitlab -ctl restart
让配置生效:gitlab -ctl reconfigure。

sudo gitlab-ctl reconfigure
sudo gitlab-ctl stop
sudo gitlab-ctl start
sudo gitlab -ctl restart

5.3 启动成功之后我们通过浏览器访问下

五: 初始化管理员密码

5.1

sudo gitlab-ctl reconfigure
sudo gitlab-ctl stop
sudo gitlab-ctl start
sudo gitlab -ctl restart


### 5.3 启动成功之后我们通过浏览器访问下


## 五: 初始化管理员密码

### 5.1 


  • 0
    点赞
  • 3
    收藏
    觉得还不错? 一键收藏
  • 2
    评论
### 回答1: 下面是CentOS 7搭建GitLab服务器的大致步骤: 1. 安装必要的依赖包:sudo yum install curl policycoreutils-python openssh-server 2. 安装Postfix以支持发送邮件:sudo yum install postfix 3. 添加GitLab仓库:curl https://packages.gitlab.com/install/repositories/gitlab/gitlab-ce/script.rpm.sh | sudo bash 4. 安装GitLab:sudo yum install gitlab-ce 5. 配置并启动GitLab:sudo gitlab-ctl reconfigure 注意:以上步骤仅提供参考,具体安装过程请参考GitLab官方文档。 ### 回答2: GitLab是一款基于Git的Web平台,用于管理Git仓库、代码审查、问题跟踪以及自动构建等。CentOS 7上安装GitLab服务器需要经过如下步骤: 1. 更新系统 首先,你要更新CentOS 7操作系统,以确保安装过程中使用最新版本的软件包。可以使用以下命令完成系统升级: ``` sudo yum update -y ``` 2. 安装必要软件 在安装GitLab之前,需要确保系统上安装了一些必要软件,包括curl,policycoreutils和Postfix等。可以使用以下命令安装这些软件: ``` sudo yum install -y curl policycoreutils openssh-server openssh-clients postfix ``` 在安装Postfix时,你需要选择“Internet Site”选项。 3. 安装GitLab 接下来,你可以使用官方的GitLab安装脚本安装GitLab。可以使用以下命令下载和运行脚本: ``` curl https://packages.gitlab.com/install/repositories/gitlab/gitlab-ce/script.rpm.sh | sudo bash sudo yum install -y gitlab-ce ``` 该脚本将会添加GitLab官方的yum存储库,以便自动安装最新版本的GitLab。 4. 配置GitLab 安装GitLab后,你需要对其进行一些配置以使其正常运行。你可以使用以下命令编辑GitLab配置文件: ``` sudo vi /etc/gitlab/gitlab.rb ``` 你需要根据具体需求和安全需求在文件中设置适当的值。最重要的配置参数如下: ``` # 配置GitLab的外部URL external_url 'http://gitlab.example.com' # 配置邮件服务,用于发送通知 gitlab_rails['smtp_enable'] = true gitlab_rails['smtp_address'] = "smtp.gmail.com" gitlab_rails['smtp_port'] = 587 gitlab_rails['smtp_user_name'] = "user@example.com" gitlab_rails['smtp_password'] = "password" gitlab_rails['smtp_authentication'] = "login" gitlab_rails['smtp_enable_starttls_auto'] = true # 配置GitLab SSH监听地址 gitlab_rails['gitlab_ssh_host'] = 'ssh.example.com' gitlab_rails['gitlab_ssh_port'] = 22 # 配置LDAP身份验证(可选) gitlab_rails['ldap_enabled'] = true gitlab_rails['ldap_servers'] = YAML.load <<-EOS main: label: 'LDAP' host: 'ldap.example.com' port: 636 uid: 'sAMAccountName' bind_dn: 'CN=GitLab,OU=Service Accounts,DC=example,DC=com' password: 'password' encryption: 'simple_tls' verify_certificates: false active_directory: true allow_username_or_email_login: true block_auto_created_users: false base: 'DC=example,DC=com' EOS ``` 5. 重新配置GitLab 完成配置文件的编辑后,你需要重新配置GitLab以应用新的设置: ``` sudo gitlab-ctl reconfigure ``` 这会执行所有必要的配置更改,以确保GitLab可以正常运行。 6. 访问GitLab 在完成GitLab的安装和配置后,你可以通过浏览器访问GitLab,登录并创建仓库、添加用户等操作。GitLab默认使用HTTP协议,可以在配置文件中配置为HTTPS。 GitLab是一款功能强大的版本控制平台,可以用于开发和团队协作。CentOS 7上的安装和配置也非常简单,只需要按照以上步骤进行即可。 ### 回答3: CentOS 7 搭建 GitLab 服务器 Git是一个版本控制系统,可用于共享和管理源代码、文本文件、电子文档等等。GitLab是一个源代码管理器,提供自托管 Git repos、代码评审、CI/CD、问题跟踪等功能。在本文中,我们将介绍在 CentOS 7 上搭建 GitLab 服务器的过程。 准备工作: 准备一台安装了 CentOS 7 操作系统的主机。 确保主机的防火墙开放了HTTP/HTTPS端口。 确保主机已连接到互联网。 安装必要的软件包: 在开始之前,我们需要确保在服务器上安装了常见的软件包: sudo yum install -y curl policycoreutils-python openssh-server sudo systemctl enable sshd sudo systemctl start sshd sudo firewall-cmd --permanent --add-service=http --add-service=https sudo systemctl reload firewalld 安装 GitLab CE: GitLab有两个版本:CE和EE。CE是社区版,免费使用;EE是企业版,需要付费才能使用。在我们的例子中,我们将使用GitLab CE搭建我们的源代码管理器。 sudo yum install -y postfix sudo systemctl enable postfix sudo systemctl start postfix curl -sS https://packages.gitlab.com/install/repositories/gitlab/gitlab-ce/script.rpm.sh | sudo bash sudo yum install -y gitlab-ce sudo gitlab-ctl reconfigure 我们现在可以通过浏览器访问GitLab web UI。在浏览器中键入服务器IP地址,然后会显示GitLab设置向导。根据您的要求来自定义您的GitLab实例。 初始登陆到GitLab: 在第一次登录 GitLab 时,您将被要求输入初始管理员密码。此密码随后需要更改。此外,还要求您更改登记用户的密码。 首先,用IP访问和端口号(默认为80)打开网站,然后选择更改密码: 输入初始管理员密码。 创建新密码以继续。 创建新用户: 现在我们需要创建用于GitLab的新用户。登陆到GitLab并点击右上角的"Add user"。 ``` 输入用户名和用户密码。 为新用户分配一个角色("reporter" 或 "developer"),并单击"Create user"。 ``` 我们已经安装并配置了GitLab服务器。这是一个初始过程,并且需要根据您的项目需要进行自定义。现在你可以开始创建和管理Git仓库,共享代码并管理您的项目。 总结: 在CentOS 7上搭建GitLab服务器非常简单,只需要几个步骤。首先,您需要确保服务器上安装了必要的软件包,例如SSH,firewalld,以打开HTTP和HTTPS端口。然后,您需要使用GitLab安装脚本安装GitLab。一旦安装成功了,您可以使用Web页面登录到GitLab,并开始上传和共享代码库。

“相关推荐”对你有帮助么?

  • 非常没帮助
  • 没帮助
  • 一般
  • 有帮助
  • 非常有帮助
提交
评论 2
添加红包

请填写红包祝福语或标题

红包个数最小为10个

红包金额最低5元

当前余额3.43前往充值 >
需支付:10.00
成就一亿技术人!
领取后你会自动成为博主和红包主的粉丝 规则
hope_wisdom
发出的红包
实付
使用余额支付
点击重新获取
扫码支付
钱包余额 0

抵扣说明:

1.余额是钱包充值的虚拟货币,按照1:1的比例进行支付金额的抵扣。
2.余额无法直接购买下载,可以购买VIP、付费专栏及课程。

余额充值