


作者:小猪快跑
基础数学&计算数学,从事优化领域5年+,主要研究方向:MIP求解器、整数规划、随机规划、智能优化算法。
GoogleTest 可帮助您编写更好的 C++ 测试。GoogleTest 是由测试技术团队开发的测试框架,具有 考虑到 Google 的具体要求和限制。无论您从事以下工作 Linux、Windows 或 Mac,如果您编写 C++ 代码,GoogleTest 可以为您提供帮助。它 支持任何类型的测试,而不仅仅是单元测试。
本文将带你快速上手GoogleTest,无需安装到环境,直接用CMake构建。
如有错误,欢迎指正。如有更好的算法,也欢迎交流!!!——@小猪快跑
相关教程
- 【从零开始】在Windows中使用Linux——在WSL使用CLion、IDEA、PyCharm(安装到建立工程)——更新于2021.12
- WSL2 运行 CLion/IDEA/PyCharm等GUI应用——更新于2022.01
相关文献
- google/googletest: GoogleTest - 谷歌测试和模拟框架 (github.com)
- googletest/googletest/README.md at main · google/googletest (github.com)
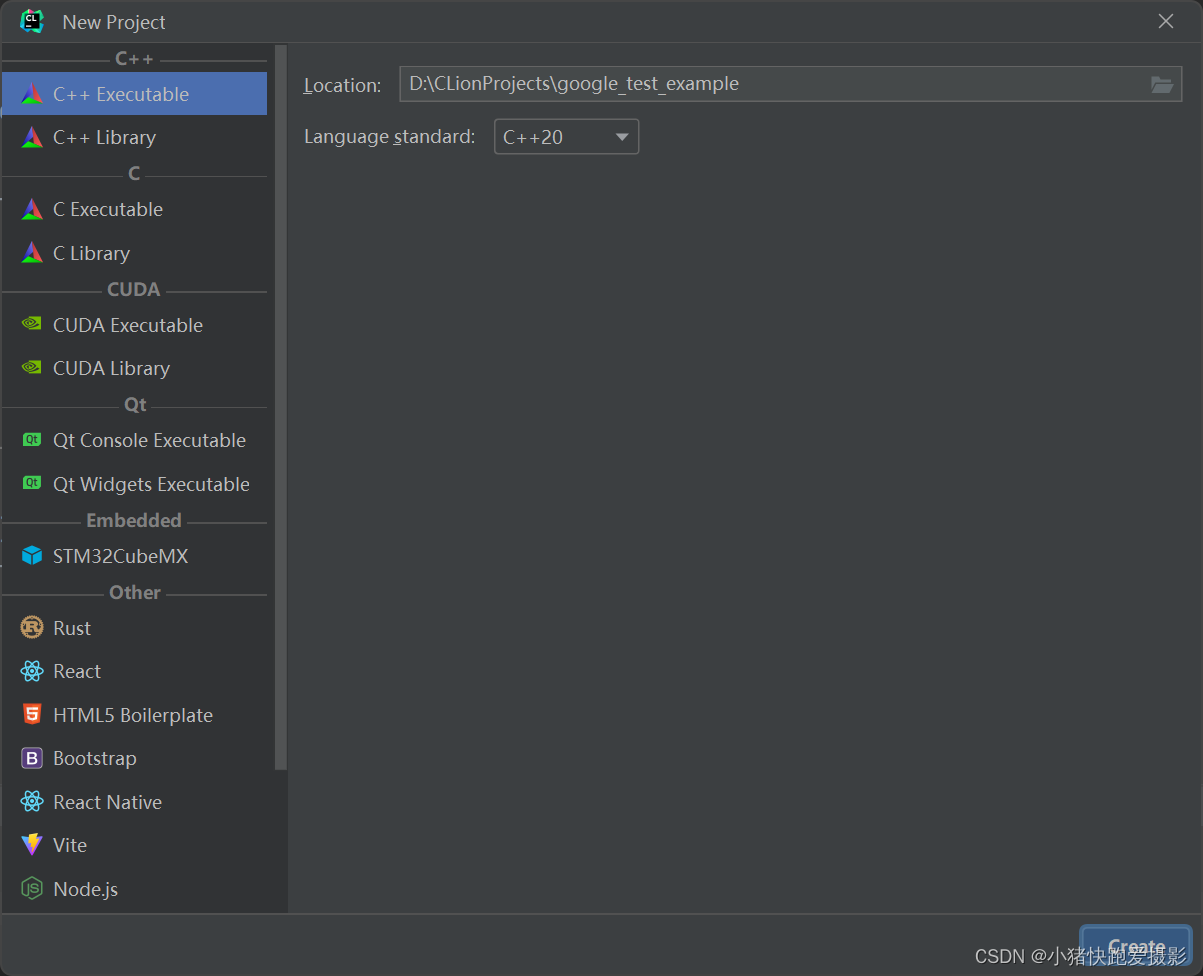
CMake工程构建
首先打开CLion创建新工程:
CMakeLists.txt(能访问GitHub)
cmake_minimum_required(VERSION 3.25)

project(google_test_example)

set(CMAKE_CXX_STANDARD 20)

set(PROJECT_ROOT_PATH "${PROJECT_SOURCE_DIR}")
# 可以把gtest打包后的.so文件放进lib目录下
set(LIBRARY_OUTPUT_PATH "${PROJECT_ROOT_PATH}/${OUTDIRS}/lib/")
# 可以把输出文件放进bin目录下
set(EXECUTABLE_OUTPUT_PATH "${PROJECT_ROOT_PATH}/${OUTDIRS}/bin/")

# Build GoogleTest dependencies.
set(BUILD_GoogleTest ON)

include(FetchContent)
# 填充期间的日志输出可能非常冗长,使得配置阶段非常嘈杂。此缓存选项(ON默认情况下)隐藏所有填充输出,除非遇到错误。如果遇到挂起下载的问题,
# 暂时关闭此选项可能有助于诊断导致问题的内容群体。
set(FETCHCONTENT_QUIET OFF)

# 避免每次下载编译及其所有依赖
get_filename_component(_deps "../_deps" REALPATH BASE_DIR "${CMAKE_BINARY_DIR}")
# 在大多数情况下,保存的详细信息没有指定与用于内部子构建、最终源和构建区域的目录相关的任何选项。通常最好将这些决定留给FetchContent 模块来代表项目处理。
# 缓存变量控制收集所有内容填充目录的FETCHCONTENT_BASE_DIR 点,但在大多数情况下,开发人员不需要更改它。
# 默认位置是${CMAKE_BINARY_DIR}/_deps,但如果开发人员更改此值,他们应该致力于保持路径短且刚好低于构建树的顶层,以避免在 Windows 上遇到路径长度问题。
set(FETCHCONTENT_BASE_DIR ${_deps})

# ##############################################################################
# GoogleTest
# ##############################################################################
if (BUILD_GoogleTest)
    message(CHECK_START "Fetching GoogleTest")
    list(APPEND CMAKE_MESSAGE_INDENT "  ")
    FetchContent_Declare(
            googletest
            URL https://github.com/google/googletest/archive/5376968f6948923e2411081fd9372e71a59d8e77.zip
    )
    FetchContent_MakeAvailable(googletest)
    list(POP_BACK CMAKE_MESSAGE_INDENT)
    message(CHECK_PASS "fetched")
endif ()

# Now simply link against gtest or gtest_main as needed. Eg
if (BUILD_GoogleTest)
    add_executable(example src/sample1.h src/sample1.cc src/sample1_unittest.cc)
    target_link_libraries(example gtest_main)
    # add_test(NAME example_test COMMAND example)
endif ()
CMakeLists.txt(不能访问GitHub)
提前下载代码【免费】GoogleTest(gtest)资源-CSDN文库

cmake_minimum_required(VERSION 3.25)

project(google_test_example)

set(CMAKE_CXX_STANDARD 20)

set(PROJECT_ROOT_PATH "${PROJECT_SOURCE_DIR}")
# 可以把gtest打包后的.so文件放进lib目录下
set(LIBRARY_OUTPUT_PATH "${PROJECT_ROOT_PATH}/${OUTDIRS}/lib/")
# 可以把输出文件放进bin目录下
set(EXECUTABLE_OUTPUT_PATH "${PROJECT_ROOT_PATH}/${OUTDIRS}/bin/")

# Build GoogleTest dependencies.
set(BUILD_GoogleTest ON)

include(FetchContent)
# 填充期间的日志输出可能非常冗长,使得配置阶段非常嘈杂。此缓存选项(ON默认情况下)隐藏所有填充输出,除非遇到错误。如果遇到挂起下载的问题,
# 暂时关闭此选项可能有助于诊断导致问题的内容群体。
set(FETCHCONTENT_QUIET OFF)

# 避免每次下载编译及其所有依赖
get_filename_component(_deps "../_deps" REALPATH BASE_DIR "${CMAKE_BINARY_DIR}")
# 在大多数情况下,保存的详细信息没有指定与用于内部子构建、最终源和构建区域的目录相关的任何选项。通常最好将这些决定留给FetchContent 模块来代表项目处理。
# 缓存变量控制收集所有内容填充目录的FETCHCONTENT_BASE_DIR 点,但在大多数情况下,开发人员不需要更改它。
# 默认位置是${CMAKE_BINARY_DIR}/_deps,但如果开发人员更改此值,他们应该致力于保持路径短且刚好低于构建树的顶层,以避免在 Windows 上遇到路径长度问题。
set(FETCHCONTENT_BASE_DIR ${_deps})

# ##############################################################################
# GoogleTest
# ##############################################################################
if (BUILD_GoogleTest)
    message(CHECK_START "Fetching GoogleTest")
    list(APPEND CMAKE_MESSAGE_INDENT "  ")
    FetchContent_Declare(
            googletest
            URL "${PROJECT_SOURCE_DIR}/deps/googletest-5376968f6948923e2411081fd9372e71a59d8e77.zip"
    )
    FetchContent_MakeAvailable(googletest)
    list(POP_BACK CMAKE_MESSAGE_INDENT)
    message(CHECK_PASS "fetched")
endif ()

# Now simply link against gtest or gtest_main as needed. Eg
if (BUILD_GoogleTest)
    add_executable(example src/sample1.h src/sample1.cc src/sample1_unittest.cc)
    target_link_libraries(example gtest_main)
    # add_test(NAME example_test COMMAND example)
endif ()
官方测试用例
文件目录如下:
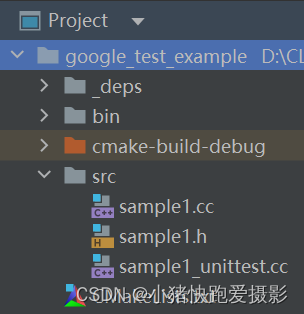
sample1.cc:
// Copyright 2005, Google Inc.
// All rights reserved.
//
// Redistribution and use in source and binary forms, with or without
// modification, are permitted provided that the following conditions are
// met:
//
//     * Redistributions of source code must retain the above copyright
// notice, this list of conditions and the following disclaimer.
//     * Redistributions in binary form must reproduce the above
// copyright notice, this list of conditions and the following disclaimer
// in the documentation and/or other materials provided with the
// distribution.
//     * Neither the name of Google Inc. nor the names of its
// contributors may be used to endorse or promote products derived from
// this software without specific prior written permission.
//
// THIS SOFTWARE IS PROVIDED BY THE COPYRIGHT HOLDERS AND CONTRIBUTORS
// "AS IS" AND ANY EXPRESS OR IMPLIED WARRANTIES, INCLUDING, BUT NOT
// LIMITED TO, THE IMPLIED WARRANTIES OF MERCHANTABILITY AND FITNESS FOR
// A PARTICULAR PURPOSE ARE DISCLAIMED. IN NO EVENT SHALL THE COPYRIGHT
// OWNER OR CONTRIBUTORS BE LIABLE FOR ANY DIRECT, INDIRECT, INCIDENTAL,
// SPECIAL, EXEMPLARY, OR CONSEQUENTIAL DAMAGES (INCLUDING, BUT NOT
// LIMITED TO, PROCUREMENT OF SUBSTITUTE GOODS OR SERVICES; LOSS OF USE,
// DATA, OR PROFITS; OR BUSINESS INTERRUPTION) HOWEVER CAUSED AND ON ANY
// THEORY OF LIABILITY, WHETHER IN CONTRACT, STRICT LIABILITY, OR TORT
// (INCLUDING NEGLIGENCE OR OTHERWISE) ARISING IN ANY WAY OUT OF THE USE
// OF THIS SOFTWARE, EVEN IF ADVISED OF THE POSSIBILITY OF SUCH DAMAGE.

// A sample program demonstrating using Google C++ testing framework.

#include "sample1.h"

// Returns n! (the factorial of n).  For negative n, n! is defined to be 1.
int Factorial(int n) {
  int result = 1;
  for (int i = 1; i <= n; i++) {
    result *= i;
  }

  return result;
}

// Returns true if and only if n is a prime number.
bool IsPrime(int n) {
  // Trivial case 1: small numbers
  if (n <= 1) return false;

  // Trivial case 2: even numbers
  if (n % 2 == 0) return n == 2;

  // Now, we have that n is odd and n >= 3.

  // Try to divide n by every odd number i, starting from 3
  for (int i = 3;; i += 2) {
    // We only have to try i up to the square root of n
    if (i > n / i) break;

    // Now, we have i <= n/i < n.
    // If n is divisible by i, n is not prime.
    if (n % i == 0) return false;
  }

  // n has no integer factor in the range (1, n), and thus is prime.
  return true;
}
sample1.h
// Copyright 2005, Google Inc.
// All rights reserved.
//
// Redistribution and use in source and binary forms, with or without
// modification, are permitted provided that the following conditions are
// met:
//
//     * Redistributions of source code must retain the above copyright
// notice, this list of conditions and the following disclaimer.
//     * Redistributions in binary form must reproduce the above
// copyright notice, this list of conditions and the following disclaimer
// in the documentation and/or other materials provided with the
// distribution.
//     * Neither the name of Google Inc. nor the names of its
// contributors may be used to endorse or promote products derived from
// this software without specific prior written permission.
//
// THIS SOFTWARE IS PROVIDED BY THE COPYRIGHT HOLDERS AND CONTRIBUTORS
// "AS IS" AND ANY EXPRESS OR IMPLIED WARRANTIES, INCLUDING, BUT NOT
// LIMITED TO, THE IMPLIED WARRANTIES OF MERCHANTABILITY AND FITNESS FOR
// A PARTICULAR PURPOSE ARE DISCLAIMED. IN NO EVENT SHALL THE COPYRIGHT
// OWNER OR CONTRIBUTORS BE LIABLE FOR ANY DIRECT, INDIRECT, INCIDENTAL,
// SPECIAL, EXEMPLARY, OR CONSEQUENTIAL DAMAGES (INCLUDING, BUT NOT
// LIMITED TO, PROCUREMENT OF SUBSTITUTE GOODS OR SERVICES; LOSS OF USE,
// DATA, OR PROFITS; OR BUSINESS INTERRUPTION) HOWEVER CAUSED AND ON ANY
// THEORY OF LIABILITY, WHETHER IN CONTRACT, STRICT LIABILITY, OR TORT
// (INCLUDING NEGLIGENCE OR OTHERWISE) ARISING IN ANY WAY OUT OF THE USE
// OF THIS SOFTWARE, EVEN IF ADVISED OF THE POSSIBILITY OF SUCH DAMAGE.

// A sample program demonstrating using Google C++ testing framework.

#ifndef GOOGLETEST_SAMPLES_SAMPLE1_H_
#define GOOGLETEST_SAMPLES_SAMPLE1_H_

// Returns n! (the factorial of n).  For negative n, n! is defined to be 1.
int Factorial(int n);

// Returns true if and only if n is a prime number.
bool IsPrime(int n);

#endif  // GOOGLETEST_SAMPLES_SAMPLE1_H_
sample1_unittest.cc
// Copyright 2005, Google Inc.
// All rights reserved.
//
// Redistribution and use in source and binary forms, with or without
// modification, are permitted provided that the following conditions are
// met:
//
//     * Redistributions of source code must retain the above copyright
// notice, this list of conditions and the following disclaimer.
//     * Redistributions in binary form must reproduce the above
// copyright notice, this list of conditions and the following disclaimer
// in the documentation and/or other materials provided with the
// distribution.
//     * Neither the name of Google Inc. nor the names of its
// contributors may be used to endorse or promote products derived from
// this software without specific prior written permission.
//
// THIS SOFTWARE IS PROVIDED BY THE COPYRIGHT HOLDERS AND CONTRIBUTORS
// "AS IS" AND ANY EXPRESS OR IMPLIED WARRANTIES, INCLUDING, BUT NOT
// LIMITED TO, THE IMPLIED WARRANTIES OF MERCHANTABILITY AND FITNESS FOR
// A PARTICULAR PURPOSE ARE DISCLAIMED. IN NO EVENT SHALL THE COPYRIGHT
// OWNER OR CONTRIBUTORS BE LIABLE FOR ANY DIRECT, INDIRECT, INCIDENTAL,
// SPECIAL, EXEMPLARY, OR CONSEQUENTIAL DAMAGES (INCLUDING, BUT NOT
// LIMITED TO, PROCUREMENT OF SUBSTITUTE GOODS OR SERVICES; LOSS OF USE,
// DATA, OR PROFITS; OR BUSINESS INTERRUPTION) HOWEVER CAUSED AND ON ANY
// THEORY OF LIABILITY, WHETHER IN CONTRACT, STRICT LIABILITY, OR TORT
// (INCLUDING NEGLIGENCE OR OTHERWISE) ARISING IN ANY WAY OUT OF THE USE
// OF THIS SOFTWARE, EVEN IF ADVISED OF THE POSSIBILITY OF SUCH DAMAGE.

// A sample program demonstrating using Google C++ testing framework.

// This sample shows how to write a simple unit test for a function,
// using Google C++ testing framework.
//
// Writing a unit test using Google C++ testing framework is easy as 1-2-3:

// Step 1. Include necessary header files such that the stuff your
// test logic needs is declared.
//
// Don't forget gtest.h, which declares the testing framework.

#include "sample1.h"

#include <limits.h>

#include "gtest/gtest.h"

namespace {

// Step 2. Use the TEST macro to define your tests.
//
// TEST has two parameters: the test case name and the test name.
// After using the macro, you should define your test logic between a
// pair of braces.  You can use a bunch of macros to indicate the
// success or failure of a test.  EXPECT_TRUE and EXPECT_EQ are
// examples of such macros.  For a complete list, see gtest.h.
//
// <TechnicalDetails>
//
// In Google Test, tests are grouped into test cases.  This is how we
// keep test code organized.  You should put logically related tests
// into the same test case.
//
// The test case name and the test name should both be valid C++
// identifiers.  And you should not use underscore (_) in the names.
//
// Google Test guarantees that each test you define is run exactly
// once, but it makes no guarantee on the order the tests are
// executed.  Therefore, you should write your tests in such a way
// that their results don't depend on their order.
//
// </TechnicalDetails>

// Tests Factorial().

// Tests factorial of negative numbers.
TEST(FactorialTest, Negative) {
  // This test is named "Negative", and belongs to the "FactorialTest"
  // test case.
  EXPECT_EQ(1, Factorial(-5));
  EXPECT_EQ(1, Factorial(-1));
  EXPECT_GT(Factorial(-10), 0);

  // <TechnicalDetails>
  //
  // EXPECT_EQ(expected, actual) is the same as
  //
  //   EXPECT_TRUE((expected) == (actual))
  //
  // except that it will print both the expected value and the actual
  // value when the assertion fails.  This is very helpful for
  // debugging.  Therefore in this case EXPECT_EQ is preferred.
  //
  // On the other hand, EXPECT_TRUE accepts any Boolean expression,
  // and is thus more general.
  //
  // </TechnicalDetails>
}

// Tests factorial of 0.
TEST(FactorialTest, Zero) { EXPECT_EQ(1, Factorial(0)); }

// Tests factorial of positive numbers.
TEST(FactorialTest, Positive) {
  EXPECT_EQ(1, Factorial(1));
  EXPECT_EQ(2, Factorial(2));
  EXPECT_EQ(6, Factorial(3));
  EXPECT_EQ(40320, Factorial(8));
}

// Tests IsPrime()

// Tests negative input.
TEST(IsPrimeTest, Negative) {
  // This test belongs to the IsPrimeTest test case.

  EXPECT_FALSE(IsPrime(-1));
  EXPECT_FALSE(IsPrime(-2));
  EXPECT_FALSE(IsPrime(INT_MIN));
}

// Tests some trivial cases.
TEST(IsPrimeTest, Trivial) {
  EXPECT_FALSE(IsPrime(0));
  EXPECT_FALSE(IsPrime(1));
  EXPECT_TRUE(IsPrime(2));
  EXPECT_TRUE(IsPrime(3));
}

// Tests positive input.
TEST(IsPrimeTest, Positive) {
  EXPECT_FALSE(IsPrime(4));
  EXPECT_TRUE(IsPrime(5));
  EXPECT_FALSE(IsPrime(6));
  EXPECT_TRUE(IsPrime(23));
}
}  // namespace

// Step 3. Call RUN_ALL_TESTS() in main().
//
// We do this by linking in src/gtest_main.cc file, which consists of
// a main() function which calls RUN_ALL_TESTS() for us.
//
// This runs all the tests you've defined, prints the result, and
// returns 0 if successful, or 1 otherwise.
//
// Did you notice that we didn't register the tests?  The
// RUN_ALL_TESTS() macro magically knows about all the tests we
// defined.  Isn't this convenient?
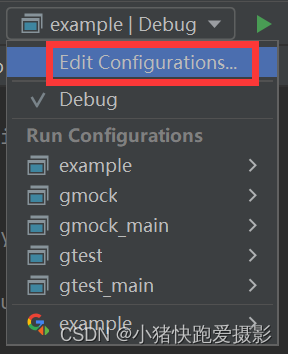
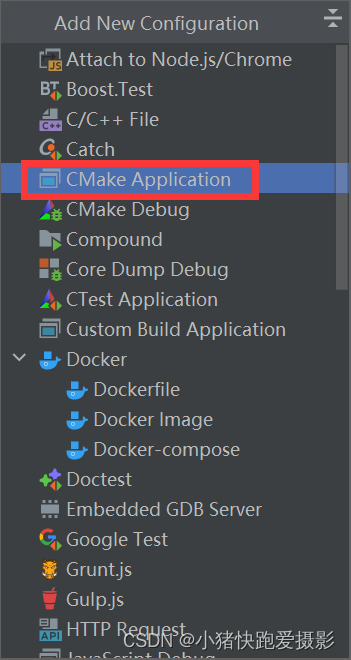
配置
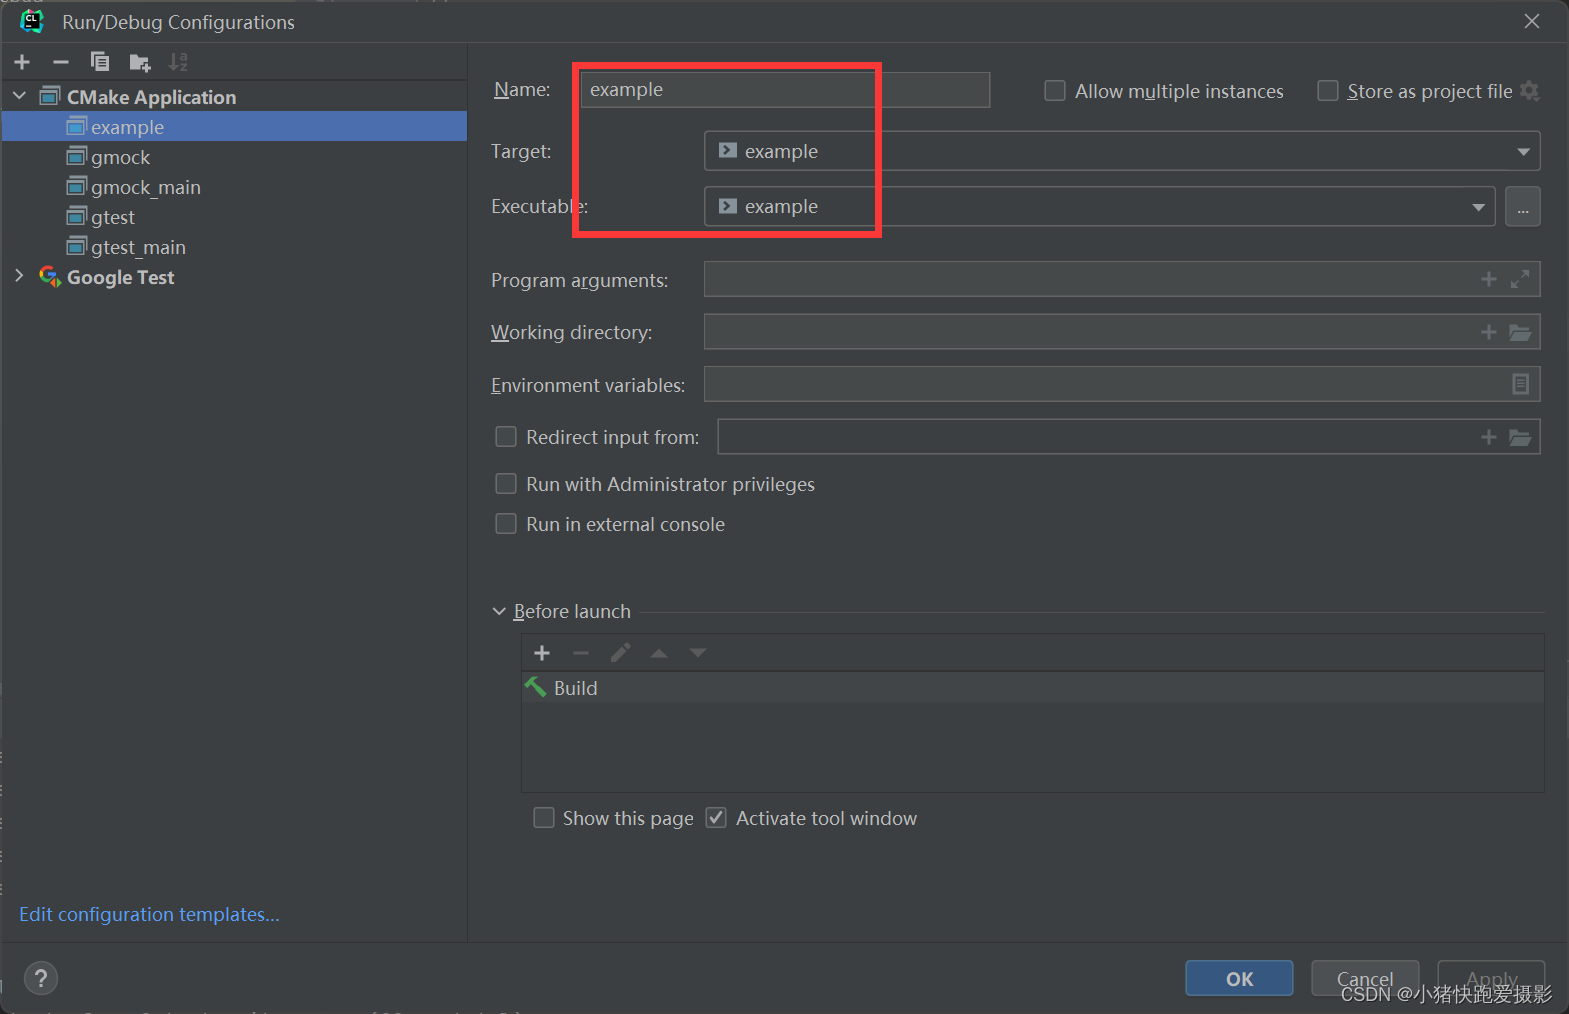

运行后:
D:\CLionProjects\google_test_example\bin\example.exe
Running main() from D:/CLionProjects/google_test_example/_deps/googletest-src/googletest/src/gtest_main.cc
[==========] Running 6 tests from 2 test suites.
[----------] Global test environment set-up.
[----------] 3 tests from FactorialTest
[ RUN      ] FactorialTest.Negative
[       OK ] FactorialTest.Negative (0 ms)
[ RUN      ] FactorialTest.Zero
[       OK ] FactorialTest.Zero (0 ms)
[ RUN      ] FactorialTest.Positive
[       OK ] FactorialTest.Positive (0 ms)
[----------] 3 tests from FactorialTest (6 ms total)


[----------] 3 tests from IsPrimeTest
[ RUN      ] IsPrimeTest.Negative
[       OK ] IsPrimeTest.Negative (0 ms)
[ RUN      ] IsPrimeTest.Trivial
[       OK ] IsPrimeTest.Trivial (0 ms)
[ RUN      ] IsPrimeTest.Positive
[       OK ] IsPrimeTest.Positive (0 ms)
[----------] 3 tests from IsPrimeTest (10 ms total)

[----------] Global test environment tear-down
[==========] 6 tests from 2 test suites ran. (26 ms total)
[  PASSED  ] 6 tests.

Process finished with exit code 0
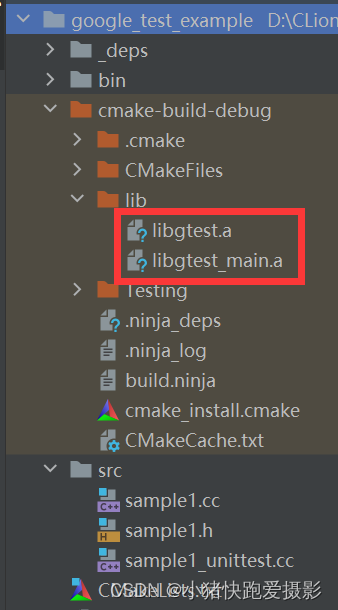
CMake打包gtest.a:
其实通过上述步骤编译后你就会发现多了一个lib目录:


 193
193


 被折叠的 条评论
为什么被折叠?
被折叠的 条评论
为什么被折叠?
 到【灌水乐园】发言


