


JAVA锁
1、公平和非公平锁
(1)是什么
公平锁:是指多个线程按照申请锁的顺序来获取锁,先来后到
非公平锁:是指多个线程获取锁的顺序并不是按照申请锁的顺序,有可能后申请的线程比先申请的线程优先获取锁。在高并发下,有可能会造成优先级反转或者饥饿现象
(2)两者区别
并发包中ReentrantLock的创建可以指定构造函数的boolean类型来得到公平或非公平锁,默认非公平suo。
公平锁:
API原文:Threads acquire a fair lock in the order in which they requested it
公平锁,就是公平对待,在并发环境中,每个线程在获取锁时会先查看此锁维护的等待队列,如果为空,或者当前线程就是等待队列的第一个,就占有锁,否则就会加入等待队列中,按照FIFO的规则从队列中取到自己
非公平锁:
API原文:a nonfair lock permits barging: threads requesting a lock can jump ahead of the queue of waiting threads if the lock happens to be available when it is requested.
非公平锁比较直接,上来就尝试占有锁,如果尝试失败,就再采用类似公平锁那种方式
2、可重入锁(递归锁)
(1)是什么
指的是同一线程外层函数获得锁之后,内层递归函数仍然能获取该锁的代码,同一线程在外层方法获取到锁后,进入内层方法会自动获取锁。也就是说,线程可以进入任何一个它已经拥有的锁所同步着的代码块。
ReetrantLock/Synchronized就是典型的可重入锁
(2)作用
可重入锁的作用就是避免死锁
public class ReenterLockDemo {
    public static void main(String[] args) {
        Phone p = new Phone();
        new Thread(() -> {
            p.playQQ();
        }, "t1").start();

        new Thread(() -> {
            p.playQQ();
        }, "t2").start();
        try {
            TimeUnit.SECONDS.sleep(1);
        } catch (InterruptedException e) {
            e.printStackTrace();
        }
        new Thread(p).start();
        new Thread(p).start();

    }
}
class Phone implements Runnable {
    /**
     * 演示Synchronized
      */
    public synchronized void playQQ() {
        System.out.println(Thread.currentThread().getName() + "\t打开QQ");
        sendMsg();
    }
    public synchronized void sendMsg() {
        System.out.println(Thread.currentThread().getName() + "\t发送消息");
    }

    /**
     * 演示ReentrantLock
     */
    Lock lock = new ReentrantLock();
    @Override
    public void run() {
        get();
    }
    private void get() {
        lock.lock();
        try {
            System.out.println(Thread.currentThread().getName() + "\tget方法");
            set();
        } finally {
            lock.unlock();
            lock.unlock();
        }
    }
    private void set() {
        lock.lock();
        try {
            System.out.println(Thread.currentThread().getName() + "\tset方法");
        } finally {
            lock.unlock();
        }
    }
}
注意:lock()与unlock()要成对出现,有几个lock()就要有几个unlock()。若少了unlock()就无法释放锁,导致线程卡死在下一个要获得锁的线程;如果缺少lock()就会报java.lang.IllegalMonitorStateException异常。
3、自旋锁
是指尝试获取锁的线程不会立即阻塞,而是采用循环的方式去尝试获取锁,这样的好处是减少线程上下文切换的消耗,缺点是循环会消耗CPU。

代码示例:
/**
 * 自旋锁
 */
public class SpinLockDemo {

    /**
     * 原值引用线程
     */
    AtomicReference<Thread> atomicReference = new AtomicReference<>();

    public void myLock() {
        Thread thread = Thread.currentThread();
        System.out.println(Thread.currentThread().getName() + "\tcome in");
        while (!atomicReference.compareAndSet(null, thread)) {

        }
    }
    public void myUnLock() {
        Thread thread = Thread.currentThread();
        atomicReference.compareAndSet(thread, null);
        System.out.println(Thread.currentThread().getName() + "\tinvoked myUnLock");
    }
    public static void main(String[] args) {
        SpinLockDemo spinLockDemo = new SpinLockDemo();
        new Thread(() -> {
            spinLockDemo.myLock();
            // 暂停一会线程
            try {
                TimeUnit.SECONDS.sleep(5);
            } catch (InterruptedException e) {
                e.printStackTrace();
            }
            spinLockDemo.myUnLock();
        }, "AA").start();
        try {
            TimeUnit.SECONDS.sleep(1);
        } catch (InterruptedException e) {
            e.printStackTrace();
        }
        new Thread(() -> {
            spinLockDemo.myLock();

            spinLockDemo.myUnLock();
        }, "BB").start();
    }
}
4、读写锁
独占锁:指该锁一次只能被一个线程所持有。对ReentrantLock和Synchronized而言都是独占锁
共享锁:指该锁可被多个线程所持有
对ReentranReadWriteLock其读锁是共享锁,其写锁是独占锁。
读锁的共享锁可保证并发读是非常高效的,读写、写读、写写的过程是互斥的。
(1)不加锁
/**
 * 读写锁操作,模拟缓存
 *   读读能共存
 *   读写不能共存
 *   写写不能共存
 */
public class ReadWriteLockDemo {
    public static void main(String[] args) {
        MyCache myCache = new MyCache();
        int n = 5;
        for (int i = 0; i < n; i++) {
            final int temp = i;
            new Thread(() -> {
                myCache.put(temp + "", temp + "");
            }, String.valueOf(i)).start();
        }
        for (int i = 0; i < n; i++) {
            final int temp = i;
            new Thread(() -> {
                myCache.get(temp + "");
            }, String.valueOf(i)).start();
        }
    }
}

/**
 * 资源类(用于多线程操作)
 */
class MyCache {
    /**
     * 保证缓存的可见性
     */
    private volatile Map<String, Object> map = new HashMap<>();
        /**
     * 写入要保证原子性
     * @param key key
     * @param value value
     */
    public void put(String key, Object value) {
       System.out.println(Thread.currentThread().getName() + "\t 正在写入:" + key);
            try {
                // 模拟网络延迟200ms
                TimeUnit.MILLISECONDS.sleep(200);
            } catch (InterruptedException e) {
                e.printStackTrace();
            }
            map.put(key, value);
            System.out.println(Thread.currentThread().getName() + "\t 写入完成");
    }

    /**
     * 读操作
     * @param key 通过key获取值
     */
    public void get(String key) {
        System.out.println(Thread.currentThread().getName() + "\t 正在读取");
            try {
                // 模拟网络延迟200ms
                TimeUnit.MILLISECONDS.sleep(200);
            } catch (InterruptedException e) {
                e.printStackTrace();
            }
            Object result = map.get(key);
            System.out.println(Thread.currentThread().getName() + "\t 读取完成:" + result);
    }

    /**
     * 清除缓存
     */
    public void clearMap() {
        map.clear();
    }
}
结果展示:
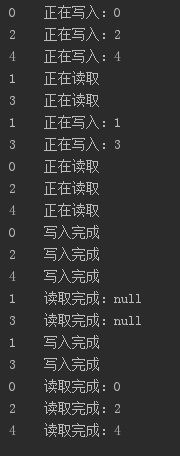
在这个写入过程中,写入被分割,0还没被写完2就开始写入了。而写操作要具有原子性,不应被打断。
(2)加入读写锁
代码:
/**
 * 读写锁操作,模拟缓存
 *   读读能共存
 *   读写不能共存
 *   写写不能共存
 */
public class ReadWriteLockDemo {
    public static void main(String[] args) {
        MyCache myCache = new MyCache();
        int n = 5;
        for (int i = 0; i < n; i++) {
            final int temp = i;
            new Thread(() -> {
                myCache.put(temp + "", temp + "");
            }, String.valueOf(i)).start();
        }
        for (int i = 0; i < n; i++) {
            final int temp = i;
            new Thread(() -> {
                myCache.get(temp + "");
            }, String.valueOf(i)).start();
        }
    }
}

/**
 * 资源类(用于多线程操作)
 */
class MyCache {
    /**
     * 保证缓存的可见性
     */
    private volatile Map<String, Object> map = new HashMap<>();
    /**
     * 读写锁
     */
    private ReentrantReadWriteLock readWriteLock = new ReentrantReadWriteLock();
    /**
     * 写入要保证原子性
     * @param key key
     * @param value value
     */
    public void put(String key, Object value) {
        readWriteLock.writeLock().lock();
        try {
            System.out.println(Thread.currentThread().getName() + "\t 正在写入:" + key);
            try {
                // 模拟网络延迟200ms
                TimeUnit.MILLISECONDS.sleep(200);
            } catch (InterruptedException e) {
                e.printStackTrace();
            }
            map.put(key, value);
            System.out.println(Thread.currentThread().getName() + "\t 写入完成");
        } catch (Exception e) {
            e.printStackTrace();
        } finally {
            readWriteLock.writeLock().unlock();
        }
    }
    /**
     * 读操作
     * @param key 通过key获取值
     */
    public void get(String key) {
        readWriteLock.readLock().lock();
        try {
            System.out.println(Thread.currentThread().getName() + "\t 正在读取");
            try {
                // 模拟网络延迟200ms
                TimeUnit.MILLISECONDS.sleep(200);
            } catch (InterruptedException e) {
                e.printStackTrace();
            }
            Object result = map.get(key);
            System.out.println(Thread.currentThread().getName() + "\t 读取完成:" + result);
        } catch (Exception e) {
            e.printStackTrace();
        } finally {
            readWriteLock.readLock().unlock();
        }
    }
    /**
     * 清除缓存
     */
    public void clearMap() {
        map.clear();
    }
}
结果展示:
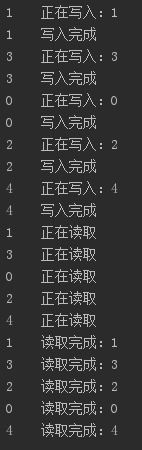
这里的写操作都是一个写完成后另一个写入操作才能执行,满足写入的原子性。
CountDownLatch、CyclicBarrier、Semaphore区别
1、CountDownLatch
减计数方式,计算为0时释放所有等待的线程
(1)简单测试CountDownLatch
没引入CountDownLatch之前:
public static void main(String[] args) {
        // 测试6个线程,模拟同学上完晚自习
        for (int i = 0; i < 6; i++) {
            new Thread(() -> {
                System.out.println(Thread.currentThread().getName() + "\t上完晚自习,离开教室");
            }, String.valueOf(i)).start();
        }
        System.out.println(Thread.currentThread().getName() + "-----------\t班长最后离开,关闭教室");
    }
执行结果:
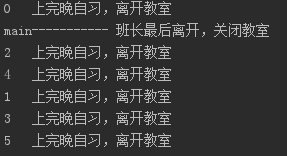
分析:班长将5名同学给锁进了教室,这合理吗?这不合理
引入CountDownLatch之后:
public static void main(String[] args) {
        final int n = 6;
        CountDownLatch countDownLatch = new CountDownLatch(n);
        // 测试6个线程,模拟同学上完晚自习
        for (int i = 0; i < n; i++) {
            new Thread(() -> {
                System.out.println(Thread.currentThread().getName() + "\t上完晚自习,离开教室");
                countDownLatch.countDown();
            }, String.valueOf(i)).start();
        }
        try {
            // 当countDownLatch减为0后,countDownLatch.await()之后的代码才能执行
            countDownLatch.await();
            System.out.println(Thread.currentThread().getName() + "-----------\t班长最后离开,关闭教室");
        } catch (InterruptedException e) {
            e.printStackTrace();
        }
    }
执行结果:
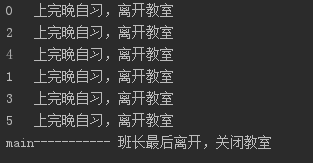
分析:6名同学按不同顺序离开了教室,班长最后离开并关闭教室,这就非常合理。
(2)引入枚举类
上述代码学员名称是数字,按正常业务逻辑是不正确的,这里引入枚举类来模拟秦灭六国(注意顺序是随便编排与历史顺序可能不一致)。
枚举类:
public enum CountryEnum {
    // ONE:表示序号为1时表示齐国
    ONE(1, "齐"),TWO(2, "楚"),THREE(3, "燕"),FOUR(4, "韩"),FIVE(5, "赵"),SIX(6, "魏");

    @Getter
    private Integer retCode;
    @Getter
    private String retMessage;

    /**
     * 构造方法,ONE(Integer, String)
     * @param retCode 返回编码
     * @param retMessage 返回信息
     */
    CountryEnum(Integer retCode, String retMessage) {
        this.retCode = retCode;
        this.retMessage = retMessage;
    }

    /**
     * 通过序号查找信息
     * @param index 下标
     * @return 枚举对象
     */
    public static CountryEnum forEach_CountryEnum(int index) {
        CountryEnum[] countryEnums = CountryEnum.values();
        for (CountryEnum countryEnum : countryEnums) {
            if (index == countryEnum.getRetCode()) {
                return countryEnum;
            }
        }
        return null;
    }

}
小总结:
让一些线程阻塞直到另一些线程完成一系列操作后才被唤醒
CountDownLatch主要有两个方法,当一个或多个线程调用await方法时,调用线程会被阻塞。其它线程调用countDown方法会将计数器减1(调用countDown方法的线程不会阻塞),当计数器的值变为零时,因调用await方法被阻塞的线程会被唤醒,继续执行。
2、CyclicBarrier
CyclicBarrier的字面意思就是可循环(Cyclic)使用的屏障(Barrier)。它要做的事情是,让一组线程到达一个屏障(也可以叫同步点)时被阻塞,直到最后一个线程到达屏障时,屏障才会开门,所有被屏障拦截的线程才会继续干活,线程进入屏障通过CyclicBarrier的await()方法。
(1)简单代码演示
/**
 * 模拟集齐七颗龙珠后召唤神龙
 */
public class CyclicBarrierDemo {
    public static void main(String[] args) {
        CyclicBarrier cyclicBarrier = new CyclicBarrier(7, () -> {
            System.out.println("龙珠集齐,召唤神龙");
        });
        int n = 7;
        for (int i = 1; i <= n; i++) {
            final int temp = i;
            new Thread(() -> {
                System.out.println(Thread.currentThread().getName() + "\t收集到" + temp + "星龙珠");
                try {
                    cyclicBarrier.await();
                } catch (InterruptedException e) {
                    e.printStackTrace();
                } catch (BrokenBarrierException e) {
                    e.printStackTrace();
                }
            }, String.valueOf(i)).start();
        }
    }
}
3、Semaphore
Semaphore称为信号量,信号量主要用于两个目的,一个是用于多个共享资源的互斥使用,另一个用于并发线程数的控制。
/**
 * 信号量测试
 */
public class SemaphoreDemo {
    public static void main(String[] args) {
        // 模拟有3个停车位
        Semaphore semaphore = new Semaphore(3);
        // 模拟有7部汽车
        int n = 7;
        for (int i = 1; i <= n; i++) {
            new Thread(() -> {
                try {
                    semaphore.acquire();
                    System.out.println(Thread.currentThread().getName() + "\t抢到车位");
                    // 暂停一会,模拟停车时间
                    final int time = new Random().nextInt(5);
                    try {
                        TimeUnit.SECONDS.sleep(time);
                    } catch (InterruptedException e) {
                        e.printStackTrace();
                    } finally {
                        semaphore.release();
                    }
                    System.out.println(Thread.currentThread().getName() + "停车" + time + "秒后离开车位");
                } catch (InterruptedException e) {
                    e.printStackTrace();
                }
            }, String.valueOf(i)).start();
        }
    }
}
阻塞队列
1、阻塞队列理论
阻塞队列,顾名思义,首先它是一个队列,而一个阻塞队列在数据结构中所起的作用大致如下图所示:

当阻塞队列是空时,从队列中获取元素的操作将会被阻塞。
当阻塞队列是满时,往队列里添加元素的操作将会被阻塞。
为什么使用?
在多线程领域:所谓阻塞,在某些情况下会挂起线程(即阻塞),一旦条件满足,被挂起的线程又会自动被唤醒。
为什么需要BlockingQueue?
好处是我们不需要关心什么时候需要阻塞线程,什么时候需要唤醒线程,这些都被BlockingQueue包办。
2、阻塞队列种类
ArrayBlockingQueue:由数组结构组成的有界阻塞队列
LinkedBlockingQueue:由链表结构组成的有界(但大小默认值为Integer。MAX_VALUE)阻塞队列。
PriorityBlockingQueue:支持优先级排序的无界阻塞队列。
DelayQueue:使用优先级队列实现的延迟无界阻塞队列。
SynchronousQueue:不存储元素的阻塞队列,也即单个元素队列。
LinkedTransferQueue:由链表结构组成的无界阻塞队列。
LinkedTransferDeque:由链表结构组成的双向阻塞队列。
3、BlockingQueue的核心方法


4、SynchronousQueue
(1)理论
SynchronousQueue没有容量。
与其他BlockingQueue不同,SynchronousQueue是一个不存储元素的BlockingQueue。
每一个put操作必须等待一个take操作,否则不能继续添加元素,反之亦然。
/**
 * SynchronousQueue测试
 */
public class BlockingQueueDemo {
    public static void main(String[] args) {
        // List list = new ArrayList();
        BlockingQueue<String> blockingQueue = new SynchronousQueue<>();
        new Thread(() -> {
            try {
                System.out.println(Thread.currentThread().getName() + "\tput 1");
                blockingQueue.put("1");
                System.out.println(Thread.currentThread().getName() + "\tput 2");
                blockingQueue.put("2");
                System.out.println(Thread.currentThread().getName() + "\tput 3");
                blockingQueue.put("3");
            } catch (InterruptedException e) {
                e.printStackTrace();
            }
        }, "AA").start();

        new Thread(() -> {
            try {
                TimeUnit.SECONDS.sleep(5);
                System.out.println(Thread.currentThread().getName() + "\t" + blockingQueue.take());
                TimeUnit.SECONDS.sleep(5);
                System.out.println(Thread.currentThread().getName() + "\t" + blockingQueue.take());
                TimeUnit.SECONDS.sleep(5);
                System.out.println(Thread.currentThread().getName() + "\t" + blockingQueue.take());
            } catch (InterruptedException e) {
                e.printStackTrace();
            }
        }, "BB").start();

    }
}
5、生产者消费者模式
(1)传统版
/**
 * 生产者消费者传统模式
 * 案例:一个初始值为0的变量,两个线程对其交替操作,一个加1一个减1,循环5轮
 */
public class ProdConsumer_TraditionDemo {
    public static void main(String[] args) {
        ShareData shareData = new ShareData();
        new Thread(() -> {
            for (int i = 1; i <= 5; i++) {
                try {
                    shareData.increment();
                } catch (Exception e) {
                    e.printStackTrace();
                }
            }
        }, "A").start();

        new Thread(() -> {
            for (int i = 1; i <= 5; i++) {
                try {
                    shareData.decrement();
                } catch (Exception e) {
                    e.printStackTrace();
                }
            }
        }, "B").start();
    }
}

/**
 * 资源类
 */
class ShareData {
    private int number = 0;
    private Lock lock = new ReentrantLock();
    private Condition condition = lock.newCondition();

    /**
     * 加1
     * @throws Exception
     */
    public void increment() throws Exception {
        lock.lock();
        try {
            // 1、判断
            while (number != 0) {
                // 等待,不能生产
                condition.await();
            }
            // 2、执行业务
            number++;
            System.out.println(Thread.currentThread().getName() + "\t" + number);
            // 3、通知唤醒
            condition.signalAll();
        } catch (Exception e) {
            e.printStackTrace();
        } finally {
            lock.unlock();
        }
    }
    /**
     * 减1
     * @throws Exception
     */
    public void decrement() throws Exception {
        lock.lock();
        try {
            // 1、判断
            while (number == 0) {
                // 等待,不能生产
                condition.await();
            }
            // 2、执行业务
            number--;
            System.out.println(Thread.currentThread().getName() + "\t" + number);
            // 3、通知唤醒
            condition.signalAll();
        } catch (Exception e) {
            e.printStackTrace();
        } finally {
            lock.unlock();
        }
    }
}
注意:在多线程情况下要重视虚假唤醒问题,该问题在大于两个线程时就会出现。如何解决,将等待(阻塞)判断设置为while循环而不是if判断
while (number != 0) {
// 等待,不能生产
condition.await();
}
(2)阻塞队列版
/**
 * 生产者和消费者阻塞队列模式
 */
public class ProdConsumer_BlockQueueDemo {
    public static void main(String[] args) {
        BlockQueueResource blockQueueResource = new BlockQueueResource(new ArrayBlockingQueue<>(10));
        new Thread(() -> {
            System.out.println(Thread.currentThread().getName() + "\t 生产线程启动");
            try {
                blockQueueResource.myprod();
            } catch (Exception e) {
                e.printStackTrace();
            }
        }, "Prod").start();
        new Thread(() -> {
            System.out.println(Thread.currentThread().getName() + "\t 消费线程启动");
            try {
                blockQueueResource.myConsumer();
            } catch (Exception e) {
                e.printStackTrace();
            }
        }, "Consumer").start();

        try {
            TimeUnit.SECONDS.sleep(5);
        } catch (InterruptedException e) {
            e.printStackTrace();
        }
        System.out.println();
        System.out.println();
        System.out.println();
        System.out.println("5秒时间到,叫停线程,活动结束");
        try {
            blockQueueResource.stop();
        } catch (Exception e) {
            e.printStackTrace();
        }
    }
}

class BlockQueueResource {
    /**
     * 默认开启,进行生产 + 消费
     */
    private volatile boolean FLAG = true;
    private AtomicInteger atomicInteger = new AtomicInteger();

    BlockingQueue<String> blockingQueue = null;

    public BlockQueueResource(BlockingQueue<String> blockingQueue) {
        this.blockingQueue = blockingQueue;
        System.out.println(blockingQueue.getClass().getName());
    }

    public void myprod() throws Exception {
        String data = null;
        boolean retValue;
        while (FLAG) {
            data = String.valueOf(atomicInteger.incrementAndGet());
            retValue = blockingQueue.offer(data, 2L, TimeUnit.SECONDS);
            if (retValue) {
                System.out.println(Thread.currentThread().getName() + "\t插入队列 " + data + "成功");
            } else {
                System.out.println(Thread.currentThread().getName() + "\t插入队列 " + data + "失败");
            }
            TimeUnit.SECONDS.sleep(1);
        }
        System.out.println(Thread.currentThread().getName() + "\t表示 FLAG=false,生产直接叫停");
    }

    public void myConsumer() throws Exception {
        String result = null;
        while (FLAG) {
            result = blockingQueue.poll(2L, TimeUnit.SECONDS);
            if (null == result || "".equalsIgnoreCase(result)) {
                FLAG = false;
                System.out.println(Thread.currentThread().getName() + "\t 超时2秒没有取到数据,消费者退出");
                return;
            }
            System.out.println(Thread.currentThread().getName() + "\t消费队列" + result + "成功");
        }
    }

    public void stop() throws Exception {
        this.FLAG = false;
    }

}
6、Callable
/**
 * 获取线程的方式:
 * 1、extends Thread
 * 2、implements Runnable
 * 3、implements Callable
 * 这里主要讲解第三种方式
 */
public class CallableDemo {
    public static void main(String[] args) throws ExecutionException, InterruptedException {
        // 两个线程,一个main主线程,一个是A子线程
        FutureTask<Integer> futureTask = new FutureTask<>(new MyThread());
        // 同一个任务只会计算一次
        new Thread(futureTask, "A").start();
        new Thread(futureTask, "B").start();
        int result1 = 100;
        System.out.println("等待futureTask计算");
        int result2 = futureTask.get();
        System.out.println("result:" + (result1 + result2));
    }
}
class MyThread implements Callable<Integer> {
    @Override
    public Integer call() throws Exception {
        System.out.println(Thread.currentThread().getName() + "-------------------- come in callable -------------------");
        TimeUnit.SECONDS.sleep(1);
        return 1024;
    }
}
线程池
1、为什么用线程池,优势是什么?
线程池做的工作主要是控制运行的线程的数量,处理过程中将任务放入队列,然后在线程创建后启动这些任务,如果线程数量超过了最大数量,超出数量的线程排队等待,等其它线程执行完毕,再从队列中取出任务来执行。
特点:线程复用、控制最大并发数、管理线程
优势:
- 降低资源消耗。通过重复利用已创建的线程降低线程创建和销毁造成的消耗。
- 提高响应速度。当任务到达时,任务可以需要的等到线程创建就能立即执行。
- 提高线程的可管理性。线程是稀缺资源,如果无限制的创建,不仅会消耗系统资源,还会降低系统的稳定性,使用线程池可以进行统一的分配,调优和监控。
2、线程池如何使用
(1)构建说明
Java中的线程池是通过Executor框架实现的,该框架用到了Executor、Executors、ExecutorService、ThreadPoolExecutor这几个类。
(2)代码实现
常见的三中实现方式:
public class MyThreadPoolDemo {
    public static void main(String[] args) {
        // 固定线程数的线程池
//        ExecutorService threadPool = Executors.newFixedThreadPool(5);
        // 固定一个线程的线程池
//        ExecutorService threadPool = Executors.newSingleThreadExecutor();
        // 自动扩容的线程池
        ExecutorService threadPool = Executors.newCachedThreadPool();
        // 模拟10个用户来办理业务
        try {
            for (int i = 1; i <= 10; i++) {
                final int tmp = i;
                threadPool.execute(() -> {
                    System.out.println(Thread.currentThread().getName() + "\t办理业务" + tmp);
                });
            }
        } catch (Exception e) {
            e.printStackTrace();
        } finally {
            threadPool.shutdown();
        }
    }
}
(3)ThreadPoolExecutor
七大参数:
public ThreadPoolExecutor(int corePoolSize,
                              int maximumPoolSize,
                              long keepAliveTime,
                              TimeUnit unit,
                              BlockingQueue<Runnable> workQueue,
                              ThreadFactory threadFactory,
                              RejectedExecutionHandler handler)
理论解释:
- corePoolSize:线程池中的常驻核心线程数
- maximumPoolSize:线程池能够容纳同时执行的最大线程数,此值必须大于等于1
- keepAliveTime:多余的空闲线程的存活时间。当前线程池数量超过corePoolSize时,当空闲时间达到keepAliveTime值时,多余空闲线程会被销毁直到只剩下corePoolSize个线程为止。
- unit:keepAliveTime的单位
- workQueue:任务队列,被提交但尚未被执行的任务
- threadFactory:表示生成线程池中工作线程的线程工厂,用于创建线程一般用默认的即可。
- handler:拒绝策略,表示当队列满了并且工作线程大于等于线程池的最大线程数(maximumPoolSize)时如何来拒绝
案例分析:
如果corePoolSize为2,workQueue最大数为3,maximumPoolSize为5,此时来6个线程,此时常驻核心线程已被使用,阻塞队列也在最大值,这时会扩容线程(运行总线程数 < maximumPoolSize)执行任务,而首先被执行的任务不是已在阻塞队列中排队的任务而是未执行并未加入阻塞的任务。具体情况详见如下代码:
public static void main(String[] args) {
        ExecutorService threadPool = new ThreadPoolExecutor(
                2,
                5,
                100L,
                TimeUnit.SECONDS,
                new LinkedBlockingDeque<>(3), // 阻塞队列只有3个
                Executors.defaultThreadFactory(),
                new ThreadPoolExecutor.AbortPolicy()
        );
        try {
            // 模拟6个客户来办理业务
            for (int i = 1; i <= 6; i++) {
                final int tmp = i;
                threadPool.execute(() -> {
                    System.out.println(Thread.currentThread().getName() + "号窗口,服务顾客" + tmp);
                    try {
                        TimeUnit.SECONDS.sleep(4);
                    } catch (InterruptedException e) {
                        e.printStackTrace();
                    }
                });
            }
        } catch (Exception e) {
            e.printStackTrace();
        } finally {
        }
    }
(4)线程池底层工作原理

重中之重:(再次感谢周阳老师)

3、线程池的拒绝策略
(1)是什么
等待队列已经排满了,无法在加入新任务;同时线程池中的max线成也达到了,无法继续为任务服务。这时就需要拒绝策略机制合理的处理问题。
(2)JDK内置的拒绝策略
AbortPolicy(默认):直接抛出RejectedExecutionException异常阻止系统正常运行
CallerRunsPolicy:“调用者运行”一种调节机制,该策略即不会抛弃任务,也不会抛出异常,而是将某些任务回退到调用者
DiscardOldestPolicy:抛弃队列中等待最久的任务,然后把当前任务加入队列中尝试再次提交当前任务
DiscardPolicy:直接丢弃任务,不予任何处理也不抛异常。如果允许任务丢失,这是最好的一种方案
以上内置拒绝策略均实现了RejectedExecutionHandler接口
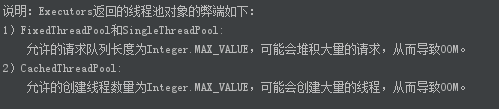
(3)Executors中自带的单一的/固定的/可变的三种创建线程池方法问题
使用情况:最好不要使用
4、线程池配置合理线程数
(1)CPU密集型
意思就是该任务需要大量的运算,而没有阻塞,CPU一直全速运行。
CPU密集任务只有在真正的多核CPU上才能得到加速(通过多线程)。
CPU密集型任务配置尽可能少的线程数量:
一般公式:CPU核数 + 1个线程的线程池
(2)IO密集型
方式一:
由于IO密集型任务线程并不是一直在执行任务,则应配置尽可能多的线程,如CPU核数 * 2
方式二:
IO密集型,即该任务需要大量的IO,即大量的阻塞。
在单线程上运行IP密集型的任务会导致浪费大量的CPU运算能力在等待上。所以在IO密集型任务中使用多线程可以大大的加速程序运行,即使在单核CPU上,这种加速主要就是利用了被浪费掉的阻塞时间。
IO密集型时,大部分线程都阻塞,故需要多配置线程数:
参考公式:CPU核数 / (1 - 阻塞系数) 阻塞系数在0.8~0.9之间
比如8核CPU: 8 / (1 - 0.9) = 80个线程数
5、死锁
死锁是指两个或两个以上的进程在执行过程中,因争夺资源而造成的一种相互等待的现象,若无外力干涉那它们将无法推进下去。如果系统资源充足,进程资源请求都能得到满足,死锁出现的可能性就低,否则就会因争夺资源而陷入死锁。

案例:
class HoldLockThread implements Runnable {

    private String lockA;
    private String lockB;

    public HoldLockThread(String lockA, String lockB) {
        this.lockA = lockA;
        this.lockB = lockB;
    }

    @Override
    public void run() {
        synchronized (lockA) {
            System.out.println(Thread.currentThread().getName() + "\t自己持有:" + lockA + "\t尝试获得:" + lockB);
            try {
                TimeUnit.SECONDS.sleep(1);
            } catch (InterruptedException e) {
                e.printStackTrace();
            }
            synchronized (lockB) {
                System.out.println(Thread.currentThread().getName() + "\t自己持有:" + lockB + "\t尝试获得:" + lockA);
            }
        }
    }
}

public class DeadLockDemo {
    public static void main(String[] args) {
        String lockA = "lockA";
        String lockB = "lockB";
        new Thread(new HoldLockThread(lockA, lockB), "ThreadA").start();
        new Thread(new HoldLockThread(lockB, lockA), "ThreadB").start();
    }
}
问题定位:
1)jps -l查看所有java线程

2)jstack 线程PID


 342
342


 被折叠的 条评论
为什么被折叠?
被折叠的 条评论
为什么被折叠?
 到【灌水乐园】发言


