


写在最前
看到这篇博客说明你应该已经入门了Kivy,如果还没有入门Kivy的话建议配合我之前写的Kivy的入门篇一起服用。
设计UI
开发一个APP之前应该先决定一下它的UI,然后才好基于UI实现各模块的功能。
本次我们打算实现的是一个具有计时器和秒表功能的表。
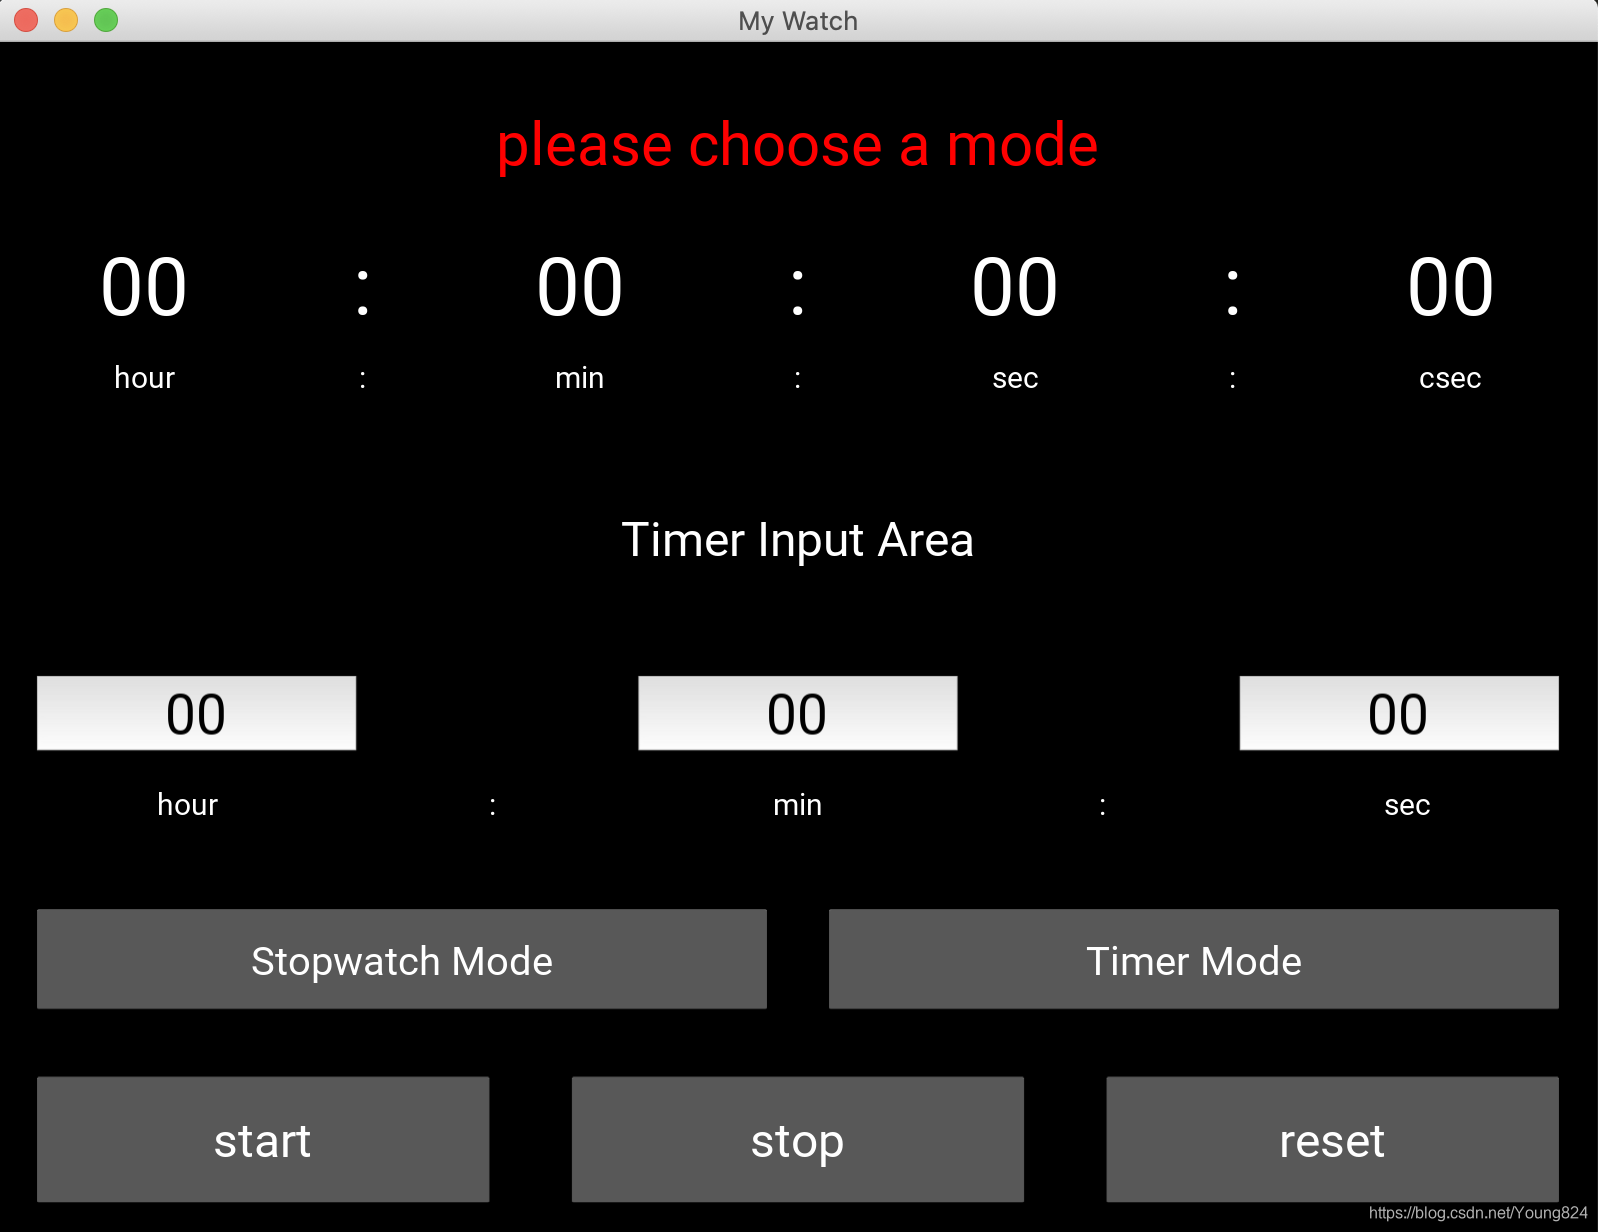
秒表的最基本的功能应该有3个“开始”,“暂停”,“复位”,因此我们考虑为秒表添加具备这3个功能的功能键;其次秒表还应该具备显示部分,并且秒表显示的最小单位应该比秒更小,因此考虑添加一个可以显示时,分,秒,厘秒的显示模块。
接下来考虑计时器的UI部分,计时器基本的功能应该有用户的输入模块,用来输入想要实现的倒计时的时间,并且最小时间单位通常为秒即可,因此考虑添加3个输入模块用来输入需要倒计的时,分,秒;然后还应该像秒表一定具有最基本的开始”,“暂停”,“复位”的功能,因此考虑添加3个键用来实现这3个功能。
到这里已经满足了基本的秒表和计时器的功能,因此我们考虑实现如下图的UI界面:

因为模式选择,计时器输入区以及消息提示是单纯输出给用户的部分,因此考虑用Label实现,消息提示下方的输入模块需要用户输入的交互,因此考虑用TextInput实现,最后剩下的模式切换和开始,暂停,复位也需要用户点击交互,因此考虑用Button实现。于是我们就可以用如下的KV语言实现UI部分:
#myWatch.kv

<myWatch>
    BoxLayout:
        orientation: 'vertical'
        spacing:15
        padding:38
        BoxLayout:
            Label:
                color: 1,0,0,1
                font_size: '30sp'
                text:root.mode_label
        BoxLayout:
            orientation: 'horizontal'
            Label:
                id: hour
                font_size: '40sp'
                text:root.hour
            Label:
                font_size: '40sp'
                text:':'
            Label:
                id: min
                font_size:'40sp'
                text:root.min
            Label:
                font_size:'40sp'
                text:':'
            Label:
                id:sec
                font_size:'40sp'
                text:root.sec
            Label:
                font_size:'40sp'
                text:':'
            Label:
                id:csec
                font_size:'40sp'
                text:root.csec
        BoxLayout:
            Label:
                font_size: '15sp'
                text:'hour'
                pos_hint: {"center_x": .5, "center_y": .9}
            Label:
                font_size: '15sp'
                text:':'
                pos_hint: {"center_x": .5, "center_y": .9}

            Label:
                font_size:'15sp'
                text:'min'
                pos_hint: {"center_x": .5, "center_y": .9}
            Label:
                font_size:'15sp'
                text:':'
                pos_hint: {"center_x": .5, "center_y": .9}
            Label:
                font_size:'15sp'
                text:'sec'
                pos_hint: {"center_x": .5, "center_y": .9}
            Label:
                font_size:'15sp'
                text:':'
                pos_hint: {"center_x": .5, "center_y": .9}
            Label:
                font_size:'15sp'
                text:'csec'
                pos_hint: {"center_x": .5, "center_y": .9}

        BoxLayout:
            orientation: 'vertical'
            Label
                font_size: '24sp'
                text:'Timer Input Area'
            Label:
                id:message
                font_size: '20sp'
                color: 1,0,0,1
                text:root.message
                pos_hint: {"center_x": .5, "center_y": .9}

        BoxLayout:
            orientation: 'horizontal'
            spacing:280

            TextInput:
                id:hour_input
                multiline: True
                readonly: False
                halign:'center'
                font_size:'55'
                pos_hint: {"center_x": .5, "center_y": .5}
                size_hint: (.1, .6)

            TextInput:
                id:min_input
                multiline: True
                readonly: False
                halign:'center'
                font_size:'55'
                pos_hint: {"center_x": .5, "center_y": .5}
                size_hint: (.1, .6)

            TextInput:
                id:sec_input
                multiline: True
                readonly: False
                halign:'center'
                font_size:'55'
                pos_hint: {"center_x": .5, "center_y": .5}
                size_hint: (.1, .6)

        BoxLayout:
            orientation: 'horizontal'
            Label:
                font_size: '15sp'
                text:'hour'
                pos_hint: {"center_x": .5, "center_y": .9}
            Label:
                font_size: '15sp'
                text:':'
                pos_hint: {"center_x": .5, "center_y": .9}

            Label:
                font_size:'15sp'
                text:'min'
                pos_hint: {"center_x": .5, "center_y": .9}
            Label:
                font_size:'15sp'
                text:':'
                pos_hint: {"center_x": .5, "center_y": .9}
            Label:
                font_size:'15sp'
                text:'sec'
                pos_hint: {"center_x": .5, "center_y": .9}

        BoxLayout:
            orientation: 'horizontal'
            spacing:60
            Button:
                font_size:'20sp'
                text:'Stopwatch Mode'
                pos_hint: {"center_x": .8, "center_y": .8}
                size_hint: (.8, .8)
                on_press:root.stopwatch_mode()
            Button:
                font_size:'20sp'
                text:'Timer Mode'
                pos_hint: {"center_x": .8, "center_y": .8}
                size_hint: (.8, .8)
                on_press:root.timer_mode()

        BoxLayout:
            orientation: 'horizontal'
            spacing:80
            Button:
                id:start
                font_size:'24sp'
                text:'start'
                on_press:root.start()
            Button:
                id:stop
                font_size:'24sp'
                text:'stop'
                on_press:root.stop()
            Button:
                id:reset
                font_size:'24sp'
                text:'reset'
                on_press:root.reset()
按照从上至下的顺序阅读,很自然地对应到我们上面设计的UI界面,如果有哪里不懂的地方欢迎留言交流。
代码段
完成了UI设计我们便开始对照我们设计的UI完成代码段部分。
首先因为按照KV语言中写的那样,需要先写一个myWatch类,并且继承BoxLayout,因为秒表的显示模块需要显示时,分,秒,厘秒,所以是实时更新的,需要在代码段中更改,因此考虑将时,分,秒,厘秒部分定义为kivy.properties中的StringProperty()类,此处为了方便理解暂且可以理解为定义为字符型,但是使用该类kivy支持值检查的功能,即当属性分配新值时,将根据验证约束检查该值。当然还有其他的功能,详细可以查看属性的官方说明。如果不想使用的话也可以单纯的将这几个值初始化为空字符'',考虑到秒表的时分秒的初始值为0,同样的也可以初始化为'00'字符。
class myWatch(BoxLayout):
    hour = StringProperty()
    min = StringProperty()
    sec = StringProperty()
    csec = StringProperty()
    def __init__(self, **kwargs):
        super(myWatch, self).__init__(**kwargs)
        self.reset() #复位
然后需要编写模式切换按键和开始,暂停,复位按键的回调函数,因为编写一个App,像计时器,秒表这种简单的App是没有使用教程的,但是用户刚接触难免不会用,可能会犯很多错误,因此需要考虑用户可能会犯的错误,让代码变得更全面,能够应付各种情况,因此在几个回调函数中加入了很多与用户交互的提示信息以及在计时器的模块中避免用户输入非数字的时间的判断代码段,完整的回调函数代码如下:
    def setTime(self, current_time, key):
        self.all_interval = time() - current_time
        self.interval = time() - current_time
        if self.start_flag:
            self.all_interval += self.escpted
        if self.mode == 'Stopwatch' and self.stop_flag:
            self.interval += self.escpted #如果暂停过则需加上已经经过的时间
        elif self.mode == 'Timer':
            self.interval = abs(time() - self.stop_time) #计时器的时间间隔区别于秒表的时间间隔
            if self.start_flag:
                self.interval -= self.escpted

        hours = int(self.interval / 60 / 60)
        mins = int((self.interval - hours * 60 * 60) / 60)
        seconds = int(self.interval - hours * 60 * 60 - mins * 60)
        cseconds = int((self.interval - hours * 60 * 60 - mins * 60 - seconds) * 100)
        self.ids['hour'].text = '{:0>2d}'.format(hours) #小于2位则补0
        self.ids['min'].text = '{:0>2d}'.format(mins)
        self.ids['sec'].text = '{:0>2d}'.format(seconds)
        self.ids['csec'].text = '{}'.format(cseconds)

        #处于定时器模式且剩余时间小于0.3秒则复位
        if self.mode == 'Timer' and self.interval < 0.3:
            self.reset()
            self.ids['message'].text = 'Time Up'

    def timer_mode(self):
        self.reset()
        self.mode = 'Timer'
        self.mode_label = 'Timer Mode'

    def stopwatch_mode(self):
        self.reset()
        self.mode = 'Stopwatch'
        self.mode_label = 'Stopwatch Mode'

    def start(self):
        if not self.mode:
            self.mode_label = 'please choose a mode'
        else:
            #防止多次开始
            if not self.start_flag:
                self.start_time = time()
                if self.mode == 'Timer':
                    try:
                        #计算用户输入的时间,单位秒
                        input_time = int(self.ids['hour_input'].text) * 60 * 60 + \
                                         int(self.ids['min_input'].text) * 60 + int(self.ids['sec_input'].text)
                        self.stop_time = self.start_time + input_time #计时器的停止时间
                        self.ids['message'].text = ''
                    except:
                        self.ids['message'].text = 'Please enter the correct number'
                        return

                    if self.stop_flag: #如果暂停过,则需减去经过的时间
                        self.stop_time -= self.escpted
                self.start_flag = True
                self.event = Clock.schedule_interval(partial(self.setTime, self.start_time), 0.1)

    def stop(self, reset_flag=False):
        if self.mode:
            self.event.cancel()
            self.start_flag = False #停止过后再按开始才有效
            if not reset_flag:
                self.stop_flag = True

                self.escpted = self.all_interval

    def reset(self):
        try:
            self.stop(reset_flag=True)
        except:
            pass
        self.ids['hour'].text = '00'
        self.ids['min'].text = '00'
        self.ids['sec'].text = '00'
        self.ids['csec'].text = '00'
        self.ids['hour_input'].text = '00'
        self.ids['min_input'].text = '00'
        self.ids['sec_input'].text = '00'
        self.mode = '' #用来记录当前模式
        self.mode_label = 'please choose a mode' #用于显示模式
        self.start_flag = None #用来记录是否可以开始
        self.stop_flag = None #用来记录是否暂停过
        self.escpted = 0. #用来记录已经经过的时间
        self.ids['message'].text = '' #用来进行用户提示
此处需要补充说明的就是:
此处使用了kivy.clock对象,按照官方手册中说的,kivy.clock对象允许用户按指定的间隔调用一个函数,可以通过dt参数获取调度和调用回调之间的时间。如果要计划使用默认参数调用的函数,可以使用Python的functools.partial模块:
from functools import partial

def my_callback(value, key, *largs):
    pass

Clock.schedule_interval(partial(my_callback, 'my value', 'my key'), 0.5)
上面的代码段的含义是每个0.5秒调用一次my_callback的回调函数。
如果有其他看不懂的地方可以尝试去看一下Kivy的入门篇,还有的话欢迎留言交流。
编写完myWatch的话工作就马上完成了,剩下的就是编写App的类设置一下UI的窗口大小和标题,然后run()即可。
博主没有单独编写一个.kv文件而是像Kivy入门篇里介绍的那样,把UI实现模块用Builder类实现,两种方法均可。
完整的代码段如下:
#!/usr/bin/env python3
from kivy.app import App
from kivy.uix.boxlayout import BoxLayout
from kivy.clock import Clock
from time import time
from kivy.core.window import Window
from kivy.properties import StringProperty
from functools import partial
from kivy.lang import Builder

Builder.load_string('''
<myWatch>
    BoxLayout:
        orientation: 'vertical'
        spacing:15
        padding:38
        BoxLayout:
            Label:
                color: 1,0,0,1
                font_size: '30sp'
                text:root.mode_label
        BoxLayout:
            orientation: 'horizontal'
            Label:
                id: hour
                font_size: '40sp'
                text:root.hour
            Label:
                font_size: '40sp'
                text:':'
            Label:
                id: min
                font_size:'40sp'
                text:root.min
            Label:
                font_size:'40sp'
                text:':'
            Label:
                id:sec
                font_size:'40sp'
                text:root.sec
            Label:
                font_size:'40sp'
                text:':'
            Label:
                id:csec
                font_size:'40sp'
                text:root.csec
        BoxLayout:
            Label:
                font_size: '15sp'
                text:'hour'
                pos_hint: {"center_x": .5, "center_y": .9}
            Label:
                font_size: '15sp'
                text:':'
                pos_hint: {"center_x": .5, "center_y": .9}

            Label:
                font_size:'15sp'
                text:'min'
                pos_hint: {"center_x": .5, "center_y": .9}
            Label:
                font_size:'15sp'
                text:':'
                pos_hint: {"center_x": .5, "center_y": .9}
            Label:
                font_size:'15sp'
                text:'sec'
                pos_hint: {"center_x": .5, "center_y": .9}
            Label:
                font_size:'15sp'
                text:':'
                pos_hint: {"center_x": .5, "center_y": .9}
            Label:
                font_size:'15sp'
                text:'csec'
                pos_hint: {"center_x": .5, "center_y": .9}

        BoxLayout:
            orientation: 'vertical'
            Label
                font_size: '24sp'
                text:'Timer Input Area'
            Label:
                id:message
                font_size: '20sp'
                color: 1,0,0,1
                text:root.message
                pos_hint: {"center_x": .5, "center_y": .9}

        BoxLayout:
            orientation: 'horizontal'
            spacing:280

            TextInput:
                id:hour_input
                multiline: True
                readonly: False
                halign:'center'
                font_size:'55'
                pos_hint: {"center_x": .5, "center_y": .5}
                size_hint: (.1, .6)

            TextInput:
                id:min_input
                multiline: True
                readonly: False
                halign:'center'
                font_size:'55'
                pos_hint: {"center_x": .5, "center_y": .5}
                size_hint: (.1, .6)

            TextInput:
                id:sec_input
                multiline: True
                readonly: False
                halign:'center'
                font_size:'55'
                pos_hint: {"center_x": .5, "center_y": .5}
                size_hint: (.1, .6)

        BoxLayout:
            orientation: 'horizontal'
            Label:
                font_size: '15sp'
                text:'hour'
                pos_hint: {"center_x": .5, "center_y": .9}
            Label:
                font_size: '15sp'
                text:':'
                pos_hint: {"center_x": .5, "center_y": .9}

            Label:
                font_size:'15sp'
                text:'min'
                pos_hint: {"center_x": .5, "center_y": .9}
            Label:
                font_size:'15sp'
                text:':'
                pos_hint: {"center_x": .5, "center_y": .9}
            Label:
                font_size:'15sp'
                text:'sec'
                pos_hint: {"center_x": .5, "center_y": .9}

        BoxLayout:
            orientation: 'horizontal'
            spacing:60
            Button:
                font_size:'20sp'
                text:'Stopwatch Mode'
                pos_hint: {"center_x": .8, "center_y": .8}
                size_hint: (.8, .8)
                on_press:root.stopwatch_mode()
            Button:
                font_size:'20sp'
                text:'Timer Mode'
                pos_hint: {"center_x": .8, "center_y": .8}
                size_hint: (.8, .8)
                on_press:root.timer_mode()

        BoxLayout:
            orientation: 'horizontal'
            spacing:80
            Button:
                id:start
                font_size:'24sp'
                text:'start'
                on_press:root.start()
            Button:
                id:stop
                font_size:'24sp'
                text:'stop'
                on_press:root.stop()
            Button:
                id:reset
                font_size:'24sp'
                text:'reset'
                on_press:root.reset()
''')


class myWatch(BoxLayout):
    hour = StringProperty()
    min = StringProperty()
    sec = StringProperty()
    csec = StringProperty()
    mode_label = StringProperty()
    message = StringProperty()
    def __init__(self, **kwargs):
        super(myWatch, self).__init__(**kwargs)
        self.reset()

    def setTime(self, current_time, key):
        self.all_interval = time() - current_time
        self.interval = time() - current_time
        if self.start_flag:
            self.all_interval += self.escpted
        if self.mode == 'Stopwatch' and self.stop_flag:
            self.interval += self.escpted #如果暂停过则需加上已经经过的时间
        elif self.mode == 'Timer':
            self.interval = abs(time() - self.stop_time) #计时器的时间间隔区别于秒表的时间间隔
            if self.start_flag:
                self.interval -= self.escpted

        hours = int(self.interval / 60 / 60)
        mins = int((self.interval - hours * 60 * 60) / 60)
        seconds = int(self.interval - hours * 60 * 60 - mins * 60)
        cseconds = int((self.interval - hours * 60 * 60 - mins * 60 - seconds) * 100)
        self.ids['hour'].text = '{:0>2d}'.format(hours) #小于2位则补0
        self.ids['min'].text = '{:0>2d}'.format(mins)
        self.ids['sec'].text = '{:0>2d}'.format(seconds)
        self.ids['csec'].text = '{}'.format(cseconds)

        #处于定时器模式且剩余时间小于0.3秒则复位
        if self.mode == 'Timer' and self.interval < 0.3:
            self.reset()
            self.ids['message'].text = 'Time Up'

    def timer_mode(self):
        self.reset()
        self.mode = 'Timer'
        self.mode_label = 'Timer Mode'

    def stopwatch_mode(self):
        self.reset()
        self.mode = 'Stopwatch'
        self.mode_label = 'Stopwatch Mode'

    def start(self):
        if not self.mode:
            self.mode_label = 'please choose a mode'
        else:
            #防止多次开始
            if not self.start_flag:
                self.start_time = time()
                if self.mode == 'Timer':
                    try:
                        #计算用户输入的时间,单位秒
                        input_time = int(self.ids['hour_input'].text) * 60 * 60 + \
                                         int(self.ids['min_input'].text) * 60 + int(self.ids['sec_input'].text)
                        self.stop_time = self.start_time + input_time #计时器的停止时间
                        self.ids['message'].text = ''
                    except:
                        self.ids['message'].text = 'Please enter the correct number'
                        return

                    if self.stop_flag: #如果暂停过,则需减去经过的时间
                        self.stop_time -= self.escpted
                self.start_flag = True
                self.event = Clock.schedule_interval(partial(self.setTime, self.start_time), 0.1)

    def stop(self, reset_flag=False):
        if self.mode:
            self.event.cancel()
            self.start_flag = False #停止过后再按开始才有效
            if not reset_flag:
                self.stop_flag = True

                self.escpted = self.all_interval

    def reset(self):
        try:
            self.stop(reset_flag=True)
        except:
            pass
        self.ids['hour'].text = '00'
        self.ids['min'].text = '00'
        self.ids['sec'].text = '00'
        self.ids['csec'].text = '00'
        self.ids['hour_input'].text = '00'
        self.ids['min_input'].text = '00'
        self.ids['sec_input'].text = '00'
        self.mode = '' #用来记录当前模式
        self.mode_label = 'please choose a mode' #用于显示模式
        self.start_flag = None #用来记录是否可以开始
        self.stop_flag = None #用来记录是否暂停过
        self.escpted = 0. #用来记录已经经过的时间
        self.ids['message'].text = '' #用来进行用户提示


class myWatchApp(App):
    def build(self):
        self.title = 'My Watch'

        return myWatch()


if __name__ == '__main__':
    app = myWatchApp()
    app.run()
运行完后如果没有问题的话即可看到如下的UI,然后任君把玩,如果你用出了BUG非常欢迎给我留言!
写在最后
如果有哪里理解错的地方欢迎大家留言交流,如需转载请标明出处。
如果你没看懂一定是我讲的不好,欢迎留言,我继续努力。
手工码字码图码代码,如果有帮助到你的话留个赞吧,谢谢。
以上。


 4111
4111

 被折叠的 条评论
为什么被折叠?
被折叠的 条评论
为什么被折叠?
 到【灌水乐园】发言


