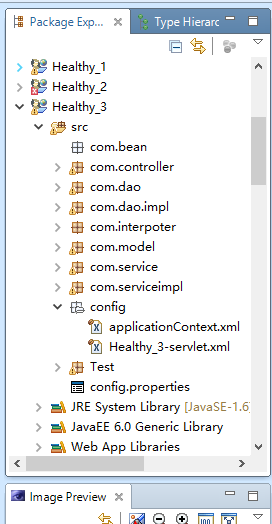
关于SSH的整合我也是在网上各种找资料,研究了一整天才整合成功的,网上完整详细的教程我到现在还没找到过,都是各种博客里面东拼西凑搞出来的。
首先要下载Spring4.x以及Hibernate4.x的jar包放到WEB-INF\lib文件夹里面。
然后用myeclipse将项目变成hibernate工程,将生成的java文件以及*.cfg.xml文件删除掉,再然后连接数据库生成映射文件以及实体文件。
然后src下面新建一个config文件夹放入Spring和Springmvc的配置文件。
接下来整合过程
新建一个applicationContext.xml文件。
<?xml version="1.0" encoding="UTF-8"?>
<beans xmlns="http://www.springframework.org/schema/beans"
    xmlns:xsi="http://www.w3.org/2001/XMLSchema-instance"
    xmlns:mvc="http://www.springframework.org/schema/mvc"
    xmlns:context="http://www.springframework.org/schema/context"
    xmlns:aop="http://www.springframework.org/schema/aop"
    xmlns:tx="http://www.springframework.org/schema/tx"
    xsi:schemaLocation="http://www.springframework.org/schema/mvc http://www.springframework.org/schema/mvc/spring-mvc-4.3.xsd
        http://www.springframework.org/schema/beans http://www.springframework.org/schema/beans/spring-beans.xsd
        http://www.springframework.org/schema/context http://www.springframework.org/schema/context/spring-context-4.3.xsd
        http://www.springframework.org/schema/aop http://www.springframework.org/schema/aop/spring-aop-4.3.xsd
        http://www.springframework.org/schema/tx http://www.springframework.org/schema/tx/spring-tx-4.3.xsd">
        <!-- 属性文件路径 -->
         <context:property-placeholder location="classpath*:/config.properties" />
         <!-- 配置扫描注解包 -->
          <context:component-scan base-package="com.serviceimpl"></context:component-scan>
  <context:component-scan base-package="com.dao.impl"></context:component-scan>
   <context:component-scan base-package="com.controller"></context:component-scan>
   <context:component-scan base-package="com.interpoter"></context:component-scan>

        <!-- 配置jdbc数据源 dataSource-->
        <bean id="dataSource" class="org.springframework.jdbc.datasource.DriverManagerDataSource">
        <!-- 数据源驱动 -->
        <property name="driverClassName" value="com.mysql.jdbc.Driver"></property>
         <!-- 数据源链接地址 -->
        <property name="url" value="jdbc:mysql://127.0.0.1:3306/healthy"></property>
         <!-- 用户名 -->
        <property name="username" value="root"></property>
         <!-- 密码 -->
        <property name="password" value="961215"></property>
    </bean>

    <!-- 配置sessionFactory dao层里面的-->
    <bean id="sessionFactory"
        class="org.springframework.orm.hibernate4.LocalSessionFactoryBean">
        <!-- 数据源 -->
        <property name="dataSource" ref="dataSource" />
        <!-- 配置实体类的映射文件路径 -->
        <property name="mappingLocations" value="classpath:/com/model/*.hbm.xml"/>
        <!-- hibernate的相关属性配置 -->
        <property name="hibernateProperties">
            <value>
            <!-- 由于hibernate的数据库连接是配置在属性文件里面的,所以这里还要配置一下jdbc连接(个人理解) -->
            hibernate.connection.username=root
            hibernate.connection.password=961215
    hibernate.connection.url=jdbc:mysql://localhost:3306/healthy
                <!-- 设置数据库方言 -->
        hibernate.dialect=org.hibernate.dialect.MySQLDialect
                <!-- 设置自动创建|更新|验证数据库表结构 -->
                hibernate.hbm2ddl.auto=update
                <!-- 是否在控制台显示sql -->
                hibernate.show_sql=true
                <!-- 是否格式化sql,优化显示 -->
                hibernate.format_sql=true
                <!-- 是否开启二级缓存 -->
                hibernate.cache.use_second_level_cache=false
                <!-- 是否开启查询缓存 -->
                hibernate.cache.use_query_cache=false
                <!-- 数据库批量查询最大数 -->
                hibernate.jdbc.fetch_size=50
                <!-- 数据库批量更新、添加、删除操作最大数 -->
                hibernate.jdbc.batch_size=50
                <!-- 是否自动提交事务 -->
                hibernate.connection.autocommit=true
                <!-- 指定hibernate在何时释放JDBC连接 -->
                hibernate.connection.release_mode=auto
                <!-- 创建session方式 hibernate4.x 的方式 -->
                hibernate.current_session_context_class=org.springframework.orm.hibernate4.SpringSessionContext
                <!-- javax.persistence.validation.mode默认情况下是auto的,就是说如果不设置的话它是会自动去你的classpath下面找一个bean-validation**包
                    所以把它设置为none即可 -->
                javax.persistence.validation.mode=none
            </value>
        </property>

        <!-- 自动扫描实体对象的包结构中存放实体类 -->
        <property name="packagesToScan" value="com.model" />
    </bean>
    <!-- 从这开始就是开启事务的配置了 -->
     <!-- hibernate交由spring托管 -->

    <bean id="txManager"
                class="org.springframework.orm.hibernate4.HibernateTransactionManager">
        <property name="sessionFactory" ref="sessionFactory"/>

    </bean>
    <!-- 配置通知 -->
    <tx:advice id="txAdvice" transaction-manager="txManager" >
         <tx:attributes>
            <!-- 凡是以这些名字开头的都通过请求,并且允许修改数据库 -->
            <tx:method name="insert*" read-only="false" propagation="REQUIRED" />

            <tx:method name="find*" read-only="true" propagation="REQUIRED" />

            <tx:method name="save*" read-only="false" propagation="REQUIRED" />

            <tx:method name="update*" read-only="false" propagation="REQUIRED" />

            <tx:method name="delete*" read-only="false" propagation="REQUIRED" />
  </tx:attributes>
    </tx:advice>
    <!-- 切面配置 -->
   <aop:config> <!-- 将项目的service层交给spring托管 -->
  <aop:pointcut id="bussinessService"
   expression="execution(* com.service.*.*(..))" />
  <aop:advisor pointcut-ref="bussinessService"
   advice-ref="txAdvice" />

 </aop:config>
        </beans>
下面是SpringMVC的配置文件
<?xml version="1.0" encoding="UTF-8"?>
<beans xmlns="http://www.springframework.org/schema/beans"
    xmlns:xsi="http://www.w3.org/2001/XMLSchema-instance"
    xmlns:mvc="http://www.springframework.org/schema/mvc"
    xmlns:context="http://www.springframework.org/schema/context"
    xmlns:aop="http://www.springframework.org/schema/aop"
    xmlns:tx="http://www.springframework.org/schema/tx"
    xsi:schemaLocation="http://www.springframework.org/schema/mvc http://www.springframework.org/schema/mvc/spring-mvc-4.3.xsd
        http://www.springframework.org/schema/beans http://www.springframework.org/schema/beans/spring-beans.xsd
        http://www.springframework.org/schema/context http://www.springframework.org/schema/context/spring-context-4.3.xsd
        http://www.springframework.org/schema/aop http://www.springframework.org/schema/aop/spring-aop-4.3.xsd
        http://www.springframework.org/schema/tx http://www.springframework.org/schema/tx/spring-tx-4.3.xsd">
  <!-- 扫描注解包 -->
 <context:component-scan base-package="com.serviceimpl"></context:component-scan>
  <context:component-scan base-package="com.dao.impl"></context:component-scan>
   <context:component-scan base-package="com.controller"></context:component-scan>

  <!-- 视图解析器 -->
  <bean class="org.springframework.web.servlet.view.InternalResourceViewResolver">
   <property name="prefix" value="/jsp/" />
   <property name="suffix" value=".jsp" />
  </bean>

<!-- 第一种静态处理 处理css,js,photo -->
    <mvc:resources location="/photo/" mapping="/photo/**"></mvc:resources>
<!-- 第二种静态处理 处理css,js,photo -->
    <mvc:default-servlet-handler/>
    <mvc:annotation-driven></mvc:annotation-driven><!-- 一般都要配置 -->
    <!-- 拦截器 -->

 <mvc:interceptors>
 <mvc:interceptor>
 <mvc:mapping path="/ToA"/>
 <bean class="com.interpoter.Interptor"></bean>
 </mvc:interceptor>
  <mvc:interceptor>
 <mvc:mapping path="/**"/>
 <bean class="com.interpoter.RegisterInterpoter"></bean>
 </mvc:interceptor>
 </mvc:interceptors>
 <bean id="multipartResolver" class="org.springframework.web.multipart.commons.CommonsMultipartResolver"/>

</beans>
最后是web文件配置
<?xml version="1.0" encoding="UTF-8"?>
<web-app xmlns:xsi="http://www.w3.org/2001/XMLSchema-instance" xmlns="http://java.sun.com/xml/ns/javaee" xsi:schemaLocation="http://java.sun.com/xml/ns/javaee http://java.sun.com/xml/ns/javaee/web-app_3_0.xsd" id="WebApp_ID" version="3.0">
  <display-name>Healthy_3</display-name>
  <!-- spring配置文件applictioncontext路径 -->
<context-param>
        <param-name>contextConfigLocation</param-name>
        <param-value>classpath:config/applicationContext.xml</param-value>
  </context-param>
  <!--   配置spring启动listener入口 -->
  <listener>
     <listener-class>org.springframework.web.context.ContextLoaderListener</listener-class>
  </listener>
  <servlet>
  <!-- springMVC配置文件路径 -->
  <servlet-name>Healthy_3</servlet-name>
  <servlet-class>org.springframework.web.servlet.DispatcherServlet</servlet-class>
        <init-param>
            <param-name>contextConfigLocation</param-name>
             <param-value>classpath:config/Healthy_3-servlet.xml</param-value>
        </init-param>
        <load-on-startup>1</load-on-startup>
  </servlet>
  <servlet-mapping>
  <servlet-name>Healthy_3</servlet-name>
  <url-pattern>/</url-pattern>
  </servlet-mapping>
  <filter>
  <filter-name>OpenSessionInViewFilter</filter-name>
  <filter-class>
   org.springframework.orm.hibernate4.support.OpenSessionInViewFilter
  </filter-class>
  <init-param>
   <param-name>FlushMode</param-name>
   <param-value>AUTO</param-value>
  </init-param>
 </filter>
  <filter-mapping>
        <filter-name>OpenSessionInViewFilter</filter-name>
        <url-pattern>/*</url-pattern>
    </filter-mapping>
   <!-- 字符集过滤器 -->
    <filter>
        <filter-name>encodingFilter</filter-name>
        <filter-class>org.springframework.web.filter.CharacterEncodingFilter</filter-class>
        <init-param>
            <param-name>encoding</param-name>
            <param-value>UTF-8</param-value>
        </init-param>
    </filter>
    <filter-mapping>
        <filter-name>encodingFilter</filter-name>
        <url-pattern>/*</url-pattern>
    </filter-mapping>

</web-app>
新人渣渣,还望有大神前来多多指教。


 4690
4690

 被折叠的 条评论
为什么被折叠?


