


1、二维向量的叉乘
之前在变换文章中提到过三维向量的叉乘,它会生成第三个垂直于前两个向量的法向量,叉乘公式为
在二维中,是没有 z 的,那么我们可以把 z 当作是 0,那么二维向量的叉乘就变成了
这个时候我们就可以把二维向量的叉乘值定义为一个标量
二维向量的叉乘公式又为
那么我们就可以利用二维向量的叉乘来计算三角形的环绕顺序,同时也可以利用二维向量的叉乘来计算平行四边形的面积
2、面剔除
面剔除又叫做背面消隐,它只对三角形有效,当我们观察一个 3D 立方体时,无论从哪个方向去看,我们最多只能看到立方体的 3 个面,甚至在有的情况下,我们只能看到 2 个或者 1 个面,那么我们就需要提前计算出来我们看不到的平面,然后把它丢弃,这样就可以省下很多的资源。
2.1 三角形环绕顺序
三角形的环绕顺序有逆时针和顺时针两种
环绕顺序为逆时针
环绕顺序为顺时针
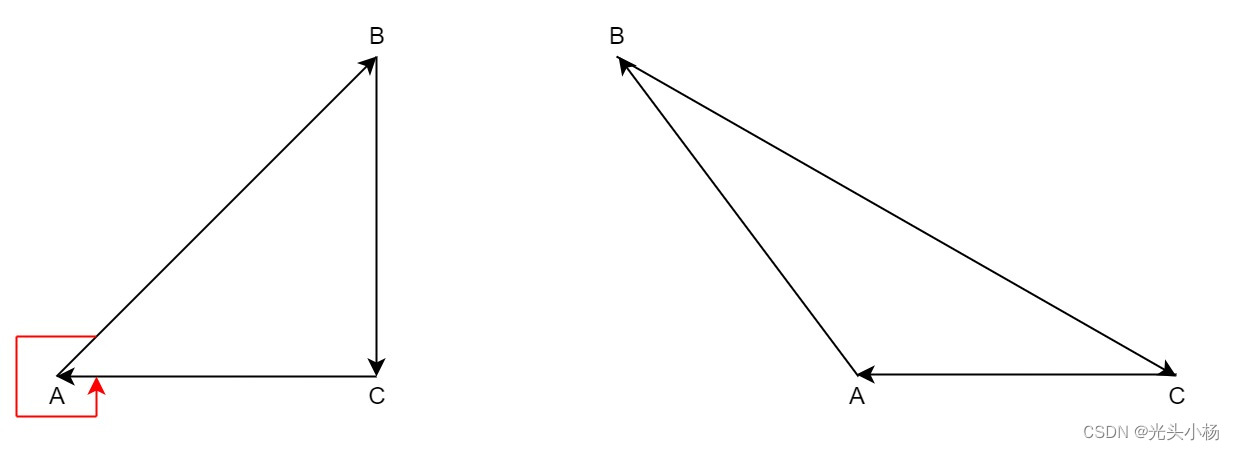
这个时候我们就可以利用上面提到过的二维向量的叉乘来判断三角形的环绕顺序了
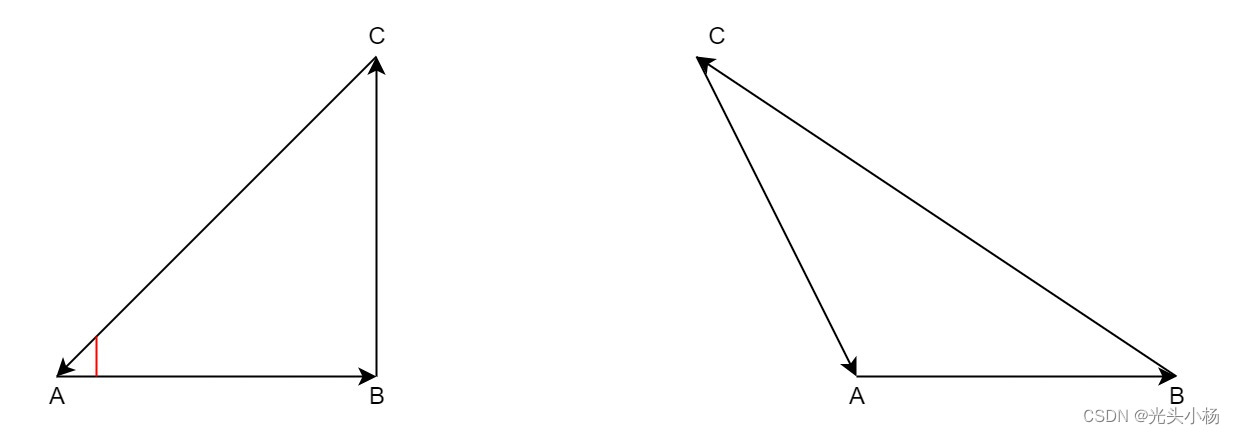
假设三角形的三个顶点 ABC 坐标分别为
A(x1, y1)
B(x2, y2)
C(x3, y3)
当环绕顺序为逆时针时,向量 AB 与向量 AC 的夹角(图中红色线)肯定小于 180 度,那么向量叉乘肯定大于 0。
当环绕顺序为顺时针时,向量 AB 与向量 AC 的夹角(图中红色线)肯定大于 180 度,那么向量叉乘肯定小于 0。
2.2 GLES 2.0 中的面剔除
当我们定义一组三角形顶点时,我们会以特定的环绕顺序来定义它们,可能是顺时针的,也可能是逆时针的,OpenGL 在渲染图元的时候将使用这个信息来决定一个三角形是正面还是背面的三角形,默认情况下,逆时针顶点所定义的三角形会被认为是正向三角形,但是也可以通过 API 来配置。
glFrontFace(GL_CCW);GL_CCW 表示逆时针为正向,GL_CW 表示顺时针为正向。
在一般情况下,我们会将背面的三角形剔除掉,但是 OpenGL 也还是有 API 来配置我们需要剔除是正面的三角形还是背面的三角形。
glCullFace(GL_FRONT);GL_FRONT 表示剔除正面,GL_BACK 表示剔除背面,GL_FRONT_AND_BACK 表示剔除正面和背面
背面消隐功能在默认清空下是关闭的,只有当用户开启了背面消隐功能,它才会生效,开启背面消隐的 API 如下
glEnable(GL_CULL_FACE);2.3 背面消隐代码实现
void CullfaceTriangle() {
    float a = points[0].x * (points[1].y - points[2].y) +
              points[1].x * (points[2].y - points[0].y) +
              points[2].x * (points[0].y - points[1].y);
    bool front_face = false;
    if (arround_order_ == GL_CCW) {
        front_face = a > 0 ? true : false;
    } else {
        front_face = a < 0 ? true : false;
    }
    if (enable_cullface_) {
        if ((cull_face_opt_ == GL_BACK) && front_face ||
            (cull_face_opt_ == GL_FRONT) && !front_face) {
            for (int i = 0; i < 3; ++i) {
                std::cout << points[0].x << " " << points[0].y << std::endl;
            }
        }
    } else {
        for (int i = 0; i < 3; ++i) {
            std::cout << points[0].x << " " << points[0].y << std::endl;
        }
    }
}
3、视窗变换
3.1 基本概念
在之前的文章中,我们也提到过视窗变换,视窗变换或者也叫视口变换,主要作用是将 NDC 坐标变换到屏幕空间,在视窗变换之前我们需要先进行透视除法,也就是将顶点的 4 个分量都除以 w,也就是乘以 1/w
w = 1 / w;
x = x * w;
y = y * w;
z = z * w;
这里我们并没有将 w 置为 1,而是变成了 1/w,这是因为我们在后面光栅化里面还需要用到这个值
视窗变换矩阵为
3.2 代码实现
void DoViewport(const Point& point) {
    float tmp_x = view_port_x + view_port_w * 1.0 / 2;
    float tmp_y = view_port_y + view_port_h * 1.0 / 2;
    point.w = 1.0 / point.w;
    point.x = point.x * point.w;
    point.y = point.y * point.w;
    point.z = point.z * point.w;
    point.x = (int)((view_port_w / 2) * point.x + tmp_x);
    point.x = (int)(point.x >= view_port_w ? view_port_w - 1 : point.x);
    point.y = (int)((view_port_h / 2) * point.y + tmp_y);
    point.y = (int)(point.y >= view_port_h ? view_port_h - 1 : point.y);
    point.z = (far - near) / 2 * point.z + (far + near) / 2;
    std::cout << "xyzw: " << point.x << " " << point.y << " " << point.z << " " << point.w << std::endl;
}


 1278
1278


 被折叠的 条评论
为什么被折叠?
被折叠的 条评论
为什么被折叠?
 到【灌水乐园】发言


