


一、概述
说到Android进程间通信,大家肯定能想到的是编写aidl文件,然后通过aapt生成的类方便的完成服务端,以及客户端代码的编写。如果你对这个过程不熟悉,可以查看Android aidl Binder框架浅析;
当然今天要说的通信方式肯定不是通过编写aidl文件的方式,那么有请今天的主角:Messenger。ok,这是什么样的一个类呢?我们看下注释
This allows for the implementation of message-based communication across processes
传送门Android Official API(Bound Services)
这里我不打算将AIDL作为主要的方面来讲,但又有关系,所以用官方的介绍作为最重要的依据。具体在使用时的差别,一般来讲通过Message来使用是官方推荐的,简单而且实用,但若你的业务逻辑就是要同时处理多少请求,效益高,但你必须自己解决线程同步问题,那就可以使用AIDL了。
Compared to AIDL
When you need to perform IPC, using a Messenger for your interface is simpler than implementing it with AIDL, because Messenger queues all calls to the service, whereas, a pure AIDL interface sends simultaneous requests to the service, which must then handle multi-threading.
For most applications, the service doesn’t need to perform multi-threading, so using a Messenger allows the service to handle one call at a time. If it’s important that your service be multi-threaded, then you should use AIDL to define your interface.
什么叫基于消息的进程间通信方式呢?看个图理解下:
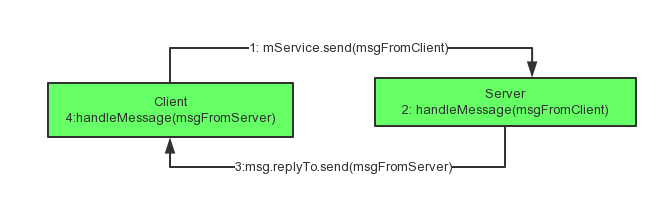
可以看到,我们可以在客户端发送一个Message给服务端,在服务端的handler中会接收到客户端的消息,然后进行对应的处理,处理完成后,再将结果等数据封装成Message,发送给客户端,客户端的handler中会接收到处理的结果。
这样的进程间通信是不是很爽呢?
基于Message,相信大家都很熟悉
支持回调的方式,也就是服务端处理完成长任务可以和客户端交互
不需要编写aidl文件
此外,还支持,记录客户端对象的Messenger,然后可以实现一对多的通信;甚至作为一个转接处,任意两个进程都能通过服务端进行通信,这个后面再说。
看到这,有没有一些的小激动,我们可以不写aidl文件,方便的实现进程间通信了,是不是又可以装一下了。哈,下面看个简单的例子。
二、通信实例
这个例子,通过两个apk演示,一个apk是Server端,一个是Client端;
(一) Server端
package com.imooc.messenger_server;

import android.app.Service;
import android.content.Intent;
import android.os.Handler;
import android.os.IBinder;
import android.os.Message;
import android.os.Messenger;
import android.os.RemoteException;

public class MessengerService extends Service
{

    private static final int MSG_SUM = 0x110;

    //最好换成HandlerThread的形式
    private Messenger mMessenger = new Messenger(new Handler()
    {
        @Override
        public void handleMessage(Message msgfromClient)
        {
            Message msgToClient = Message.obtain(msgfromClient);//返回给客户端的消息
            switch (msgfromClient.what)
            {
                //msg 客户端传来的消息
                case MSG_SUM:
                    msgToClient.what = MSG_SUM;
                    try
                    {
                        //模拟耗时
                        Thread.sleep(2000);
                        msgToClient.arg2 = msgfromClient.arg1 + msgfromClient.arg2;
                        msgfromClient.replyTo.send(msgToClient);
                    } catch (InterruptedException e)
                    {
                        e.printStackTrace();
                    } catch (RemoteException e)
                    {
                        e.printStackTrace();
                    }
                    break;
            }

            super.handleMessage(msgfromClient);
        }
    });

    @Override
    public IBinder onBind(Intent intent)
    {
        return mMessenger.getBinder();
    }
}
服务端就一个Service,可以看到代码相当的简单,只需要去声明一个Messenger对象,然后onBind方法返回mMessenger.getBinder();
然后坐等客户端将消息发送到handleMessage想法,根据message.what去判断进行什么操作,然后做对应的操作,最终将结果通过 msgfromClient.replyTo.send(msgToClient);返回。
可以看到我们这里主要是取出客户端传来的两个数字,然后求和返回,这里我有意添加了sleep(2000)模拟耗时,注意在实际使用过程中,可以换成在独立开辟的线程中完成耗时操作,比如和HandlerThread结合使用。
服务啊!!别忘记了清单中注册服务!!
 <service
            android:name=".MessengerService"
            android:enabled="true"
            android:exported="true">
            <intent-filter>
                <action android:name="com.zhy.aidl.calc"></action>
                <category android:name="android.intent.category.DEFAULT" />
            </intent-filter>
</service>
(二)客户端
Activity

package com.imooc.messenger_client;

import android.content.ComponentName;
import android.content.Context;
import android.content.Intent;
import android.content.ServiceConnection;
import android.os.Bundle;
import android.os.Handler;
import android.os.IBinder;
import android.os.Message;
import android.os.Messenger;
import android.os.RemoteException;
import android.support.v7.app.AppCompatActivity;
import android.util.Log;
import android.view.View;
import android.widget.Button;
import android.widget.LinearLayout;
import android.widget.TextView;

public class MainActivity extends AppCompatActivity
{
    private static final String TAG = "MainActivity";
    private static final int MSG_SUM = 0x110;

    private Button mBtnAdd;
    private LinearLayout mLyContainer;
    //显示连接状态
    private TextView mTvState;

    private Messenger mService;
    private boolean isConn;


    private Messenger mMessenger = new Messenger(new Handler()
    {
        @Override
        public void handleMessage(Message msgFromServer)
        {
            switch (msgFromServer.what)
            {
                case MSG_SUM:
                    TextView tv = (TextView) mLyContainer.findViewById(msgFromServer.arg1);
                    tv.setText(tv.getText() + "=>" + msgFromServer.arg2);
                    break;
            }
            super.handleMessage(msgFromServer);
        }
    });


    private ServiceConnection mConn = new ServiceConnection()
    {
        @Override
        public void onServiceConnected(ComponentName name, IBinder service)
        {
            mService = new Messenger(service);
            isConn = true;
            mTvState.setText("connected!");
        }

        @Override
        public void onServiceDisconnected(ComponentName name)
        {
            mService = null;
            isConn = false;
            mTvState.setText("disconnected!");
        }
    };

    private int mA;

    @Override
    protected void onCreate(Bundle savedInstanceState)
    {
        super.onCreate(savedInstanceState);
        setContentView(R.layout.activity_main);

        //开始绑定服务
        bindServiceInvoked();

        mTvState = (TextView) findViewById(R.id.id_tv_callback);
        mBtnAdd = (Button) findViewById(R.id.id_btn_add);
        mLyContainer = (LinearLayout) findViewById(R.id.id_ll_container);

        mBtnAdd.setOnClickListener(new View.OnClickListener()
        {
            @Override
            public void onClick(View v)
            {
                try
                {
                    int a = mA++;
                    int b = (int) (Math.random() * 100);

                    //创建一个tv,添加到LinearLayout中
                    TextView tv = new TextView(MainActivity.this);
                    tv.setText(a + " + " + b + " = caculating ...");
                    tv.setId(a);
                    mLyContainer.addView(tv);

                    Message msgFromClient = Message.obtain(null, MSG_SUM, a, b);
                    msgFromClient.replyTo = mMessenger;
                    if (isConn)
                    {
                        //往服务端发送消息
                        mService.send(msgFromClient);
                    }
                } catch (RemoteException e)
                {
                    e.printStackTrace();
                }
            }
        });

    }

    private void bindServiceInvoked()
    {
        Intent intent = new Intent();
        intent.setAction("com.zhy.aidl.calc");
        bindService(intent, mConn, Context.BIND_AUTO_CREATE);
        Log.e(TAG, "bindService invoked !");
    }

    @Override
    protected void onDestroy()
    {
        super.onDestroy();
        unbindService(mConn);
    }
}
代码也不复杂,首先bindService,然后在onServiceConnected中拿到回调的service(IBinder)对象,通过service对象去构造一个mService =new Messenger(service);然后就可以使用mService.send(msg)给服务端了。
我们消息的发送在Btn.onclick里面:
Message msgFromClient = Message.obtain(null, MSG_SUM, a, b);
msgFromClient.replyTo = mMessenger;
if (isConn)
{
    //往服务端发送消息
    mService.send(msgFromClient);
}
那么服务端会收到消息,处理完成会将结果返回,传到Client端的mMessenger中的Handler的handleMessage方法中。
布局文件如下
<LinearLayout android:id="@+id/id_ll_container"
              xmlns:android="http://schemas.android.com/apk/res/android"
              xmlns:tools="http://schemas.android.com/tools"
              android:layout_width="match_parent"
              android:layout_height="match_parent"
              android:orientation="vertical"
              android:paddingBottom="@dimen/activity_vertical_margin"
              android:paddingLeft="@dimen/activity_horizontal_margin"
              android:paddingRight="@dimen/activity_horizontal_margin"
              android:paddingTop="@dimen/activity_vertical_margin"
              tools:context=".MainActivity">

    <TextView
        android:id="@+id/id_tv_callback"
        android:layout_width="match_parent"
        android:layout_height="wrap_content"
        android:text="Messenger Test!"/>

    <Button android:id="@+id/id_btn_add"
            android:layout_width="wrap_content"
            android:layout_height="wrap_content"
            android:text="add"/>

</LinearLayout>
效果图
可以看到,我们每点击一次按钮,就往服务器发送个消息,服务器拿到消息执行完成后,将结果返回。
整个通信的代码看起来还是相当的清爽的,那么大家有没有对其内部的原理有一丝的好奇呢?下面我们就来看下其内部是如何实现的。
对了,源码分析前,这里插一句,大家通过代码可以看到服务端往客户端传递数据是通过msg.replyTo这个对象的。那么服务端完全可以做到,使用一个List甚至Map去存储所有绑定的客户端的msg.replyTo对象,然后想给谁发消息都可以。甚至可以把A进程发来的消息,通过B进程的msg.replyTo发到B进程那里去。相关代码呢,可以参考官方的文档:service,注意下拉找:Remote Messenger Service Sample。
三、总结
- 客户端与服务端通信,利用的aidl文件,没什么特殊的
- 服务端与客户端通信,主要是在传输的消息上做了处理,让Messager.replyTo指向的客户端的Messenger,而Messenger又持有客户端的一个Binder对象(MessengerImpl)。服务端正是利用这个Binder对象做的与客户端的通信。
- 可以考虑自己编写aidl文件,实现下服务端对客户端的回调。
源码分析,推荐地址:http://www.cnblogs.com/xiaochao1234/p/4683554.html
android.com/guide/components/bound-services.html#Binding


 6174
6174

 被折叠的 条评论
为什么被折叠?
被折叠的 条评论
为什么被折叠?
 到【灌水乐园】发言


