


背景介绍:目前随着电商、社交、游戏和代购等的流行,“附近的人”这一功能提供了一种便捷的方式允许同一地区或者一定距离范围内的用户进行相互交流的途径,一般都是在用户点击某个菜单或按钮时记录用户的坐标信息,拿微信的“附近的人”功能举例子,如下图所示,

当你在点击附近的人时微信服务端会提示获取你所在位置的经纬度,记录到服务端,右上角的小脚印就表示你的经纬度信息被记录。然后服务端会根据你的位置信息拉取附近同样在服务器端有位置记录的用户信息,按照距离进行排序。一般来说“附近的人”功能只要能否大体反应距你多少米或千米范围内有XX用户即可,这句话体现了两个知识点:对精度要求不高和一定范围内(具体指多少M或KM)的用户;目前“附近的人”实现方式有很多,各有利弊,本文基于Redis(v3.2+)实现,redis3.2版本起,提供了以geo为前缀的命令采用geohash用于存储地理位置坐标信息,并对储存的地理位置信息进行操作,常用命令如下:
# GEOADD 用于存储指定的地理空间位置,可以将一个或多个经度(longitude)、纬度(latitude)、位置名称##(member)添加到指定的 key 中。
GEOADD key longitude latitude member [longitude latitude member ...]

# geopos 用于从给定的 key 里返回所有指定名称(member)的位置(经度和纬度),不存在的返回 nil
GEOPOS key member [member ...]

# geodist 用于返回两个给定位置之间的距离
GEODIST key member1 member2 [m|km|ft|mi]

# georadius 以给定的经纬度为中心, 返回键包含的位置元素当中, 与中心的距离不超过给定最大距离的所有位置元素。
GEORADIUS key longitude latitude radius m|km|ft|mi [WITHCOORD] [WITHDIST] [WITHHASH] [COUNT count] [ASC|DESC] [STORE key] [STOREDIST key]

# georadiusbymember 和 GEORADIUS 命令一样, 都可以找出位于指定范围内的元素, 但是georadiusbymember 的中心点是由给定的位置元素决定的, 而不是使用经度和纬度来决定中心点。
GEORADIUSBYMEMBER key member radius m|km|ft|mi [WITHCOORD] [WITHDIST] [WITHHASH] [COUNT count] [ASC|DESC] [STORE key] [STOREDIST key]

# GEOHASH 用于获取一个或多个位置元素的 geohash 值。
GEOHASH key member [member ...]
简单演示下,假设有两个位置,通过地图拾取坐标系统获取到北京南站( 116.387021,39.873306)和北京西站(116.327805,39.900766),然后在地图上大体测距两个地点距离为5.9公里。
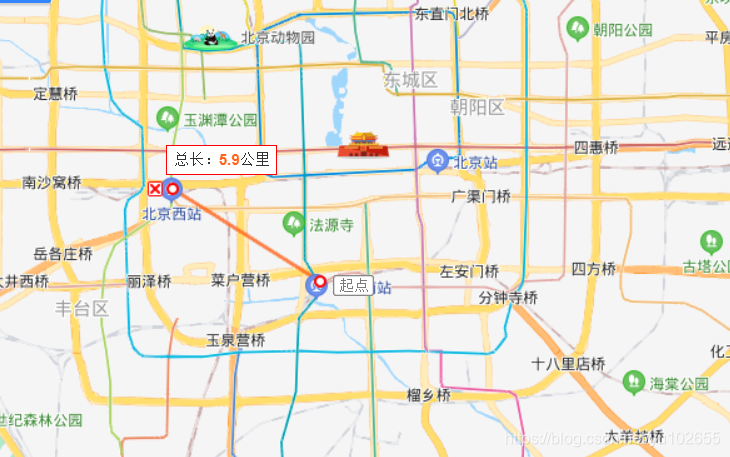
那么下面看看,如果利用redis的GEO命令计算两个站之间的距离吧,执行过程如下,可以看出利用GEODIST命令计算出来的两个位置之间的距离和地图标注的距离大致一样,要记住Redis GEO采用geohash来保存地理位置坐标,误差肯定是存在的,在实现功能时要考虑如何消减误差产生的影响:

比如我目前位于北京动物园(116.344478,39.946361),我想看看6KM范围内是否有高铁站,两种思路:要么先GEOADD添加,然后再利用GEORADIUSBYMEMBER或者利用GEORADIUS命令来实现该功能都可以:

好的,现在开始编码:
1、新建一个SpringBoot项目,并引入spring-boot-redis依赖,项目结构和pom.xml文件如下:
<?xml version="1.0" encoding="UTF-8"?>
<project xmlns="http://maven.apache.org/POM/4.0.0" xmlns:xsi="http://www.w3.org/2001/XMLSchema-instance"
         xsi:schemaLocation="http://maven.apache.org/POM/4.0.0 https://maven.apache.org/xsd/maven-4.0.0.xsd">
    <modelVersion>4.0.0</modelVersion>
    <parent>
        <groupId>org.springframework.boot</groupId>
        <artifactId>spring-boot-starter-parent</artifactId>
        <version>2.2.1.RELEASE</version>
        <relativePath/> <!-- lookup parent from repository -->
    </parent>
    <groupId>thinking-in-spring-boot</groupId>
    <artifactId>first-app-by-gui</artifactId>
    <version>0.0.1-SNAPSHOT</version>
    <name>first-app-by-gui</name>
    <description>Demo project for Spring Boot</description>

    <properties>
        <java.version>1.8</java.version>
    </properties>

    <dependencies>
        <dependency>
            <groupId>org.springframework.boot</groupId>
            <artifactId>spring-boot-starter-web</artifactId>
        </dependency>
        <dependency>
            <groupId>org.springframework.boot</groupId>
            <artifactId>spring-boot-starter-data-redis</artifactId>
        </dependency>
        <dependency>
            <groupId>com.alibaba</groupId>
            <artifactId>fastjson</artifactId>
            <version>1.2.60</version>
        </dependency>
        <dependency>
            <groupId>org.projectlombok</groupId>
            <artifactId>lombok</artifactId>
            <version>1.16.22</version>
        </dependency>
        <dependency>
            <groupId>org.springframework.boot</groupId>
            <artifactId>spring-boot-starter-test</artifactId>
            <scope>test</scope>
        </dependency>
        <!--		<dependency>-->
        <!--			<groupId>org.springframework.boot</groupId>-->
        <!--			<artifactId>spring-boot-loader</artifactId>-->
        <!--			<scope>provided</scope>-->
        <!--		</dependency>-->
    </dependencies>

    <build>
        <plugins>
            <plugin>
                <groupId>org.springframework.boot</groupId>
                <artifactId>spring-boot-maven-plugin</artifactId>
            </plugin>
        </plugins>
    </build>

</project>

2、向application.yml项目配置文件中新增redis配置:
spring:
  redis:
    database: 0
    host: 127.0.0.1
    port: 6379
    password:
    timeout: 1000
3、编写Redis配置类(RedisConfig)。需要注意的是由于SpringBoot默认只支持对String类型的数据缓存操作,像redis的geo操作,就涉及到复杂数据类型,所以大多数情况下都需要单独编写一个Redis配置类通过丰富RedisTemplate功能来实现对String之外的类型缓存操作,另外一般不直接暴露RedisTemplate给业务代码,需要提供进一步封装,具体实现因项目而异,本次只做简单实现,不做特殊要求:
package com.dongnao.config;

import com.fasterxml.jackson.annotation.JsonAutoDetect;
import com.fasterxml.jackson.annotation.PropertyAccessor;
import com.fasterxml.jackson.databind.ObjectMapper;
import org.springframework.cache.annotation.EnableCaching;
import org.springframework.context.annotation.Bean;
import org.springframework.context.annotation.Configuration;
import org.springframework.data.redis.connection.RedisConnectionFactory;
import org.springframework.data.redis.core.*;
import org.springframework.data.redis.serializer.Jackson2JsonRedisSerializer;
import org.springframework.data.redis.serializer.StringRedisSerializer;

@EnableCaching
@Configuration
public class RedisConfig {

    @Bean
    public RedisTemplate<String, Object> redisTemplate(RedisConnectionFactory factory) {

        RedisTemplate<String, Object> template = new RedisTemplate<>();
        // 配置连接工厂
        template.setConnectionFactory(factory);

        //使用Jackson2JsonRedisSerializer来序列化和反序列化redis的value值(默认使用JDK的序列化方式)
        Jackson2JsonRedisSerializer jacksonSeial = new Jackson2JsonRedisSerializer(Object.class);

        ObjectMapper om = new ObjectMapper();
        // 指定要序列化的域,field,get和set,以及修饰符范围,ANY是都有包括private和public
        om.setVisibility(PropertyAccessor.ALL, JsonAutoDetect.Visibility.ANY);
        // 指定序列化输入的类型,类必须是非final修饰的,final修饰的类,比如String,Integer等会跑出异常
        om.enableDefaultTyping(ObjectMapper.DefaultTyping.NON_FINAL);
        jacksonSeial.setObjectMapper(om);

        // 值采用json序列化
        template.setValueSerializer(jacksonSeial);
        //使用StringRedisSerializer来序列化和反序列化redis的key值
        template.setKeySerializer(new StringRedisSerializer());

        // 设置hash key 和value序列化模式
        template.setHashKeySerializer(new StringRedisSerializer());
        template.setHashValueSerializer(jacksonSeial);
        template.afterPropertiesSet();
        return template;
    }

}
4、编写测试类,内容如下,示例代码中含有添加用户坐标信息到redis中,也有基于特定坐标降序或升序查询多少距离以内的用户列表操作,简单来说针对redis的geo命令,springboot-redis api中有对应封装,结合实际业务情形使用即可:
package com.dongnao;

import com.alibaba.fastjson.JSON;
import lombok.Data;
import org.junit.Test;
import org.junit.runner.RunWith;
import org.springframework.beans.factory.annotation.Autowired;
import org.springframework.boot.test.context.SpringBootTest;
import org.springframework.data.geo.*;
import org.springframework.data.redis.connection.RedisGeoCommands;
import org.springframework.data.redis.core.RedisTemplate;
import org.springframework.test.context.junit4.SpringRunner;

import java.util.ArrayList;
import java.util.List;

@RunWith(SpringRunner.class)
@SpringBootTest
public class FirstAppByGuiApplicationTests {

    @Autowired
    private RedisTemplate redisTemplate;

    //GEO相关命令用到的KEY
    private final static String KEY = "position";

    @Test
    public void test() {
        // 1、初始化用户坐标数据
//        initData();
        // 获取距离(116.844478,39.146161)这个坐标点100公里以内的用户信息
        List<User> users = nearBySearch(100, 116.844478, 39.146161);
        System.out.println(JSON.toJSONString(users));
    }

    /**
     * 初始化用户坐标数据
     */
    private void initData() {
        redisTemplate.opsForGeo().add(KEY, new RedisGeoCommands.GeoLocation<>(
                "user01",
                new Point(116.344478, 39.946161))
        );
        redisTemplate.opsForGeo().add(KEY, new RedisGeoCommands.GeoLocation<>(
                "user02",
                new Point(116.345478, 39.946261))
        );
        redisTemplate.opsForGeo().add(KEY, new RedisGeoCommands.GeoLocation<>(
                "user03",
                new Point(116.346878, 39.946361))
        );
        redisTemplate.opsForGeo().add(KEY, new RedisGeoCommands.GeoLocation<>(
                "user04",
                new Point(116.34318, 39.946341))
        );
        redisTemplate.opsForGeo().add(KEY, new RedisGeoCommands.GeoLocation<>(
                "user05",
                new Point(116.344978, 39.946561))
        );
    }

    /**
     * 获取距指定位置distance公里范围内的用户信息
     *
     * @param distance 距离
     * @param userLng  经度
     * @param userLat  维度
     * @return
     */
    public List<User> nearBySearch(double distance, double userLng, double userLat) {
        List<User> users = new ArrayList<>();
        // 1、等价于GEORADIUS position 116.344478 39.9463616 6 "km" "WITHDIST" "WITHCOORD" "ASC"
        GeoResults<RedisGeoCommands.GeoLocation<Object>> reslut =
                redisTemplate.opsForGeo().radius(KEY,
                        new Circle(new Point(userLng, userLat), new Distance(distance, Metrics.KILOMETERS)),
                        RedisGeoCommands.GeoRadiusCommandArgs.newGeoRadiusArgs()
                                .includeDistance()
                                .includeCoordinates().sortAscending());
        //2、遍历并封装GEO结果
        List<GeoResult<RedisGeoCommands.GeoLocation<Object>>> content = reslut.getContent();
        content.forEach(a -> users.add(
                new User().setDistance(a.getDistance().getValue())
                        .setLatitude(a.getContent().getPoint().getX())
                        .setLongitude(a.getContent().getPoint().getY()).setUsername(a.getContent().getName().toString())));
        return users;
    }

    @Data
    class User {

        private String username;

        private Double latitude;

        private Double longitude;

        private Double distance;

        public User setUsername(String username) {
            this.username = username;
            return this;
        }

        public User setLatitude(Double latitude) {
            this.latitude = latitude;
            return this;
        }

        public User setLongitude(Double longitude) {
            this.longitude = longitude;
            return this;
        }

        public User setDistance(Double distance) {
            this.distance = distance;
            return this;
        }
    }

}
运行测试代码,结果如下,按照距离升序,返回用户信息:
[
  {
    "distance": 98.706,
    "latitude": 116.34688049554825,
    "longitude": 39.94636014167523,
    "username": "user03"
  },
  {
    "distance": 98.7481,
    "latitude": 116.34548038244247,
    "longitude": 39.946261287550016,
    "username": "user02"
  },
  {
    "distance": 98.7752,
    "latitude": 116.3444772362709,
    "longitude": 39.94615989870364,
    "username": "user01"
  },
  {
    "distance": 98.7968,
    "latitude": 116.34497612714767,
    "longitude": 39.94656038464682,
    "username": "user05"
  },
  {
    "distance": 98.8416,
    "latitude": 116.3431790471077,
    "longitude": 39.946339863905955,
    "username": "user04"
  }
]
讲完了使用,再来说说缺点:如上结果所示,只存储对象唯一识别信息,不便进行复杂对象存储和多条件查询等操作。技术就是这样,没有最好,只有更合适些的,办法总比困难多!
以上,完了!


 1085
1085


 被折叠的 条评论
为什么被折叠?
被折叠的 条评论
为什么被折叠?
 到【灌水乐园】发言


