


1.标签栏的基本概念
- tabBar是UITabBar对象, UITabBarItem, 每一个tabBarItem对应一个viewController, tabBar高度为49,导航栏和状态栏高度为64.
- 当tabBarItem超过5个时,系统会自动增加一个更多按钮, 点击更多按钮, 没有在底部出现的那些按钮会以列表的形式显示出来.
- tabBar属性: tintColor(item被点击之后的颜色), barTintColor(背景颜色)图像设置.
- tabBarItem可以设置titile, image, badgeValue. 可以使用系统样式创建tabBarItem.
- UITabBarController是项目中常见的布局方式, 与 UINavigationController不同, 它的viewControllers都是并列的; 而 UINavigationController则是层次性的.
- UITabBarController, UINavigationController, UITableViewController通常都是组合出现, 这种布局方式特别常见,一定掌握. UITabBarController和UINavigationController可以互相嵌套用.
- UITabBarController的常用属性: viewControllers(显示的视图控制器), tabBar(标签栏), selectedIndex(选中某个tabBarItem).
- AppDelegate –> window -> tabBar ->navigation ->view
2.基本运用
AppDelegate.m文件
#import "AppDelegate.h"
#import "FirstViewController.h"
#import "SecondViewController.h"
#import "ThirdViewController.h"
#import "FouthViewController.h"
#import "FiveViewController.h"
#import "SixViewController.h"
//定义一个常量
#define SELECTEDKEY @"selected"
@interface AppDelegate ()<UITabBarControllerDelegate>
@end
@implementation AppDelegate
- (BOOL)application:(UIApplication *)application didFinishLaunchingWithOptions:(NSDictionary *)launchOptions {
self.window = [[UIWindow alloc] initWithFrame:[[UIScreen mainScreen] bounds]];
// Override point for customization after application launch.
self.window.backgroundColor = [UIColor whiteColor];
[self.window makeKeyAndVisible];
[_window release];
//AppDelegate --> window -> tabBar ->navigation ->view
//创建第一个视图控制器对象和第一个naVC
FirstViewController *firstVC = [[FirstViewController alloc] init];
UINavigationController *firstNav = [[UINavigationController alloc] initWithRootViewController:firstVC];
//创建tabbar上面的按钮及其内容
firstVC.tabBarItem = [[[UITabBarItem alloc] initWithTabBarSystemItem:UITabBarSystemItemHistory tag:1000] autorelease];
SecondViewController *secondVC = [[SecondViewController alloc] init];
UINavigationController *secondNav = [[UINavigationController alloc ] initWithRootViewController:secondVC];
secondVC.tabBarItem = [[[UITabBarItem alloc] initWithTitle:@"动态" image:[UIImage imageNamed:@"iconfont-favor"] selectedImage:[UIImage imageNamed:@"iconfont-favorfill"]] autorelease];
ThirdViewController *thirdVC = [[ThirdViewController alloc] init];
UINavigationController *thirdNav = [[UINavigationController alloc] initWithRootViewController:thirdVC];
thirdVC.tabBarItem = [[[UITabBarItem alloc] initWithTitle:@"消息" image:[UIImage imageNamed:@"iconfont-message"] tag:1001] autorelease];
thirdVC.tabBarItem.badgeValue = @"+5";
FouthViewController *fouthVC = [[FouthViewController alloc] init];
UINavigationController *fouthNav = [[UINavigationController alloc] initWithRootViewController:fouthVC];
fouthVC.tabBarItem = [[[UITabBarItem alloc] initWithTitle:@"淘宝" image:[UIImage imageNamed:@"iconfont-mobiletao"] tag:1002] autorelease];
FiveViewController *fiveVC = [[FiveViewController alloc] init];
UINavigationController *fiveNav = [[UINavigationController alloc] initWithRootViewController:fiveVC];
fiveVC.tabBarItem = [[[UITabBarItem alloc] initWithTabBarSystemItem:UITabBarSystemItemRecents tag:1003] autorelease];
SixViewController *sixVC = [[SixViewController alloc] init];
UINavigationController *sixNav = [[UINavigationController alloc] initWithRootViewController:sixVC];
sixVC.tabBarItem = [[[UITabBarItem alloc] initWithTitle:@"刷新" image:[UIImage imageNamed:@"iconfont-refresh"] tag:1004] autorelease];
#pragma mark 按钮创建好后创建tabBarController,通过一个数组来管理所要显示的Nav
UITabBarController *tabBar = [[[UITabBarController alloc] init] autorelease];
tabBar.viewControllers = @[firstNav,secondNav,thirdNav,fouthNav,fiveNav,sixNav];
self.window.rootViewController = tabBar;
//对tabbar进行外观设置
tabBar.tabBar.translucent = NO;
//背景颜色
tabBar.tabBar.barTintColor = [UIColor cyanColor];
//点击之后图标的颜色
tabBar.tabBar.tintColor = [UIColor redColor];
//设置代理人
tabBar.delegate = self;
//tabBar.selectedIndex = 2;
//让下次打开是显示在上次关闭的那一tabBarItem上面
NSString *viewControllerTitle = [[NSUserDefaults standardUserDefaults] objectForKey:SELECTEDKEY];
if (viewControllerTitle) {
for (UIViewController *vc in tabBar.viewControllers) {
if ([vc.tabBarItem.title isEqualToString:viewControllerTitle]) {
tabBar.selectedViewController = vc ;
}
}
}
[firstVC release];[firstNav release];[secondVC release];[secondNav release];[thirdNav release];[thirdVC release]; [fouthVC release];[fouthNav release];[fiveNav release];[fiveVC release];[sixVC release];[sixNav release];
return YES;
}
- (void)dealloc
{
[_window release];
[super dealloc];
}
- (void)tabBarController:(UITabBarController *)tabBarController didSelectViewController:(UIViewController *)viewController{
//把上面的badgeValue(标记值)去除, 如果= @"",那么显示出来的是一个小实心圆点.
viewController.tabBarItem.badgeValue = nil;
//通过方法得到NSUserDefaults,他是指向应用程序plist文件
NSUserDefaults *defaults = [NSUserDefaults standardUserDefaults];
//如果可以拿到视图控制器的标题,调用setObject方法,将标题记录在NSUserDefaults,key定义一个常量,取值时候要与设定的值保持一致
if (viewController.tabBarItem.title) {
[defaults setObject:viewController.tabBarItem.title forKey:SELECTEDKEY];
}
//将数据同步给应用程序
[defaults synchronize];
//下一次进入程序,如果在NSUserDefaults能取到viewController.title,则会直接将标题栏控制器直接指向视图控制器,直接是视图控制器所对应的tabbar处于被选中的状态
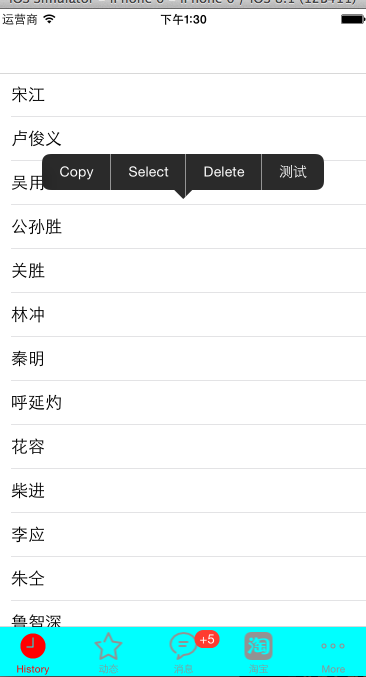
}FirstViewController.m文件, 在里面添加一个tableView, 在cell上添加手势(又添加快捷菜单)和按钮, 在cell的判断里面写实现cell的重用
#import "FirstViewController.h"
@interface FirstViewController ()<UITableViewDataSource,UITableViewDelegate>
@property(nonatomic,retain)NSMutableArray *arr;
@end

@implementation FirstViewController

- (instancetype)init
{
    self = [super init];
    if (self) {
        self.arr =  [NSMutableArray arrayWithObjects:@"宋江", @"卢俊义", @"吴用", @"公孙胜", @"关胜", @"林冲", @"秦明" ,@"呼延灼" , @"花容",@"柴进", @"李应", @"朱仝",@"鲁智深",@"武松",nil];
    }
    return self;
}

- (void)viewDidLoad {
    [super viewDidLoad];
    self.navigationController.navigationBar.translucent = NO;
    UITableView *tableView = [[UITableView alloc] initWithFrame:CGRectMake(0, 0, 375, 603-49) style:UITableViewStylePlain];
   tableView.delegate = self;
   tableView.dataSource = self;
   [self.view addSubview:tableView];
   [tableView release];
}

- (NSInteger)tableView:(UITableView *)tableView numberOfRowsInSection:(NSInteger)section{
    return self.arr.count;
}
- (UITableViewCell *)tableView:(UITableView *)tableView cellForRowAtIndexPath:(NSIndexPath *)indexPath{
    static NSString *ID = @"mycell";
    UITableViewCell *cell = [tableView dequeueReusableCellWithIdentifier:ID];
    if (cell == nil) {
        cell = [[UITableViewCell alloc] initWithStyle:UITableViewCellStyleDefault reuseIdentifier:ID];
        //在这里给cell添加手势,也实现了重用
        UILongPressGestureRecognizer *longPress = [[UILongPressGestureRecognizer alloc] initWithTarget:self action:@selector(click:)];
        [cell addGestureRecognizer:longPress];
        [longPress release];
        //也可以在这里添加视图按钮
        UIButton *button = [UIButton buttonWithType:UIButtonTypeCustom];
        button.frame = CGRectMake(300, 0, 100, 40);
        [button setTitle:@"测试" forState:UIControlStateNormal];
        [cell addSubview:button];
    }
    cell.textLabel.text = self.arr[indexPath.row];
    return cell;
}
- (void)click:(UILongPressGestureRecognizer *)longPress{
    //通过手势找到所添加的cell
    UITableViewCell *cell = (UITableViewCell *)longPress.view;
    //创建一个快捷菜单,单例
    UIMenuController *menu = [UIMenuController sharedMenuController];
    //给这个快捷菜单进行定位
    [menu setTargetRect:cell.frame inView:cell.superview];
    //让菜单显示出来
    [menu setMenuVisible:YES animated:YES];

    //如果想使用自定义的功能
    UIMenuItem *flag = [[UIMenuItem alloc] initWithTitle:@"测试" action:@selector(flag)];
    //把这个按钮放到快捷菜单上
    [menu setMenuItems:@[flag]];
    //不管是系统的还是自定义的方法必须要实现,否则不会添加到快捷菜单上
}
#pragma mark 快捷菜单捆绑了一个方法,这个方法必须实现,否则没法显示
- (BOOL)canBecomeFirstResponder{
    return YES;
}
- (void)delete:(id)sender{
    NSLog(@"删除");
}
- (void)copy:(id)sender{
    NSLog(@"复制");
}
- (void)select:(id)sender{
    NSLog(@"选择");
}
- (void)flag{
    NSLog(@"flag");
}


 439
439


 被折叠的 条评论
为什么被折叠?
被折叠的 条评论
为什么被折叠?
 到【灌水乐园】发言


