


ArtisticStyle----很好用的C/C++样式格式化工具(支持VC6)
下载地址:
http://srgb.googlecode.com/files/AStyle_2.02_windows.7z
把astyle.exe 复制到 C:\WINDOWS 目录里,省的指定路径
VC6++ 设置方法
菜单->工具->定制->工具菜单内容->新建菜单,参数如下
命令行:astyle.exe
变量:
--style=k&r --brackets=break --indent=spaces --indent-cases --indent-preprocessor --pad-header --pad-oper --unpad-paren --keep-one-line-statements --keep-one-line-blocks --convert-tabs $(FileName)$(FileExt)
初始目录: $(FileDir)
VC2008 外部工具里设置,还可以添加快捷键
命令:astyle.exe
参数:
--style=k&r --brackets=break --indent=spaces --indent-cases --indent-preprocessor --pad-header --pad-oper --unpad-paren --keep-one-line-statements --keep-one-line-blocks --convert-tabs $(ItemFileName)$(ItemExt)
初始目录: $(ItemDir)
CodeBlocks 设置差不多,很多绿色版的已经设置好了
AStyle_2.02_windows.zip
bin 目录里有官方编译好的
Artistic Style 2.01
Maintained by: Jim Pattee
Original Author: Tal Davidson
Usage : astyle [options] Source1.cpp Source2.cpp [...]
astyle [options] < Original > Beautified
When indenting a specific file, the resulting indented file RETAINS the
original file-name. The original pre-indented file is renamed, with a
suffix of ".orig" added to the original filename.
在source Insight中加入Artistic Style实现代码的格式化
Artistic style是一个开源的用于格式化代码的项目,
网站是http://astyle.sourceforge.net/
下载地址:http://sourceforge.net/projects/astyle/files/astyle/
1.首先安装Source Insight(以下简称SI),然后下个Artistic Style(以下简称AS)的Windows版本,解压。
解压后有4个文件夹,bin目录下就是编译好的AS,src和doc下分别是源代码和文档。
假设解压路径为E:\astyle121,则E:\astyle121\bin下就是AS的可执行程序,添加到SI中的方法如下:
2.在SI的菜单中选择“选项->自定义命令”,打开自定义命令对话框,然后单击添加,输入一个命令名称,这里随意输入,它只用来在菜单中显示,比如输入AS之后确定。然后在运行里填入你的AS可执行程序名,需要输入完整路径以便SI找到,后面跟参数
--options=c.opt和文件名,表示用c.opt来做格式模板,文件名用SI的通配符%f代替。比如此例中应输入:
E:\astyle121\bin\AStyle.exe --options=c.opt %f
选中“控制”项中的“首先保存文件”和“完整后终止”。其他默认。
3.然后点击“菜单”按钮,调出菜单对话框。在左边找到你刚刚新建的命令“自定义命令:AS”,单击选中。在menu中选择你要把这个命令添加到的菜单,比如选择“视图”,在下面找到“<菜单结束>”,单击选中。然后点插入。此时AS命令就被插入到你的视图菜单下了,你可以在你的菜单->视图中找到他。
4.打开你的源代码,选择试图菜单中的AS。SI会提示你文件被外部编辑器修改,是否重新载入,选择是。就可以看到格式化好的代码了。
快捷键的添加:
1.选项->键分配
2.左侧找到“自定义命令:AS”,单击,然后选择分配新键,按下新的快捷键,保存。
以后就可以不用去菜单里找,直接按快捷键就行了。
关于c.opt的建立:
新建个文本文档,写入以下内容:
style=ansi
# set default parsing to c/cpp files
mode=c
# brackets should be attached to pre-bracket lines
brackets=break
# set 6 spaces per indent
indent=spaces=4
# indent switch blocks
indent-switches
# suffix of original files should be .pre
suffix=.pre
#Add extra indentation to namespace blocks
indent-namespaces
max-instatement-indent=80
min-conditional-indent=0
pad=oper
然后把文本文档的文件名改为c.opt
Artistic Style 2.02
A Free, Fast and Small Automatic Formatter
for C, C++, C#, and Java Source Code
Artistic Style is a source code indenter, formatter, and beautifier for the C, C++, C# and Java programming languages.
When indenting source code, we as programmers have a tendency to use both spaces and tab characters to create the wanted indentation. Moreover, some editors by default insert spaces instead of tabs when pressing the tab key, and other editors (Emacs for example) have the ability to "pretty up" lines by automatically setting up the white space before the code on the line, possibly inserting spaces in a code that up to now used only tabs for indentation.
Since the NUMBER of space characters showed on screen for each tab character in the source code changes between editors (unless the user sets up the number to his liking...), one of the standard problems programmers are facing when moving from one editor to another is that code containing both spaces and tabs that was up to now perfectly indented, suddenly becomes a mess to look at when changing to another editor. Even if you as a programmer take care to ONLY use spaces or tabs, looking at other people's source code can still be problematic.
To address this problem, Artistic Style was created - a filter written in C++ that automatically re-indents and re-formats C / C++ / C# / Java source files. It can be used from a command line, or it can be incorporated as classes in another C++ program.
Linux Version Install
GCC Compiler
To compile using the GCC compiler you must have GCC (3.1 or better) installed. There is no autoconf dependency. To build the Artistic Style configurations use the makefile located in the astyle/build/gcc directory. The executables will be in the astyle/build/gcc/bin directory. To build the command line configuration enter the following:
cd astyle/build/gcc
make
To build the other astyle configurations you can enter the file name or a symbolic name. Entering "make astyle" or "make release" will build the command line configuration. Following are the symbolic names and file names (in parens) of the various configurations:
- release builds the Artistic Style command line program (astyle). This is the default option.
- shared builds the Artistic Style program as a shared library (libastyle.so).
- static builds the Artistic Style program as a static library (libastyle.a).
- debug builds the Artistic Style command line program with debugging information (astyled).
- shareddebug builds the Artistic Style program as a shared library with debugging information (libastyled.so).
- staticdebug builds the Artistic Style program as a static library with debugging information (libastyled.a).
- all builds all of the above configurations.
The following Java shared library builds are separate from the above. They include a Java Native Interface (JNI) and require that the Java Development Kit (JDK) be installed. The environment variable JAVA_HOME should be defined. It defines the install directory for the JDK. The makefile also has default install directories for Java 5 and 6. If the compile cannot find the file jni.h, either set the variable or change the value in the makefile.
- java builds the Artistic Style program as a shared library which includes the JNI (libastylej.so).
- javadebug builds the Artistic Style program as a shared library which includes the JNI and debugging information (libastylejd.so).
- javaall builds all of the above java configurations.
More than one configuration can be built at the same time. For example, to build all of the release configurations enter:
cd astyle/build/gcc
make release shared static
http://astyle.sourceforge.net/astyle.html (使用方法)
http://astyle.sourceforge.net/
Usage
Artistic style is a console program that receives information from the command line. The format of the command line is:
astyle [options] SourceFile1 SourceFile2 SourceFile3 [ . . . ]
The block parens [ ] indicate that more than one option or more than one filename can be entered. They are NOT actually included in the command. For the options format see the following Options section.
Example to format a single file:
astyle --style=allman /home/user/project/foo.cpp
Example to format all .cpp and .h files recursively:
astyle --style=allman --recursive /home/user/project/*.cpp /home/user/project/*.h
Another option will format a single file and change the name:
astyle [options] < OriginalSourceFile > BeautifiedSourceFile
The < and > characters are used to redirect the files into standard input (cin) and out of standard output (cout) - don't forget them! With this option only one file at a time can be formatted. Wildcards are not recognized, there are no console messages, and a backup is not created.
关于google的C++编码规范
看google的C++编码规范也有一段时间了,但是实施起来有些难度。
一来写代码的时候有些细节就忘了,比如if后面的空格,花括号左边的空格神马的...
二来有时候拿到别人写的代码,看不惯格式又不想去改,心里还总是别扭...
于是开始找格式化代码的工具,于是今天找到了Artistic Style。
今天记录下Artistic Style的配置,怎么添加为VS的插件就不说了,网上一搜一大把。本人的配置命令如下:
--style=java -N -S -M -p -H -U -k1 $(ItemDir)$(ItemFileName)$(ItemExt)
--style=java是风格是java的编码风格,选java是因为离google的编码规范比较近;
-N是缩进namespace;
-S是缩进switch下的case子句;
-M是缩进函数多个参数放在不同行的情况,这个说不清楚,得放个代码示例:
格式化前:
1 fooArray[] = { red,2 green,3 blue };4 5 fooFunction(barArg1,6 barArg2,7 barArg3);
格式化后:
1 fooArray[] = { red,2 green,3 blue };4 5 fooFunction(barArg1,6 barArg2,7 barArg3);
-p是操作符左右留空格(++,--这样的就不留了);
-H是'if', 'for', 'while'等关键字右边留空格;
-U是移除括号里外的空格;
-k1是*和&在表示指针和引用类型时,和类型名称并紧,和变量名之间留空格。
后面三个就是VS的环境变量了,分别表示路径名、文件名和文件扩展名。合起来就是要格式化的文件的绝对路径名。
工具不大,但是用起来超赞。
用法:
AStyle.exe --style=ansi --indent=spaces=4 -M80 -k1 -p -j -D -H -c -w test.cpp
--style=ansi ansi C风格代码 我个人喜欢用这个风格
void Foo(bool isFoo)
{
if (isFoo)
{
bar();
}
else
{
anotherBar();
}
}
--indent=spaces=4 缩进用4个空格
-p 在运算符号左右加上空格
if (foo==2)
a=bar((b-c)*a,d--);
becomes:
if (foo == 2)
a = bar((b - c) * a, d--);
-j 给每个if增加大括号
if (isFoo)
isFoo = false;
becomes:
if (isFoo) {
isFoo = false;
}
-D 在小括号边上增加上一个空格
if (isFoo(a, b))
bar(a, b);
becomes:
if ( isFoo( a, b ) )
bar( a, b );
-H 在c/c++ 关键字的后面增加一个空格
if(isFoo(a, b))
bar(a, b);
becomes:
if (isFoo(a, b))
bar(a, b);
-c
把TAB字符替换成空格为什么要把TAB替换成空格?主要是因为各种不同的编辑器对TAB的解释不一样造成的。
有的编辑器把TAB解释成4个空格,有的是8个,还有的是2个。这样会破坏原有的代码的对齐的结构,
因此最好把TAB替换成空格,这样不管在任何编辑器下面代码都是以对齐的风格来显示。
-k1 --align-pointer=type
char *foo1;
char &foo2;
becomes (with align-pointer=type):
char* foo1;
char& foo2;
-M# 对定义的参数和变量进行对齐
fooArray[] = { red,
green,
blue };
fooFunction(barArg1,
barArg2,
barArg3);
becomes (with larger value):
fooArray[] = { red,
green,
blue };
fooFunction(barArg1,
barArg2,
barArg3);
-w 对宏进行对齐处理
#define Is_Bar(arg,a,b) \
(Is_Foo((arg), (a)) \
|| Is_Foo((arg), (b)))
becomes:
#define Is_Bar(arg,a,b) \
(Is_Foo((arg), (a)) \
|| Is_Foo((arg), (b)))
看到上面这么多的美化代码的参数,真的很hi。
AStyle.exe --style=ansi --indent=spaces=4 -M80 -k1 -p -j -D -H -c -w $(ItemFileName)$(ItemExt)
这个参数是我自已用的,大伙可以根据自已的风格来设定。
如果集成到VS当中呢?
1. 把AStyle.exe 拷到 “C:\Program Files\Microsoft Visual Studio 9.0\Common7\IDE\”目录下
2. Tools –> External Tools
如图增加一个外部工具配置


在Tools菜单下面会多出一个Beautify点击它就可以来美化当前的文件 如下图:

总体来说这个工具美化的效果还是很不错的,喜欢的人大家都可以试试。
使用Astyle 帮助整理代码
Astyle 的全称是Artistic Style,某种程度是目前最好用的代码整理工具,很多所谓的代码整理工具其实都是拿这个东东改进,开发的。其网址在,http://astyle.sourceforge.net/,最新版本是2.02,基本已经稳定,最近升级很少了。
Astyle好在那儿呢,一方面他支持大部分代码格式,一方面他支持C, C++, C#, and Java等语言,一方面他可以编译成LINUX版本,直接用命令行方式,一方面也可以和大部分IDE环境集成。所以其是编写代码处理的利器。
另外,虽然很多IDE环境有自己的一些代码格式化方法,比如visual studio下选择代码,快捷键Ctrl +KF(或者Alt +F8,Ctrl+E,F,Ctrl+E,D之类),就可以格式化整理代码。但是还是术有专攻,visual studio的代码格式化不会自动帮我将代码中间的旧有tab 替换成空格,在分析某些稍微复杂的语法(特别是模版)时,经常会出现换行对齐错误的问题,而且visual studio不同版本下,自己默认的某些对齐方式也有所不同。
所以我个人还是推荐定期用Astyle整理一下自己的代码,可以让自己的代码更加养眼。从网站下载回来的Astyle有Windows编译版本,也有源代码。在Linux下你可以自己编译。整日骇客帝国的兄弟也可以使用。
我们先介绍一下Astyle如何集成到IDE开放工具中,
如果单独是命令行,Astyle的使用比较简单,我一般都将选项放入到配置文件里面。当然如果你记忆力超凡,可以直接输入参数另说。
astyle --options=astyle.conf 文件名称 [生成文件名称]
如果你和我一样,虽然喜欢用visual studio基础环境,你可以打开菜单Tools\External Tools。打开外部工具设置界面。
你可以根据你自己的喜好一次格式化一个文件,配置如下:
Title: AStyle File
【说明:任意输入】
Command: F:\MyTools\Astyle\bin\AStyle.exe
【说明:绝对路径】
Arguments: --options=F:\MyTools\Astyle\bin\astyle.conf $(ItemFileName)$(ItemExt)
【说明:选项文件也用绝对路径,$(ItemFileName)$(ItemExt) 表示当前要处理的文件】
Initial directory: $(ItemDir) 表示处理文件的目录
【说明:在那个目录进行处理,一般选择$(ItemDir)】
Use Output window: 勾选
【说明:将astyle的输出放到output窗口】
也可以一次将Porject下所有的文件全部格式化了。配置如下:
Title: AStyle Project
【说明:任意输入】
Command: F:\MyTools\Astyle\bin\AStyle.exe
【说明:绝对路径】
Arguments: --options=F:\MyTools\Astyle\bin\astyle.conf *.h *.cpp *.hpp *.c
【说明:选项文件也用绝对路径,一次将所有的文件都进行处理掉】
Initial directory: $(ItemDir) 表示处理文件的目录
【说明:在那个目录进行处理,一般选择$(ItemDir)】
Source insight的配置也大同小异。主要就是run这个地方配置成
F:\MyTools\Astyle\bin\AStyle.exe --options=F:\MyTools\Astyle\bin\astyle.conf %f
其中%f表示当前正在处理的文件。
下面简单介绍一下我使用的选项配置说明,,大家有兴趣自己阅读,说明文档http://astyle.sourceforge.net/astyle.html,也很简短的说。
#指定文件处理模式,C/C++模式,其他选择还有cs,java
--mode=c
#ANSI标准的文件格式,就是{另启一行,}另启一行的那种,其他选择很多,不介绍了
--style=ansi
#缩进采用4个空格
--indent=spaces=4
#对于单行的语句增加括号
#Add brackets to unbracketed one line conditional statements (e.g. 'if', 'for', 'while'...).
--add-brackets
#强制转换TAB为空格
--convert-tabs
#将preprocessor (#define) 这类预定的语句,如果有多行时前面填充对齐,(是对单语句(多行)进行填充呀)
--indent-preprocessor
#Attach a pointer or reference operator (* or &) to either the variable type (left) or variable name (right), or place it between the type and name.
#*,&这类字符靠近类型
#--align-pointer=type
#*,&这类字符靠近变量名字,目前选择这个,
--align-pointer=name
#在操作符号两边增加空格字符 ==
--pad-oper
#在几个关键字后面增加空格
#insert space padding after paren headers only (e.g. 'if', 'for', 'while'...).
--pad-header
#在if,for,while等代码段前后增加空行,这个其实挺好,但如果你不喜欢,可以关闭
#Pad empty lines around header blocks (e.g. 'if', 'for', 'while'...).
--break-blocks
#去掉括号两边多余的空格,
#暂时放弃,不是特别喜欢这个
#Remove extra space padding around parenthesis on the inside and outside.
#--unpad-paren
#备份文件的后缀,默认是.orig,=none表示不进行备份,
#放弃备份文件,以Astyle的版本,目前做这个没有什么差别。而且备份文件会影响你的代码
--suffix=none
#行结束用什么文件格式,UNIX的还是Windows的,
#--lineend=windows
#后台开放统一用UNIX的方式
--lineend=linux
#switch case的代码也按照标准缩进方式缩进
--indent-switches
#如果函数开始后面({后面)第一行是注释,也进行缩进
--indent-col1-comments
#namespace class内部的public,等我没有选择缩进
#--indent-namespaces
#--indent-classes
#多行条件语句如何进行缩进,=0表示和(对齐,=1表示缩进一次,=2表示缩进两次,=3缩进一个半
#MS visual studio的默认格式化是缩进一个,
--min-conditional-indent=1
#最大的缩进对齐长度,默认40,最大120,超过这个长度的多行()内语句不进行缩进,考虑到现在语句都较长
--max-instatement-indent=80
下面我就介绍一个名为astyle的开源代码整理工具以及在VC开发环境中集成配置的方法。可以迅速实现在VC中进行代码整理的功能,希望能给你一定的帮助。
1、 访问http://sourceforge.net/projects/astyle,下载astyle包,包括源文件、可执行文件、使用说明等。
2、 拷贝astyle.exe到c:\winnt\system32下。
3、 接下来配置VC,添加astyle代码整理功能。
1) 在VC中新建菜单项"格式整理"。在工具栏上点击右键打开Customize窗口,在Tools标签页新建一个菜单项:"格式整理",并在Command 中输入菜单项对应外挂工具程序当前所在路径:"C:\winnt\system32\astyle.exe"。

|
2) 在Arguments中输入外挂工具程序配置参数--style=ansi ${FileName}${FileExt}。其中 --style=ansi表示选择使用ANSI 风格格式和缩进。当然也可选用其他风格,可选的风格和样例如下:
--style=ansi:ANSI 风格格式和缩进
| namespace foospace { int Foo() { if (isBar) { bar(); return 1; |
astyle是一个我自己常用的开放源码工具。它可以方便的将程序代码格式化成自己想要的样式而不必人工修改。本来嘛,作为高等生物应该优先去做一些智慧的事情,而不是把时间消耗在机器可以完美完成的事情上。
想要立刻开始?请先去主页http://sourceforge.net/projects/astyle下载最新版本。可以选择二进制版本,也可以下载源码自行编译。总之得到可执行文件后请将astyle放在Path(C:\Program Files\Microsoft Visual Studio 8\Common7\IDE)中,这样会方便很多。
astyle是一个命令行工具,命令语法很简单:
astyle [options] < original > Beautified
astyle [options] Foo.cpp Bar.cpp [...]
例如:
astyle --style=ansi foo.cpp
上面的命令将美化foo.cpp文件,更改其风格为ANSI,并将原始文件备份到foo.cpp.orgin。所以,你可以安全的使用该软件而不必担心会将代码改得无法回头。
具体的来说,astyle包含了以下几种预定义风格,只需在参数中简单指定即可使用:
--style=ansi:ANSI 风格格式和缩进
| namespace foospace { int Foo() { if (isBar) { bar(); return 1; } else return 0; } } |
--style=kr :Kernighan&Ritchie 风格格式和缩进
| namespace foospace { int Foo() { if (isBar) { bar(); return 1; } else return 0; } } |
--style=linux :Linux 风格格式和缩进
| namespace foospace { int Foo() { if (isBar) { bar(); return 1; } else return 0; } } |
--style=gnu :GNU 风格格式和缩进
| namespace foospace { int Foo() { if (isBar) { bar(); return 1; } else return 0; } } |
--style=java :Java 风格格式和缩进
| class foospace { int Foo() { if (isBar) { bar(); return 1; } else return 0; } } |
从这里开始介绍astyle的高级应用!这里要介绍的是两种应用情形,一是在Visual Studio中整合,二是批量处理。
先看如何在Visual Studio中整合。看图说话!
第一步:点击“工具”菜单

第二步:点击“外部工具”

第三步:配置并保存

在对话框中点击“添加”,如图填入各项。其中参数填写 --style=ansi $(ItemFileName)$(ItemExt)
可以勾选“使用输出窗口”,这样将不会显示黑色的命令窗口。相关信息都会显示在Visual Studio中。
经过上面设置之后,只需点击该菜单项就可以将当前文档格式化成ansi风格。如果你想要其它风格,可以自行设置参数。
值得注意的是在低版本的Visual Studio中,默认设置运行外部程序不会保存当前文档。这样的话如果在未保存的情况下运行该命令,未保存部分将会丢失。这个可以通过设置一个选项来解决。Visual Studio 6.0中:Options -> Editor -> Save Options -> Save before running tools 将该项勾选即可。我已经验证,在Visual Studio 2005中不用担心这类问题,可以放心使用。但是作为一个好习惯,我仍然建议你随时保存你的工作,尤其是做这种大幅度改动之前,甚至应该对源代码进行Check in操作。不知道Check in是什么?没关系,过几天我还会写一篇关于代码控制的文章,应该可以解决你的疑惑。
1.常用功能
(1) 单个文件--缺省美化
astyle --style=ansi Form1.cs
处理前的代码:
private void Form1_Load(object sender, EventArgs e)
{
int s;
for (int i=0;i<10;i++){
for (int j=0;j<10; j++){
s = s+j+i;}
}
}
处理后:
private void Form1_Load(object sender, EventArgs e)
{
int s;
for (int i=0;i<10;i++)
{
for (int j=0;j<10; j++)
{
s = s+j+i;
}
}
}
(2) 单个文件--更改缩进2个空格
astyle --style=ansi --indent=spaces=2 Form1.cs
缺省缩进一个TAB,也可以显式说明使用Tab,如下:
astyle --style=ansi --indent=tab Form1.cs
(3) 处理多个文件--有限个
astyle --style=ansi Form1.cs Form2.cs
(4) 批量处理多个文件--无限个
for /R .\ %f in (*.cs) do astyle --style=ansi "%f"
说明:/R表明遍历一个目录树,后面紧跟的路径是根,缺省为当前目录。
本例中,根为.\表示当前目录,命令等价于:
for /R %f in (*.cs) do astyle --style=ansi "%f"
作用是从(目录树根)当前目录开始,查找所有java文件,包含子目录中的文件;然后交给astyle处理。
当然,目录树根也可以使用绝对路径,下面的命令查找C盘所有的java文件并处理。
for /R c:\ %f in (*.cs) do astyle --style=ansi "%f"
2. 其他比较有用的开关:
(1) -f
在两行不相关的代码之间插入空行,如import和public class之间、public class和成员之间等;
(2) -p
在操作符两边插入空格,如=、+、-等。
如:int a=10*60;
处理后变成int a = 10 * 60;
(3) -P
在括号两边插入空格。另,-d只在括号外面插入空格,-D只在里面插入。
如:MessageBox.Show ("aaa");
处理后变成MessageBox.Show ( "aaa" );
(4) -U
移除括号两边不必要的空格。
如:MessageBox.Show ( "aaa" );
处理后变成MessageBox.Show ("aaa");
(5) -V
将Tab替换为空格。
下面再介绍第二项独门绝技:批量格式化!
有时候你会有很多文件需要格式化成统一风格,难道一个个点击菜单?不!那样太累了。
在Windows中,我们可以用命令行来解决问题。这里用到一个超级命令 for
我来写个范例,大家就知道该怎么处理了。
for /R %f in (*.cpp;*.c;*.h) do astyle --style=ansi "%f"
该命令在当前目录中寻找文件名匹配模式 *.cpp;*.c;*.h 的所有文件(不同模式可用英文逗号隔开),并且对每个文件%f执行操作:
astyle --style=ansi "%f"
好了,本教程可以结束了。希望对你有所帮助。
使用astyle格式化代码
astyle是一款代码格式化工具,它的下载地址是:http://sourceforge.net/projects/astyle
一。基本命令
astyle --style=ansi main.cs (使用ansi风格格式化main.cs)
了解上面的命令就可以格式化一个文件了,下面来看如何格式化目录下的文件
二。格式化目录
for /R %f in (*.cpp;*.cs;) do astyle --style=ansi "%f" (使用ansi风格格式下当前目录下的所有cpp,cs文件,注意:批处理文件时,"%f" 要改为"%%f")
三。参数说明:
(1) -f
在两行不相关的代码之间插入空行,如import和public class之间、public class和成员之间等;
(2) -p
在操作符两边插入空格,如=、+、-等。
如:int a=10*60;
处理后变成int a = 10 * 60;
(3) -P
在括号两边插入空格。另,-d只在括号外面插入空格,-D只在里面插入。
如:System.out.println(1);
处理后变成System.out.println( 1 );
(4) -U
移除括号两边不必要的空格。
如:System.out.println( 1 );
处理后变成System.out.println(1);
(5) -V
将Tab替换为空格。
(6)-N
本条主要针对namespaces,如果没有此参数,效果如下:
namespace foospace
{
class Foo
{
public:
Foo();
virtual ~Foo();
};
}
有此参数就会变成这样:
namespace foospace
{
class Foo
{
public:
Foo();
virtual ~Foo();
};
}
(7) -n
不生成备份文件,即默认的 .orig文件。
C#的默认方式为第二种,所以如果你是用来格式化C#代码的话,这个参数就有用了。
四:加入到VS2008,VS2005中
估计加入到VS2005中也是一样,不过我这里没有VS2005,就说一下VS2008的做法。
工具——>外部工具——>添加
标题:astyle
命令:AStyle.exe (填好astyle.exe的路径)
参数:--style=allman -N $(ItemDir)$(ItemFileName)$(ItemExt)
初始目录:$(TargetDir)
勾上“使用初始目录”
点击确定完成。以后就可以在工具菜单中找到“astyle“这一项了,点击它,就可以对当前文件进行格式化操作。
五:加入到VS6中
Tools——>Customize——>Tools
标题:astyle
命令:AStyle.exe (填好astyle.exe的路径)
参数:--style=ansi -s4 --suffix=.orig $(FileName)$(FileExt)
初始目录:$(FileDir)
勾上“Using Output Window”
点击确定完成。以后就可以在工具菜单中找到“astyle“这一项了,点击它,就可以对当前文件进行格式化操作。
六:加入到Ultraedit和UltraStudio
高级-->工具配置——>外部工具——>添加
命令:AStyle.exe -v --style=ansi -s4 --suffix=.orig "%f"(填好astyle.exe的路径)
Optiones:选择 Windows program和Save Active File.
Output: 选择output to list box,show dos box 和no replace。
点击确定完成。以后就可以在工具菜单中找到“astyle“这一项了,点击它,就可以对当前文件进行格式化操作。
七:加入到Source insight
Options-->Custom Command-->Add
Command:astyle
Run "astyle.exe" --style=ansi --pad=oper --unpad=paren -s4 --suffix=.orig %f(填好astyle.exe的路径)
Output:不选.
Control: 选择pause when done和exit to window.
source links in output:file, then line
-->menu
add to work menu.
点击确定完成。以后就可以在Work菜单中找到“astyle“这一项了,点击它,就可以对当前文件进行格式化操作。
八:控制台目录批处理(Astyle.bat)
REM bygreencn@gmail.com
REM 批量将本目录中的所有C++文件用Astyle进行代码美化操作
REM 2009-01-05
REM 设置Astyle命令位置和参数
@echo off
set astyle="astyle.exe"
REM 循环遍历目录
for /r . %%a in (*.cpp;*.c) do %astyle% --style=ansi --pad=oper --unpad=paren -s4 -n "%%a"
for /r . %%a in (*.hpp;*.h) do %astyle% --style=ansi --pad=oper --unpad=paren -s4 -n "%%a"
REM 删除所有的astyle生成文件
for /r . %%a in (*.orig) do del "%%a"
pause
为UltraEdit添加astyle按钮
打开ultraedit,高级->工具配置
在命令行填写:(注意修改ultraedit的安装路径)
D:\UltraEdit-32\GNU\astyle.exe --style=ansi "%f" "%f"
工作目录填写:%P
选项不改
输出那里把捕获输出去掉就可以了。--style=ansi 是astyle的命令,"%f" "%f"是ultraedit的参数。

Tips:
可以简单地安装bin文件的astyle程序到cygwin系统
eg: tar xjvf astyle-2.02-1.tar.bz2 -C / (默认以根目录作为跟路径打包,所以解压缩要-C /)
或者在Cygwin中用cygport 方式安装src的astyle, astyle-2.02-1-src.tar.bz2
1 通过cygwin release的site下载安装包
http://ftp.ntu.edu.tw/ftp/cygwin/release/astyle/
http://www.cise.ufl.edu/mirrors/cygwin/release/astyle/
2 下载后放到用户目录下解压缩
tar xjvf astyle-2.02.1-1-src.tar.bz2 ( j 表示文件为bzip2的压缩文件, x表示解压缩)

继续解压缩出来的.tar.gz

3 查看cygport文件可以看到会在src的build/gcc目录下cygmake, 并且将astyle.exe放在/user/bin下面
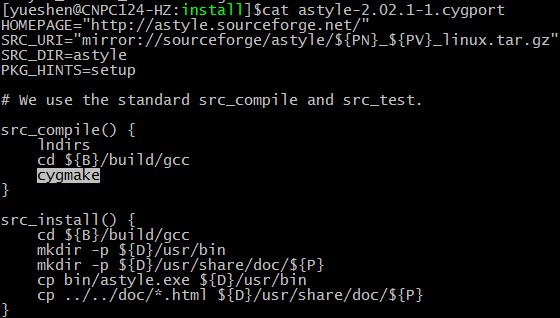
4 查看vim astyle-2.02.1-1.cygwin.patch,可知现在src已经解压缩
只需要cygport ./astyle-2.02.1-X.cygport all 即可
+Build instructions:
23 + unpack astyle-2.02.1-X-src.tar.bz2
24 + if you use setup to install this src package, it will be unpacked
25 + under /usr/src automatically
26 + cd /usr/src
27 + cygport ./astyle-2.02.1-X.cygport all
28 +
29 +This will create:
30 + /usr/src/astyle-2.02.1-X-src.tar.bz2
31 + /usr/src/astyle-2.02.1-X.tar.bz2
32 +
33 +Or use 'cygport ./astyle-2.02.1-X.cygport prep' to get the source
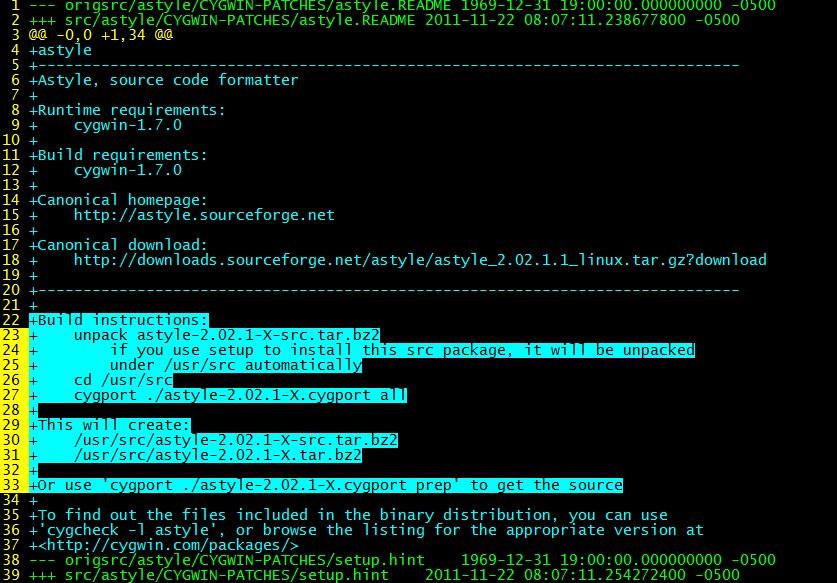
5 cygport ./astyle-2.02.1-X.cygport all
Bonus:
常规的Cygwin的resource pagage 管理工具cygport 安装软件的使用方法
a.确保本地有cygport,如果没有的话下载二进制包,解压缩到相应目录
eg: tar xjvf cygport-0.10.9-1.tar.bz2 -C /
b.通过下面的网址下载想要的软件包
http://mirrors.xmission.com/cygwin/release/
c.解压后应该会有一个后缀名是.cygport的的文件。
运行
cygport <文件名>.cygport all


 875
875

 被折叠的 条评论
为什么被折叠?
被折叠的 条评论
为什么被折叠?
 到【灌水乐园】发言


