


之前一直使用的是10版本的,但一些功能10不支持…所以安装了12,自己在网上找得12安装的教程很多种,但都安装不成功…后面分析到问题之后终于安装成功了…这边做了笔记
-
weblogic12 的jar包链接
链接:https://pan.baidu.com/s/1p2lSmnHflHh5aQbBNJgrgQ 密码:18eq -
jdk安装 1.8.0_251
这里不做说明(但需要jdk的包的话可以私信我) -
建立swap空间
weglogic12 的安装必须要建立swap空间
1.]# dd if=/dev/zero of=/swap bs=1024 count=1024000
2.]# mkswap /swap
3.]# free -m

注:建立虚拟空间上的一些误操作会导致空间被占满,这边要注意,:空间占满解决 -
建立weblogic 用户(weblogic12 不能用root用户进行安装)
1.]# groupadd weblogic
2.]# useradd -g weblogic weblogic
3.]# passwd weblogic -
创建/app/weblogic 文件夹存放jar包
创建一个文件夹,后面会对这个文件夹赋权…weblogic 都在这个文件夹下进行操作 -
创建 oraInventory文件夹 和 wsl.rsp,oraInst.loc 文件

wsl.rsp:
[ENGINE]
#DO NOT CHANGE THIS.

Response File Version=1.0.0.0.0

[GENERIC]
#The oracle home location. This can be an existing Oracle Home or a new Oracle Home

ORACLE_HOME=/app/weblogic/oracle
#Set this variable value to the Installation Type selected. e.g. WebLogic Server, Coherence, Complete with Examples.

INSTALL_TYPE=WebLogic Server
#Provide the My Oracle Support Username. If you wish to ignore Oracle Configuration Manager configuration provide empty string for user name.

MYORACLESUPPORT_USERNAME=
#Provide the My Oracle Support Password

MYORACLESUPPORT_PASSWORD=<SECURE VALUE>
#Set this to true if you wish to decline the security updates. Setting this to true and providing empty string for My Oracle Support username will ignore the Oracle Configuration Manager configuration

DECLINE_SECURITY_UPDATES=true
#Set this to true if My Oracle Support Password is specified

SECURITY_UPDATES_VIA_MYORACLESUPPORT=false
#Provide the Proxy Host

PROXY_HOST=
#Provide the Proxy Port

PROXY_PORT=
#Provide the Proxy Username

PROXY_USER=
#Provide the Proxy Password

PROXY_PWD=<SECURE VALUE>
#Type String (URL format) Indicates the OCM Repeater URL which should be of the format [scheme[Http/Https]]://[repeater host]:[repeater port]

COLLECTOR_SUPPORTHUB_URL=
oraInst.loc
inventory_loc=/app/weblogic/oraInventory

inst_group=weblogic
- 文件下赋权
1.]# chown 777 /app
2.]# chown 777 /app/* - 切换weblogic用户,执行安装命令
1.]# su weblogic
2.]# cd /app/weblogic/
3.]#java -jar fmw_12.2.1.3.0_wls_quick.jar -silent -responseFile /app/weblogic/wsl.rsp -invPtrLoc /app/weblogic/oraInst.loc
安装过程:
/home/weblogic/oraInst.loc

Launcher log file is /tmp/OraInstall2018-12-15_02-15-57PM/launcher2018-12-15_02-15-57PM.log.

Extracting the installer . . . . Done

Checking if CPU speed is above 300 MHz.   Actual 2394.455 MHz    Passed

Checking swap space: must be greater than 512 MB.   Actual 4095 MB    Passed

Checking if this platform requires a 64-bit JVM.   Actual 64    Passed (64-bit not required)

Checking temp space: must be greater than 300 MB.   Actual 3195 MB    Passed

Preparing to launch the Oracle Universal Installer from /tmp/OraInstall2018-12-15_02-15-57PM

Log: /tmp/OraInstall2018-12-15_02-15-57PM/install2018-12-15_02-15-57PM.log

*****************************************************

Distribution Name : Oracle Fusion Middleware 12c WebLogic and Coherence Developer

Distribution Version : 12.2.1.3.0

Oracle Inventory : /home/weblogic/oraInventory

Oracle Home : /home/weblogic/wls12213

Java Home : /usr/java/jdk1.8.0_11

Validations are enabled for this session.

Verifying data

Copying Files

Percent Complete : 10

Percent Complete : 20

Percent Complete : 30

Percent Complete : 40

Percent Complete : 50

Percent Complete : 60

Percent Complete : 70

Percent Complete : 80

Percent Complete : 90
注: 安装会有点久
9. 安装成功后,创建域create_domain.rsp脚本

create_domain.rsp :
read template from "/app/weblogic/wls12213/wlserver/common/templates/wls/wls.jar";

set JavaHome "/usr/local/jdk/jdk1.8.0_251";
set ServerStartMode "prod";

find Server "AdminServer" as AdminServer;
set AdminServer.ListenAddress "";
set AdminServer.ListenPort "7001";
set AdminServer.SSL.Enabled "true";
set AdminServer.SSL.ListenPort "7002";

//Create Machine
//create Machine "base" as Machinename;

//use templates default weblogic user
find User "weblogic" as u1;
set u1.password "weblogic123";

write domain to "/app/weblogic/wls12213/user_projects/cloud_ec/";

// The domain name will be "demo-domain"

close template;
注:密码是:字母加数字,不然可能会报错
- 执行域脚本
1]# cd /app/weblogic/wls12213/wlserver/common/bin/
2]# nohup ./config.sh -mode=silent -silent_script=/app/weblogic/create_domain.rsp -logfile=/app/weblogic/create_domain.log >w.log &
3]# tail -f w.log
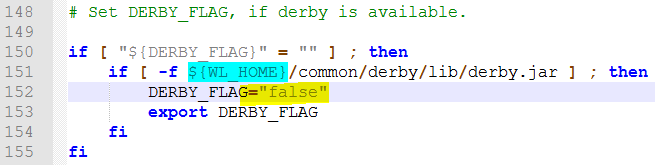
- 创建成功后进入,禁止启动derby数据库
可参考:启动时禁止启动derby数据库
1]# vi /app/weblogic/wls12213/user_projects/cloud_ec/bin/setDomainEnv.sh
找到Set DERBY_FLAG,把DERBY_FLAG设为false
修改前: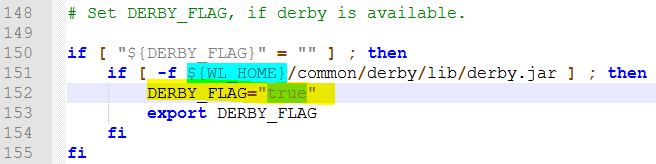
修改后:
- 设置随机数,不然启动会很慢
- 修改Linux上Weblogic使用的j $JAVA_HOME/jre/lib/security/java.security 文件
- 将securerandom.source=file:/dev/urandom 修改为 securerandom.source=file:/dev/./urandom
1.]# vi /usr/local/jdk/jdk1.8.0_251/jre/lib/security/java.security
修改前

修改后

- 启动
1]# cd /app/weblogic/wls12213/user_projects/cloud_ec/
2]# ./startWebLogic.sh


 2087
2087


 被折叠的 条评论
为什么被折叠?
被折叠的 条评论
为什么被折叠?
 到【灌水乐园】发言


