GridLayout的基本用法

可以用v4中兼容的GridView,其实主要是xml的一些属性:

<?xml version="1.0" encoding="utf-8"?>
<!-- 注意事项:命名空间,是这个app的命名空间才对 -->
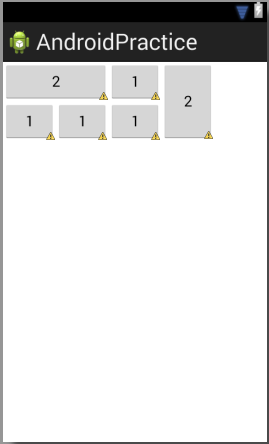
<!-- app:columnCount="4" 总的列数 -->
<!-- app:rowCount="2" 总的行数 -->
<!-- 占据两列  app:layout_columnSpan="2" -->
<!-- app:layout_gravity="fill" -->
<!-- 占据两行 app:layout_rowSpan="2" -->
<!-- app:layout_gravity="fill" -->
<LinearLayout xmlns:android="http://schemas.android.com/apk/res/android"
    xmlns:app="http://schemas.android.com/apk/res/com.example.androidpractice"
    android:layout_width="match_parent"
    android:layout_height="match_parent"
    android:orientation="vertical" >

    <android.support.v7.widget.GridLayout
        android:layout_width="wrap_content"
        android:layout_height="wrap_content"
        app:columnCount="4"
        app:rowCount="2" >

        <Button
            app:layout_columnSpan="2"
            app:layout_gravity="fill"
            android:text="2" />

        <Button android:text="1" />

        <Button
            app:layout_gravity="fill"
            app:layout_rowSpan="2"
            android:text="2" />

        <Button android:text="1" />

        <Button android:text="1" />

        <Button android:text="1" />
    </android.support.v7.widget.GridLayout>

</LinearLayout>
结果如下:


  • 0
    点赞
  • 0
    收藏
    觉得还不错? 一键收藏
  • 0
    评论
SWT GridLayout 是一种布局类,它可在 GUI 应用程序中定位和排列控件。GridLayout 将父控制器分成几个列和行,并将每个子控件放置在一个单元格中。您可以根据需要更改列和行的数量。 SWT GridLayout 类的构造函数如下所示: ```java public GridLayout() public GridLayout(int numColumns, boolean makeColumnsEqualWidth) ``` 其中,第一个构造函数将创建一个包含一个列和一个布尔值的默认布局,而第二个构造函数将创建一个指定列数和布尔值的 GridLayout。 以下是一个基本示例,演示如何使用 SWT GridLayout 布局来创建两个标签和一个按钮: ```java import org.eclipse.swt.SWT; import org.eclipse.swt.layout.GridData; import org.eclipse.swt.layout.GridLayout; import org.eclipse.swt.widgets.Button; import org.eclipse.swt.widgets.Display; import org.eclipse.swt.widgets.Label; import org.eclipse.swt.widgets.Shell; public class SWTGridLayoutExample { public static void main(String[] args) { Display display = new Display(); Shell shell = new Shell(display); shell.setLayout(new GridLayout(2, false)); Label label1 = new Label(shell, SWT.NONE); label1.setText("Label 1"); GridData data = new GridData(SWT.FILL, SWT.CENTER, true, false); label1.setLayoutData(data); Label label2 = new Label(shell, SWT.NONE); label2.setText("Label 2"); data = new GridData(SWT.FILL, SWT.CENTER, true, false); label2.setLayoutData(data); Button button = new Button(shell, SWT.PUSH); button.setText("Button"); data = new GridData(SWT.CENTER, SWT.CENTER, true, false, 2, 1); button.setLayoutData(data); shell.pack(); shell.open(); while (!shell.isDisposed()) { if (!display.readAndDispatch()) display.sleep(); } display.dispose(); } } ``` 这个例子中,我们创建了一个包含两个标签和一个按钮的窗口。我们使用了 GridLayout 布局,并将窗口分成两列。我们还使用了 GridData 类来设置控件的布局数据,以指定它们应该在哪个单元格中显示,并设置它们的大小和位置。 这是一个简单的 SWT GridLayout 示例,您可以根据需要更改和扩展它。
评论
添加红包

请填写红包祝福语或标题

红包个数最小为10个

红包金额最低5元

当前余额3.43前往充值 >
需支付:10.00
成就一亿技术人!
领取后你会自动成为博主和红包主的粉丝 规则
hope_wisdom
发出的红包
实付
使用余额支付
点击重新获取
扫码支付
钱包余额 0

抵扣说明:

1.余额是钱包充值的虚拟货币,按照1:1的比例进行支付金额的抵扣。
2.余额无法直接购买下载,可以购买VIP、付费专栏及课程。

余额充值