


文章目录
一、篇头
目标是把内核相关部分的实验都再做一次,虽然有现成源码,但从以往学习经历看,自己还是得多少做一些改动,对于要自虐的,可以从头打一遍,这样效果会好很多,练习完后,做个总结。实验简单,花的时间也不多,温故而知新。
二、源码
2.1 驱动关键部分
static int __init test_3_init(void)
{
	int ret;

		pr_info("test_3_init\n");

	ret = alloc_chrdev_region(&dev, 0, count, DEMO_NAME);
	if (ret) {
		pr_err("failed to allocate char device region");
		return ret;
	}

	test_3_cdev = cdev_alloc();
	if (!test_3_cdev) {
		pr_err("cdev_alloc failed\n");
		goto unregister_chrdev;
	}

	cdev_init(test_3_cdev, &test_3_fops);

        /*
          (1) 下面语句会创建 /proc/devices/test_3_dev, 但不会创建/dev下的设备节点
        */
	ret = cdev_add(test_3_cdev, dev, count);
	if (ret) {
		pr_err("cdev_add failed\n");
		goto cdev_fail;
	}

	pr_err("succeeded register char device: %s\n", DEMO_NAME);
	pr_err("Major number = %d, minor number = %d\n",
			MAJOR(dev), MINOR(dev));
// …… 省略 ……
	return ret;
}
2.2 APP:test_3_app.c
- 完成的linux app源码
#include <stdio.h>
#include <fcntl.h>
#include <unistd.h>

#define MY_DEV_NAME "/dev/test_3_dev"

int main()
{
	char buffer[64];
	int fd;

	fd = open(MY_DEV_NAME, O_RDONLY);
	if (fd < 0) {
		printf("open device %s failded\n", MY_DEV_NAME);
		return -1;
	}
	read(fd, buffer, 64);
	close(fd);
	return 0;
}
2.3 驱动完整源码
- test_3.c
#include <linux/module.h>
#include <linux/fs.h>
#include <linux/uaccess.h>
#include <linux/init.h>
#include <linux/cdev.h>

#define DEMO_NAME "test_3_dev"
static dev_t dev;
static struct cdev *test_3_cdev;
static signed count = 1;

static int test_3_open(struct inode *inode, struct file *file)
{
	int major = MAJOR(inode->i_rdev);
	int minor = MINOR(inode->i_rdev);

	pr_info("%s: major=%d, minor=%d\n", __func__, major, minor);
	return 0;
}

static int test_3_release(struct inode *inode, struct file *file)
{
	pr_info("%s \n", __func__);

	return 0;
}

static ssize_t
test_3_read(struct file *file, char __user *buf, size_t lbuf, loff_t *ppos)
{
	pr_info("%s \n", __func__);
	return 0;
}

static ssize_t
test_3_write(struct file *file, const char __user *buf, size_t count, loff_t *f_pos)
{
	pr_info("%s \n", __func__);
	return 0;

}

static const struct file_operations test_3_fops = {
	.owner = THIS_MODULE,
	.open = test_3_open,
	.release = test_3_release,
	.read = test_3_read,
	.write = test_3_write
};


static int __init test_3_init(void)
{
	int ret;

		pr_info("test_3_init\n");

	ret = alloc_chrdev_region(&dev, 0, count, DEMO_NAME);
	if (ret) {
		pr_err("failed to allocate char device region");
		return ret;
	}

	test_3_cdev = cdev_alloc();
	if (!test_3_cdev) {
		pr_err("cdev_alloc failed\n");
		goto unregister_chrdev;
	}

	cdev_init(test_3_cdev, &test_3_fops);

	ret = cdev_add(test_3_cdev, dev, count);
	if (ret) {
		pr_err("cdev_add failed\n");
		goto cdev_fail;
	}

	pr_err("succeeded register char device: %s\n", DEMO_NAME);
	pr_err("Major number = %d, minor number = %d\n",
			MAJOR(dev), MINOR(dev));

	return 0;

cdev_fail:
	cdev_del(test_3_cdev);
unregister_chrdev:
	unregister_chrdev_region(dev, count);

	return ret;
}

static void __exit test_3_exit(void)
{
	pr_info("test_3_exit\n");

	if (test_3_cdev)
		cdev_del(test_3_cdev);

	unregister_chrdev_region(dev, count);
}

module_init(test_3_init);
module_exit(test_3_exit);

MODULE_LICENSE("Dual BSD/GPL");
MODULE_AUTHOR("szhou <66176468@qq.com>");
MODULE_DESCRIPTION("test_1, simple char kernel module");
2.4 Makefile
- 实验和之前几篇文章有集成性,本文实验只需要在 obj-m 后面添加 test_3.o 即可
KDIR := /home/szhou/works/qemu_linux/linux-stable


obj-m := test_1.o test_2.o test_3.o


all :
	$(MAKE) -C $(KDIR) M=$(PWD) modules

clean:
	$(MAKE) -C $(KDIR) SUBDIRS=$(PWD) clean
	rm -f *.ko
三、编译
3.1 编译ko
szhou@bc01:~/works/qemu_linux/linux-stable/my_kmodules$ ls
Makefile  modules.order  Module.symvers  test_1.c  test_1.ko  test_1.mod  test_1.mod.c  test_1.mod.o  test_1.o  test_2.c  test_2.ko  test_2.mod  test_2.mod.c  test_2.mod.o  test_2.o  test_3_app.c  test_3.c
szhou@bc01:~/works/qemu_linux/linux-stable/my_kmodules$ make
make -C /home/szhou/works/qemu_linux/linux-stable M=/home/szhou/works/qemu_linux/linux-stable/my_kmodules modules
make[1]: Entering directory '/home/szhou/works/qemu_linux/linux-stable'
  CC [M]  /home/szhou/works/qemu_linux/linux-stable/my_kmodules/test_3.o
  MODPOST /home/szhou/works/qemu_linux/linux-stable/my_kmodules/Module.symvers
  CC [M]  /home/szhou/works/qemu_linux/linux-stable/my_kmodules/test_1.mod.o
  LD [M]  /home/szhou/works/qemu_linux/linux-stable/my_kmodules/test_1.ko
  CC [M]  /home/szhou/works/qemu_linux/linux-stable/my_kmodules/test_2.mod.o
  LD [M]  /home/szhou/works/qemu_linux/linux-stable/my_kmodules/test_2.ko
  CC [M]  /home/szhou/works/qemu_linux/linux-stable/my_kmodules/test_3.mod.o
  LD [M]  /home/szhou/works/qemu_linux/linux-stable/my_kmodules/test_3.ko
make[1]: Leaving directory '/home/szhou/works/qemu_linux/linux-stable'
szhou@bc01:~/works/qemu_linux/linux-stable/my_kmodules$
3.2 编译app
- 因为使用qemu模拟,而我们之前建立的mini Linux系统尚未添加 so 等各种依赖库,所以需要在编译app时候添加 --static标志,使用静态链接,这样就可以不依赖于so文件。
szhou@bc01:~/works/qemu_linux/linux-stable/my_kmodules$ arm-linux-gnueabi-gcc test_3_app.c -o test_3_app --static
szhou@bc01:~/works/qemu_linux/linux-stable/my_kmodules$ file test_3_app
test_3_app: ELF 32-bit LSB executable, ARM, EABI5 version 1 (SYSV), statically linked, BuildID[sha1]=1a479f0e5a7f3cba6fb0ea4121337f56623cb5a5, for GNU/Linux 3.2.0, not stripped
szhou@bc01:~/works/qemu_linux/linux-stable/my_kmodules$
四、测试
4.1 部署
- 透过NFS部署,不了解的,请参考之前的内核实验(四)
- 将测试文件复制到nfs共享目录下
szhou@bc01:~/works/qemu_linux/linux-stable/my_kmodules$ cp test_3.ko ~/works/nfs_share/
szhou@bc01:~/works/qemu_linux/linux-stable/my_kmodules$ cp test_3_app ~/works/nfs_share/
4.2 测试
4.2.1 启动qemu虚拟机
qemu-system-arm -nographic -M vexpress-a9 -m 1024M -kernel arch/arm/boot/zImage -initrd ../busybox/rootfs.ext4.img.gz -dtb arch/arm/boot/dts/vexpress-v2p-ca9.dtb
4.2.2 运行测试文件
----------------------------------------
Welcome to szhou's tiny Linux
----------------------------------------
Please press Enter to activate this console.
~ #
~ #
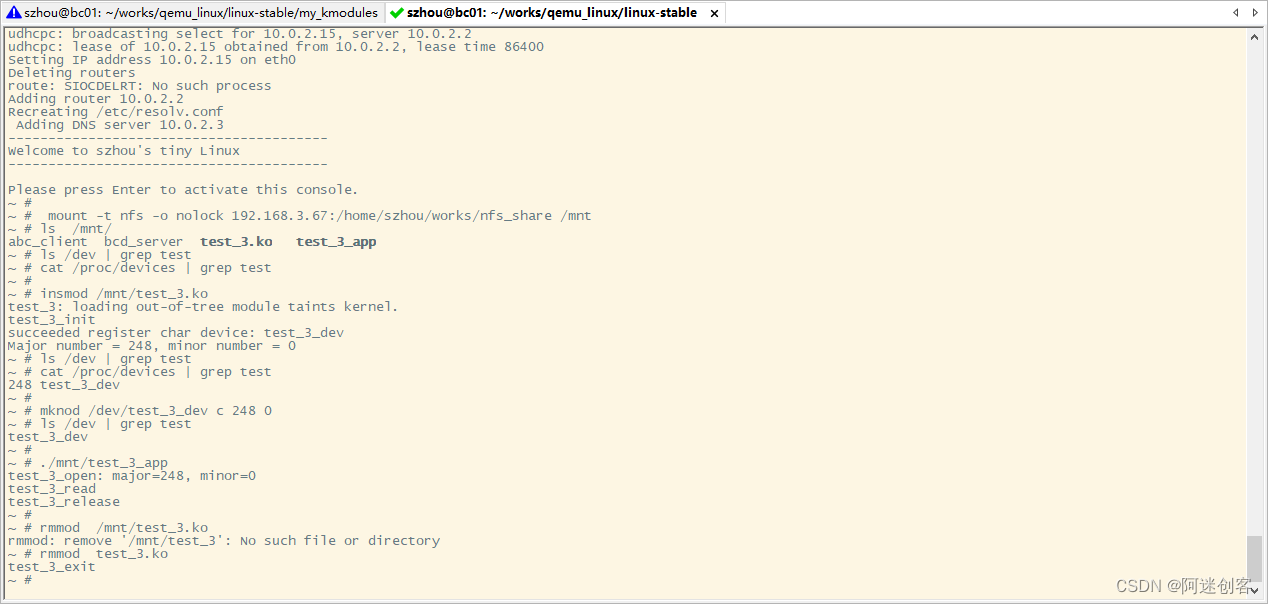
~ # mount -t nfs -o nolock 192.168.3.67:/home/szhou/works/nfs_share /mnt
~ # cd /mnt/
/mnt # ls
abc_client bcd_server test_3.ko
/mnt # insmod test_3.ko
test_3: loading out-of-tree module taints kernel.
test_3_init
succeeded register char device: test_3_dev
Major number = 248, minor number = 0
/mnt #
/mnt # mknod /dev/test_3_dev c 248 0
/mnt # ./test_3_app
test_3_open: major=248, minor=0
test_3_read
test_3_release
/mnt #
/mnt # rmmod test_3.ko
test_3_exit
/mnt #
4.2.3 查看设备情况
- 注意,此处尚未使用mknod手动创建设备文件
(1) insmod ko
/mnt # insmod test_3.ko
test_3: loading out-of-tree module taints kernel.
test_3_init
succeeded register char device: test_3_dev
Major number = 248, minor number = 0


(2)查看 /dev 可见无目标设备


(3)查看 /proc/devices ,则创建了test_3_dev
/dev # cat /proc/devices
Character devices:
  1 mem
  2 pty
  3 ttyp
  4 /dev/vc/0
  4 tty
  5 /dev/tty
  5 /dev/console
// …… 省略 ……
248 test_3_dev
// …… 省略 ……

Block devices:
// …… 省略 ……
/dev #
五、篇尾
略……
用这个简单的实验, 再次检验了内核实验四,NFS环境的高效。


 6836
6836


 被折叠的 条评论
为什么被折叠?
被折叠的 条评论
为什么被折叠?
 到【灌水乐园】发言


