


目录
Kubernetes部署方式
官方提供Kubernetes部署3种方式
minikube
Minikube是一个工具,可以在本地快速运行一个单点的Kubernetes,尝试Kubernetes或日常开发的用户使用。不能用于生产环境。
二进制包
从官方下载发行版的二进制包,手动部署每个组件,组成Kubernetes集群。目前企业生产环境中主要使用该方式。
下载地址:https://github.com/kubernetes/kubernetes/blob/master/CHANGELOG-1.11.md#v1113
Kubeadm
Kubeadm 是谷歌推出的一个专门用于快速部署 kubernetes 集群的工具。在集群部署的过程中,可以通过 kubeadm init 来初始化 master 节点,然后使用 kubeadm join 将其他的Node节点加入到集群中。
Kubeadm 通过简单配置可以快速将一个最小可用的集群运行起来。它在设计之初关注点是快速安装并将集群运行起来,而不是一步步关于各节点环境的准备工作。同样的,kubernetes 集群在使用过程中的各种插件也不是 kubeadm 关注的重点,比如 kubernetes集群 WEB Dashboard、prometheus 监控集群业务等。kubeadm 应用的目的是作为所有部署的基础,并通过 kubeadm 使得部署 kubernetes 集群更加容易。
Kubeadm 的简单快捷的部署可以应用到如下三方面:
- 新用户可以从 kubeadm 开始快速搭建 Kubernetes 并了解。
- 熟悉 Kubernetes 的用户可以使用 kubeadm 快速搭建集群并测试他们的应用。
- 大型的项目可以将 kubeadm 配合其他的安装工具一起使用,形成一个比较复杂的系统。
- 官方文档:
Kubeadm | KubernetesKubeadm is a tool built to provide kubeadm init and kubeadm join as best-practice "fast paths" for creating Kubernetes clusters.kubeadm performs the actions necessary to get a minimum viable cluster up and running. By design, it cares only about bootstrapping, not about provisioning machines. Likewise, installing various nice-to-have addons, like the Kubernetes Dashboard, monitoring solutions, and cloud-specific addons, is not in scope.Instead, we expect higher-level and more tailored tooling to be built on top of kubeadm, and ideally, using kubeadm as the basis of all deployments will make it easier to create conformant clusters. https://kubernetes.io/docs/reference/setup-tools/kubeadm/kubeadm/
Installing kubeadm | KubernetesThis page shows how to install the kubeadm toolbox. For information on how to create a cluster with kubeadm once you have performed this installation process, see the Creating a cluster with kubeadm page.Before you begin A compatible Linux host. The Kubernetes project provides generic instructions for Linux distributions based on Debian and Red Hat, and those distributions without a package manager. 2 GB or more of RAM per machine (any less will leave little room for your apps).https://kubernetes.io/docs/setup/independent/install-kubeadm/
基于kubeadm部署K8S集群
一、环境准备
| 操作系统 | IP地址 | 主机名 | 组件 |
| CentOS7.5 | 192.168.2.116 | k8s-master | kubeadm、kubelet、kubectl、docker-ce |
| CentOS7.5 | 192.168.2.117 | k8s-node01 | kubeadm、kubelet、kubectl、docker-ce |
| CentOS7.5 | 192.168.2.118 | k8s-node02 | kubeadm、kubelet、kubectl、docker-ce |
注意:所有主机配置推荐CPU:2C+ Memory:2G+
1.1、主机初始化配置
所有主机配置禁用防火墙和selinux
[root@localhost ~]# setenforce 0
[root@localhost ~]# iptables -F
[root@localhost ~]# systemctl stop firewalld
[root@localhost ~]# systemctl disable firewalld
[root@localhost ~]# systemctl stop NetworkManager
[root@localhost ~]# systemctl disable NetworkManager

Removed symlink /etc/systemd/system/multi-user.target.wants/NetworkManager.service.
Removed symlink /etc/systemd/system/dbus-org.freedesktop.nm-dispatcher.service.
Removed symlink /etc/systemd/system/network-online.target.wants/NetworkManager-wait-online.service.

[root@localhost ~]# sed -i '/^SELINUX=/s/enforcing/disabled/' /etc/selinux/config
配置主机名并绑定hosts,不同主机名称不同
[root@localhost ~]# hostname k8s-master
[root@localhost ~]# bash
[root@k8s-master ~]# cat << EOF >> /etc/hosts
192.168.2.116 k8s-master
192.168.2.117 k8s-node01
192.168.2.118 k8s-node02
EOF

[root@k8s-master ~]# scp /etc/hosts 192.168.200.117:/etc/
[root@k8s-master ~]# scp /etc/hosts 192.168.200.118:/etc/

[root@localhost ~]# hostname k8s-node1
[root@localhost ~]# bash
[root@k8s-node1 ~]#

[root@localhost ~]# hostname k8s-node2
[root@localhost ~]# bash
[root@k8s-node2 ~]#
主机配置初始化
[root@k8s-master yum.repos.d]# yum -y install vim wget net-tools lrzsz        #所有机器

[root@k8s-master ~]# swapoff -a
[root@k8s-master ~]# sed -i '/swap/s/^/#/' /etc/fstab

[root@k8s-node1 ~]#  cat << EOF >> /etc/sysctl.conf
> net.bridge.bridge-nf-call-ip6tables = 1
> net.bridge.bridge-nf-call-iptables = 1
> EOF

[root@k8s-node1 ~]# modprobe br_netfilter

[root@k8s-node1 ~]# sysctl -p
net.bridge.bridge-nf-call-ip6tables = 1
net.bridge.bridge-nf-call-iptables = 1
1.2、部署docker环境
三台主机上分别部署 Docker 环境,因为 Kubernetes 对容器的编排需要 Docker 的支持。
[root@k8s-master yum.repos.d]# wget -O /etc/yum.repos.d/CentOS-Base.repo http://mirrors.aliyun.com/repo/Centos-7.repo


[root@k8s-master ~]# yum install -y yum-utils device-mapper-persistent-data lvm2
使用 YUM 方式安装 Docker 时,推荐使用阿里的 YUM 源。阿里的官方开源站点地址是:https://developer.aliyun.com/mirror/,可以在站点内找到 Docker 的源地址。
[root@k8s-master ~]# yum-config-manager --add-repo https://mirrors.aliyun.com/docker-ce/linux/centos/docker-ce.repo

[root@k8s-master ~]# yum clean all && yum makecache fast

[root@k8s-master ~]# yum -y install docker-ce
[root@k8s-master ~]# systemctl start docker
[root@k8s-master ~]# systemctl enable docker
镜像加速器(所有主机配置)
很多镜像都是在国外的服务器上,由于网络上存在的问题,经常导致无法拉取镜像的错误,所以最好将镜像拉取地址设置成国内的。目前国内很多公有云服务商都提供了镜像加速服务。镜像加速配置如下所示。
https://dockerhub.azk8s.cn //Azure 中国镜像
https://hub-mirror.c.163.com //网易云加速器
[root@k8s-master ~]#  cat << END > /etc/docker/daemon.json
> {
>         "registry-mirrors":[ "https://nyakyfun.mirror.aliyuncs.com" ]
> }
> END

[root@k8s-master ~]# systemctl daemon-reload
[root@k8s-master ~]# systemctl restart docker
将镜像加速地址直接写入/etc/docker/daemon.json 文件内,如果文件不存在,可直接新建文件并保存。通过该文件扩展名可以看出,daemon.json 的内容必须符合 json 格式,书写时要注意。同时,由于单一镜像服务存在不可用的情况,在配置加速时推荐配置两个或多个加速地址,从而达到冗余、高可用的目的。
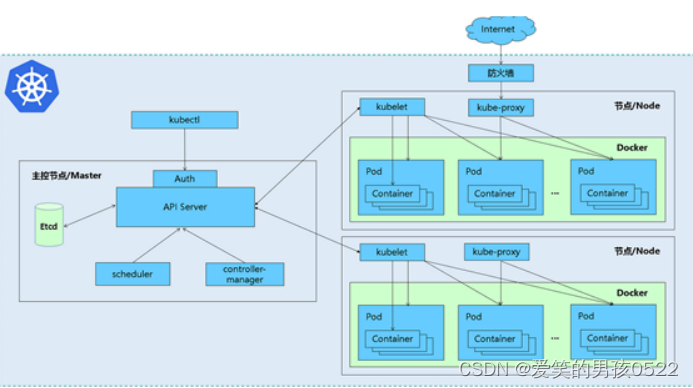
二、部署kubernetes集群
2.1、组件介绍
三个节点都需要安装下面三个组件
- kubeadm:安装工具,使所有的组件都会以容器的方式运行
- kubectl:客户端连接K8S API工具
- kubelet:运行在node节点,用来启动容器的工具
2.2、配置阿里云yum源
推荐使用阿里云的yum源安装:
[root@k8s-master ~]# cat <<EOF > /etc/yum.repos.d/kubernetes.repo
[kubernetes]
name=Kubernetes
baseurl=https://mirrors.aliyun.com/kubernetes/yum/repos/kubernetes-el7-x86_64/
enabled=1
gpgcheck=0
repo_gpgcheck=0
gpgkey=https://mirrors.aliyun.com/kubernetes/yum/doc/yum-key.gpg
       https://mirrors.aliyun.com/kubernetes/yum/doc/rpm-package-key.gpg
EOF

[root@k8s-master ~]# ls /etc/yum.repos.d/
CentOS-Base.repo  docker-ce.repo  kubernetes.repo  test
2.3、安装kubelet kubeadm kubectl
所有主机配置
[root@k8s-master ~]# yum -y install kubelet-1.20.0 kubeadm-1.20.0 kubectl-1.20.0

[root@k8s-master ~]# systemctl enable kubelet

Created symlink from /etc/systemd/system/multi-user.target.wants/kubelet.service to /usr/lib/systemd/system/kubelet.service.
kubelet 刚安装完成后,通过 systemctl start kubelet 方式是无法启动的,需要加入节点或初始化为 master 后才可启动成功。
如果在命令执行过程中出现索引 gpg 检查失败的情况, 请使用 yum install -y --nogpgcheck kubelet kubeadm kubectl 来安装。
2.4、配置init-config.yaml
Kubeadm 提供了很多配置项,Kubeadm 配置在 Kubernetes 集群中是存储在ConfigMap 中的,也可将这些配置写入配置文件,方便管理复杂的配置项。Kubeadm 配内容是通过 kubeadm config 命令写入配置文件的。
在master节点安装,master 定于为192.168.2.116,通过如下指令创建默认的init-config.yaml文件:
[root@k8s-master ~]# kubeadm config print init-defaults > init-config.yaml
其中,kubeadm config 除了用于输出配置项到文件中,还提供了其他一些常用功能,如下所示。
- kubeadm config view:查看当前集群中的配置值。
- kubeadm config print join-defaults:输出 kubeadm join 默认参数文件的内容。
- kubeadm config images list:列出所需的镜像列表。
- kubeadm config images pull:拉取镜像到本地。
- kubeadm config upload from-flags:由配置参数生成 ConfigMap。
init-config.yaml配置
[root@k8s-master ~]# cat init-config.yaml

  - system:bootstrappers:kubeadm:default-node-token
  token: abcdef.0123456789abcdef
  ttl: 24h0m0s
  usages:
  - signing
  - authentication
kind: InitConfiguration
localAPIEndpoint:
  advertiseAddress: 192.168.2.116
  bindPort: 6443
nodeRegistration:
  criSocket: /var/run/dockershim.sock
  name: k8s-master
  taints:
  - effect: NoSchedule
    key: node-role.kubernetes.io/master
---
apiServer:
  timeoutForControlPlane: 4m0s
apiVersion: kubeadm.k8s.io/v1beta2
certificatesDir: /etc/kubernetes/pki
clusterName: kubernetes
controllerManager: {}
dns:
  type: CoreDNS
etcd:
  local:
    dataDir: /var/lib/etcd
imageRepository: registry.aliyuncs.com/google_containers
kind: ClusterConfiguration
kubernetesVersion: v1.20.0
networking:
  dnsDomain: cluster.local
  serviceSubnet: 10.96.0.0/12
  podSubnet: 10.244.0.0/16
scheduler: {}
2.5、安装master节点
拉取所需镜像
[root@k8s-master ~]#  kubeadm config images list --config init-config.yaml

registry.aliyuncs.com/google_containers/kube-apiserver:v1.20.0
registry.aliyuncs.com/google_containers/kube-controller-manager:v1.20.0
registry.aliyuncs.com/google_containers/kube-scheduler:v1.20.0
registry.aliyuncs.com/google_containers/kube-proxy:v1.20.0
registry.aliyuncs.com/google_containers/pause:3.2
registry.aliyuncs.com/google_containers/etcd:3.4.13-0
registry.aliyuncs.com/google_containers/coredns:1.7.0


[root@k8s-master ~]#  kubeadm config images pull --config=init-config.yaml

[config/images] Pulled registry.aliyuncs.com/google_containers/kube-apiserver:v1.20.0
[config/images] Pulled registry.aliyuncs.com/google_containers/kube-controller-manager:v1.20.0
[config/images] Pulled registry.aliyuncs.com/google_containers/kube-scheduler:v1.20.0
[config/images] Pulled registry.aliyuncs.com/google_containers/kube-proxy:v1.20.0
[config/images] Pulled registry.aliyuncs.com/google_containers/pause:3.2
[config/images] Pulled registry.aliyuncs.com/google_containers/etcd:3.4.13-0
[config/images] Pulled registry.aliyuncs.com/google_containers/coredns:1.7.0
[root@k8s-master ~]# echo "1" > /proc/sys/net/ipv4/ip_forward
[root@k8s-master ~]# kubeadm init --config=init-config.yaml
[init] Using Kubernetes version: v1.20.0
[preflight] Running pre-flight checks
	[WARNING IsDockerSystemdCheck]: detected "cgroupfs" as the Docker cgroup driver. The recommended driver is "systemd". Please follow the guide at https://kubernetes.io/docs/setup/cri/
	[WARNING SystemVerification]: this Docker version is not on the list of validated versions: 24.0.5. Latest validated version: 19.03
[preflight] Pulling images required for setting up a Kubernetes cluster
[preflight] This might take a minute or two, depending on the speed of your internet connection
[preflight] You can also perform this action in beforehand using 'kubeadm config images pull'
[certs] Using certificateDir folder "/etc/kubernetes/pki"
[certs] Generating "ca" certificate and key
[certs] Generating "apiserver" certificate and key
[certs] apiserver serving cert is signed for DNS names [k8s-master kubernetes kubernetes.default kubernetes.default.svc kubernetes.default.svc.cluster.local] and IPs [10.96.0.1 192.168.2.116]
[certs] Generating "apiserver-kubelet-client" certificate and key
[certs] Generating "front-proxy-ca" certificate and key
[certs] Generating "front-proxy-client" certificate and key
[certs] Generating "etcd/ca" certificate and key
[certs] Generating "etcd/server" certificate and key
[certs] etcd/server serving cert is signed for DNS names [k8s-master localhost] and IPs [192.168.2.116 127.0.0.1 ::1]
[certs] Generating "etcd/peer" certificate and key
[certs] etcd/peer serving cert is signed for DNS names [k8s-master localhost] and IPs [192.168.2.116 127.0.0.1 ::1]
[certs] Generating "etcd/healthcheck-client" certificate and key
[certs] Generating "apiserver-etcd-client" certificate and key
[certs] Generating "sa" key and public key
[kubeconfig] Using kubeconfig folder "/etc/kubernetes"
[kubeconfig] Writing "admin.conf" kubeconfig file
[kubeconfig] Writing "kubelet.conf" kubeconfig file
[kubeconfig] Writing "controller-manager.conf" kubeconfig file
[kubeconfig] Writing "scheduler.conf" kubeconfig file
[kubelet-start] Writing kubelet environment file with flags to file "/var/lib/kubelet/kubeadm-flags.env"
[kubelet-start] Writing kubelet configuration to file "/var/lib/kubelet/config.yaml"
[kubelet-start] Starting the kubelet
[control-plane] Using manifest folder "/etc/kubernetes/manifests"
[control-plane] Creating static Pod manifest for "kube-apiserver"
[control-plane] Creating static Pod manifest for "kube-controller-manager"
[control-plane] Creating static Pod manifest for "kube-scheduler"
[etcd] Creating static Pod manifest for local etcd in "/etc/kubernetes/manifests"
[wait-control-plane] Waiting for the kubelet to boot up the control plane as static Pods from directory "/etc/kubernetes/manifests". This can take up to 4m0s
[apiclient] All control plane components are healthy after 13.001998 seconds
[upload-config] Storing the configuration used in ConfigMap "kubeadm-config" in the "kube-system" Namespace
[kubelet] Creating a ConfigMap "kubelet-config-1.20" in namespace kube-system with the configuration for the kubelets in the cluster
[upload-certs] Skipping phase. Please see --upload-certs
[mark-control-plane] Marking the node k8s-master as control-plane by adding the labels "node-role.kubernetes.io/master=''" and "node-role.kubernetes.io/control-plane='' (deprecated)"
[mark-control-plane] Marking the node k8s-master as control-plane by adding the taints [node-role.kubernetes.io/master:NoSchedule]
[bootstrap-token] Using token: abcdef.0123456789abcdef
[bootstrap-token] Configuring bootstrap tokens, cluster-info ConfigMap, RBAC Roles
[bootstrap-token] configured RBAC rules to allow Node Bootstrap tokens to get nodes
[bootstrap-token] configured RBAC rules to allow Node Bootstrap tokens to post CSRs in order for nodes to get long term certificate credentials
[bootstrap-token] configured RBAC rules to allow the csrapprover controller automatically approve CSRs from a Node Bootstrap Token
[bootstrap-token] configured RBAC rules to allow certificate rotation for all node client certificates in the cluster
[bootstrap-token] Creating the "cluster-info" ConfigMap in the "kube-public" namespace
[kubelet-finalize] Updating "/etc/kubernetes/kubelet.conf" to point to a rotatable kubelet client certificate and key
[addons] Applied essential addon: CoreDNS
[addons] Applied essential addon: kube-proxy

Your Kubernetes control-plane has initialized successfully!

To start using your cluster, you need to run the following as a regular user:

  mkdir -p $HOME/.kube
  sudo cp -i /etc/kubernetes/admin.conf $HOME/.kube/config
  sudo chown $(id -u):$(id -g) $HOME/.kube/config

Alternatively, if you are the root user, you can run:

  export KUBECONFIG=/etc/kubernetes/admin.conf

You should now deploy a pod network to the cluster.
Run "kubectl apply -f [podnetwork].yaml" with one of the options listed at:
  https://kubernetes.io/docs/concepts/cluster-administration/addons/

Then you can join any number of worker nodes by running the following on each as root:

kubeadm join 192.168.2.116:6443 --token abcdef.0123456789abcdef \
    --discovery-token-ca-cert-hash sha256:4ec8cb9c8813abe2bc9c61b47d2ed5ffbb1fb8397dd91ccbbfe09c30bcfd78a8
安装matser节点
[root@k8s-master ~]#echo "1" > /proc/sys/net/ipv4/ip_forward

[root@k8s-master ~]# kubeadm init --config=init-config.yaml	//初始化安装K8S
根据提示操作
kubectl 默认会在执行的用户家目录下面的.kube 目录下寻找config 文件。这里是将在初始化时[kubeconfig]步骤生成的admin.conf 拷贝到.kube/config
[root@k8s-master ~]# mkdir -p $HOME/.kube
[root@k8s-master ~]# cp -i /etc/kubernetes/admin.conf $HOME/.kube/config
[root@k8s-master ~]# chown $(id -u):$(id -g) $HOME/.kube/config
kubeadm init 主要执行了以下操作:
[init]:指定版本进行初始化操作
[preflight] :初始化前的检查和下载所需要的Docker镜像文件
[kubelet-start] :生成kubelet 的配置文件”/var/lib/kubelet/config.yaml”,没有这个文件kubelet无法启动,所以初始化之前的kubelet 实际上启动失败。
[certificates]:生成Kubernetes 使用的证书,存放在/etc/kubernetes/pki 目录中。
[kubeconfig] :生成 Kubeconfig 文件,存放在/etc/kubernetes 目录中,组件之间通信需要使用对应文件。
[control-plane]:使用/etc/kubernetes/manifest 目录下的YAML 文件,安装 Master 组件。
[etcd]:使用/etc/kubernetes/manifest/etcd.yaml 安装Etcd 服务。
[wait-control-plane]:等待control-plan 部署的Master 组件启动。
[apiclient]:检查Master组件服务状态。
[uploadconfig]:更新配置
[kubelet]:使用configMap 配置kubelet。
[patchnode]:更新CNI信息到Node 上,通过注释的方式记录。
[mark-control-plane]:为当前节点打标签,打了角色Master,和不可调度标签,这样默认就不会使用Master 节点来运行Pod。
[bootstrap-token]:生成token 记录下来,后边使用kubeadm join 往集群中添加节点时会用到
[addons]:安装附加组件CoreDNS 和kube-proxy
Kubeadm 通过初始化安装是不包括网络插件的,也就是说初始化之后是不具备相关网络功能的,比如 k8s-master 节点上查看节点信息都是“Not Ready”状态、Pod 的 CoreDNS无法提供服务等。
2.6、安装node节点
根据master安装时的提示信息
[root@k8s-node1 ~]# kubeadm join 192.168.2.116:6443 --token abcdef.0123456789abcdef --discovery-token-ca-cert-hash sha256:4ec8cb9c8813abe2bc9c61b47d2ed5ffbb1fb8397dd91ccbbfe09c30bcfd78a8

[preflight] Running pre-flight checks
	[WARNING IsDockerSystemdCheck]: detected "cgroupfs" as the Docker cgroup driver. The recommended driver is "systemd". Please follow the guide at https://kubernetes.io/docs/setup/cri/
	[WARNING SystemVerification]: this Docker version is not on the list of validated versions: 24.0.5. Latest validated version: 19.03
[preflight] Reading configuration from the cluster...
[preflight] FYI: You can look at this config file with 'kubectl -n kube-system get cm kubeadm-config -o yaml'
[kubelet-start] Writing kubelet configuration to file "/var/lib/kubelet/config.yaml"
[kubelet-start] Writing kubelet environment file with flags to file "/var/lib/kubelet/kubeadm-flags.env"
[kubelet-start] Starting the kubelet
[kubelet-start] Waiting for the kubelet to perform the TLS Bootstrap...

This node has joined the cluster:
* Certificate signing request was sent to apiserver and a response was received.
* The Kubelet was informed of the new secure connection details.

Run 'kubectl get nodes' on the control-plane to see this node join the cluster.


[root@k8s-node2 ~]# kubeadm join 192.168.2.116:6443 --token abcdef.0123456789abcdef --discovery-token-ca-cert-hash sha256:4ec8cb9c8813abe2bc9c61b47d2ed5ffbb1fb8397dd91ccbbfe09c30bcfd78a8

[preflight] Running pre-flight checks
	[WARNING IsDockerSystemdCheck]: detected "cgroupfs" as the Docker cgroup driver. The recommended driver is "systemd". Please follow the guide at https://kubernetes.io/docs/setup/cri/
	[WARNING SystemVerification]: this Docker version is not on the list of validated versions: 24.0.5. Latest validated version: 19.03
[preflight] Reading configuration from the cluster...
[preflight] FYI: You can look at this config file with 'kubectl -n kube-system get cm kubeadm-config -o yaml'
[kubelet-start] Writing kubelet configuration to file "/var/lib/kubelet/config.yaml"
[kubelet-start] Writing kubelet environment file with flags to file "/var/lib/kubelet/kubeadm-flags.env"
[kubelet-start] Starting the kubelet
[kubelet-start] Waiting for the kubelet to perform the TLS Bootstrap...

This node has joined the cluster:
* Certificate signing request was sent to apiserver and a response was received.
* The Kubelet was informed of the new secure connection details.

Run 'kubectl get nodes' on the control-plane to see this node join the cluster.


[root@k8s-master ~]# kubectl get nodes
NAME         STATUS     ROLES                  AGE    VERSION
k8s-master   NotReady   control-plane,master   32m    v1.20.0
k8s-node1    NotReady   <none>                 114s   v1.20.0
k8s-node2    NotReady   <none>                 11s    v1.20.0
前面已经提到,在初始化 k8s-master 时并没有网络相关配置,所以无法跟 node 节点通信,因此状态都是“NotReady”。但是通过 kubeadm join 加入的 node 节点已经在k8s-master 上可以看到。


 2891
2891


 被折叠的 条评论
为什么被折叠?
被折叠的 条评论
为什么被折叠?
 到【灌水乐园】发言


