Deep Learning Onramp 学习笔记

1.1

deepnet = alexnet %利用库内pretrained alexnet

img  = imread('filename')  %使用变量存储图片

imshow(img)  %展示图片

classify(deepnet,img) %使用alexnet来分类当前的图片

1.2

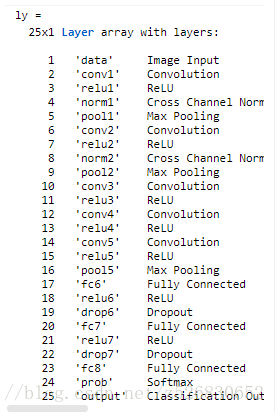
ly=deepnet.Layers  %用ly变量存储deepnet的layers信息,如下图

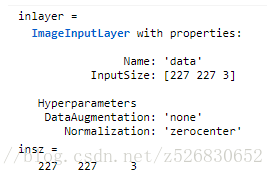
inlayer = ly(1) %提取输入层的信息

insz = inlayer.InputSize %提取输入层的维度


outlayer=ly(end) %提取输出层的信息

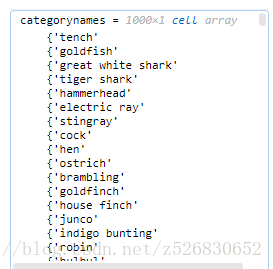
categorynames = outlayer.ClassNames %提取输出层的分类名


1.3  对每个类别的输出概率

[pred,scrs] = classify(net,img) %获取每个标签的概率scrs
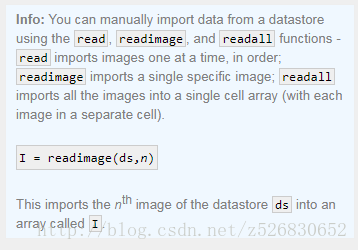

thresh = median (scores) + std(scores) %中值+ 标准差
highscores = scores > thresh %大于该阈值的分数置1其余置0
有许多概率远低于阈值的标签,在绘制直方图时应将这些标签去除。
scores(highscores) %提取出大于阈值的分数
bar(scores(highscores)) %直方图展示

xticks(1:length(scores(highscores))) %划出有多少个刻度值
xticklabels(categorynames(highscores)) %标出该刻度值的标签
xtickangle(60) %标签显示角度

1.4 创造一个datastore

将图片存在硬盘中即可,使用datastore来索引图片,还可以不必考虑内存使用

imds = imageDatastore('file*.jpg')  %创建一个datastore *号代表任意值

fname = imds.Files %提取所有文件的名字


[pred,scores] = classify(deepnet,imds) %将ds的图片都送入进行分类,scores = 文件数*预测单元数

[C,labels]=max(scores,[],2)                   %C为预测的最大值,labels 为预测的种类标签  长度= 文件数*1

bar(C)

xticks(1:length(labels,2)) %划出有多少个刻度值
xticklabels(categorynames(labels)) %标出该刻度值的标签
xtickangle(60) %标签显示角度


1.5 

用自己的文件夹把不同的花进行分类

利用

flwrds= imageDatastore('Flowers','IncludeSubfolders',true);

‘includeSubfolders’可以将子文件夹也包括进去;


2. 迁移学习

 迁移学习中我们需要的有三件事。1.选取一个pretrained神经网络 2.所需的数据集 3.超参数的设置 

利用文件夹的名字对datastore里的数据进行标记。

  load pathToImages


flwrds = imageDatastore(pathToImages,'IncludeSubfolders',true,...
'LabelSource','foldernames')

flowernames = flwrds.Labels %获取标签


将数据集进行分块

[ds1,ds2]=splitEachLabels(ds,p or n,'randomlize');

防止数据偏斜,将ds的数据随机分为两个部分,p值决定ds1中数据量的占比,n值可以决定ds1中数据量


对预训练的神经网络进行修改

例中我们要识别12种花,我们要将第23层有1000个单元的神经层替换成12个单元的全连接层。再将最后一层1000个类别的输出层换成我们的类别输出层(无需加上类型?);


Layer(23) = fullyConnectedLayer(12)

layers(25) = classificationLayer


修改超参数的设置


opts = trainingOptions('sgdm') %显示随机梯度下降的默认options

opts = trainingOptions('sgdm','name',value) %name中填入对应想修改的参数名


迁移学习总览

Transfer Learning Example Script

The code below implements transfer learning for the flower species example in this chapter. It is available as the script  trainflowers.mlx in the course example files. You can download the course example files from the help menu in the top-right corner. Note that this example can take some time to run if you run it on a computer that does not have a GPU.

Get training images


flower_ds = imageDatastore('Flowers','IncludeSubfolders',true,'LabelSource','foldernames');
[trainImgs,testImgs] = splitEachLabel(flower_ds,0.6);
numClasses = numel(categories(flower_ds.Labels));


Create a network by modifying AlexNet


net = alexnet;
layers = net.Layers;
layers(end-2) = fullyConnectedLayer(numClasses);
layers(end) = classificationLayer;


Set training algorithm options


options = trainingOptions('sgdm','InitialLearnRate', 0.001);


Perform training


[flowernet,info] = trainNetwork(trainImgs, layers, options);


%可使用 plot(info.TrainingLoss) 绘图loss的变化

Use trained network to classify test images


testpreds = classify(flowernet,testImgs)

correct = nn(AuctualLabels == testpreds) %输出一个分类正确与否的向量

Performance by class


loss与accuracy 给予了全面的关于神经网络表现的信息,但是不能直观的看出那些数据的分类情况

这时候我们使用分类混淆矩阵(confusion matrix)来帮助我们直观的看见哪些数据被误分类

[flwrconf,flwrnames]=confusionmat(testImgs.Labels,flwrPreds)


还是不够直观,我们使用heatmap(xlabels,ylabels,confusionmat)来构建直观的图像


对输入图像进行处理

图像切割


减少图片像素


为图像增加两个通道


wormds = imageDatastore(pathToImages,'ReadFcn',@wormread)

function img = wormread(file)
% Import image
img = imread(file);
% Crop and resize
img = imcrop(img,[130 80 426 426]);
img = imresize(img,[227 227]);
% Adjust intensity levels (NOTE: not needed when training a CNN as inputs are normalized anyway)
img = imadjust(img);
% Convert grayscale to color (RGB)
img = repmat(img,[1 1 3]);
end

使用DataStore时使用@myfun


fuction myfun

....

end


来自定义读取文件时的操作


img = read(wormds); %读取图片时的操作


通过对图片的修改来增强自己的图片集


  • 1
    点赞
  • 4
    收藏
    觉得还不错? 一键收藏
  • 1
    评论

“相关推荐”对你有帮助么?

  • 非常没帮助
  • 没帮助
  • 一般
  • 有帮助
  • 非常有帮助
提交
评论 1
添加红包

请填写红包祝福语或标题

红包个数最小为10个

红包金额最低5元

当前余额3.43前往充值 >
需支付:10.00
成就一亿技术人!
领取后你会自动成为博主和红包主的粉丝 规则
hope_wisdom
发出的红包
实付
使用余额支付
点击重新获取
扫码支付
钱包余额 0

抵扣说明:

1.余额是钱包充值的虚拟货币,按照1:1的比例进行支付金额的抵扣。
2.余额无法直接购买下载,可以购买VIP、付费专栏及课程。

余额充值