


学习郭明强关于Openlayers的书,第二版,尝试里面的示例图层探查,就是裁剪部分上层图层,让下面的图层可见。我用的是目前最新的Openlayers9,按照书上的代码敲好之后发现并不能按照想要的进行显示,但同时控制台不报错!
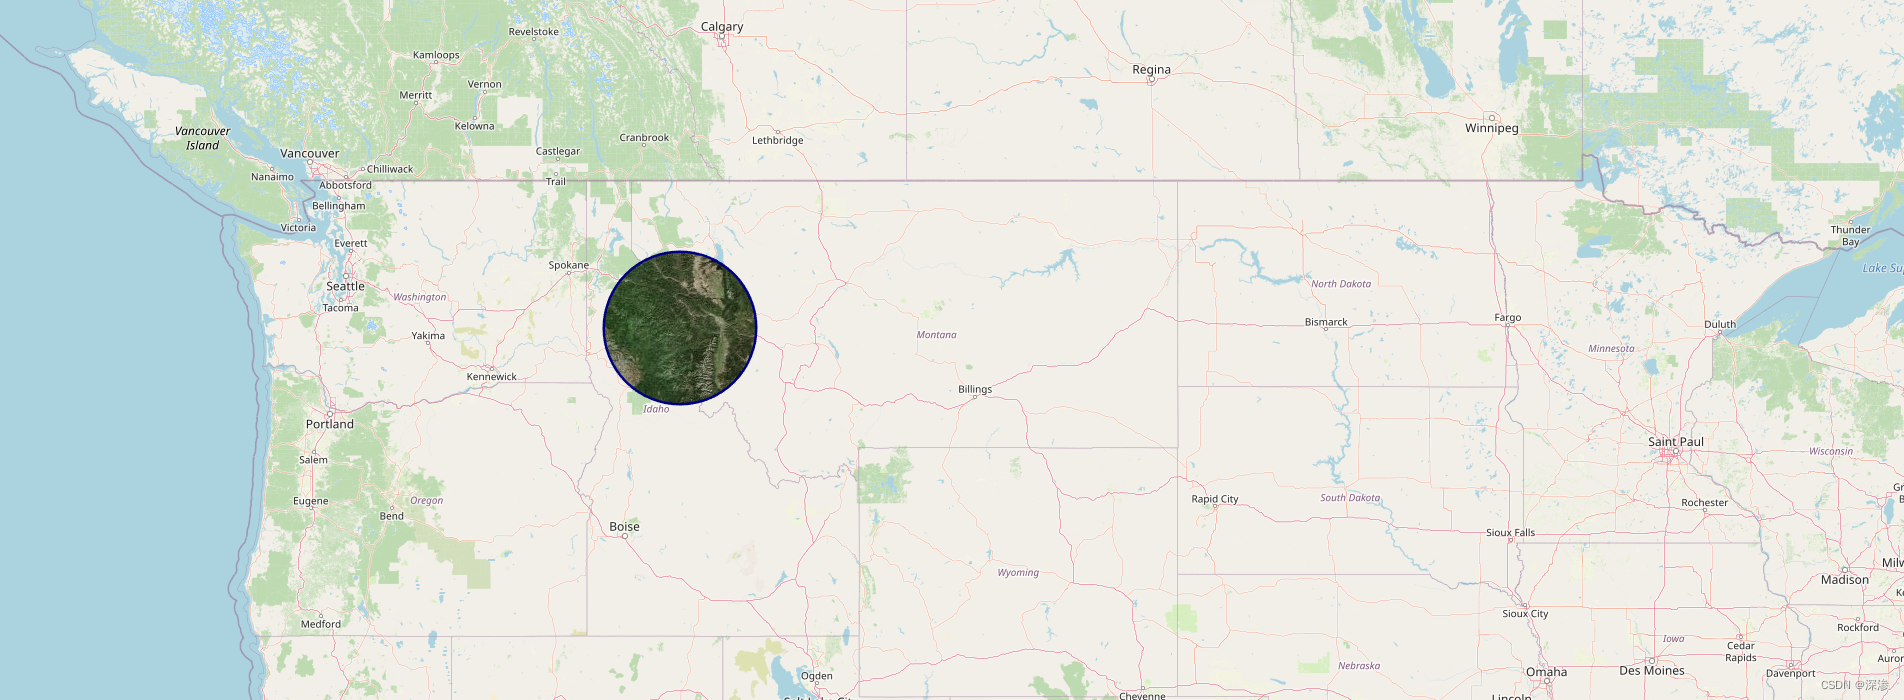
好像书上使用的是Openlayers 5,于是下载了5对应的js和css,发现可以正常显示。如图:
然后我就在找Openlayers 9实现不了的原因。
以下来自ol 9的API
书上的代码关于图层裁剪的地方是这样写的:
layerbing.on('precompose',function (event) {
var ctx =event.context;
var pixelratio=event.frameState.pixelRatio;
ctx.save();
ctx.beginPath();
if (mousePosition){
ctx.arc(mousePosition[0]*pixelratio, mousePosition[1]*pixelratio,
radius*pixelratio,0,2*Math.PI);
ctx.lineWidth=5*pixelratio;
ctx.strokeStyle='#000080';
ctx.stroke();
}
ctx.clip();
});
layerbing.on('postcompose',function(event){
var ctx=event.context;
ctx.restore();
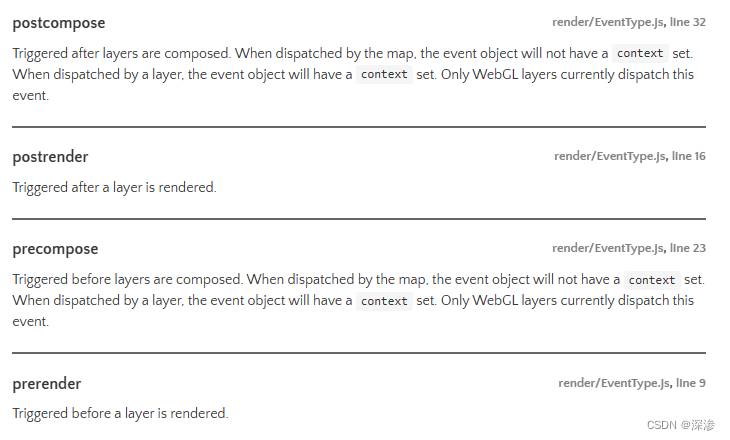
});上面ol 9的API说 postcompose是“Only WebGL layers currently dispatch this event.”,虽然不是很懂,但似乎这里不是WebGL。事实上,我也不明白这里为什么使用pre/post-compose,compose的直译是‘组成’。我猜测是之前的版本并不严格区分?
以下是两者的区别(来自chat gpt):
WebGL(Web Graphics Library)和 Canvas 是用于在 Web 上进行图形渲染的两种不同技术。它们都可以用于在浏览器中创建交互式的图形和动画,但它们之间有一些重要的区别:
Canvas:
- 2D 绘图:Canvas 元素是 HTML5 中的一个标准元素,用于在网页上绘制 2D 图形。
- API:Canvas 使用 Canvas 2D Context API 来进行绘图操作,提供了诸如绘制路径、文本、图像等功能。
- 灵活性:Canvas 适用于简单的 2D 图形绘制,如图表、游戏等,但对于复杂的图形和动画可能会有限制。
- 性能:Canvas 的性能较好,适合处理大量的静态图形和简单动画。
WebGL:
- 3D 绘图:WebGL 是基于 OpenGL ES 的 JavaScript API,用于在网页上进行高性能的 3D 图形渲染。
- API:WebGL 提供了底层的 3D 图形渲染功能,开发者可以直接操作 GPU 进行图形计算。
- 复杂性:WebGL 可以实现复杂的 3D 场景、动画和效果,适合游戏开发、虚拟现实(VR)、数据可视化等领域。
- 性能:WebGL 的性能非常出色,能够利用 GPU 进行硬件加速,处理复杂的图形和动画效果。
所以解决很简单,把‘postcompose’改为‘postrender’,把‘precompose’改为‘prerender’就能在ol下使用了。
最后附上完整代码:
<!DOCTYPE html>
<html lang="en">
<head>
    <meta charset="UTF-8">
    <title>图层探查</title>
<!--    <link rel="stylesheet" href="ol.css">-->
<!--    <script src="ol.js"></script>-->
<!--    这里使用的是Openlayers 9 -->
    <link rel="stylesheet" href="https://cdn.jsdelivr.net/npm/ol@v9.0.0/ol.css">
    <script src="https://cdn.jsdelivr.net/npm/ol@v9.0.0/dist/ol.js"></script>
    <style>
        #map{
            width: auto;
            height: 700px;
        }
    </style>

    <script>

    </script>
</head>
<body>
<div id="map"></div>
<script>
    const layerbing=new ol.layer.Tile({
        source: new ol.source.BingMaps({
            key:'你自己的key',
            imagerySet: 'Aerial'
        }) });
    const layerosm=new ol.layer.Tile({
        source: new ol.source.OSM()
    });
    const map8=new ol.Map({
        target: 'map',
        layers:[layerosm,layerbing],
        view: new ol.View({
            center: ol.proj.fromLonLat([-109,46.5]),
            zoom: 6
        })
    });
    // 探查半径
    var radius=75;
    document.addEventListener('keydown',function (event) {
        //通过键盘调节探查的范围,但好像不管用??
        if (event.key==38){
            radius=Math.min(radius+5,150);
            event.preventDefault();
        }else if(event.key==40){
            radius=Math.max(radius-5,25);
            map8.render();
            event.preventDefault();
        }
    });

    var mousePosition=null;
    document.addEventListener('mousemove',function (event) {
        mousePosition=map8.getEventPixel(event);

        map8.render();
    });
    document.addEventListener('mouseout',function () {
        mousePosition=null;
        map8.render();
    })

    //    在渲染之前进行裁剪
//修改的地方在这里
    layerbing.on('prerender',function (event) {
        var ctx =event.context;
        var pixelratio=event.frameState.pixelRatio;
        ctx.save();
        ctx.beginPath();
        if (mousePosition){
            ctx.arc(mousePosition[0]*pixelratio, mousePosition[1]*pixelratio,
                radius*pixelratio,0,2*Math.PI);
            ctx.lineWidth=5*pixelratio;
            ctx.strokeStyle='#000080';
            ctx.stroke();
        }
        ctx.clip();
    });
    layerbing.on('postrender',function(event){
        var ctx=event.context;
        ctx.restore();
    });


</script>
</body>
</html>


 282
282


 被折叠的 条评论
为什么被折叠?
被折叠的 条评论
为什么被折叠?
 到【灌水乐园】发言


