


1、新建工程,在官方文档中命名规范为 xxx-spring-boot-starter xxx为你的starter的项目功能名字
2、在pom.xml文件中加入两个依赖
<dependency>
<groupId>org.springframework.boot</groupId>
<artifactId>spring-boot-autoconfigure</artifactId>
<version>2.3.3.RELEASE</version>
</dependency>
<dependency>
<groupId>org.springframework.boot</groupId>
<artifactId>spring-boot-configuration-processor</artifactId>
<version>2.3.3.RELEASE</version>
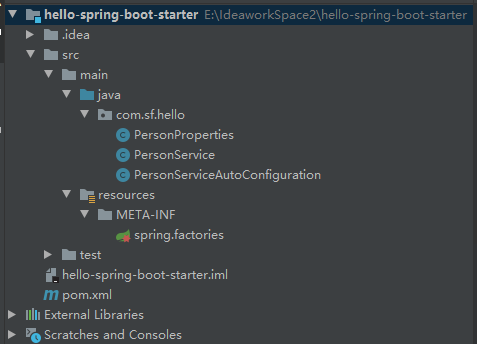
</dependency>3、目录结构如下
4、PersonProperties类
@ConfigurationProperties(prefix = "spring.person")
public class PersonProperties {
    // 姓名
    private String name;
    // 年龄
    private int age;
    // 性别
    private String sex = "M";

    // Getter & Setter
5、PersonService类
public class PersonService {

    private PersonProperties properties;

    public PersonService() {
    }

    public PersonService(PersonProperties properties) {
        this.properties = properties;
    }

    public void sayHello(){
        System.out.println("大家好,我叫: " + properties.getName() + ", 今年" + properties.getAge() + "岁"
                + ", 性别: " + properties.getSex());
    }
}
6、PersonServiceAutoConfiguration类
首先需要明白下面一张图的配置内容
@EnableConfigurationProperties:外部化配置

@Configuration
@EnableConfigurationProperties(PersonProperties.class)
@ConditionalOnClass(PersonService.class)
@ConditionalOnProperty(prefix = "spring.person", value = "enabled", matchIfMissing = true)
public class PersonServiceAutoConfiguration {

    @Autowired
    private PersonProperties properties;

    @Bean
    @ConditionalOnMissingBean(PersonService.class)  // 当容器中没有指定Bean的情况下,自动配置PersonService类
    public PersonService personService(){
        PersonService personService = new PersonService(properties);
        return personService;
    }
}
7、spring.factories文件
META-INF是自己手动创建的目录,spring.factories也是手动创建的文件,在该文件中配置自己的自动配置类
org.springframework.boot.autoconfigure.EnableAutoConfiguration=\
com.sf.hello.PersonServiceAutoConfiguration
8、最后将项目打包 mvn clean install
maven会自动将包复制到你的maven仓库,在原始项目中pom文件开头
<groupId>hello</groupId>
<artifactId>hello-spring-boot-starter</artifactId>
<version>1.0-SNAPSHOT</version>
所以你的包在hello文件夹中
9、在其他项目中引入jar包
<dependency>
    <groupId>hello</groupId>
    <artifactId>hello-spring-boot-starter</artifactId>
    <version>1.0-SNAPSHOT</version>
</dependency>
10、在yml文件中编辑配置信息
spring:
  person:
    age: 28
    name: csy
    sex: M
11、test类中测试
@SpringBootTest
class DemoApplicationTests {

    @Autowired
    @SuppressWarnings("ALL")
    private PersonService personService;

    @Test
    void contextLoads() {
    }

    @Test
    public void testHello(){
        personService.sayHello();
    }
}
到此结束!完美


 385
385


 被折叠的 条评论
为什么被折叠?
被折叠的 条评论
为什么被折叠?
 到【灌水乐园】发言


