


本分享是iOS开发中有趣的UI模块的相关内容技术点分享。如果您是一位已经有C基础了的iOS爱好者,但还未接触Objectiov C语言,您需要学习我之前分享的 iOS开发核心语言Objective C 系列
如果您是零基础,建议您从我之前分享的iOS开发分分钟搞定C语言 系列开始学习。另外将无偿分享自己整理出来的大概400G iOS学习视频及学习资料,都是干货哦!可以新浪微博私信➕关注 极客James,期待与您的共同学习和探讨!!由于时间有限,每天在工作之余整理的学习分享,难免有不足之处,也希望各路大神指正!
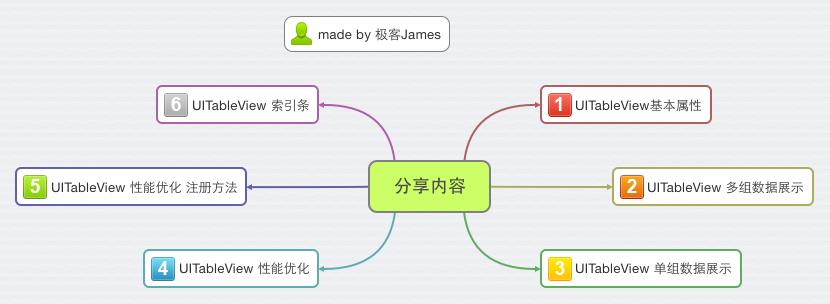
made by 极客James
一、UITableView基本属性
1.UITableView的样式
UITableView在iOS开发中非常实用且应用广泛,常见的样式有Plain和Group两种。
2.UITableView的数据展示
在UITableView中要想进行数据源的展示需要遵守UITableViewDataSource协议并实现相应的方法。
UITableViewDataSource数据展示步骤:
(1)数据源首先要遵守UITableViewDataSource协议
在声明头文件中遵守协议
@interface ViewController ()<UITableViewDataSource>(2)然后设置数据源对象
可以通过storyboard拖线,也可以在viewDidLoad中
self.tableView.dataSource = self;
(3)最后实现数据源方法。
// 有多少组数据
- (NSInteger)numberOfSectionsInTableView:(UITableView
*)tableView;// 每一组有多少行数据
- (NSInteger)tableView:(UITableView *)tableView
numberOfRowsInSection:(NSInteger)section;// 每一行显示什么内容(注意:必须是UITableViewCell或者其子类)
-(UITableViewCell)tableView:
(UITableView )tableView cellForRowAtIndexPath:(NSIndexPath
*)indexPath;// 每一组的头部
-(NSString )tableView:(UITableView )tableView
titleForHeaderInSection:(NSInteger)section;// 每一组的尾部 - (NSString )tableView:(UITableView )tableView
titleForFooterInSection:(NSInteger)section
二、多组数据展示
项目需求:
通过tableView展示一组汽车数据,需要有汽车的名字,汽车的logo,并且有头部标题索引。
项目效果:
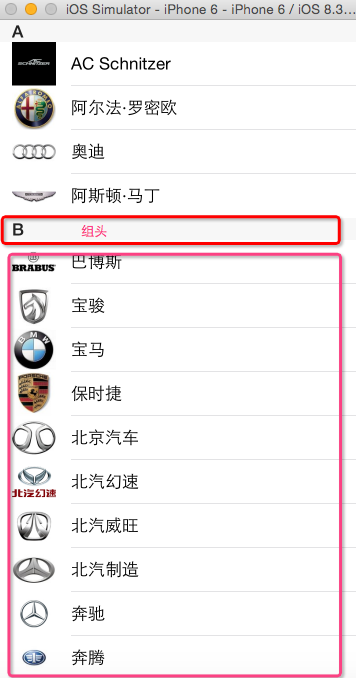
项目整体思路:
(1)首先通过storyboard创建一个UITableView视图并且和控制器建立联系。
(2)导入用到的素材图片和plist文件。
(3)建立ZJCar的数据模型
(4)建立ZJCarGroup数据模型
(5)进行相应的字典转模型操作
(6)在控制器中遵守数据源协议,设置数据源对象,实现数据源方法。
项目编码过程:
ZJCar数据模型:
ZJCar.h 文件
/* 名字 / @property (nonatomic ,copy)NSString name; /* 图片 */
@property (nonatomic ,copy)NSString *icon;
+(instancetype)carWithDict:(NSDictionary *)dict;ZJCar.m 文件
+(instancetype)carWithDict:(NSDictionary *)dict{
ZJCar *car = [[self alloc]init];
// 通过KVC方式直接赋值
[car setValuesForKeysWithDictionary:dict];
return car;
}
ZJCarGroup数据模型:
ZJCarGroup.h
/** 索引 */
@property (nonatomic ,copy)NSString *title;
/** 所有的车数组 */
@property (nonatomic,strong) NSArray *cars;
+(instancetype)carGroupWithDict:(NSDictionary *)cardict;
ZJCarGroup.m
首先要导入ZJCar.h的头文件
+(instancetype)carGroupWithDict:(NSDictionary *)dict{
ZJCarGroup *group = [[self alloc]init];
group.title = dict[@"title"];
// 创建一个字典数组
NSMutableArray *cars = [NSMutableArray array];
// 将dict中的cars字典数组 取出然后 转为模型数组
for (NSDictionary *cardict in dict[@"cars"] ) {
[cars addObject:[ZJCar carWithDict:cardict]];
}
group.cars = cars;
return group;
}在控制器viewController中
声明一个数组
@property (nonatomic,strong) NSArray *carGroups;
然后对数组进行懒加载
#pragma mark - groups 懒加载
- (NSArray *)carGroups{
    if (!_carGroups) {
        // 加载字典数组
        NSArray *groupsCar = [NSArray arrayWithContentsOfFile:[[NSBundle mainBundle]pathForResource:@"cars.plist" ofType:nil]];
         // 创建一个数组模型
        NSMutableArray *carArrayM = [NSMutableArray array];
        // 将字典数组-> 模型数组
        for (NSDictionary *dict in groupsCar) {
            ZJCarGroup *carGroup = [ZJCarGroup carGroupWithDict:dict];
            [carArrayM addObject:carGroup];
        }
        _carGroups = carArrayM;
    }

    return _carGroups;
}
实现数据源方法:
// 多少行
- (NSInteger)numberOfSectionsInTableView:(UITableView *)tableView{return self.carGroups.count;}
多少组
-(NSInteger)tableView:(UITableView *)tableView numberOfRowsInSection:(NSInteger)section{
ZJCarGroup *carGroup = self.carGroups[section];
return carGroup.cars.count; }
- (UITableViewCell *)tableView:(UITableView *)tableView cellForRowAtIndexPath:(NSIndexPath *)indexPath{
     // 定义一个可重用标示符ID
     static NSString *ID = @"cellID";
     // 先在缓冲池中找
    UITableViewCell *cell = [tableView dequeueReusableCellWithIdentifier:ID];
    // 如果没有在创建
    if (!cell) {
        cell = [[UITableViewCell alloc]initWithStyle:UITableViewCellStyleSubtitle reuseIdentifier:ID];
    }
    // 覆盖数据
    // 从ZJCarGroup 中取出数据
    ZJCarGroup *group = self.carGroups[indexPath.section];
    ZJCar *car = group.cars[indexPath.row];
    cell.textLabel.text = car.name;
    cell.imageView.image = [UIImage imageNamed:car.icon];
    return cell;
}
组头描述索引的设置
// 组头
- (NSString )tableView:(UITableView )tableView titleForHeaderInSection:(NSInteger)section{
ZJCarGroup *carTitle = self.carGroups[section];
return carTitle.title;}
完成以上代码就可以实现对多组数据的展示。
注意:在ZJCarGroup中要引入ZJCar头文件并且在ZJCarGroup的字典转模型中要引入ZJCar里面的数据,这样才能把两组数据进行模型的整合。
三、单组数据展示
单组数据相比多组数据更容易些,在字典转模型时可以直接用KVC的方式快速进行转化,其他步骤和多组数据展示一样。
项目需求:
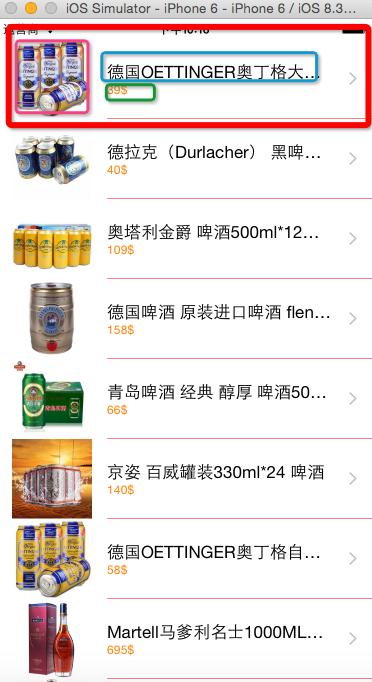
完成类似团购的tableView页面的展示,要求在页面上有图片,描述,价格等。
项目效果图:
实现思路:
(1)首先通过storyboard创建一个UITableView视图并且和控制器建立联系。
(2)导入用到的素材图片和plist文件。
(3)建立ZJWine的数据mox
(4)进行相应的字典转模型操作
(5)在控制器中遵守数据源协议,设置数据源对象,实现数据源方法。
项目编码过程:
代码实现过程:
ZJWine.h
/** 名字 */
@property (nonatomic ,copy)NSString *name;
/** 图片 */
@property (nonatomic ,copy)NSString *image;
/** 价格 */
@property (nonatomic ,copy)NSString *money;
+ (instancetype)modelWithDict:(NSDictionary *)dict;
ZJWine.m
+ (instancetype)modelWithDict:(NSDictionary *)dict{
ZJWine *wine = [[self alloc]init];
// 通过kvc直接赋值
[wine setValuesForKeysWithDictionary:dict];
return wine; }
在控制器viewController中
声明一个数组
@property (nonatomic ,strong)NSArray *wineGroup;
然后对数组进行懒加载
- (NSArray *)wineGroup{
    if (!_wineGroup) {
// 加载字典数组
 NSArray *wineDictArray = [NSArray arrayWithContentsOfFile:[[NSBundle mainBundle]pathForResource:@"wine.plist" ofType:nil]];
// 创建一个数组
NSMutableArray *wineArrayM = [NSMutableArray array];
// 将字典数组 - > 模型数组
for (NSDictionary *dict in wineDictArray) {
 [wineArrayM addObject:[ZJWine modelWithDict:dict]];

 }
   _wineGroup = wineArrayM;

 }
    return _wineGroup;
}
完成数据源的方法
// 行
- (NSInteger)tableView:(UITableView *)tableView numberOfRowsInSection:(NSInteger)section{
    return self.wineGroup.count;
}
UITableViewCell *cell = [[UITableViewCell
alloc]initWithStyle:UITableViewCellStyleSubtitle reuseIdentifier:nil];
// 取出indexPath位置对应的模型
ZJWine *wine = self.wineGroup[indexPath.row];
cell.textLabel.text = wine.name;
cell.imageView.image = [UIImage imageNamed:wine.image];
cell.detailTextLabel.text = [NSString stringWithFormat:@”%@$”,wine.money];
cell.detailTextLabel.textColor = [UIColor orangeColor]; return cell; }完成了以上代码就实现了单组数据的展示,但是性能比较差,在UITableViewCell中每次显示都要进行创建和销毁大大的影响了性能。
四、UITableView性能优化
上面单组数据展示的实例中,cell进入屏幕创建,离开屏幕销毁;频繁调用极耗性能如何解决呢?
利用tableView的缓存池,存放离开屏幕的cell
当cell进入屏幕后,先取缓存池若没有再新建
这样就可以只创建n+1个cell来展示所有数据
n表示屏幕上显示cell的最大数量
cell的循环利用
1.确定重用标识
2.static修饰局部变量是改变了生存期
3.static修饰全局变量主要是修改了作用域
4.根据标识从缓存池中取
5.封装若没有根据注册创建,拿到return,nil继续
6.nil后继续查看storyboard中是否有带重用标识的cell
7.若返回nil则手动创建
8.覆盖cell上的数据
9.返回cell
cell性能优化代码过程:
- (UITableViewCell *)tableView:(UITableView *)tableView cellForRowAtIndexPath:(NSIndexPath *)indexPath
{
    // 1.定义一个cell的标识
      static NSString *ID = @”cellID";
   // 2.从缓存池中取出cell
      UITableViewCell *cell = [tableView dequeueReusableCellWithIdentifier:ID];
   // 3.如果缓存池中没有cell
      if (cell == nil) {
        cell = [[UITableViewCell alloc] initWithStyle:UITableViewCellStyleSubtitle reuseIdentifier:ID];
cell的重用原理:
当滚动列表时,部分UITableViewCell会移出窗口,UITableView会将窗口外的UITableViewCell放入一个对象池中,等待重用。当UITableView要求dataSource返回UITableViewCell时,dataSource会先查看这个对象池,如果池中有未使用的UITableViewCell,dataSource会用新的数据配置这个UITableViewCell,然后返回给UITableView,重新显示到窗口中,从而避免创建新对象.
还有一个非常重要的问题:有时候需要自定义UITableViewCell(用一个子类继承UITableViewCell),而且每一行用的不一定是同一种UITableViewCell,所以一个UITableView可能拥有不同类型的UITableViewCell,对象池中也会有很多不同类型的UITableViewCell,那么UITableView在重用UITableViewCell时可能会得到错误类型的UITableViewCell
解决方案:UITableViewCell有个NSString *reuseIdentifier属性,可以在初始化UITableViewCell的时候传入一个特定的字符串标识来设置reuseIdentifier(一般用UITableViewCell的类名)。当UITableView要求dataSource返回UITableViewCell时,先通过一个字符串标识到对象池中查找对应类型的UITableViewCell对象,如果有,就重用,如果没有,就传入这个字符串标识来初始化一个UITableViewCell对象
五、性能优化 注册方法
1.先确定cell的重用标识
2.注册带重用标识的cell
3.从缓存池中取是否有带重用标识的cell(如果没有,系统会根据注册自动创建一个相应的cell返回给我们)
4.覆盖cell上面的数据
说明:当cell离开屏幕的时候,就会放到tableView的缓存池中,这时候缓存池才有数据
5.返回每行内容: 该方法,只有当cell显示在屏幕上的时候才会调用,是一种懒加载的思想
- (UITableViewCell )tableView:(UITableView )tableView cellForRowAtIndexPath:(NSIndexPath )indexPath {
// static修饰局部变量,局部变量从执行后始终存在, 但不能被其它函数使用, 当再次进入该函数时, 将保存上次的结果。其它与局部变量一样。
代码实现过程:
定义一个全局的变量:
NSString *ID = @”cellID”
然后在viewDidLoad中进行注册
[self.tableView registerClass:[UITableViewCell class]
forCellReuseIdentifier:ID];
在- (UITableViewCell )tableView:(UITableView )tableView cellForRowAtIndexPath:(NSIndexPath *)indexPath;数据源方法中:
// 先从缓存池中找,如果没有注册,则自动创建
UITableViewCell *cell = [tableView
dequeueReusableCellWithIdentifier:ID];
六、索引
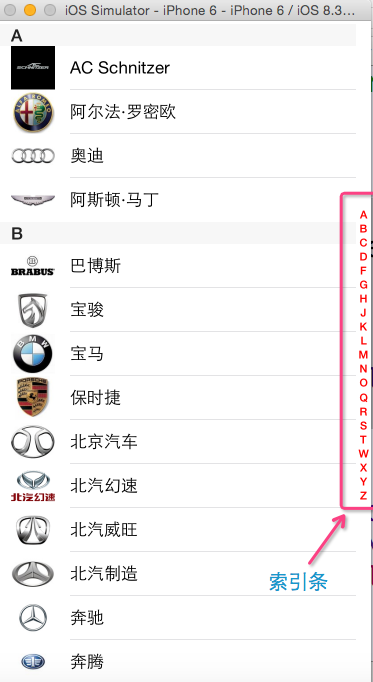
在多组数据展示的基础上我们实现索引条的实现。
索引的效果图:
实现思路:
在多组数据展示的基础上进行索引数据源方法的实现就可以完成次操作。
在多数据展示的控制器中实现如下方法就可以完成。
// 索引条数据源方法
- (NSArray )sectionIndexTitlesForTableView:(UITableView )tableView{
// 通过KVC直接来设置
return [self.carGroups valueForKey:@”title”]; }


 6632
6632

 被折叠的 条评论
为什么被折叠?
被折叠的 条评论
为什么被折叠?
 到【灌水乐园】发言


