


一、什么是Fragment
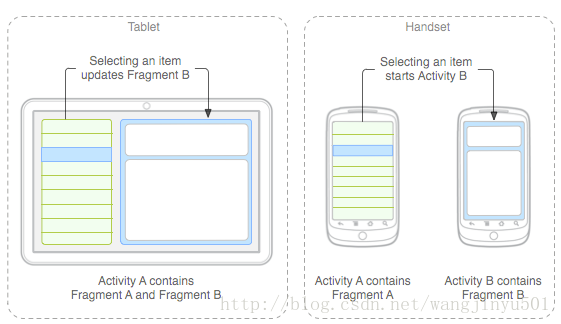
Android在3.0中引入了fragments的概念,主要目的是用在大屏幕设备上--例如平板电脑上,支持更加动态和灵活的UI设计。平板电脑的屏幕要比手机的大得多,有更多的空间来放更多的UI组件,并且这些组件之间会产生更多的交互。Fragment允许这样的一种设计,而不需要你亲自来管理 viewhierarchy的复杂变化。 通过将activity的布局分散到fragment中, 你可以在运行时修改activity的外观,并在由activity管理的back stack中保存那些变化。当一个片段指定了自身的布局时,它能和其他片段配置成不同的组合,在活动中为不同的屏幕尺寸修改布局配置(小屏幕可能每次显示一个片段,而大屏幕则可以显示两个或更多)。
二、谁在使用Fragment
- 网易新闻
- 网易云音乐
- 百度音乐
- 多米
- 豌豆荚
- 小米app
- Path
- Fuubo
- adding and removing Fragement可以做动画的效果,平滑过度
- 自动化堆栈管理,所以返回键可以删除动态添加的Fragment,最后销毁Activity,无需做过多判断
- 集成ActionBar的标签,可以替代TabHost,ActivityGrounp,与谷歌设计风格紧密结合
- 布局更加模块化.与原Activity中的Layout分块化,VCBase的分块化道理相同
- 灵活准确的生命周期去管理当前View的状态记录以及横竖屏处理
- Fragement管理的View,可同时使用在Phone和Pad上,一份代码两份机器,可重用性高
- Is a View, More than View
- 可以从startActivityForResult中接收到返回结果,但是View不能
- 唯一Id标识,可以从FragmentManager中获取id对应的Fragment
- Fragment之间的通讯依赖Activity使用接口管理并通知
四、如何使用Fragment
如果你的应用版本在3.0以上,那就直接使用Fragment就可以了,它在android.app.Fragment这个里面。如果版本低于3.0,那就需要使用android-support-v4.jar这个jar包了,Android Support Library(支持库)提供了包含一个API库的JAR文件,当你的应用运行在Android早期版本时,Support Library(支持库)允许你的应用使用一些最近版本的Android API。注意:现在创建程序的时候,默认会有android-support-v4.jar这个包,所以如果是3.0之后在继承Fragment时会有两个Fragment包,要选择android.app.Fragment。
你可以把fragment看作是activity的模块化组件,它拥有自己的生命周期,

接受它自己的输入事件,你也可以在运行activity的时候添加或者移除它(有点像可以在不同的activity中重用的“子activity”)。这节课演示怎么样使用Support Library继承Fragment类,如此你的app(应用)就能与运行android1.6老版本的系统设备兼容 。注意:如果你因为一些其他原因决定你的app需要的最低API版本为11或者更高,那你就没必要使用Support Library,而可以直接使用框架内置的Fragment类和相关API。我们分别使用来自Support Library的API和内置在平台(API),使用特定包名下的API跟内置在平台(API)的还是略有不同。
使用Fragment有两种方式:一是像在布局文件添加一个控件一样,在xml里面声明一个Fragment就行;例如下面这样:
- <LinearLayout xmlns:android="http://schemas.android.com/apk/res/android"
- android:orientation="horizontal"
- android:layout_width="fill_parent"
- android:layout_height="fill_parent">
- <fragment android:name="com.example.android.fragments.HeadlinesFragment"
- android:id="@+id/headlines_fragment"
- android:layout_weight="1"
- android:layout_width="0dp"
- android:layout_height="match_parent" />
- <fragment android:name="com.example.android.fragments.ArticleFragment"
- android:id="@+id/article_fragment"
- android:layout_weight="2"
- android:layout_width="0dp"
- android:layout_height="match_parent" />
- </LinearLayout>
   <LinearLayout xmlns:android="http://schemas.android.com/apk/res/android"
    android:orientation="horizontal"
    android:layout_width="fill_parent"
    android:layout_height="fill_parent">

    <fragment android:name="com.example.android.fragments.HeadlinesFragment"
              android:id="@+id/headlines_fragment"
              android:layout_weight="1"
              android:layout_width="0dp"
              android:layout_height="match_parent" />

    <fragment android:name="com.example.android.fragments.ArticleFragment"
              android:id="@+id/article_fragment"
              android:layout_weight="2"
              android:layout_width="0dp"
              android:layout_height="match_parent" />

</LinearLayout>- //得到一个fragment 事务(类似sqlite的操作)
- FragmentTransaction ft = getFragmentManager()
- .beginTransaction();
- ft.replace(R.id.details, details);//将得到的fragment 替换当前的viewGroup内容,add则不替换会依次累加
- ft.setTransition(FragmentTransaction.TRANSIT_FRAGMENT_FADE);//设置动画效果
- ft.commit();//提交
                    //得到一个fragment 事务(类似sqlite的操作)
                    FragmentTransaction ft = getFragmentManager()
                            .beginTransaction();
                    ft.replace(R.id.details, details);//将得到的fragment 替换当前的viewGroup内容,add则不替换会依次累加
                    ft.setTransition(FragmentTransaction.TRANSIT_FRAGMENT_FADE);//设置动画效果
                    ft.commit();//提交
1、先用第一中方式接受如何使用Fragment。
要创建一个fragment需要继承Fragment类,然后重写关键的生命周期方法插入你自己的应用逻辑,操作的方式跟创建一个Activity类似。
不同的是当你创建一个Fragment时,你必须使用onCreateView()回调去定义你的布局。事实上,这是唯一的需要让fragment获得运行的回调函数。例如,这里有一个简单的指定了自己布局的fragment:- import android.os.Bundle;
- import android.support.v4.app.Fragment;
- import android.view.LayoutInflater;
- import android.view.ViewGroup;
- public class ArticleFragment extends Fragment {
- @Override
- public View onCreateView(LayoutInflater inflater, ViewGroup container,
- Bundle savedInstanceState) {
- // Inflate the layout for this fragment
- return inflater.inflate(R.layout.article_view, container, false);
- }
- }
  import android.os.Bundle;
    import android.support.v4.app.Fragment;
    import android.view.LayoutInflater;
    import android.view.ViewGroup;

    public class ArticleFragment extends Fragment {
    @Override
    public View onCreateView(LayoutInflater inflater, ViewGroup container,
        Bundle savedInstanceState) {
        // Inflate the layout for this fragment
        return inflater.inflate(R.layout.article_view, container, false);
    }
}因为fragment是可重用的,模块化的UI组件,每一个Fragment实例必须与父类FragmentActivity相关联。你可以通过在你Activity布局XML文件中定义每一个fragment来获得关联。注意:FragmentActivity是在系统版本低于API level 11时由Support Library提供用来管理fragment的特殊activity。如果你支持的最低系统版本是API level 11或者更高,那你可以直接使用常规的Activity。以下是一个例子,当设备屏幕被认为“大”的时候,一个布局文件添加了两个fragment到activity。当屏幕比较大的时候(比如平板)是可以同时显示两个fragment的,但是屏幕比较小(比如普通手机)同一时间只能显示一个fragment,这是由于它们的屏幕尺寸造成的。这个布局文件被指定在“高”分辨率的目录名下。(译者注:请注意下面xml的目录结构:是在res目录下的layout-large目录下,这样的目录下存放的文件通常都是用来支持高分辨率的布局文件)res/layout-large/news_articles.xml:
- <LinearLayout xmlns:android="http://schemas.android.com/apk/res/android"
- android:orientation="horizontal"
- android:layout_width="fill_parent"
- android:layout_height="fill_parent">
- <fragment android:name="com.example.android.fragments.HeadlinesFragment"
- android:id="@+id/headlines_fragment"
- android:layout_weight="1"
- android:layout_width="0dp"
- android:layout_height="match_parent" />
- <fragment android:name="com.example.android.fragments.ArticleFragment"
- android:id="@+id/article_fragment"
- android:layout_weight="2"
- android:layout_width="0dp"
- android:layout_height="match_parent" />
- </LinearLayout>
   <LinearLayout xmlns:android="http://schemas.android.com/apk/res/android"
    android:orientation="horizontal"
    android:layout_width="fill_parent"
    android:layout_height="fill_parent">

    <fragment android:name="com.example.android.fragments.HeadlinesFragment"
              android:id="@+id/headlines_fragment"
              android:layout_weight="1"
              android:layout_width="0dp"
              android:layout_height="match_parent" />

    <fragment android:name="com.example.android.fragments.ArticleFragment"
              android:id="@+id/article_fragment"
              android:layout_weight="2"
              android:layout_width="0dp"
              android:layout_height="match_parent" />

</LinearLayout>- import android.os.Bundle;
- import android.support.v4.app.FragmentActivity;
- public class MainActivity extends FragmentActivity {
- @Override
- public void onCreate(Bundle savedInstanceState) {
- super.onCreate(savedInstanceState);
- setContentView(R.layout.news_articles);
- }
- }
import android.os.Bundle;
    import android.support.v4.app.FragmentActivity;

    public class MainActivity extends FragmentActivity {
    @Override
    public void onCreate(Bundle savedInstanceState) {
        super.onCreate(savedInstanceState);
        setContentView(R.layout.news_articles);
    }
}LeftFragment类:
- package com.example.teblets;
- import android.app.Activity;
- import android.app.Fragment;
- import android.os.Bundle;
- import android.view.LayoutInflater;
- import android.view.View;
- import android.view.ViewGroup;
- public class LeftFragment extends Fragment {
- @Override
- public void onAttach(Activity activity) {
- // TODO Auto-generated method stub
- super.onAttach(activity);
- System.out.println("LeftFragment onAttach");
- }
- @Override
- public void onCreate(Bundle savedInstanceState) {
- // TODO Auto-generated method stub
- super.onCreate(savedInstanceState);
- System.out.println("LeftFragment onCreate");
- }
- @Override
- public View onCreateView(LayoutInflater inflater, ViewGroup container,
- Bundle savedInstanceState) {
- // TODO Auto-generated method stub
- return inflater.inflate(R.layout.fragment_left, container,true);
- }
- @Override
- public void onDestroy() {
- // TODO Auto-generated method stub
- super.onDestroy();
- System.out.println("LeftFragment onDestroy");
- }
- @Override
- public void onDestroyView() {
- // TODO Auto-generated method stub
- super.onDestroyView();
- System.out.println("LeftFragment onDestroyView");
- }
- @Override
- public void onPause() {
- // TODO Auto-generated method stub
- super.onPause();
- System.out.println("LeftFragment onPause");
- }
- @Override
- public void onResume() {
- // TODO Auto-generated method stub
- super.onResume();
- System.out.println("LeftFragment onResume");
- }
- @Override
- public void onStart() {
- // TODO Auto-generated method stub
- super.onStart();
- System.out.println("LeftFragment onStart");
- }
- @Override
- public void onStop() {
- // TODO Auto-generated method stub
- super.onStop();
- System.out.println("LeftFragment onStop");
- }
- }
package com.example.teblets;

import android.app.Activity;
import android.app.Fragment;
import android.os.Bundle;
import android.view.LayoutInflater;
import android.view.View;
import android.view.ViewGroup;

public class LeftFragment extends Fragment {

	@Override
	public void onAttach(Activity activity) {
		// TODO Auto-generated method stub
		super.onAttach(activity);
		System.out.println("LeftFragment onAttach");
	}

	@Override
	public void onCreate(Bundle savedInstanceState) {
		// TODO Auto-generated method stub
		super.onCreate(savedInstanceState);
		System.out.println("LeftFragment onCreate");
	}

	@Override
	public View onCreateView(LayoutInflater inflater, ViewGroup container,
			Bundle savedInstanceState) {
		// TODO Auto-generated method stub
		return inflater.inflate(R.layout.fragment_left, container,true);

	}

	@Override
	public void onDestroy() {
		// TODO Auto-generated method stub
		super.onDestroy();
		System.out.println("LeftFragment onDestroy");
	}

	@Override
	public void onDestroyView() {
		// TODO Auto-generated method stub
		super.onDestroyView();
		System.out.println("LeftFragment onDestroyView");
	}

	@Override
	public void onPause() {
		// TODO Auto-generated method stub
		super.onPause();
		System.out.println("LeftFragment onPause");
	}

	@Override
	public void onResume() {
		// TODO Auto-generated method stub
		super.onResume();
		System.out.println("LeftFragment onResume");
	}

	@Override
	public void onStart() {
		// TODO Auto-generated method stub
		super.onStart();
		System.out.println("LeftFragment onStart");
	}

	@Override
	public void onStop() {
		// TODO Auto-generated method stub
		super.onStop();
		System.out.println("LeftFragment onStop");
	}


}
LeftFragment对应的布局文件:
- <?xml version="1.0" encoding="utf-8"?>
- <LinearLayout xmlns:android="http://schemas.android.com/apk/res/android"
- android:layout_width="match_parent"
- android:layout_height="match_parent"
- android:background="@android:color/holo_orange_dark"
- android:orientation="vertical" >
- <Button
- android:id="@+id/previous_button"
- android:layout_width="fill_parent"
- android:layout_height="wrap_content"
- android:text="@string/previous_button" />
- <Button
- android:id="@+id/next_button"
- android:layout_width="fill_parent"
- android:layout_height="wrap_content"
- android:text="@string/next_button" />
- <Button
- android:id="@+id/exit_button"
- android:layout_width="fill_parent"
- android:layout_height="wrap_content"
- android:text="@string/exit_button" />
- </LinearLayout>
<?xml version="1.0" encoding="utf-8"?>
 <LinearLayout xmlns:android="http://schemas.android.com/apk/res/android"
     android:layout_width="match_parent"
     android:layout_height="match_parent"
     android:background="@android:color/holo_orange_dark"
     android:orientation="vertical" >

     <Button
 android:id="@+id/previous_button"
         android:layout_width="fill_parent"
         android:layout_height="wrap_content"
         android:text="@string/previous_button" />

     <Button
 android:id="@+id/next_button"
         android:layout_width="fill_parent"
         android:layout_height="wrap_content"
         android:text="@string/next_button" />

     <Button
 android:id="@+id/exit_button"
         android:layout_width="fill_parent"
         android:layout_height="wrap_content"
         android:text="@string/exit_button" />

</LinearLayout>- package com.example.teblets;
- import android.app.Activity;
- import android.app.Fragment;
- import android.os.Bundle;
- import android.view.LayoutInflater;
- import android.view.View;
- import android.view.ViewGroup;
- public class RightFragment extends Fragment {
- @Override
- public void onAttach(Activity activity) {
- // TODO Auto-generated method stub
- super.onAttach(activity);
- System.out.println("LeftFragment onAttach");
- }
- @Override
- public void onCreate(Bundle savedInstanceState) {
- // TODO Auto-generated method stub
- super.onCreate(savedInstanceState);
- System.out.println("LeftFragment onCreate");
- }
- @Override
- public View onCreateView(LayoutInflater inflater, ViewGroup container,
- Bundle savedInstanceState) {
- // TODO Auto-generated method stub
- return inflater.inflate(R.layout.fragment_right, container,true);
- }
- @Override
- public void onDestroy() {
- // TODO Auto-generated method stub
- super.onDestroy();
- System.out.println("LeftFragment onDestroy");
- }
- @Override
- public void onDestroyView() {
- // TODO Auto-generated method stub
- super.onDestroyView();
- System.out.println("LeftFragment onDestroyView");
- }
- @Override
- public void onPause() {
- // TODO Auto-generated method stub
- super.onPause();
- System.out.println("LeftFragment onPause");
- }
- @Override
- public void onResume() {
- // TODO Auto-generated method stub
- super.onResume();
- System.out.println("LeftFragment onResume");
- }
- @Override
- public void onStart() {
- // TODO Auto-generated method stub
- super.onStart();
- System.out.println("LeftFragment onStart");
- }
- @Override
- public void onStop() {
- // TODO Auto-generated method stub
- super.onStop();
- System.out.println("LeftFragment onStop");
- }
- }
package com.example.teblets;

import android.app.Activity;
import android.app.Fragment;
import android.os.Bundle;
import android.view.LayoutInflater;
import android.view.View;
import android.view.ViewGroup;

public class RightFragment extends Fragment {

	@Override
	public void onAttach(Activity activity) {
		// TODO Auto-generated method stub
		super.onAttach(activity);
		System.out.println("LeftFragment onAttach");
	}

	@Override
	public void onCreate(Bundle savedInstanceState) {
		// TODO Auto-generated method stub
		super.onCreate(savedInstanceState);
		System.out.println("LeftFragment onCreate");
	}

	@Override
	public View onCreateView(LayoutInflater inflater, ViewGroup container,
			Bundle savedInstanceState) {
		// TODO Auto-generated method stub
		return inflater.inflate(R.layout.fragment_right, container,true);

	}

	@Override
	public void onDestroy() {
		// TODO Auto-generated method stub
		super.onDestroy();
		System.out.println("LeftFragment onDestroy");
	}

	@Override
	public void onDestroyView() {
		// TODO Auto-generated method stub
		super.onDestroyView();
		System.out.println("LeftFragment onDestroyView");
	}

	@Override
	public void onPause() {
		// TODO Auto-generated method stub
		super.onPause();
		System.out.println("LeftFragment onPause");
	}

	@Override
	public void onResume() {
		// TODO Auto-generated method stub
		super.onResume();
		System.out.println("LeftFragment onResume");
	}

	@Override
	public void onStart() {
		// TODO Auto-generated method stub
		super.onStart();
		System.out.println("LeftFragment onStart");
	}

	@Override
	public void onStop() {
		// TODO Auto-generated method stub
		super.onStop();
		System.out.println("LeftFragment onStop");
	}


}
- <?xml version="1.0" encoding="utf-8"?>
- <LinearLayout xmlns:android="http://schemas.android.com/apk/res/android"
- android:layout_width="match_parent"
- android:layout_height="match_parent"
- android:orientation="vertical" >
- <TextView
- android:id="@+id/show_message"
- android:layout_width="fill_parent"
- android:layout_height="fill_parent"
- android:background="@android:color/holo_blue_dark"
- android:text="@string/show_message" />
- </LinearLayout>
<?xml version="1.0" encoding="utf-8"?>
 <LinearLayout xmlns:android="http://schemas.android.com/apk/res/android"
     android:layout_width="match_parent"
     android:layout_height="match_parent"
     android:orientation="vertical" >

     <TextView
 android:id="@+id/show_message"
         android:layout_width="fill_parent"
         android:layout_height="fill_parent"
         android:background="@android:color/holo_blue_dark"
         android:text="@string/show_message" />

</LinearLayout>- <?xml version="1.0" encoding="utf-8"?>
- <LinearLayout xmlns:android="http://schemas.android.com/apk/res/android"
- android:layout_width="fill_parent"
- android:layout_height="fill_parent"
- android:baselineAligned="false"
- android:orientation="horizontal" >
- <fragment
- android:id="@+id/left_fragment"
- android:name="com.example.teblets.LeftFragment"
- android:layout_width="match_parent"
- android:layout_height="fill_parent"
- android:layout_weight="3" />
- <fragment
- android:id="@+id/right_fragment"
- android:name="com.example.teblets.RightFragment"
- android:layout_width="match_parent"
- android:layout_height="fill_parent"
- android:layout_weight="1" />
- </LinearLayout>
<?xml version="1.0" encoding="utf-8"?>
<LinearLayout xmlns:android="http://schemas.android.com/apk/res/android"
    android:layout_width="fill_parent"
    android:layout_height="fill_parent"
    android:baselineAligned="false"
    android:orientation="horizontal" >

    <fragment
        android:id="@+id/left_fragment"
        android:name="com.example.teblets.LeftFragment"
        android:layout_width="match_parent"
        android:layout_height="fill_parent"
        android:layout_weight="3" />

    <fragment
        android:id="@+id/right_fragment"
        android:name="com.example.teblets.RightFragment"
        android:layout_width="match_parent"
        android:layout_height="fill_parent"
        android:layout_weight="1" />

</LinearLayout>
在Activity中的布局文件中加入Fragment标签,其中android:name属性对应的就是自定义Fragment类的全名,系统会根据这个调用指定的Fragment的onCreateView()方法来得到这个Fragment的布局,然后加入Activity中. onCreateView()方法中的Container参数就是这时候传递过去的。显示结果:

打开程序时生命周期显示:
按返回键时生命周期显示:
2、动态使用Fragment
相比上节课提到的使用标签在布局文件中为activity定义一个fragment组件,更好的方式是在activity运行时添加fragment。如果你想在activity的生命周期中变换fragment的话就必须这样做。执行类似添加或者删除fragment的事务,你必须使用FragmentManager创建一个FragmentTransaction,它提供了添加,删除以及其他fragment事务的API。如果你的activity允许移除或者替换fragment,你应该在activity的onCreate())方法中添加初始化的fragment。在你处理fragment(尤其是你在运行时添加的那些)的时候,有一个很重要的规则就是你的fragment放置位置的布局中必须有一个视图容器。下面这个布局是上节课在同一时间只显示一个fragment布局的替代品。为了将一个fragment替换成另一个,这个activity布局包含了一个空的FrameLayout作为fragment容器。注意这个文件名跟上节课的布局文件名字一样,但是这个布局并没有指定在“高分辨率”目录中(译者注:请注意下面xml的路径,res/layout这个layout文件夹并没有像上节课提到的是一个layout-large文件夹),如此这个布局是用在比large更小的设备屏幕上,因为这个屏幕不能在同一时间充满两个fragment。res/layout/news_articles.xml:
- <FrameLayout xmlns:android="http://schemas.android.com/apk/res/android"
- android:id="@+id/fragment_container"
- android:layout_width="match_parent"
- android:layout_height="match_parent" />
 <FrameLayout xmlns:android="http://schemas.android.com/apk/res/android"
    android:id="@+id/fragment_container"
    android:layout_width="match_parent"
android:layout_height="match_parent" />你可以对activity使用同一个FragmentTransaction对象去执行多个fragment事务,当你确定要做这些操作时,你必须调用 commit()方法。
例如,以下代码演示怎样添加一个fragment到前面的layout:
- import android.os.Bundle;
- import android.support.v4.app.FragmentActivity;
- public class MainActivity extends FragmentActivity {
- @Override
- public void onCreate(Bundle savedInstanceState) {
- super.onCreate(savedInstanceState);
- setContentView(R.layout.news_articles);
- // Check that the activity is using the layout version with
- // the fragment_container FrameLayout
- if (findViewById(R.id.fragment_container) != null) {
- // However, if we're being restored from a previous state,
- // then we don't need to do anything and should return or else
- // we could end up with overlapping fragments.
- if (savedInstanceState != null) {
- return;
- }
- // Create an instance of ExampleFragment
- HeadlinesFragment firstFragment = new HeadlinesFragment();
- // In case this activity was started with special instructions from an Intent,
- // pass the Intent's extras to the fragment as arguments
- firstFragment.setArguments(getIntent().getExtras());
- // Add the fragment to the 'fragment_container' FrameLayout
- getSupportFragmentManager().beginTransaction()
- .add(R.id.fragment_container, firstFragment).commit();
- }
- }
- }
import android.os.Bundle;
import android.support.v4.app.FragmentActivity;

    public class MainActivity extends FragmentActivity {
    @Override
    public void onCreate(Bundle savedInstanceState) {
        super.onCreate(savedInstanceState);
        setContentView(R.layout.news_articles);

        // Check that the activity is using the layout version with
        // the fragment_container FrameLayout
        if (findViewById(R.id.fragment_container) != null) {

            // However, if we're being restored from a previous state,
            // then we don't need to do anything and should return or else
            // we could end up with overlapping fragments.
            if (savedInstanceState != null) {
                return;
            }

            // Create an instance of ExampleFragment
            HeadlinesFragment firstFragment = new HeadlinesFragment();

            // In case this activity was started with special instructions from an Intent,
            // pass the Intent's extras to the fragment as arguments
            firstFragment.setArguments(getIntent().getExtras());

            // Add the fragment to the 'fragment_container' FrameLayout
            getSupportFragmentManager().beginTransaction()
                    .add(R.id.fragment_container, firstFragment).commit();
        }
    }
}需要注意的是,当你执行fragment事务时,比如替换或者删除一个fragment。允许用户“后退”或者“撤销”改变通常是比较合适的做法。为了让用户可以通过fragment事务“后退”,你必须在你提交fragment事务之前调用 addToBackStack()方法。当你移除或者替换fragment且将事务添加到堆栈中时,被移除的fragment是被停止了(没有消亡)。如果用户导航回来重新加载这个fragment,它将会重新启动;如果你没有把事务加入到堆栈中,当fragment被删除或者替换时,这个fragment也就消亡了;
以下使用fragment替换另一个的例子:
- // Create fragment and give it an argument specifying the article it should show
- ArticleFragment newFragment = new ArticleFragment();
- Bundle args = new Bundle();
- args.putInt(ArticleFragment.ARG_POSITION, position);
- newFragment.setArguments(args);
- FragmentTransaction transaction = getSupportFragmentManager().beginTransaction();
- // Replace whatever is in the fragment_container view with this fragment,
- // and add the transaction to the back stack so the user can navigate back
- transaction.replace(R.id.fragment_container, newFragment);
- transaction.addToBackStack(null);
- // Commit the transaction
- transaction.commit();
    // Create fragment and give it an argument specifying the article it should show
    ArticleFragment newFragment = new ArticleFragment();
    Bundle args = new Bundle();
    args.putInt(ArticleFragment.ARG_POSITION, position);
    newFragment.setArguments(args);

    FragmentTransaction transaction = getSupportFragmentManager().beginTransaction();

    // Replace whatever is in the fragment_container view with this fragment,
    // and add the transaction to the back stack so the user can navigate back
    transaction.replace(R.id.fragment_container, newFragment);
    transaction.addToBackStack(null);

    // Commit the transaction
transaction.commit();为了重用Fragment UI组件,你应该将Fragment建立成完全独立,模块化并且定义了自己布局和行为的组件。一旦你定义了这些可重用的Fragment,你可以通过activity,应用程序逻辑使它们关联,交互以组成一个整体复合型UI。
通常情况下,你希望一个Fragment可以与另一个交互,比如基于用户事件去修改内容。所有Fragment到Fragment的交互都是通过相关联的activity来做的。两个fragment应该从不直接交互。
为了允许Fragment与它的activity交互,你可以在fragment类中定义一个接口并且在activity中实现它。fragment可以在生命周期中的onAttach()方法获取接口的实现并调用接口的方法与activity交互。以下是fragment到activity的交互例子:
- public class HeadlinesFragment extends ListFragment {
- OnHeadlineSelectedListener mCallback;
- // Container Activity must implement this interface
- public interface OnHeadlineSelectedListener {
- public void onArticleSelected(int position);
- }
- @Override
- public void onAttach(Activity activity) {
- super.onAttach(activity);
- // This makes sure that the container activity has implemented
- // the callback interface. If not, it throws an exception
- try {
- mCallback = (OnHeadlineSelectedListener) activity;
- } catch (ClassCastException e) {
- throw new ClassCastException(activity.toString()
- + " must implement OnHeadlineSelectedListener");
- }
- }
- ...
- }
public class HeadlinesFragment extends ListFragment {
    OnHeadlineSelectedListener mCallback;

    // Container Activity must implement this interface
    public interface OnHeadlineSelectedListener {
        public void onArticleSelected(int position);
    }

    @Override
    public void onAttach(Activity activity) {
        super.onAttach(activity);

        // This makes sure that the container activity has implemented
        // the callback interface. If not, it throws an exception
        try {
            mCallback = (OnHeadlineSelectedListener) activity;
        } catch (ClassCastException e) {
            throw new ClassCastException(activity.toString()
                    + " must implement OnHeadlineSelectedListener");
        }
    }

    ...
}例如,当用户点击list item(list子项)时就会调用下面在fragment的方法。fragment使用回调接口提供事件到父的activity。
- @Override
- public void onListItemClick(ListView l, View v, int position, long id) {
- // Send the event to the host activity
- mCallback.onArticleSelected(position);
- }
@Override
    public void onListItemClick(ListView l, View v, int position, long id) {
        // Send the event to the host activity
        mCallback.onArticleSelected(position);
}例如:下面这个activity就实现了上一例子中的接口:
- public static class MainActivity extends Activity
- implements HeadlinesFragment.OnHeadlineSelectedListener{
- ...
- public void onArticleSelected(Uri articleUri) {
- // The user selected the headline of an article from the HeadlinesFragment
- // Do something here to display that article
- }
- }
public static class MainActivity extends Activity
        implements HeadlinesFragment.OnHeadlineSelectedListener{
    ...

    public void onArticleSelected(Uri articleUri) {
        // The user selected the headline of an article from the HeadlinesFragment
        // Do something here to display that article
    }
}例如,假设在上面显示的那个activity中可能包含另外一个fragment,并且用来显示由上面那个回调方法返回的数据指定的项目。在这个案例中,这个activity可以从回调函数中获得信息并且传递给其他显示项目的fragment:
- public static class MainActivity extends Activity
- implements HeadlinesFragment.OnHeadlineSelectedListener{
- ...
- public void onArticleSelected(int position) {
- // The user selected the headline of an article from the HeadlinesFragment
- // Do something here to display that article
- ArticleFragment articleFrag = (ArticleFragment)
- getSupportFragmentManager().findFragmentById(R.id.article_fragment);
- if (articleFrag != null) {
- // If article frag is available, we're in two-pane layout...
- // Call a method in the ArticleFragment to update its content
- articleFrag.updateArticleView(position);
- } else {
- // Otherwise, we're in the one-pane layout and must swap frags...
- // Create fragment and give it an argument for the selected article
- ArticleFragment newFragment = new ArticleFragment();
- Bundle args = new Bundle();
- args.putInt(ArticleFragment.ARG_POSITION, position);
- newFragment.setArguments(args);
- FragmentTransaction transaction = getSupportFragmentManager().beginTransaction();
- // Replace whatever is in the fragment_container view with this fragment,
- // and add the transaction to the back stack so the user can navigate back
- transaction.replace(R.id.fragment_container, newFragment);
- transaction.addToBackStack(null);
- // Commit the transaction
- transaction.commit();
- }
- }
- }
public static class MainActivity extends Activity
        implements HeadlinesFragment.OnHeadlineSelectedListener{
    ...

    public void onArticleSelected(int position) {
        // The user selected the headline of an article from the HeadlinesFragment
        // Do something here to display that article

        ArticleFragment articleFrag = (ArticleFragment)
                getSupportFragmentManager().findFragmentById(R.id.article_fragment);

        if (articleFrag != null) {
            // If article frag is available, we're in two-pane layout...

            // Call a method in the ArticleFragment to update its content
            articleFrag.updateArticleView(position);
        } else {
            // Otherwise, we're in the one-pane layout and must swap frags...

            // Create fragment and give it an argument for the selected article
            ArticleFragment newFragment = new ArticleFragment();
            Bundle args = new Bundle();
            args.putInt(ArticleFragment.ARG_POSITION, position);
            newFragment.setArguments(args);

            FragmentTransaction transaction = getSupportFragmentManager().beginTransaction();

            // Replace whatever is in the fragment_container view with this fragment,
            // and add the transaction to the back stack so the user can navigate back
            transaction.replace(R.id.fragment_container, newFragment);
            transaction.addToBackStack(null);

            // Commit the transaction
            transaction.commit();
        }
    }
}


五、应用案例
1、Fragment+FragmentTabHost实现仿新浪微博底部菜单栏:TabHost其实已经被弃用了,这个例子就是用来体现一下Fragment的用法,很简单在切换TabHost的时候加载Fragment。个人觉得意义不大,还不如那种直接加载Activity,里面再嵌套Fragment来的实在。
2、通过SlidingMenu+Fragment实现当前最流行的侧滑:
3、 基于Android Fragment功能的例子:这个例子Fragment之间的交互没有使用接口的形式,而是直接调用,这样做比较方便,但是不规范。
4、Android开发 侧边滑动菜单栏SlidingMenu结合Fragment
5、Implementing ActionBarSherlock Fragment Tabs in Android
六、注意事项
1、如果你想在Fragment 里面创建menu,则必须在onCreate的时候设置让它可以存在optionMenu才可以创建,代码为:
- public static class DetailsFragment extends Fragment {
- @Override
- public void onCreate(Bundle savedInstanceState) {
- // TODO Auto-generated method stub
- super.onCreate(savedInstanceState);
- setHasOptionsMenu(true);
- }
- }
public static class DetailsFragment extends Fragment {

             @Override

             public void onCreate(Bundle savedInstanceState) {

                 // TODO Auto-generated method stub

                 super.onCreate(savedInstanceState);

                 setHasOptionsMenu(true);

             }

}1.使用接口,让Activity扮演管理角色,负责分发消息到该窗口的子View
该方案的缺点
- 不方便使用单元测试
- 随着应用功能的增加,需要监听的事件越来越多,导致越来越多的接口声明以及绑定
该方案的缺点
- 不方便单元测试,需要实例化Intent,填装Intent的数据,实现Broadcast receivers以及再次提取Intent中的数据
- receiver中不可做耗时操作,因为reciver是限时进程,10秒后会被系统kill掉,如果需要做耗时操作,需另外启Service来完成
- 消息订阅者:Activity or Fragment等订阅类注册自己到EventBus中
- 消息发布者:只负责发布消息以及消息包装数据到EventBus
- 回调基于命名约定以及消息包装对象
- 方便的单元测试
七、总结归纳
Fragment是3.0之后一个很重要的API,要深刻理解和掌握。
八、Fragment开源项目
1、https://github.com/johnkil/Android-ProgressFragment
2、Implementing Fragment Tabs in Android
八、Demo下载
九、推荐博客:http://www.vogella.com/articles/AndroidFragments/article.html
转载:http://blog.csdn.net/wangjinyu501/article/details/9315139


 5855
5855


 被折叠的 条评论
为什么被折叠?
被折叠的 条评论
为什么被折叠?
 到【灌水乐园】发言


