


struts2+spring+mybatis框架整合详细介绍
发表于2016/5/25 15:41:40 7110人阅读
分类: 框架整合 spring整合 web.xml学习
一、问题的提出
最近一直在看各种主流javaweb框架,感触颇深,一个好的框架可以让你的程序代码变得相当的明了,也便于后期的维护!目前用到的主流框架包括struts2+spring+mybatis和spring+springmvc+mybatis(注:个人觉得mybatis框架很好用,所以框架基本都会选择用mybatis)。其实很多的小伙伴都想自己配置个框架,但是基于怕报错啊、引入jar包、程序调试啊等等问题都放弃了!基于这个现象,本人在这里就详细的介绍下本人配置框架的详细过程,希望对读者有所帮助。
二、引入jar包
这个问题一直是想搭建框架的小伙伴们的最大的一个障碍!很多人就是由于不知道导入什么样的jar而犯愁!对于这个问题我个人的想法是,jar包都是向下兼容的所以你大可不用担心你的jar包版本不对的问题,尽可能下载版本靠后的jar包就能解决这个问题。其次是不知道要导入多少个jar包,这确实是个棘手的问题,对于这个问题我的解决方案是:首选是在网上查找,这方面的资料网上还是很全面的 什么jar都可以下载 ,其次是注意struts2 以及spring 等的官网,官网上也会有详细的介绍每个jar的功能。这里我就不在详细的描述了。下面是我这个框架搭建需要的jar包截图,如果有需要jar包的可私下联系我,大家共同学习。

三、配置框架
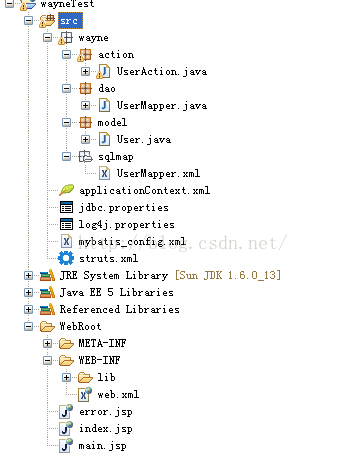
1、首先让大家看看我配置完后的框架图,再来讲述我配置的流程
2、配置流程
2.1、首先任何一个系统都需要有其对应的数据库,这里我用的是mysql数据库,首先在数据库里新建个数据库,注意数据库的字符集最好选为utf-8的这样能防止数据库中文字符乱码。由于我只是配置框架,所以我新建数据库名为wayneTest数据库里也只建了一张表,如下图:

2.2、建好数据库后,我用了个工具Mybatis Generator自动生成model类,dao,mapper文件.这个工具的详细的用法网上也很多,如果读者不懂得话也可以私下联系我
这里给你们个链接 Mybatis 主页 http://code.google.com/p/mybatis/ 上下载 Mybatis mybatis-generator-core 。具体用法可参考http://qiuguo0205.iteye.com/blog/819100
2.3、把这些生成好的代码放到项目下,接下来就是配置文件的书写了,我分为以下几步:
2.3.1、书写jdbc.properties配置文件,为什么首先书写这个配置文件呢?因为项目肯定是要连接数据库的,接下来的spring的配置文件也会用到这个配置文件
db.driver=com.mysql.jdbc.Driver
db.url=jdbc:mysql://127.0.0.1:3306/wayneTest?<span style="color:#ff6666;">characterEncoding=UTF-8</span>
db.username=root
db.password=wayne
其中?characterEncoding=UTF-8这段代码是为了确保编码的一致性(注意代码中的”?“一定不能少。这个原因相信大家都懂得,不懂私下找我)这一段代码相信大家都能看懂,就是配置数据库连接访问的路径和用户名及密码。
2.3.2、书写log4j.properties配置文件,为什么接下来书写这个文件呢?因为这个文件是由于打印控制台信息以及保存项目运行日志的配置文件,虽说与框架没什么关系,但是还是很需要配置的,应为他可以起到查看程序运行日志啊打印程序执行sql等功能,方便调试和维护。(个人强烈建议任何项目都配上这个日志文件)
# Create names for settings
log4j.rootCategory=INFO, fileOut,stdout
log4j.appender.fileOut=org.apache.log4j.RollingFileAppender
log4j.appender.fileOut.File=${wayneTest.root}/WEB-INF/logs/igp_error.log
log4j.appender.dataerr=org.apache.log4j.ConsoleAppender
log4j.appender.fileOut.MaxFileSize=2000KB
log4j.appender.fileOut.MaxBackupIndex=2
log4j.appender.fileOut.layout=org.apache.log4j.PatternLayout
log4j.appender.fileOut.layout.ConversionPattern=%-2d{yyyy-MM-dd HH:mm} [%t] %5p %c:%L - %m%n
log4j.appender.fileOut.Threshold=INFO
#log4j.logger.com.ibatis=DEBUG
#log4j.logger.com.ibatis.common.jdbc.SimpleDataSource=DEBUG
#log4j.logger.com.ibatis.common.jdbc.ScriptRunner=DEBUG
#log4j.logger.com.ibatis.sqlmap.engine.impl.SqlMapClientDelegate=DEBUG
log4j.logger.java.sql.Connection=DEBUG
#log4j.logger.java.sql.Statement=DEBUG
#log4j.logger.java.sql.PreparedStatement=DEBUG
#log4j.logger.java.sql.ResultSet=DEBUG
log4j.appender.stdout=org.apache.log4j.ConsoleAppender
log4j.appender.stdout.layout=org.apache.log4j.PatternLayout
log4j.appender.stdout.layout.ConversionPattern=[%d] [%-5p] %c %n--%m--%n
这里是这个配置文件的详细配置,其中 <span style="font-family: Arial, Helvetica, sans-serif;">log4j.logger.java.sql.Connection=DEBUG 这一句是打印程序执行的sql语句的(个人认为很有必要配出来),关于这些配置文件的意义,我给大家推荐链接 </span><span style="font-family: Arial, Helvetica, sans-serif;">http://blog.csdn.net/weiluo12/article/details/8185662</span>2.3.3、书写mybatis_config.xml配置文件,这个配置文件主要是用来设置的,比如是否启用缓存、数据库超时时间、字段映射、<a target=_blank href="https://www.baidu.com/s?wd=%E5%BB%B6%E8%BF%9F%E5%8A%A0%E8%BD%BD&tn=44039180_cpr&fenlei=mv6quAkxTZn0IZRqIHckPjm4nH00T1dWuWmsnvf4PAcLujnLPvnd0ZwV5Hcvrjm3rH6sPfKWUMw85HfYnjn4nH6sgvPsT6KdThsqpZwYTjCEQLGCpyw9Uz4Bmy-bIi4WUvYETgN-TLwGUv3EnHDkn10sP1fkPWDsnHTkPjnLrf" target="_blank" class="baidu-highlight" rel="nofollow">延迟加载</a>、配置分页等等,很有用这些配置。但是对于新手来说作用不大,可以不进行任何配置。当然了解学习下还是很好的,<span style="font-family: Arial, Helvetica, sans-serif;">我给大家推荐链接http://blog.csdn.net/liuzhen917/article/details/37876727</span><span style="font-family: Arial, Helvetica, sans-serif;"></span><pre name="code" class="html"><?xml version="1.0" encoding="UTF-8" ?>
<!DOCTYPE configuration PUBLIC "-//mybatis.org//DTD Config 3.0//EN" "http://mybatis.org/dtd/mybatis-3-config.dtd">
<configuration>
<!--
<typeAliases>
<typeAlias alias="user" type="wayne.model.User"/>
</typeAliases>
<mappers>
<mapper resource="wayne/sqlmap/UserMapper.xml"/>
</mappers>
-->
</configuration>2.3.4、书写applicationContext.xml配置文件,这个文件很重要,相当重要,下面我给出这部分的代码,我会详细介绍这部分内容<pre name="code" class="html"><?xml version="1.0" encoding="UTF-8"?>
<beans xmlns="http://www.springframework.org/schema/beans"
xmlns:aop="http://www.springframework.org/schema/aop"
xmlns:tx="http://www.springframework.org/schema/tx"
xmlns:xsi="http://www.w3.org/2001/XMLSchema-instance"
xsi:schemaLocation="http://www.springframework.org/schema/beans
http://www.springframework.org/schema/beans/spring-beans-3.0.xsd
http://www.springframework.org/schema/aop
http://www.springframework.org/schema/aop/spring-aop-3.0.xsd
http://www.springframework.org/schema/tx
http://www.springframework.org/schema/tx/spring-tx-3.0.xsd ">
<!-- 配置DataSource数据源 -->
<bean class="org.springframework.beans.factory.config.PropertyPlaceholderConfigurer">
<property name="locations">
<!-- 导入属性配置文件 -->
<value>classpath:jdbc.properties</value>
</property>
</bean>
<!--配置数据连接-->
<bean id="dataSource" class="org.springframework.jdbc.datasource.DriverManagerDataSource">
<!-- 指定连接数据库的JDBC驱动 -->
<property name="driverClassName" value="${db.driver}" />
<!-- 连接数据库所用的URL -->
<property name="url" value="${db.url}" />
<!-- 连接数据库的用户名 -->
<property name="username" value="${db.username}" />
<!-- 连接数据库的密码 -->
<property name="password" value="${db.password}" />
</bean>
<!-- 配置事务管理器,注意这里的dataSource和SqlSessionFactoryBean的dataSource要一致,不然事务就没有作用了 -->
<bean id="transactionManager" class="org.springframework.jdbc.datasource.DataSourceTransactionManager">
<property name="dataSource" ref="dataSource" />
</bean>
<!-- 创建SqlSessionFactory,同时指定数据源 这里要注意Habernate 使用的 SessionFactory;Mybatis 的 SqlSessionFactory -->
<bean id="sqlSessionFactory" class="org.mybatis.spring.SqlSessionFactoryBean">
<property name="dataSource" ref="dataSource" />
<!-- 创建SqlSessionFactory,同时指定数据源 -->
<!-- 集成myBaits框架,配置sqlSessionFatory -->
<property name="configLocation" value="classpath:mybatis_config.xml"></property>
<!-- 引入sqlmap下的xml文件 -->
<property name="mapperLocations" value="classpath:wayne/sqlmap/*.xml"></property>
</bean>
<!--把xml文件注入到mapperInterface -->
<bean id="userDao" class="org.mybatis.spring.mapper.MapperFactoryBean">
<property name="mapperInterface" value="wayne.dao.UserMapper"/>
<property name="sqlSessionFactory" ref="sqlSessionFactory" />
</bean>
<!--把dao注入到action -->
<bean id="userAction" class="wayne.action.UserAction">
<property name="userDao" ref="userDao"></property>
</bean>
<!-- 单独配置一个Mapper; 这种模式就是得给每个mapper接口配置一个bean -->
<!--
<bean id="accountMapper" class="org.mybatis.spring.mapper.MapperFactoryBean">
<property name="mapperInterface" value="com.hoo.mapper.AccountMapper" />
<property name="sqlSessionFactory" ref="sqlSessionFactory" />
</bean>
<bean id="companyMapper" class="org.mybatis.spring.mapper.MapperFactoryBean">
<property name="mapperInterface" value="com.hoo.mapper.CompanyMapper" />
<property name="sqlSessionFactory" ref="sqlSessionFactory" />
</bean>
-->
<!-- 通过扫描的模式,扫描目录在com/hoo/mapper目录下,所有的mapper都继承SqlMapper接口的接口, 这样一个bean就可以了 <br>
<bean class="org.mybatis.spring.mapper.MapperScannerConfigurer">
<property name="basePackage" value="wayne.sqlmap"/>
<property name="markerInterface" value="wayne.sqlmap.SqlMapper"/>
</bean>
-->
</beans>在上面的这个配置文件里每一步我都详细的注明了它的用途,每一步都必不可少!如果还有没看懂的地方,私下找我共同探讨;到了这里的话spring已经整合完mybatis
2.3.5、书写struts.xml配置文件,struts配置文件主要用于和前台交互,其本质是个过滤器,下面我给出这部分的代码<pre name="code" class="html"><?xml version="1.0" encoding="UTF-8" ?>
<!DOCTYPE struts PUBLIC "-//Apache Software Foundation//DTD Struts Configuration 2.1//EN" "http://struts.apache.org/dtds/struts-2.1.dtd">
<struts>
<constant name="struts.i18n.encoding" value="UTF-8" /> <pre name="code" class="html"> <!-- 这里的namespace空间名,由于我只是做个简单的登陆页面所以用缺省“/”代替,如果项目比较庞大的话可以通过不同的命名空间来区分--><pre name="code" class="html">2.3.6、书写web.xml配置文件,这个文件很重要,下面我给出这部分的代码,我会详细介绍这部分内容<pre name="code" class="html"><?xml version="1.0" encoding="UTF-8"?>
<web-app version="2.4"
xmlns="http://java.sun.com/xml/ns/j2ee"
xmlns:xsi="http://www.w3.org/2001/XMLSchema-instance"
xsi:schemaLocation="http://java.sun.com/xml/ns/j2ee
http://java.sun.com/xml/ns/j2ee/web-app_2_4.xsd">
<!-- web.xml 的加载顺序是:ServletContext-> context-param ->listener -> filter -> servlet,
而同个类型之间的实际程序调用的时候的顺序是根据对应的 mapping 的顺序进行调用的。 -->
<context-param>
<!--配置spring的配置文件 -->
<param-name>contextConfigLocation</param-name>
<param-value>/WEB-INF/classes/applicationContext.xml</param-value>
</context-param>
<context-param>
<!--配置项目运行日志的配置文件 -->
<param-name>log4jConfigLocation</param-name>
<param-value>/WEB-INF/classes/log4j.properties</param-value>
</context-param>
<listener>
<!--配置spring监听文件 -->
<listener-class>
org.springframework.web.context.ContextLoaderListener
</listener-class>
</listener>
<listener>
<!--配置log4j监听文件 -->
<listener-class>
org.springframework.web.util.Log4jConfigListener
</listener-class>
</listener>
<filter>
<!--配置struts2的配置文件 -->
<filter-name>struts2</filter-name>
<filter-class>
org.apache.struts2.dispatcher.ng.filter.StrutsPrepareAndExecuteFilter
</filter-class>
</filter>
<!--配置struts2过滤 /* 指过滤所有,也可以自行配置过滤特定,默认是action -->
<filter-mapping>
<filter-name>struts2</filter-name>
<url-pattern>/*</url-pattern>
</filter-mapping>
<welcome-file-list>
<!--配置项目起始页面 -->
<welcome-file>index.jsp</welcome-file>
</welcome-file-list>
</web-app> 到这里所有的配置就全部都配置好了,有不明白的可留言,也可私下找我,本人qq2422014433,希望对初学者有所帮助!其中有表述不明确的地方,或者错误的地方,请批评改正!2.4、其他部分代码2.4.1、UserAction.java<pre name="code" class="html">package wayne.action;
import wayne.dao.UserMapper;
import wayne.model.User;
import com.opensymphony.xwork2.ActionSupport;
public class UserAction extends ActionSupport{
private Integer id;
private String name;
private String password;
private Byte sex;
private String phone;
private String address;
private UserMapper userDao;
public UserMapper getUserDao() {
return userDao;
}
public void setUserDao(UserMapper userDao) {
this.userDao = userDao;
}
public Integer getId() {
return id;
}
public void setId(Integer id) {
this.id = id;
}
public String getName() {
return name;
}
public void setName(String name) {
this.name = name;
}
public String getPassword() {
return password;
}
public void setPassword(String password) {
this.password = password;
}
public Byte getSex() {
return sex;
}
public void setSex(Byte sex) {
this.sex = sex;
}
public String getPhone() {
return phone;
}
public void setPhone(String phone) {
this.phone = phone;
}
public String getAddress() {
return address;
}
public void setAddress(String address) {
this.address = address;
}
/**
* 进入开户登记页面
*
* @return
*/
public String login() {
String result ="";
try {
String username = getName();
String password = getPassword();
User user = userDao.selectByPrimaryKey(id);
if(user!=null){
String pass = user.getPassword();
if(password.equals(pass) && password!=""){
result = "success";
}else{
result = "error";
}
}else{
return ERROR;
}
} catch (Exception e) {
e.printStackTrace();
return ERROR;
}
return result;
}
}
2.4.2、UserMapper.java
<pre name="code" class="html">package wayne.dao;

import wayne.model.User;

public interface UserMapper {
    int deleteByPrimaryKey(Integer id);

    int insert(User record);

    int insertSelective(User record);

    User selectByPrimaryKey(Integer id);

    int updateByPrimaryKeySelective(User record);

    int updateByPrimaryKey(User record);
}2.4.3、User.java<pre name="code" class="html">package wayne.model;
public class User {
private Integer id;
private String name;
private String password;
private Byte sex;
private String phone;
private String address;
public Integer getId() {
return id;
}
public void setId(Integer id) {
this.id = id;
}
public String getName() {
return name;
}
public void setName(String name) {
this.name = name == null ? null : name.trim();
}
public String getPassword() {
return password;
}
public void setPassword(String password) {
this.password = password == null ? null : password.trim();
}
public Byte getSex() {
return sex;
}
public void setSex(Byte sex) {
this.sex = sex;
}
public String getPhone() {
return phone;
}
public void setPhone(String phone) {
this.phone = phone == null ? null : phone.trim();
}
public String getAddress() {
return address;
}
public void setAddress(String address) {
this.address = address == null ? null : address.trim();
}
}<pre name="code" class="html"><?xml version="1.0" encoding="UTF-8"?>
<!DOCTYPE mapper PUBLIC "-//mybatis.org//DTD Mapper 3.0//EN" "http://mybatis.org/dtd/mybatis-3-mapper.dtd">
<mapper namespace="wayne.dao.UserMapper">
<resultMap id="BaseResultMap" type="wayne.model.User">
<id column="id" jdbcType="INTEGER" property="id" />
<result column="name" jdbcType="VARCHAR" property="name" />
<result column="password" jdbcType="VARCHAR" property="password" />
<result column="sex" jdbcType="TINYINT" property="sex" />
<result column="phone" jdbcType="VARCHAR" property="phone" />
<result column="address" jdbcType="VARCHAR" property="address" />
</resultMap>
<sql id="Base_Column_List">
id, name, password, sex, phone, address
</sql>
<select id="selectByPrimaryKey" parameterType="java.lang.Integer" resultMap="BaseResultMap">
select
<include refid="Base_Column_List" />
from user_info
where id = #{id,jdbcType=INTEGER}
</select>
<delete id="deleteByPrimaryKey" parameterType="java.lang.Integer">
delete from user_info
where id = #{id,jdbcType=INTEGER}
</delete>
<insert id="insert" parameterType="wayne.model.User">
insert into user_info (id, name, password,
sex, phone, address
)
values (#{id,jdbcType=INTEGER}, #{name,jdbcType=VARCHAR}, #{password,jdbcType=VARCHAR},
#{sex,jdbcType=TINYINT}, #{phone,jdbcType=VARCHAR}, #{address,jdbcType=VARCHAR}
)
</insert>
<insert id="insertSelective" parameterType="wayne.model.User">
insert into user_info
<trim prefix="(" suffix=")" suffixOverrides=",">
<if test="id != null">
id,
</if>
<if test="name != null">
name,
</if>
<if test="password != null">
password,
</if>
<if test="sex != null">
sex,
</if>
<if test="phone != null">
phone,
</if>
<if test="address != null">
address,
</if>
</trim>
<trim prefix="values (" suffix=")" suffixOverrides=",">
<if test="id != null">
#{id,jdbcType=INTEGER},
</if>
<if test="name != null">
#{name,jdbcType=VARCHAR},
</if>
<if test="password != null">
#{password,jdbcType=VARCHAR},
</if>
<if test="sex != null">
#{sex,jdbcType=TINYINT},
</if>
<if test="phone != null">
#{phone,jdbcType=VARCHAR},
</if>
<if test="address != null">
#{address,jdbcType=VARCHAR},
</if>
</trim>
</insert>
<update id="updateByPrimaryKeySelective" parameterType="wayne.model.User">
update user_info
<set>
<if test="name != null">
name = #{name,jdbcType=VARCHAR},
</if>
<if test="password != null">
password = #{password,jdbcType=VARCHAR},
</if>
<if test="sex != null">
sex = #{sex,jdbcType=TINYINT},
</if>
<if test="phone != null">
phone = #{phone,jdbcType=VARCHAR},
</if>
<if test="address != null">
address = #{address,jdbcType=VARCHAR},
</if>
</set>
where id = #{id,jdbcType=INTEGER}
</update>
<update id="updateByPrimaryKey" parameterType="wayne.model.User">
update user_info
set name = #{name,jdbcType=VARCHAR},
password = #{password,jdbcType=VARCHAR},
sex = #{sex,jdbcType=TINYINT},
phone = #{phone,jdbcType=VARCHAR},
address = #{address,jdbcType=VARCHAR}
where id = #{id,jdbcType=INTEGER}
</update>
</mapper>2.4.5index.jsp<pre name="code" class="html"><%@ page language="java" import="java.util.*" pageEncoding="utf-8"%>
<%
String path = request.getContextPath();
String basePath = request.getScheme()+"://"+request.getServerName()+":"+request.getServerPort()+path+"/";
%>
<!DOCTYPE HTML PUBLIC "-//W3C//DTD HTML 4.01 Transitional//EN">
<html>
<head>
<base href="<%=basePath%>">
<title>My JSP 'index.jsp' starting page</title>
<meta http-equiv="pragma" content="no-cache">
<meta http-equiv="cache-control" content="no-cache">
<meta http-equiv="expires" content="0">
<meta http-equiv="keywords" content="keyword1,keyword2,keyword3">
<meta http-equiv="description" content="This is my page">
<!--
<link rel="stylesheet" type="text/css" href="styles.css">
-->
</head>
<body>
<form action="login" method="post">
用 户ID:<input type="text" name="id" /> <!-- 注:这里的name如果设为“id” 则后台struts里必须要配置input -->
登陆密码:<input type="password" name="password" />
<input type="submit" value="提交">
</form>
</body>
</html>
(注:由于下面代码基本都是Mybatis Generator自动生成的,所以就没详细介绍)
3、常见报错3.1、java.lang.IllegalArgumentException: Mapped Statements collection does not contain value for wayne.dao.UserMapper.selectByPrimaryKey
<span style="white-space:pre"> </span>at org.apache.ibatis.session.Configuration$StrictMap.get(Configuration.java:672)
<span style="white-space:pre"> </span>at org.apache.ibatis.session.Configuration.getMappedStatement(Configuration.java:507)
<span style="white-space:pre"> </span>at org.apache.ibatis.session.Configuration.getMappedStatement(Configuration.java:500)
<span style="white-space:pre"> </span>at org.apache.ibatis.binding.MapperMethod.setupCommandType(MapperMethod.java:240)
<span style="white-space:pre"> </span>at org.apache.ibatis.binding.MapperMethod.<init>(MapperMethod.java:71)
<span style="white-space:pre"> </span>at org.apache.ibatis.binding.MapperProxy.invoke(MapperProxy.java:39)
<span style="white-space:pre"> </span>at $Proxy7.selectByPrimaryKey(Unknown Source)
<span style="white-space:pre"> </span>at wayne.action.UserAction.login(UserAction.java:103)
<span style="white-space:pre"> </span>at sun.reflect.NativeMethodAccessorImpl.invoke0(Native Method)
<span style="white-space:pre"> </span>at sun.reflect.NativeMethodAccessorImpl.invoke(NativeMethodAccessorImpl.java:39)出现这样的报错说明3.1.1、mapper.xml中没有加入namespace
3.1.2、mapper.xml中的方法和接口mapper的方法不对应
3.1.3、mapper.xml没有加入到mybatis-config.xml中(即总的配置文件),例外:配置了mapper文件的包路径的除外
3.1.4、mapper.xml文件名和所写的mapper名称不相同。3.2另外错误请参考http://wenku.baidu.com/link?url=5bwXDHgjpUAHwbD2TuGofTNpHAyzmTcqhRiBnajzxEjxg7LGfoRcpnU1HW6vP_wWS4eP3n90hd7M_OpiAsow1duJ3vM_Ki63dsAR1Vf-Nyq<span style="font-family:Helvetica, Tahoma, Arial, sans-serif;"><span style="font-size: 14px; line-height: 25.2px;">
</span></span>4、总结由于此为本人第一次书写,有不到和错误之处请批评指正,也可私下谈谈学习,工作心得!欢迎之至!


 2万+
2万+


 被折叠的 条评论
为什么被折叠?
被折叠的 条评论
为什么被折叠?
 到【灌水乐园】发言


