


在开发的过程中列表相关的布局是最不可或缺的一部分,而掌握一些高效的技巧可以帮助我们提升开发效率的同时,还能优化代码,减少冗余和bug的产生。
1.listitem实时预览
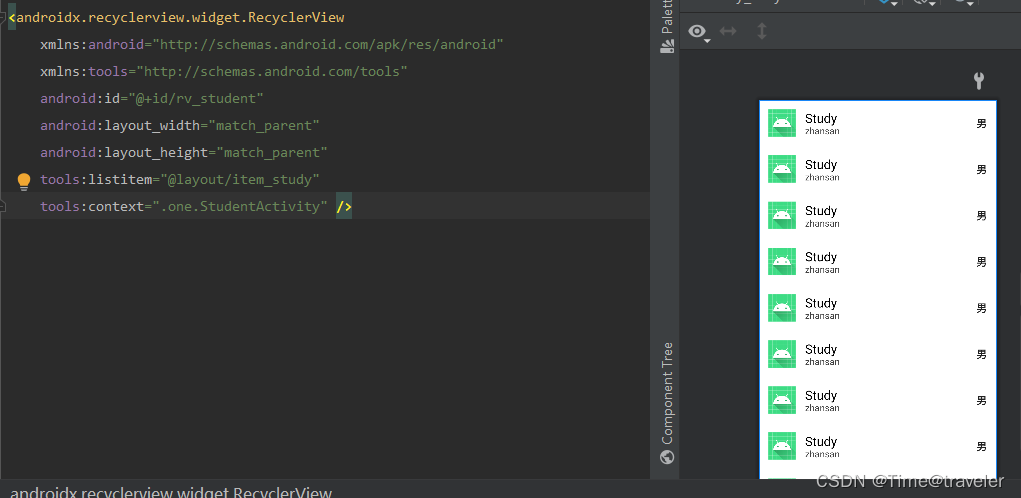
在UI绘制时,免不了进行细节和样式的调整,如果每次的调整都去run之后查看效果,则效率低下,使用listitem,则可以避免运行,直接使用AndroidStudio自带的预览功能进行调试
例如
<androidx.recyclerview.widget.RecyclerView
    xmlns:android="http://schemas.android.com/apk/res/android"
    xmlns:tools="http://schemas.android.com/tools"
    android:id="@+id/rv_student"
    android:layout_width="match_parent"
    android:layout_height="match_parent"
    xmlns:app="http://schemas.android.com/apk/res-auto"
    tools:listitem="@layout/item_study"
    tools:context=".one.StudentActivity" />
效果如下:
2,xml中设置layoutManager
<androidx.recyclerview.widget.RecyclerView
    xmlns:android="http://schemas.android.com/apk/res/android"
    xmlns:tools="http://schemas.android.com/tools"
    android:id="@+id/rv_student"
    android:layout_width="match_parent"
    android:layout_height="match_parent"
    xmlns:app="http://schemas.android.com/apk/res-auto"
    tools:listitem="@layout/item_study"
    android:orientation="vertical"
    app:layoutManager="androidx.recyclerview.widget.LinearLayoutManager"
    tools:context=".one.StudentActivity" />
在布局代码中可以直接设置LayoutManager类型和相关的一些属性,例如方向,网格布局时每一行的个数等。
3,使用默认的分割线
可以使用官方提供的默认的分割线样式,减少重复的创建。
    //添加默认的分割线
        rv_student.addItemDecoration(DividerItemDecoration(this,
            (rv_student.layoutManager as LinearLayoutManager).orientation))
如需个性化定制,需要自己基于ItemDecoration进行定制
4,添加Item点击事件
使用Kotlin函数式的思想,快捷的添加点击事件
1)在Adapter的构造函数中添加入参
class StudentAdapter(private val data:ArrayList<StudentInfo>,
                     private val itemClick:(StudentInfo) ->Unit):
    RecyclerView.Adapter<StudentAdapter.ViewHolder>() {

}
2)初始化Adapter时传入点击的函数
    //学生数据列表
    private val studentEntities = ArrayList<StudentInfo>()
    //适配器
    private val  studentAdapter by lazy {
        StudentAdapter(studentEntities,this::onStudentItemClick)
    }

	/**
	*点击事件
	*/
    private fun onStudentItemClick(entity:StudentInfo){
        /**
         * 点击Item时,获取的当前点击的用户信息
         */
        Log.d(TAG,"onStudentItemClick()--->$entity")
        Toast.makeText(this,"$entity",Toast.LENGTH_LONG).show()
    }
3)使用时
itemView.setOnClickListener { itemClick(entity) }
5,Adapter中获取上下文
在onCreateViewHolder中获取context对象,减少构建时的传参
  //定义上下文
    private lateinit var context:Context

    override fun onCreateViewHolder(parent: ViewGroup, viewType: Int): ViewHolder {
        context = parent.context
    }
如上功能完成的代码如下:
1,item布局
<?xml version="1.0" encoding="utf-8"?>
<androidx.constraintlayout.widget.ConstraintLayout xmlns:android="http://schemas.android.com/apk/res/android"
    android:layout_width="match_parent"
    android:layout_height="wrap_content"
    android:layout_margin="16dp"
    xmlns:app="http://schemas.android.com/apk/res-auto">

    <androidx.appcompat.widget.AppCompatImageView
        android:id="@+id/iv_icon"
        android:layout_width="48dp"
        app:layout_constraintLeft_toLeftOf="parent"
        android:src="@mipmap/ic_launcher"
        app:layout_constraintTop_toTopOf="parent"
        app:layout_constraintBottom_toBottomOf="parent"
        android:layout_height="48dp"/>

    <TextView

        app:layout_constraintTop_toTopOf="parent"
        app:layout_constraintLeft_toRightOf="@+id/iv_icon"
        android:layout_width="wrap_content"
        android:id="@+id/tv_title"
        android:gravity="center"
        android:text="Study"
        android:textSize="22sp"
        android:layout_marginLeft="16dp"
        app:layout_constraintVertical_chainStyle="packed"
        app:layout_constraintBottom_toTopOf="@+id/tv_second"
        android:textColor="@android:color/black"
        android:layout_height="wrap_content"/>

    <TextView
        android:id="@+id/tv_subtitle"
        android:layout_width="wrap_content"
        app:layout_constraintLeft_toRightOf="@+id/iv_icon"
        app:layout_constraintTop_toBottomOf="@+id/tv_study"
        android:textSize="16sp"
        android:layout_marginLeft="16dp"
        app:layout_constraintVertical_chainStyle="packed"
        android:text="zhansan"
        android:textColor="@color/cardview_dark_background"
        app:layout_constraintBottom_toBottomOf="parent"
        android:layout_height="wrap_content"/>

    <TextView
        android:id="@+id/tv_gender"
        android:layout_width="wrap_content"
        android:textSize="18sp"
        android:text="男"
        android:textColor="@color/material_on_surface_emphasis_high_type"
        app:layout_constraintRight_toRightOf="parent"
        app:layout_constraintTop_toTopOf="parent"
        android:textStyle="bold"
        app:layout_constraintBottom_toBottomOf="parent"
        android:layout_height="wrap_content"/>


</androidx.constraintlayout.widget.ConstraintLayout>
2,Activity布局
<?xml version="1.0" encoding="utf-8"?>
<androidx.recyclerview.widget.RecyclerView
    xmlns:android="http://schemas.android.com/apk/res/android"
    xmlns:tools="http://schemas.android.com/tools"
    android:id="@+id/rv_student"
    android:layout_width="match_parent"
    android:layout_height="match_parent"
    xmlns:app="http://schemas.android.com/apk/res-auto"
    tools:listitem="@layout/item_study"
    android:orientation="vertical"
    app:layoutManager="androidx.recyclerview.widget.LinearLayoutManager"
    tools:context=".one.StudentActivity" />
3,Activity代码
package com.example.recyclerviewstudy.one

import androidx.appcompat.app.AppCompatActivity
import android.os.Bundle
import android.util.Log
import android.widget.Toast
import androidx.recyclerview.widget.DividerItemDecoration
import androidx.recyclerview.widget.LinearLayoutManager
import androidx.recyclerview.widget.RecyclerView
import com.example.recyclerviewstudy.R
import com.example.recyclerviewstudy.StudentInfo

class StudentActivity : AppCompatActivity() {
    companion object{
        val TAG = this::class.simpleName
    }
    //学生数据列表
    private val studentEntities = ArrayList<StudentInfo>()
    //适配器
    private val  studentAdapter by lazy {
        StudentAdapter(studentEntities,this::onStudentItemClick)
    }
    override fun onCreate(savedInstanceState: Bundle?) {
        super.onCreate(savedInstanceState)
        setContentView(R.layout.activity_study)
        initRecyclerView()
    }

    private fun initRecyclerView(){
        val rv_student = findViewById<RecyclerView>(R.id.rv_student)
        //添加默认的分割线
        rv_student.addItemDecoration(DividerItemDecoration(this,
            (rv_student.layoutManager as LinearLayoutManager).orientation))
        rv_student.adapter = studentAdapter
        produceData()
    }

    private fun onStudentItemClick(entity:StudentInfo){
        /**
         * 点击Item时,获取的当前点击的用户信息
         */
        Log.d(TAG,"onStudentItemClick()--->$entity")
        Toast.makeText(this,"$entity",Toast.LENGTH_LONG).show()
    }

	//生产数据
    private fun produceData(){
        for (i in 0..20){
            studentEntities.add(StudentInfo("zhang san $i",i,if (i%2==0)"男" else "女"))
        }
    }
}
4,Adapter完整代码
package com.example.recyclerviewstudy.one

import android.content.Context
import android.view.LayoutInflater
import android.view.View
import android.view.ViewGroup
import android.widget.TextView
import androidx.recyclerview.widget.RecyclerView
import com.example.recyclerviewstudy.R
import com.example.recyclerviewstudy.StudentInfo

class StudentAdapter(private val data:ArrayList<StudentInfo>,
                     private val itemClick:(StudentInfo) ->Unit):
    RecyclerView.Adapter<StudentAdapter.ViewHolder>() {

    //定义上下文
    private lateinit var context:Context

    override fun onCreateViewHolder(parent: ViewGroup, viewType: Int): ViewHolder {
        context = parent.context
        return ViewHolder(LayoutInflater.from(context)
            .inflate(R.layout.item_study,parent,false),itemClick)
    }

    override fun onBindViewHolder(holder: ViewHolder, position: Int) {
        holder.bind(data[position])
    }

    override fun getItemCount() = data.size

    inner class ViewHolder(itemView:View,val itemClick:(StudentInfo) -> Unit):RecyclerView.ViewHolder(itemView){
        val tv_name:TextView = itemView.findViewById(R.id.tv_title)
        val tv_age:TextView = itemView.findViewById(R.id.tv_subtitle)
        val tv_gender:TextView = itemView.findViewById(R.id.tv_gender)
        private lateinit var entity:StudentInfo

        init {
            itemView.setOnClickListener { itemClick(entity) }
        }

        fun bind(entity:StudentInfo){
            this.entity = entity
            entity.apply {
                tv_name.text = name
                tv_age.text = "$age"
                tv_gender.text = gander
            }
        }
    }
}
针对RecyclerView相关的实际使用目前学到的就这些,具体实践还需结合自己项目架构进行优化实现。
RecyclerView是开发中必不可少的,虽然它的功能和性能相较于ListView有了很大的改善和提升,但使用不当还是会存在一些性能问题,且目还有进一步的优化空间,结合mCacheViewExtension和DiffUtil的实现,让你的UI更加流畅。


 674
674


 被折叠的 条评论
为什么被折叠?
被折叠的 条评论
为什么被折叠?
 到【灌水乐园】发言


