


上一篇文章中简单的讲了Fragment的概念并运行了一个小Demo。
现在,我们来看一下Activity如何传递参数给Fragment和如何在运行过程中替换Fragment。
首先,我们来说一下Activity之间怎么传递参数给Fragment。其实,我们只要在创建Fragment的实例的时候设置参数就可以了,看如下代码:
关键方法:setArguments
public static ReplaceFragment newInstance(int value, int color){
	ReplaceFragment f = new ReplaceFragment();
	// 使用Bundle对象传递参数
	Bundle b = new Bundle();
	//
	b.putInt(PARAM_VALUE, value);
	b.putInt(PARAM_COLOR, color);
	// 设置传递参数
	f.setArguments(b);

	return f;
}
然后在Fragment的onCreate方法中接收参数
关键方法:getArguments
@Override
public void onCreate(Bundle savedInstanceState) {
	super.onCreate(savedInstanceState);
	Bundle b = getArguments();
	// 获取传递过来的参数
	if(b != null){
		value = b.getInt(PARAM_VALUE);
		color = b.getInt(PARAM_COLOR);
	}
}
然后就可以在onCreateView方法中使用参数了(或是在其他地方使用)
@Override
public View onCreateView(LayoutInflater inflater, ViewGroup container,
Bundle savedInstanceState) {
View view = inflater.inflate(R.layout.fragment_replace, null);
// 设置背景颜色
view.setBackgroundColor(color);
// 设置传过来的值
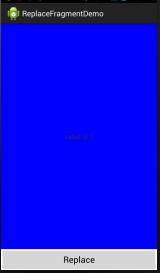
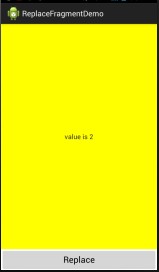
((TextView)view.findViewById(R.id.tv)).setText("value is " + value);
return view;
}那么在,如何替换Fragment呢?
其实,看上个实例的代码,我们用的是add方法,其实还有一个方法叫replace,我们只要在某个事件发生的时候,调用这个方法,就可以完成Fragment的替换了,很简单。
这里,我们的事件是Button的点击事件:
关键方法:replace
public void replace(View view){
	Fragment f = ReplaceFragment.newInstance(value++, getColor());
	// 替换为新的Fragment
	mFragmentManager.beginTransaction().replace(R.id.fragment_container, f).commit();
}
下面是运行效果图:
下面附上类和资源文件的完整代码:
MainActivity:
package com.example.replacefragmentdemo;

import android.graphics.Color;
import android.os.Bundle;
import android.support.v4.app.Fragment;
import android.support.v4.app.FragmentActivity;
import android.support.v4.app.FragmentManager;
import android.view.View;

public class MainActivity extends FragmentActivity {

	private FragmentManager mFragmentManager;
	private int value = 1;
	private int[] colors = {Color.BLUE, Color.YELLOW};
	private int curColorIndex = 0;

	@Override
	protected void onCreate(Bundle savedInstanceState) {
		super.onCreate(savedInstanceState);
		setContentView(R.layout.activity_main);
		mFragmentManager = getSupportFragmentManager();
		if(savedInstanceState == null){
			Fragment f = ReplaceFragment.newInstance(value++, getColor());

			mFragmentManager.beginTransaction().add(R.id.fragment_container, f).commit();
		}
	}

	public void replace(View view){
		Fragment f = ReplaceFragment.newInstance(value++, getColor());
		// 替换为新的Fragment
		mFragmentManager.beginTransaction().replace(R.id.fragment_container, f).commit();
	}

	/** 获取当前color */
	private int getColor(){
		return colors[curColorIndex++%colors.length];
	}
}
ReplaceFragment:
package com.example.replacefragmentdemo;

import android.os.Bundle;
import android.support.v4.app.Fragment;
import android.view.LayoutInflater;
import android.view.View;
import android.view.ViewGroup;
import android.widget.TextView;

public class ReplaceFragment extends Fragment {

	private static final String PARAM_VALUE = "param_value";
	private static final String PARAM_COLOR = "param_color";

	private int value;
	private int color;

	public static ReplaceFragment newInstance(int value, int color){
		ReplaceFragment f = new ReplaceFragment();
		// 使用Bundle对象传递参数
		Bundle b = new Bundle();
		//
		b.putInt(PARAM_VALUE, value);
		b.putInt(PARAM_COLOR, color);
		// 设置传递参数
		f.setArguments(b);

		return f;
	}

	@Override
	public void onCreate(Bundle savedInstanceState) {
		super.onCreate(savedInstanceState);
		Bundle b = getArguments();
		// 获取传递过来的参数
		if(b != null){
			value = b.getInt(PARAM_VALUE);
			color = b.getInt(PARAM_COLOR);
		}
	}

	@Override
	public View onCreateView(LayoutInflater inflater, ViewGroup container,
			Bundle savedInstanceState) {

		View view = inflater.inflate(R.layout.fragment_replace, null);
		// 设置背景颜色
		view.setBackgroundColor(color);
		// 设置传过来的值
		((TextView)view.findViewById(R.id.tv)).setText("value is " + value);

		return view;
	}

}
资源文件:
activity_main.xml
<LinearLayout xmlns:android="http://schemas.android.com/apk/res/android"
    xmlns:tools="http://schemas.android.com/tools"
    android:layout_width="match_parent"
    android:layout_height="match_parent"
    android:orientation="vertical"
    >

    <FrameLayout
        android:id="@+id/fragment_container"
        android:layout_width="match_parent"
        android:layout_height="0dp"
        android:layout_weight="1"
        ></FrameLayout>

    <Button
        android:layout_width="fill_parent"
        android:layout_height="wrap_content"
        android:gravity="center"
        android:onClick="replace"
        android:text="Replace" />

</LinearLayout>
fragment_replace.xml
<RelativeLayout xmlns:android="http://schemas.android.com/apk/res/android"
    xmlns:tools="http://schemas.android.com/tools"
    android:layout_width="match_parent"
    android:layout_height="match_parent"
    tools:context=".MainActivity" >

    <TextView
        android:id="@+id/tv"
        android:layout_width="wrap_content"
        android:layout_height="wrap_content"
        android:layout_centerInParent="true"
        />

</RelativeLayout>
好了,参数传递和Fragment替换的内容就到这里了!


 1万+
1万+

 被折叠的 条评论
为什么被折叠?
被折叠的 条评论
为什么被折叠?
 到【灌水乐园】发言


