


1.电商核心概念
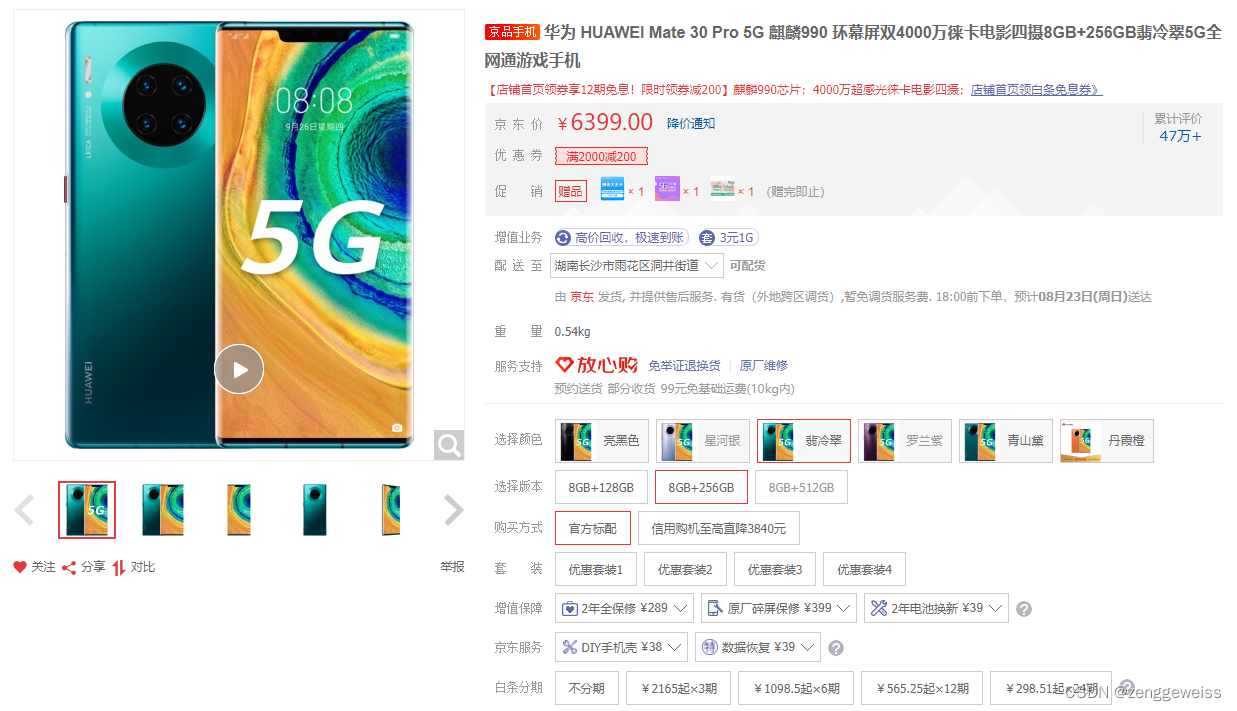
1.1.SPU与SKU
-
SPU:Standard Product Unit(标准化产品单元)
是商品信息聚合的最小单位,是一组可复用、易检索的标准化信息的集合,该集合描述了一个 产品的特性。
决定商品属性的值
-
SKU:Stock Keeping Unit(库存量单位)
即库存进出计量的基本单元,可以是件,盒,托盘等为单位。SKU这是对于大型连锁超市DC(配送中心)物流管理的一个必要的方法。现在已经被引申为产品统一编号的简称,每种 产品均对应有唯一的SKU号。
决定销售属性的值
-
举例
iPhone12,iPhone12 Pro :SPU
iPhone12 128G 白色:SKU
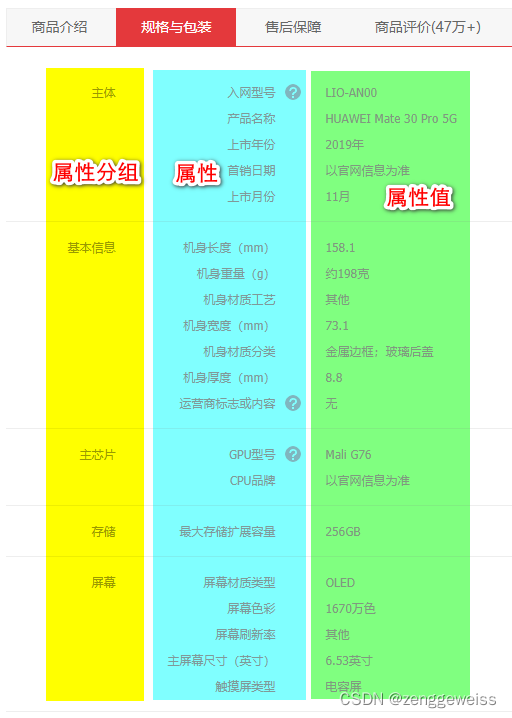
1.2.规格参数(基本属性)与销售属性
每个分类下的商品共享规格参数与销售属性,只是有些商品不一定要用这个分类下全部的属性。
- 属性是以三级分类组织起来的
- 规格参数中有些是可以提供检索的
- 规格参数也是基本属性,他们具有自己的分组
- 属性的分组也是以三级分类组织起来的
- 属性名确定,但是值是每一个商品不同来决定的
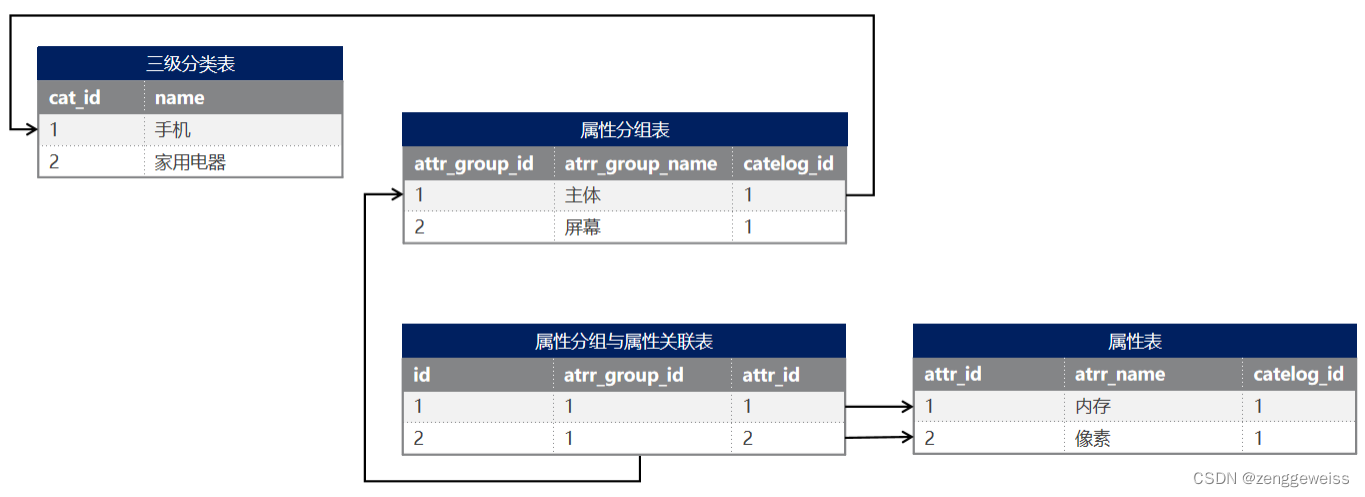
1.3.数据表设计
- pms_attr 属性表
- pms_attr_group 属性分组表
- pms_attr_attrgroup_relation 属性和属性分组关联表
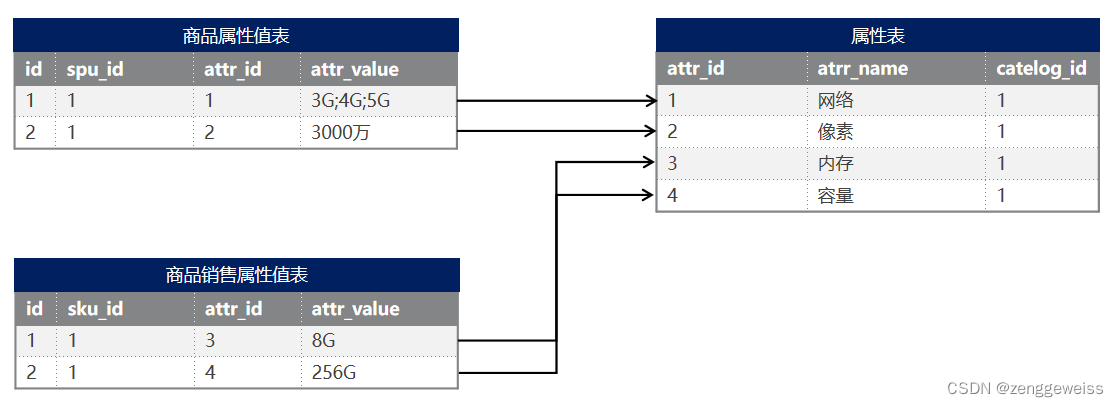
- pms_product_attr_value 商品属性值表
- pms_spu_info 商品属性表
- pms_sku_info 销售属性表
- pms_sku_images 销售属性图片表
- pms_sku_sale_attr_value 销售属性值表
数据表采用了冗余设计,尽量减少数据关联查询,提供查询性能(互联网系统设计建议)!!!
注意:在数据表更新时要保持数据一致性,在业务代码中要手动实现多表级联更新!!!
1.4.SKU - SPU关系图
属性分组 - 规格参数 - 销售属性 - 三级分类 【关联关系】
2.查询属性分组-前端
2.1.功能说明
- 属性分组组件默认加载所有的属性分组数据
- 点击三级分类,在属性分组列表显示对应的三级分类下的所有属性分组
前端Vue组件:
- attrgroup.vue
- attrgroup-add-or-update.vue
- attr-group-relation.vue
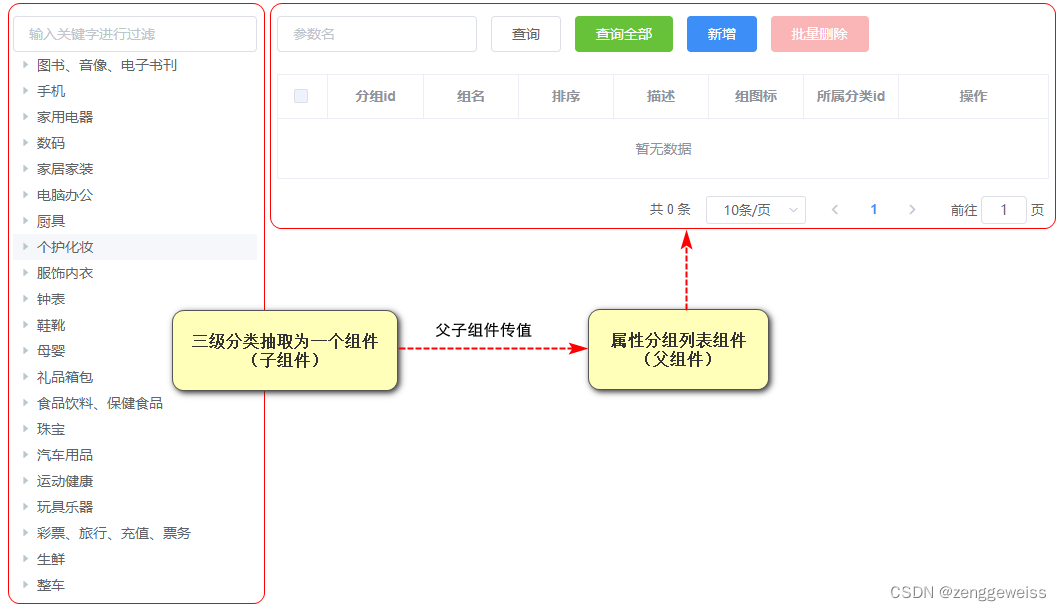
2.2.抽取三级分类组件
2.2.1.创建 category.vue 组件
在 views/modules/common/ 目录下新建 category.vue 三级分类Vue组件
2.2.2.使用 category.vue 组件
在 attrgroup.vue 属性分组父组件中使用 category.vue 组件
<template>
	<category> </category>
</template>
<script>
import Category from ' ../common/category'
export default {
	components: { Category }
}
</script>
2.3.父子组件传递数据
2.3.1.子组件给父组件传值
子组件给父组件传递数据:事件机制(子组件给父组件发送一个事件,携带上数据)
//$emit('事件名', 参数...)
this.$emit('node-click', data, node, component)
3.查询属性分组-后台
3.1.获取分类属性分组
3.1.1.API
GET /product/attrgroup/list/{catelogId}

//请求参数
{
	page: 1, //当前页码
	limit: 10, //每页记录数
	sidx: 'id', //排序字段
	order: 'asc',//排序方式
	key: '华为' //检索关键字
}
3.1.2.接口实现
AttrGroupController
@RestController
@RequestMapping("product/attrgroup")
public class AttrGroupController {
	@Autowired
	private AttrGroupService attrGroupService;

	/**
	 * 根据三级分类ID查询父类下的属性分组
	 */
	@RequestMapping("/list/{catelogId}")
	public R list(@RequestParam Map<String, Object> params,@PathVariable Long catelogId){
		PageUtils page = attrGroupService.queryPage(params, catelogId);
		return R.ok().put("page", page);
	}
}
AttrGroupServiceImpl
@Service("attrGroupService")
public class AttrGroupServiceImpl extends ServiceImpl<AttrGroupDao,AttrGroupEntity> implements AttrGroupService {
	/**
	 * 根据三级分类id查询属性分组
	 * @param params 封装了分页信息参数
	 * @param catelogId 三级分类id
	 * @return
	 */
	@Override
	public PageUtils queryPage(Map<String, Object> params, Long catelogId) {
		String key = (String) params.get("key");
		QueryWrapper<AttrGroupEntity> queryWrapper = new QueryWrapper<AttrGroupEntity>();
		if (!StringUtils.isEmpty(key)) {
			queryWrapper.and(obj -> {
				obj.eq("attr_group_id", key).or().like("attr_group_name", key);
			});
		}

		//如果三级分类id为0,则查询所有属性分组
		if (catelogId ==0) {
			IPage<AttrGroupEntity> page = this.page(new Query<AttrGroupEntity>().getPage(params),queryWrapper);
			return new PageUtils(page);
		} else {
			queryWrapper.eq("catelog_id", catelogId);
			IPage<AttrGroupEntity> page = this.page(new Query<AttrGroupEntity>().getPage(params),queryWrapper);
			return new PageUtils(page);
		}
	}
}
4.新增属性分组
4.1.Cascader 级联选择器
Element UI 级联选择器组件: Cascader
4.2.过滤三级分类子分类
商品分类只有三级分类,所以查询出来的三级分类不应该再有子分类显示
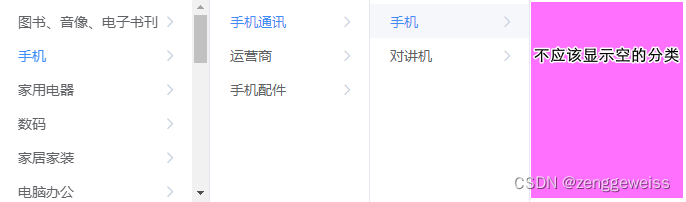
在 CategoryEntity 里面,将children属性加上 @JsonInclude
//children 为空,则不输出该属性
@JsonInclude(JsonInclude.Include.NON_EMPTY)
private List<CategoryEntity> children;
5.修改属性分组
5.1.前端级联选择器回显
Cascader 级联选择器的回显需要三级分类的完整路径 [level1Id, level2Id, level3Id]
5.2.查询三级分类完整路径
5.2.1.API
GET /product/attrgroup/info/{attrGroupId}
5.2.2.后台接口实现
AttrGroupController
/**
* 查询属性分组
* @param attrGroupId 属性分组ID
* @return 属性分组信息
*/
@RequestMapping("/info/{attrGroupId}")
public R info(@PathVariable("attrGroupId") Long attrGroupId){
	AttrGroupEntity attrGroup = attrGroupService.getById(attrGroupId);
	//查找三级分类的完整路径 [level1Id, level2Id, level3Id]
	Long[] catelogPath =categoryService.findCategoryPath(attrGroup.getCatelogId());
	attrGroup.setCatelogPath(catelogPath);
	return R.ok().put("attrGroup", attrGroup);
}
CategoryServiceImpl
/**
 * 查找三级分类的完整路径
 * @param catelogId 三级分类id
 * @return 三级分类的完整路径
 */
@Override
public Long[] findCategoryPath(Long catelogId) {
	List<Long> paths = new ArrayList<>();
	List<Long> fullPath = findParentPath(catelogId, paths);
	//集合数据进行逆序
	Collections.reverse(fullPath);
	return fullPath.toArray(new Long[fullPath.size()]);
}
/**
 * 递归收集三级分类的父id
 * @param catelogId
 * @param paths
 * @return
 */
private List<Long> findParentPath(Long catelogId, List<Long> paths) {
	//收集当前节点id
	paths.add(catelogId);
	//查询当前分类的信息
	CategoryEntity categoryEntity = getById(catelogId);
	if (categoryEntity.getParentCid() != 0) {
		//递归
		findParentPath(categoryEntity.getParentCid(), paths);
	}
	return paths;
}
6.分页插件
6.1.MyBatis-Plus分页插件
6.1.1.PaginationInterceptor 拦截器
package com.atguigu.gmall.product.config;

import com.baomidou.mybatisplus.extension.plugins.PaginationInterceptor;
import com.baomidou.mybatisplus.extension.plugins.pagination.optimize.JsqlParserCountOptimize;
import org.mybatis.spring.annotation.MapperScan;
import org.springframework.context.annotation.Bean;
import org.springframework.context.annotation.Configuration;
import org.springframework.transaction.annotation.EnableTransactionManagement;

/**
 * MyBatisPlus 配置类 {@link MybatisPlusConfig}
 *
 * @author zhangwen
 * @email: 1466787185@qq.com
 */
@Configuration
//开启事务
@EnableTransactionManagement
@MapperScan("com.atguigu.gmall.product.dao")
public class MybatisPlusConfig {
    /**
     * 引入分页插件
     * @return 分页插件拦截器实例
     */
    @Bean
    public PaginationInterceptor paginationInterceptor() {
        PaginationInterceptor paginationInterceptor = new PaginationInterceptor();
        // 设置请求的页面大于最大页后操作, true调回到首页,false 继续请求,默认false
        paginationInterceptor.setOverflow(true);
        // 设置最大单页限制数量,默认 500 条,-1 不受限制
        paginationInterceptor.setLimit(100);
        // 开启 count 的 join 优化,只针对部分 left join
        paginationInterceptor.setCountSqlParser(new JsqlParserCountOptimize(true));
        return paginationInterceptor;
    }
}
7.品牌分类关联
7.1.数据表
pms_category_brand_relation 品牌分类关联表
7.2.获取品牌关联的分类
7.2.1.API
GET /product/categorybrandrelation/catelog/list

//请求参数
brandId Long //品牌id

//响应数据
{
	"msg": "success",
	"code": 0,
	"data": [{
		"catelogId": 4,
		"catelogName": "华为",
	}]
}
7.2.2.后台接口实现
CategoryBrandRelationController
/**
 * 获取品牌关联的所有分类
 */
@GetMapping("/catelog/list")
public R list(@RequestParam("brandId") Long brandId){
	List<CategoryBrandRelationEntity> list = categoryBrandRelationService.list(brandId);
	return R.ok().put("data", list);
}
CategoryBrandRelationServiceImpl
/**
 * 获取品牌关联的所有分类
 * @param brandId
 * @return
 */
@Override
public List<CategoryBrandRelationEntity> list(Long brandId) {
	List<CategoryBrandRelationEntity> brandRelationEntities = this.list(new QueryWrapper<CategoryBrandRelationEntity>().eq("brand_id",brandId));
	return brandRelationEntities;
}
7.3.新增品牌分类
7.3.1.API
POST product/categorybrandrelation/save

//请求参数
{
	"brandId": 1,
	"catelogId": 2
}

//响应数据
{
	"msg": "success",
	"code": 0
}
7.3.2.后台接口实现
CategoryBrandRelationController
/**
 * 保存
 */
@RequestMapping("/save")
public R save(@RequestBody CategoryBrandRelationEntity categoryBrandRelation){
	categoryBrandRelationService.saveDetail(categoryBrandRelation);
	return R.ok();
}
CategoryBrandRelationServiceImpl
/**
 * 新增品牌分类
 * @param categoryBrandRelation
 */
@Override
public void saveDetail(CategoryBrandRelationEntity categoryBrandRelation) {
	//获取品牌名
	BrandEntity brandEntity = brandDao.selectById(categoryBrandRelation.getBrandId());
	//获取分类名
	CategoryEntity categoryEntity = categoryDao.selectById(categoryBrandRelation.getCatelogId());
	//设置
	categoryBrandRelation.setBrandName(brandEntity.getName());
	categoryBrandRelation.setCatelogName(categoryEntity.getName());
	this.save(categoryBrandRelation);
}
8.冗余数据同步
数据表冗余设计
在品牌分类关联表中有两个冗余数据:
- brand_name 品牌名
- catelog_name 分类名
提示:在修改品牌和修改分类的业务操作中,需要同步更新品牌分类关联表中的品牌名和分类名!
8.1.级联更新品牌
BrandController
/**
 * 级联更新品牌
 */
@RequestMapping("/update")
public R update(@RequestBody BrandEntity brand){
	brandService.updateCascade(brand);
	return R.ok();
}
BrandService
/**
 * 级联更新品牌
 * @param brand
 */
void updateCascade(BrandEntity brand);
BrandServiceImpl
/**
* 级联更新品牌
* @param brand
*/
@Transactional(rollbackFor = Exception.class)
@Override
public void updateCascade(BrandEntity brand) {
	//保证数据表冗余字段的数据一致
	//更新品牌表的数据
	this.updateById(brand);

	if (!StringUtils.isEmpty(brand.getName())) {
	//同步更新品牌分类关联表中的数据
	CategoryBrandRelationEntity categoryBrandRelationEntity = new CategoryBrandRelationEntity();
	categoryBrandRelationEntity.setBrandId(brand.getBrandId());
	categoryBrandRelationEntity.setBrandName(brand.getName());
	categoryBrandRelationDao.update(categoryBrandRelationEntity,new UpdateWrapper<CategoryBrandRelationEntity>().eq("brand_id", brand.getBrandId()));
	//TODO 更新其他关联
    }
}
8.2.级联更新商品分类
CategoryController
/**
 * 级联更新
 */
@RequestMapping("/update")
public R update(@RequestBody CategoryEntity category){
	categoryService.updateCascade(category);
	return R.ok();
}
CategoryService
/**
 * 级联更新分类
 * @param category
 */
void updateCascade(CategoryEntity category);
CategoryServiceImpl
/**
 * 级联更新分类
 * @param category
 */
@Transactional(rollbackFor = Exception.class)
@Override
public void updateCascade(CategoryEntity category) {
	this.updateById(category);

	if (!StringUtils.isEmpty(category.getName())) {
	//同步更新品牌分类关联表中的数据
		CategoryBrandRelationEntity categoryBrandRelationEntity = new CategoryBrandRelationEntity();
		categoryBrandRelationEntity.setCatelogId(category.getCatId());
		categoryBrandRelationEntity.setCatelogName(category.getName());
		categoryBrandRelationDao.update(categoryBrandRelationEntity,new UpdateWrapper<CategoryBrandRelationEntity>().eq("catelog_id", category.getCatId()));
	}
}


 118
118


 被折叠的 条评论
为什么被折叠?
被折叠的 条评论
为什么被折叠?
 到【灌水乐园】发言


