


学完 C 和 C++ 之后,就一直有学习GUI的想法,毕竟一直对着黑框框实在是没有一点成就感,但在学校的时候多次翻起Win32、MFC都无奈败退。后来又了解到了Qt,学习起来确实比MFC更快,但了解了一点之后也没继续学习下去。后来忙着毕业、找工作,就把程序暂时搁置了。现在闲下来就又萌生了捡起这些的打算,虽然MFC已经不再被微软支持更新,且有很多其他优秀的GUI框架。但不知道为什么,每次想起MFC都很不甘心,本着就算不能学的很熟练,至少也要完成一个小工具的打算就又开始了MFC的学习。学习的时候主要看了吕鑫老师的视频B站地址,获益匪浅。学了一段时间之后就有了自己做一个串口通信工具的计划,因为学习单片机的时候就对这些工具很感兴趣,希望自己也能开发出小工具。
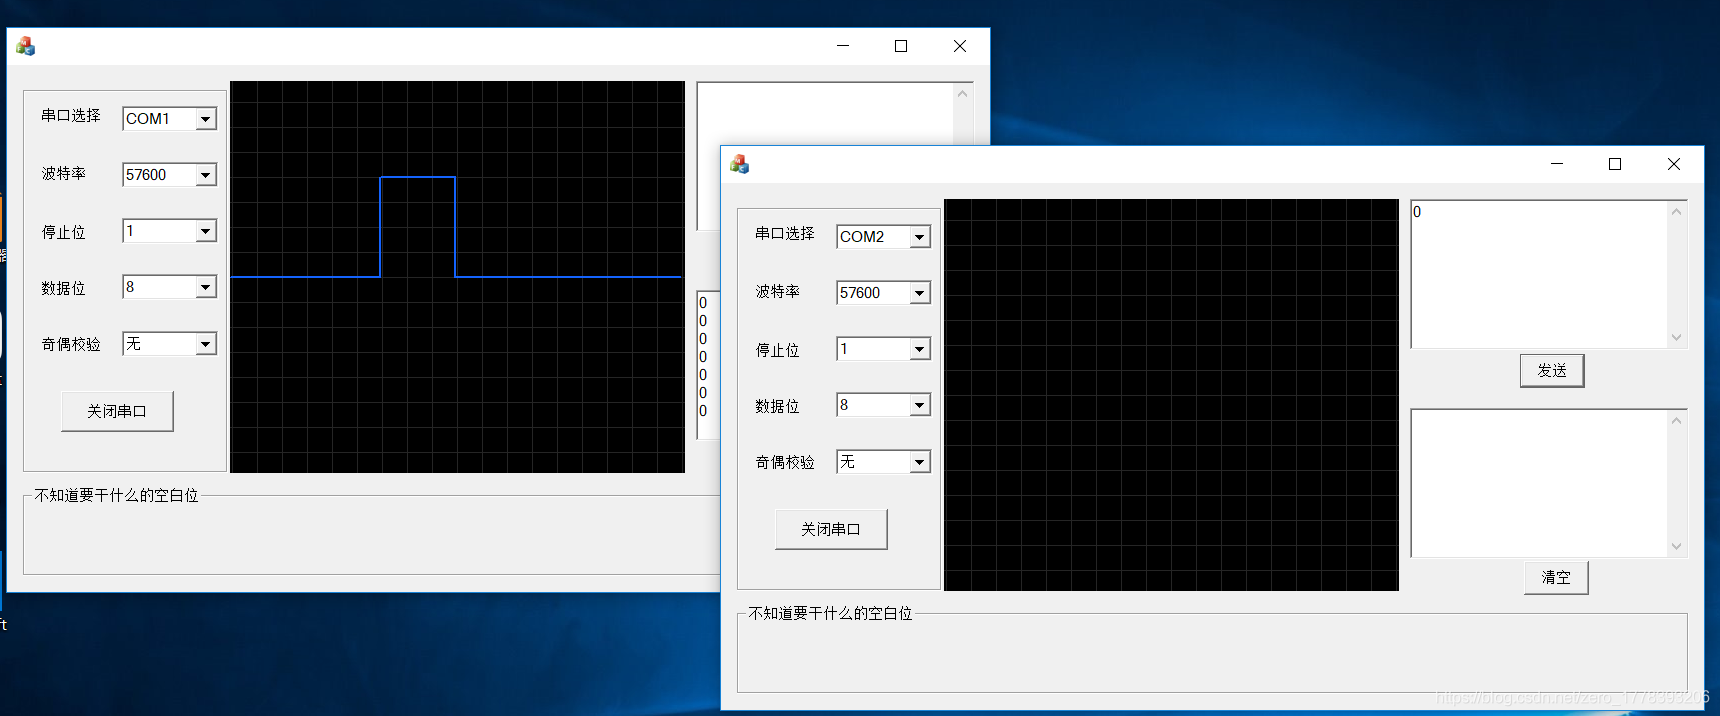
先上效果图和EXE下载
源代码下载
一、 创建项目以及放置相关控件
1) 建立一个MFC对话框项目,项目创建成功后设置项目为多字节字符集。
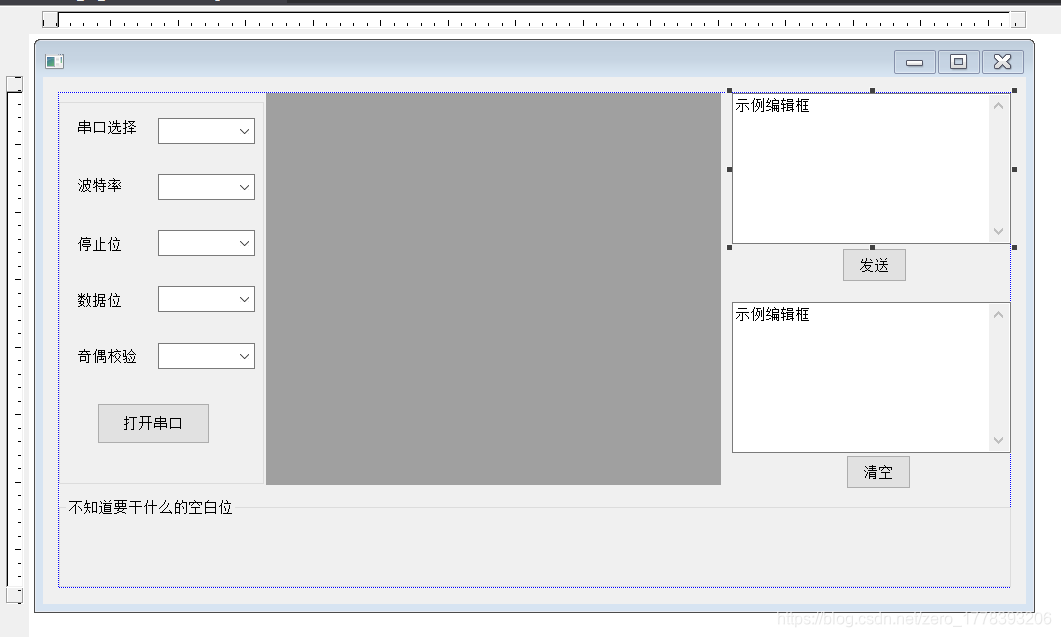
2) 在对话框里放置一个Group Box控件,在里边放置五个Combo Box控件(用来选择串口号、波特率、数据位、停止位、奇偶校验)、五个Static Text控件(显示串口选择、波特率、数据位、停止位、奇偶校验)和一个Button控件(用来打开/关闭串口)。在每个控件的属性界面设置其Caption属性和ID,如下图所示:
选择第一个Combo Box控件,右键->添加变量,设置如下:
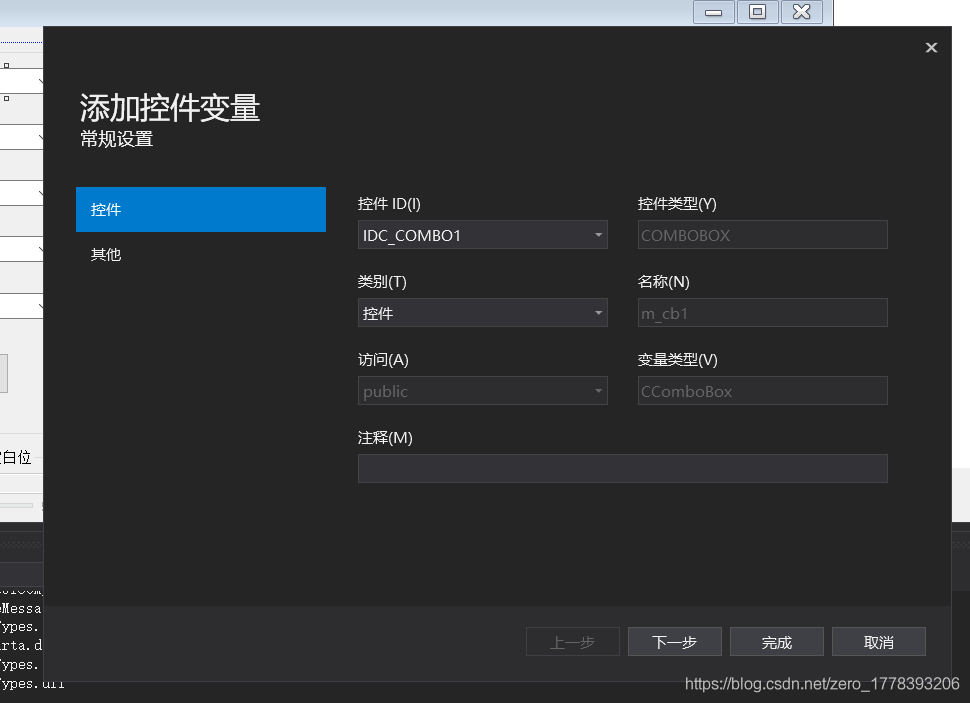
同样设置其余四个Combo Box控件,注意变量名不要重复。
然后在对话框初始化函数OnInitDialog()里设置五个Combo Box控件要显示的文字,代码如下:
//串口
 m_cb1.AddString(_T("COM1"));
 m_cb1.AddString(_T("COM2"));
 m_cb1.AddString(_T("COM3"));
 m_cb1.AddString(_T("COM4"));
 m_cb1.AddString(_T("COM5"));
 //波特率
 m_cb2.AddString(_T("1382400"));
 m_cb2.AddString(_T("921600"));
 m_cb2.AddString(_T("460800"));
 m_cb2.AddString(_T("256000"));
 m_cb2.AddString(_T("230400"));
 m_cb2.AddString(_T("128000"));
 m_cb2.AddString(_T("115200"));
 m_cb2.AddString(_T("76800"));
 m_cb2.AddString(_T("57600"));
 m_cb2.AddString(_T("43000"));
 m_cb2.AddString(_T("38400"));
 m_cb2.AddString(_T("19200"));
 m_cb2.AddString(_T("14400"));
 m_cb2.AddString(_T("9600"));
 m_cb2.AddString(_T("4800"));
 m_cb2.AddString(_T("4800"));
 m_cb2.AddString(_T("2400"));
 m_cb2.AddString(_T("1200"));
 //停止位
 m_cb3.AddString(_T("1"));
 m_cb3.AddString(_T("1.5"));
 m_cb3.AddString(_T("2"));
 //数据位
 m_cb4.AddString(_T("8"));
 m_cb4.AddString(_T("7"));
 m_cb4.AddString(_T("6"));
 m_cb4.AddString(_T("5"));
 //奇偶校验
 m_cb5.AddString(_T("无"));
 m_cb5.AddString(_T("奇校验"));
 m_cb5.AddString(_T("偶校验"));
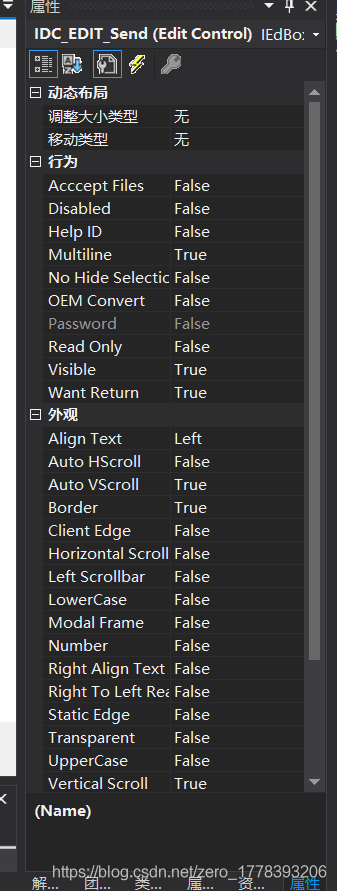
3) 在对话框中添加两个Edit Control控件(用来显示接收和发送的信息)、两个Button(发送数据和清除数据按钮)。如下图所示:

在控件的属性界面设置两个按钮的Caption值以及ID,然后重点设置两个文字编辑控件的属性如下,当然也可以根据自己的需要设置,我这样设置是为了实现可以输入多行信息。
4) 在界面的中间部分我放置了一个Custom Control控件来充当画布,最初的目的是为了可以实现串口数据的可视化,当然这个部分跳过也可以。对于自定义控件需要设置的东西就比较多了,可以参考点这里
具体步骤如下:
首先往对话框添加一个“自定义控件”,然后右击该控件选择“建立类向导”,在弹出的对话框点击“Add Class…”,选择“New…",之后,“Base Class"选择generic CWnd,“Name"项填Canvas(这是这个自定义控件所对应的类的名字),点确定。
给Canvas类添加如下函数:
BOOL Canvasl::RegisterWndClass()
{
	WNDCLASS windowclass;
	HINSTANCE hInst=AfxGetInstanceHandle();
	if(!::GetClassInfo(hInst,"MyDrawPad",&windowclass))
	{
		windowclass.style=CS_DBLCLKS;
		windowclass.lpfnWndProc=::DefWindowProc;
		windowclass.cbClsExtra=windowclass.cbWndExtra=0;
		windowclass.hInstance=hInst;
		windowclass.hIcon=NULL;
		windowclass.hCursor=AfxGetApp()->LoadStandardCursor(IDC_ARROW);
		windowclass.hbrBackground=::GetSysColorBrush(COLOR_WINDOW);
		windowclass.lpszMenuName=NULL;
		windowclass.lpszClassName="MyDrawPad";
		if(!AfxRegisterClass(&windowclass))
		{
		   AfxThrowResourceException();
		   return FALSE;
		}
	}
	return TRUE;
}
在Canvas类构造函数中调用RegisterWndClass函数,如下:
Canvas::Canvas()
{
 RegisterWndClass();
}
接着右击对话框里“自定义控件”,选择属性,“种类”框里填上MyDrawPad(窗口类)。————这是窗口类的名字,区别于自定义控件的类名,这是自定义控件被定制成窗口之后,该自定义控件所具有的名字。
给对话框类添加一个Canvas类对象。如:Canvas canv;(记得包含头文件)。对话框类的DoDataExchange函数里添加如下语句:
void CVIDlg::DoDataExchange(CDataExchange* pDX)
{
  CDialogEx::DoDataExchange(pDX);
  DDX_Control(pDX, IDC_Canvas, canv);//ID是自己设置的
  DDX_Control(pDX, IDC_COMBO1, m_cb1);//以下几句是之前添加控件变量自动生成的,从这也可以看出自定义控件和基础控件的区别
  DDX_Control(pDX, IDC_COMBO2, m_cb2);
  DDX_Control(pDX, IDC_COMBO3, m_cb3);
  DDX_Control(pDX, IDC_COMBO4, m_cb4);
  DDX_Control(pDX, IDC_COMBO5, m_cb5);
}
到了这里,自定义控件的基本问题算是解决了。
二、Win32 API 编写串口相关函数
接下来就到了本程序的核心部分,CSDN有很多资料可以参考,
https://blog.csdn.net/cwm_meng_home/article/details/24351269
https://blog.csdn.net/lenojackson/article/details/81872021
https://blog.csdn.net/qq_36305492/article/details/78318571
https://www.cnblogs.com/smulngy/p/7095711.html
https://blog.csdn.net/wowocpp/article/details/80533975
串口类的头文件和实现文件内容如下:
头文件
#pragma once
class SerialPort
{
public:
       int m_Port;
       char szCurPath[256];
       SerialPort();
       ~SerialPort();
       bool OpenPort(int port);
       bool SetPort(DWORD baud,BYTE stop,BYTE data,BYTE parity);
       void ClosePort();
       bool ReadDate(unsigned char *receive,DWORD & receivelen);
       bool WriteDate(unsigned char *send,int sendlen);
private:
       OVERLAPPED ReadovReady, WriteovReady;
       HANDLE hCom;
       bool bOpenCom;
};
实现
#include "pch.h"
#include "SerialPort.h"
#include"VI.h"

SerialPort::SerialPort()
{
	this->bOpenCom = false;
}
SerialPort::~SerialPort()
{
	this->ClosePort();
}

bool SerialPort::OpenPort(int port)
{
	if (bOpenCom)
	{
		this->ClosePort();
		bOpenCom = false;
	}
	char szport[10];
	CString portname;
	sprintf_s(szport, "COM%d", port);
	portname = szport;
	hCom = CreateFile(portname, GENERIC_READ | GENERIC_WRITE, 0, NULL, OPEN_EXISTING, FILE_FLAG_OVERLAPPED,NULL);
	if (hCom == INVALID_HANDLE_VALUE)
	{
		CString mess;
		mess = _T("打开") + portname + _T("失败");
		AfxMessageBox(mess);
		return FALSE;
	}
	else
	{
		CString mess;
		mess = _T("打开") + portname + _T("成功");
		AfxMessageBox(mess);
		return TRUE;
	}

}
void SerialPort::ClosePort()
{
	if (!bOpenCom)
		return;

	CloseHandle(hCom);
	hCom = NULL;

	CloseHandle(ReadovReady.hEvent);
	CloseHandle(WriteovReady.hEvent);
	ReadovReady.hEvent = NULL;
	WriteovReady.hEvent = NULL;
}
bool SerialPort::SetPort(DWORD baud, BYTE stop, BYTE data, BYTE parity)
{
	if (!SetupComm(hCom, 1024, 1024))//输入缓冲区和输出缓冲区的大小都是1024
		return false;

	COMMTIMEOUTS TimeOuts;
	//设定读超时
	TimeOuts.ReadIntervalTimeout = 1000;
	TimeOuts.ReadTotalTimeoutMultiplier = 500;
	TimeOuts.ReadTotalTimeoutConstant = 5000;
	//设定写超时
	TimeOuts.WriteTotalTimeoutMultiplier = 500;
	TimeOuts.WriteTotalTimeoutConstant = 2000;
	if(!SetCommTimeouts(hCom, &TimeOuts)) //设置超时
		return false;

	memset(&ReadovReady, 0, sizeof(OVERLAPPED));
	memset(&WriteovReady, 0, sizeof(OVERLAPPED));
	ReadovReady.hEvent = CreateEvent(NULL, TRUE, FALSE, NULL);
	WriteovReady.hEvent = CreateEvent(NULL, TRUE, FALSE, NULL);

	SECURITY_ATTRIBUTES sa;
	sa.nLength = sizeof(SECURITY_ATTRIBUTES);
	sa.lpSecurityDescriptor = NULL;
	sa.bInheritHandle = TRUE;

	DCB dcb;
	GetCommState(hCom, &dcb);
	//dcb.BaudRate = 115200; //波特率为9600
	//dcb.ByteSize = 8; //每个字节有8位
	//dcb.Parity = NOPARITY; //无奇偶校验位
	//dcb.StopBits = TWOSTOPBITS; //两个停止位
	dcb.BaudRate = baud;
	dcb.ByteSize = data;
	dcb.Parity = parity;
	dcb.StopBits = stop;
	if(!SetCommState(hCom, &dcb))
		return false;

	bOpenCom = true;
	return bOpenCom;

}
bool SerialPort::ReadDate(unsigned char* receive, DWORD& receivelen)
{

	if (!bOpenCom)
		return false;
	/*if (ReadovReady.hEvent == NULL)
		return false;*/
	DWORD dwErrorFlags;
	COMSTAT ComStat;
	receivelen = 0;
	ClearCommError(hCom, &dwErrorFlags, &ComStat);
	if (ReadFile(hCom, receive, ComStat.cbInQue, &receivelen, &ReadovReady) == FALSE)
	{
		if (GetLastError() != ERROR_IO_PENDING)
			return false;
	}

	if (receivelen == 0)
		return false;

	//receive[receivelen] = 0;

	DWORD dwRead;
	DWORD dwRes = WaitForSingleObject(ReadovReady.hEvent, 2000);
	switch (dwRes)
	{
	case WAIT_OBJECT_0:
		if (!GetOverlappedResult(hCom, &ReadovReady, &dwRead, FALSE))
			return false;
		break;

	case WAIT_TIMEOUT:
		break;

	default:
		break;
	}
	return true;

}

bool SerialPort::WriteDate(unsigned char* send, int sendlen)
{
	if (!bOpenCom)    return false;

	DWORD    BytesSent;
	DWORD    resD;

	PurgeComm(hCom, PURGE_RXCLEAR | PURGE_TXCLEAR | PURGE_RXABORT | PURGE_TXABORT);

	BytesSent = 0;
	BOOL hr = WriteFile(hCom,       // Handle to COMM Port
		send,                       // Pointer to message buffer in calling finction
		sendlen,                    // Length of message to send
		&BytesSent,                 // Where to store the number of bytes sent
		&WriteovReady);             // Overlapped structure
	if (!hr)
	{
		if (GetLastError() != ERROR_IO_PENDING)
		{
			return false;
		}
		else
		{
			resD = WaitForSingleObject(WriteovReady.hEvent, INFINITE);
		}
		switch (resD)
		{
		case WAIT_OBJECT_0:
		{
			if (!GetOverlappedResult(hCom, &WriteovReady, &BytesSent, false))
				return false;
			else
				return true;

		}
		default:
			return false;
			break;
		}
	}
	return true;

}
在项目中添加两个文件之后需要在对话框头文件里添加一个串口类变量,记得包含头文件。关于这部分主要是借鉴他人修改而成,对底层的实现细节没有深入研究。因此也对后来数据可视化的实现造成了一些影响,不过对于简单的通信还是可以实现的。
三、 编写各个控件的函数
1) 打开/关闭串口按钮
在资源视图里双击打开串口按钮就能进入相应函数里,直接编写代码。首先要获得几个串口参数,只有当五个参数正确选择之后才能执行打开串口,否则会弹出错误信息。并且当打开串口后,会把按钮上的文字改为关闭按钮,再次点击一下就会执行关闭串口命令,并把文字改为打开串口。
void CVIDlg::OnBnClickedButtonCom()
{
	static bool flag=false;
	// TODO: 在此添加控件通知处理程序代码
	if (!flag)
	{
		int comport = m_cb1.GetCurSel() + 1;//获取串口号
		if (comport == 0)
		{
			Alert();
			return;
		}


		//int baud, stop,data, parity;
		DWORD baud;
		BYTE stop, data, parity;

		int index;
		CString text;

		index = m_cb2.GetCurSel();		// 获取选定项的序号
		if (index == -1)
		{
			Alert();
			return;
		}
		else
		{
			m_cb2.GetLBText(index, text);  // 获取波特率
			baud = _ttoi(text);
		}


		index = m_cb3.GetCurSel();
		if (index == -1)
		{
			Alert();
			return;
		}
		else
		{
			m_cb3.GetLBText(index, text);  // 获取停止位
			if (text == "1")
				stop = 0;
			else if (text == "1.5")
				stop = 1;
			else if (text == "2")
				stop = 2;
		}


		index = m_cb4.GetCurSel();
		if (index == -1)
		{
			Alert();
			return;
		}
		else
		{
			m_cb4.GetLBText(index, text);  // 获取数据位
			data = _ttoi(text);
		}

		index = m_cb5.GetCurSel();
		if (index == -1)
		{
			Alert();
			return;
		}
		else
		{
			m_cb5.GetLBText(index, text);  // 获取奇偶校验位
			if (text == "无")
				parity = 0;
			else if (text == "奇校验")
				parity = 1;
			else if (text == "偶校验")
				parity = 2;

		}

		com.OpenPort(comport);
		com.SetPort(baud, stop, data, parity);
		GetDlgItem(IDC_BUTTON_COM)->SetWindowText("关闭串口");
		flag = true;
	}
	else
	{
		com.ClosePort();
		GetDlgItem(IDC_BUTTON_COM)->SetWindowText("打开串口");
		flag = false;
	}
}
2) 发送按钮
获得发送编辑框的内容并调用串口类发送函数发送。
void CVIDlg::OnBnClickedButtonSend()
{
	// TODO: 在此添加控件通知处理程序代码
	CString sendText;
	GetDlgItemText(IDC_EDIT_Send, sendText);
	sendText += "\r\n";
	//在多字符集模式下
	unsigned char* send;
	//send = (unsigned char*)(LPCTSTR)sendText;
	send = (unsigned char*)sendText.GetBuffer(sendText.GetLength());


	//unsigned char send[100];
	//memcpy(send, LPCTSTR(sendText), sendText.GetLength() * sizeof(TCHAR));
	//send[sendText.GetLength()] = '\0';

	com.WriteDate(send, sendText.GetLength());


	//AfxMessageBox(sendText);
}
3) 清除按钮
清除接收框的信息。
void CVIDlg::OnBnClickedButtonClear()
{
	// TODO: 在此添加控件通知处理程序代码
	SetDlgItemText(IDC_EDIT_Receive, _T(""));
}
4) 接收函数
读取串口接收到的数据并显示到接收框,为了使每次接收到的数据都显示出来,需要先获得接收编辑框的内容,然后添加上本次的数据一起显示。这个函数需要有定时函数调用,每个一定的时间间隔就执行一次,需要设置定时间隔时间。
void CVIDlg::Receive()
{
	//static int h = 0;
	int static h = 0;
	// TODO: 在此添加控件通知处理程序代码
	static int i = 0;
	unsigned char receive[1024]="";
	DWORD len = 0;
	CString s;
	com.ReadDate(receive, len);
	CString receiveText(receive);
	/*s.Format(_T(":%d"), i++);
	receiveText += s;
	receiveText += "\r\n";*/
	GetDlgItemText(IDC_EDIT_Receive, s);
	receiveText = s + receiveText;
	SetDlgItemText(IDC_EDIT_Receive, receiveText);
	SendDlgItemMessage(IDC_EDIT_Receive, WM_VSCROLL, SB_BOTTOM, 0); //滚动条始终在底部
	if (len != 0)
	{
		if (receive[0] == '1')
			canv.Update(1 * 100);
		else if (receive[0] == '0')
			canv.Update(0 * 100);
	}

}
5) 定时函数
在对话框类视图里,右键->类视图->消息->WM_TIMER->添加处理程序,系统会自动进入OnTimer(UINT_PTR nIDEvent)函数。要使用定时函数,还需要启动定时器才能正常运行,在对话框初始化函数OnInitDialog()里添加如下语句:
SetTimer(1,1000,NULL); //参数:定时器标号,定时时间(ms)。启动定时器1,每隔1s刷新一次,
如果想要关闭定时器,使用如下函数:
KillTimer(1); //关定时器1
如果有多个定时器,则可以根据定时器标号在OnTimer()函数里使用switch case语句分别执行其各自的内容。
void CVIDlg::OnTimer(UINT_PTR nIDEvent)
{
	// TODO: 在此添加消息处理程序代码和/或调用默认值
	switch (nIDEvent)
	{
	case 1:
	{
		canv.Draw();
		break;
	case 2:
		Receive();
		break;
	}
	default:
		break;
	}


	CDialogEx::OnTimer(nIDEvent);
}
6) 改变尺寸函数
一般对于桌面程序而言,界面的大小并不是固定不变的,使用者往往会根据需要调整界面的大小,但使用者的目的并不仅仅是调整整个界面的大小,还包括界面中的控件。因此要想达到整体的大小改变,就需要动态改变控件大小。
在对话框类视图里,右键->类视图->消息->WM_SIZE->添加处理程序,系统会自动生成OnSize(UINT nType, int cx, int cy)函数,并进入到函数体,在函数体内调用函数改变各个控件的位置和大小并记录当前界面的大小。这样当界面改变时所有控件就会跟着一起改变。当然,为了记录对话框的尺寸需要在头文件里添加一个CRect变量,在每次对话框改变大小时就记录数值,当下一次变化时可以根据变化的倍数来改变其余控件的尺寸。
void CVIDlg::OnSize(UINT nType, int cx, int cy)
{
	CDialogEx::OnSize(nType, cx, cy);

	// TODO: 在此处添加消息处理程序代码
	if (nType != SIZE_MINIMIZED)
	{

		ChangeSize(IDC_Canvas, cx, cy);
		ChangeSize(IDC_BUTTON_Clear,cx,cy);
		ChangeSize(IDC_BUTTON_Send,cx,cy);
		ChangeSize(IDC_EDIT_Send,cx,cy);
		ChangeSize(IDC_EDIT_Receive,cx,cy);
		ChangeSize(IDC_COMBO1, cx, cy);
		ChangeSize(IDC_COMBO2, cx, cy);
		ChangeSize(IDC_COMBO3, cx, cy);
		ChangeSize(IDC_COMBO4, cx, cy);
		ChangeSize(IDC_COMBO5, cx, cy);
		ChangeSize(IDC_STATIC1, cx, cy);
		ChangeSize(IDC_STATIC2, cx, cy);
		ChangeSize(IDC_STATIC3, cx, cy);
		ChangeSize(IDC_STATIC4, cx, cy);
		ChangeSize(IDC_STATIC5, cx, cy);
		ChangeSize(IDC_BUTTON_COM, cx, cy);
		ChangeSize(IDC_GROUP_BOX1, cx, cy);
		ChangeSize(IDC_GROUP_BOX2, cx, cy);


		GetClientRect(&oldrect);
	}

}
void CVIDlg::ChangeSize(UINT nID, int x, int y)
{
	CWnd* pWnd;
	pWnd = GetDlgItem(nID);
	if (pWnd != NULL)
	{
		CRect rect;
		pWnd->GetWindowRect(&rect);
		ScreenToClient(&rect);
		rect.left = rect.left * x / oldrect.Width();
		rect.right = rect.right * x / oldrect.Width();
		rect.top = rect.top * y / oldrect.Height();
		rect.bottom = rect.bottom * y / oldrect.Height();
		if (nID == IDC_COMBO1)
			rect.bottom += (rect.bottom - rect.top) * (m_cb1.GetCount());
		if (nID == IDC_COMBO2)
			rect.bottom += (rect.bottom - rect.top) * (m_cb2.GetCount());
		if (nID == IDC_COMBO3)
			rect.bottom += (rect.bottom - rect.top) * (m_cb3.GetCount());
		if (nID == IDC_COMBO4)
			rect.bottom += (rect.bottom - rect.top) * (m_cb4.GetCount());
		if (nID == IDC_COMBO5)
			rect.bottom += (rect.bottom - rect.top) * (m_cb5.GetCount());
		pWnd->MoveWindow(rect);

		/*CFont font;
		font.CreatePointFont(fontsize, "Microsoft Sans Serif");
		pWnd->SetFont(&font);*/
	}
}
7) 系统函数
为了改变回车和ESC键的功能需要添加OnIdcancel();OnIdok();同样是在类向导,具体如之前步骤所示。然后修改函数代码。
void CVIDlg::OnIdcancel()
{
	// TODO: 在此添加命令处理程序代码
	EndDialog(IDCANCEL);
}
void CVIDlg::OnIdok()
{
	// TODO: 在此添加命令处理程序代码
}
四、 画布类
对于自定义控件实现的画布功能,主要是把接收到的数据显示出来,在这里只实现了利用单片机采集某个端口的电平值,并通过串口发送到上位机并实时显示,因此只能看到高低电平的方波,如果想要实现其余功能需要对接收到的数据进行相关处理,并更新到画布类的成员变量,定时函数会调用画图函数实时绘制数据。
头文件
#pragma once

#include<vector>
using namespace std;

#define PI 3.14159265853
// Canvas

class Canvas : public CWnd
{
	DECLARE_DYNAMIC(Canvas)

public:
	Canvas();
	virtual ~Canvas();
	BOOL RegisterWndClass();

	void Set();
	void Init(CDC &dc);
	void Draw();
	void DrawTest();
	void Update();
	void Update(float data);

protected:
	int x, y, width, height;
	int datelen;
	vector <float> VI_date1, VI_date2;

protected:
	DECLARE_MESSAGE_MAP()
};
实现
// Canvas.cpp: 实现文件
//

#include "pch.h"
#include "VI.h"
#include "Canvas.h"


// Canvas

IMPLEMENT_DYNAMIC(Canvas, CWnd)

Canvas::Canvas()
{
	RegisterWndClass();

	x = y = 0;
	width = height = 300;
	this->datelen = width / 25;
}

Canvas::~Canvas()
{
}


BEGIN_MESSAGE_MAP(Canvas, CWnd)
END_MESSAGE_MAP()


// Canvas 消息处理程序

BOOL Canvas::RegisterWndClass()
{
	WNDCLASS windowclass;
	HINSTANCE hInst = AfxGetInstanceHandle();

	if (!(::GetClassInfo(hInst, _T("MyDrawPad"), &windowclass)))
	{

		windowclass.style = CS_DBLCLKS;

		windowclass.lpfnWndProc = ::DefWindowProc;

		windowclass.cbClsExtra = windowclass.cbWndExtra = 0;

		windowclass.hInstance = hInst;

		windowclass.hIcon = NULL;

		windowclass.hCursor = AfxGetApp()->LoadStandardCursor(IDC_ARROW);

		windowclass.hbrBackground = ::GetSysColorBrush(COLOR_WINDOW);

		windowclass.lpszMenuName = NULL;

		windowclass.lpszClassName = _T("MyDrawPad");


		if (!AfxRegisterClass(&windowclass))

		{

			AfxThrowResourceException();

			return FALSE;

		}

	}

	return TRUE;

}
void Canvas::Set()
{
	CRect rect;
	GetClientRect(&rect);
	x = y = 0;
	width = rect.Width();
	height = rect.Height();
	this->datelen = width / 25;
}
void Canvas::Init(CDC &dc)
{
	Set();
	/*CClientDC dc(this);*/
	CBrush bru(RGB(0, 0, 0));
	dc.SelectObject(bru);
	dc.Rectangle(x, y, width + x, height + y);

	//画背景
	CPen pen;
	pen.CreatePen(PS_SOLID, 1, RGB(37, 37, 37));
	dc.SelectObject(&pen);


	//画横线
	for (int i = height / 2; i <= height; i += 25)
	{
		dc.MoveTo(0 + x, i + y);
		dc.LineTo(width + x, i + y);
	}
	for (int i = height / 2; i >= 0; i -= 25)
	{
		dc.MoveTo(0 + x, i + y);
		dc.LineTo(width + x, i + y);
	}

	//画竖线
	for (int j = width / 2; j < width; j += 25)
	{
		dc.MoveTo(x + j, 0 + y);
		dc.LineTo(x + j, height + y);
	}
	for (int j = width / 2; j >= 0; j -= 25)
	{
		dc.MoveTo(x + j, 0 + y);
		dc.LineTo(x + j, height + y);
	}
}
//画正弦函数
void Canvas::DrawTest()
{
	CRect rect;
	GetClientRect(&rect);
	CDC dc;
	CBitmap bmp;//内存中承载临时图象的位图
	CDC* pdc = GetDC();
	if (!pdc)
		return;
	dc.CreateCompatibleDC(pdc);//依附窗口DC创建兼容内存DC
	//创建兼容位图(必须用pDC创建,否则画出的图形变成黑色)
	bmp.CreateCompatibleBitmap(pdc, rect.Width(), rect.Height());
	dc.SelectObject(&bmp);

	Update();
	Init(dc);

	CPen pen;
	pen.CreatePen(PS_SOLID, 2, RGB(20, 99, 253));
	dc.SelectObject(&pen);


	for (int j = 0; j < VI_date1.size(); j++)
	{
		int x = this->x + (this->width / (float)VI_date1.size()) * j;
		int y = this->y + this->height / 2 - VI_date1[j];
		if (j == 0)
			dc.MoveTo(x, y);
		else
			dc.LineTo(x, y);
	}

	pdc->BitBlt(0, 0, rect.Width(), rect.Height(), &dc, 0, 0, SRCCOPY);

	//delete pdc;
	pdc->DeleteDC();
	/*dc.DeleteDC();
	bmp.DeleteObject();*/
}
//画采集到的信号值
void Canvas::Draw()
{
	CRect rect;
	GetClientRect(&rect);
	CDC dc;
	CBitmap bmp;//内存中承载临时图象的位图
	CDC* pdc = GetDC();
	if (!pdc)
		return;
	dc.CreateCompatibleDC(pdc);//依附窗口DC创建兼容内存DC
	//创建兼容位图(必须用pDC创建,否则画出的图形变成黑色)
	bmp.CreateCompatibleBitmap(pdc, rect.Width(), rect.Height());
	dc.SelectObject(&bmp);

	Init(dc);

	CPen pen;
	pen.CreatePen(PS_SOLID, 2, RGB(20, 99, 253));
	dc.SelectObject(&pen);

	for (int j = 0; j < VI_date2.size(); j++)
	{
		int x = this->x + j * 25;
		int y = this->y + this->height / 2 - VI_date2[j];
		if (j == 0)
			dc.MoveTo(x, y);
		else
			dc.LineTo(x, y);
		dc.LineTo(x+25, y);


	}
	pdc->BitBlt(0, 0, rect.Width(), rect.Height(), &dc, 0, 0, SRCCOPY);
	//delete pdc;
	pdc->DeleteDC();
	/*dc.DeleteDC();
	bmp.DeleteObject();*/
}
void Canvas::Update()
{
	int static d1 = 0;
	//update date1
	while (VI_date1.size() <= this->datelen)
	{
		float y = 100 * sin(2 * PI * 0.01 * d1);
		VI_date1.push_back(y);
		d1++;
	}
	if (VI_date1.size() > this->datelen)
	{
		vector<float>::iterator it = VI_date1.begin();
		VI_date1.erase(it);
	}
}
void Canvas::Update(float data)
{
	//update date2
	VI_date2.push_back(data);
	if (VI_date2.size() > this->datelen)
	{
		vector<float>::iterator it = VI_date2.begin();
		VI_date2.erase(it);
	}
}
到这里差不多就介绍完了,利用虚拟串口软件和单片机分别进行过测试,可以正常运行。


 1万+
1万+


 被折叠的 条评论
为什么被折叠?
被折叠的 条评论
为什么被折叠?
 到【灌水乐园】发言


