Train of thought
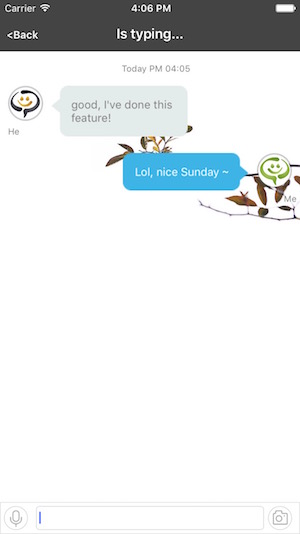
要显示对方输入状态,也就是说要给对方发送一个标志,对方接收到这个标志,就知道你正在输入,然后在标题栏上显示你正在输入就行了。
那怎么发送标志呢?知道了我们传输的信息都是XML文件,也就是要接收两个不同的状态。增加一个标记composing,假如我们输入的时候它就传递isTyping,不输入的时候什么都不传就好了。
Do it!
OK, 有了思路我们就着手去做。
首先我得知道我们什么时候正在输入什么时候停止输入,而且我们知道输入框是一个UITextView,由于真正的控件调用都是框架做好了的,我们要进入框架。
找到UUInputFunctionView.h,好啊,我们看到了定义成UITextView的*TextViewInput这个小东西,接着进入m文件中去!
在m文件中我们发现TextViewDelegate已经接收了代理,
- (void)textViewDidBeginEditing:(UITextView *)textView和- (void)textViewDidEndEditing:(UITextView *)textView,我们需要的正是他们!太好了找到了能够发现输入状态变更的方法,我们就该让它们为我们提供服务了!
改框架:UUInputFunctionView.h中@Protocol中我们增加两个方法- (void)composing;和- (void)endComposing;,添加好后我们就要把钥匙交给代理了。交接,UUInputFunctionView.m中
- (void)textViewDidBeginEditing:(UITextView *)textView
 {
 placeHold.hidden = self.TextViewInput.text.length > 0;
 [self.delegate composing];
 }
和
- (void)textViewDidEndEditing:(UITextView *)textView
 {
 placeHold.hidden = self.TextViewInput.text.length > 0;
 [self.delegate endComposing];
}实现代理:回到我们UUChatViewController.m中,增加两个方法:
- (void)composing {}和- (void)endComposing {},方法内容先留空,接下来我们要大改了。首先,改变发送XML的结构:
#pragma mark - 发送XML封装数据
- (void)sendXML:(NSString *)message image:(UIImage *)img voice:(NSData *)voice time:(NSUInteger)second isComposing:(NSString *)status{
    //生成xml
    //<composing>
    NSXMLElement *composing = [NSXMLElement elementWithName:@"composing"];
    [composing setStringValue:status];
    //<body>
    NSXMLElement *body = [NSXMLElement elementWithName:@"body"];
    [body setStringValue:message];
    //<message>
    NSXMLElement *mes = [NSXMLElement elementWithName:@"message"];
    //<message type = chat>
    [mes addAttributeWithName:@"type" stringValue:@"chat"];
    //<message type = "chat" to = _chatUserName>
    [mes addAttributeWithName:@"to" stringValue:_chatUserName];
    //<message type = "chat" to = _chatUserName from = ...>
    [mes addAttributeWithName:@"from" stringValue:[[NSUserDefaults standardUserDefaults] stringForKey:USERID]];
    //<message ...><composing></composing><body></body></message>
    [mes addChild:composing];
    [mes addChild:body];

    if (img) {
        NSData *imgData = UIImageJPEGRepresentation(img, 0.1);
        NSString *imgStr=[imgData base64EncodedStringWithOptions:0];

        //<message ...><body></body><img></img></message>
        NSXMLElement *imgAttachment = [NSXMLElement elementWithName:@"image"];
        [imgAttachment setStringValue:imgStr];
        [mes addChild:imgAttachment];
    }

    if (voice) {
        NSString *voiceStr = [voice base64EncodedStringWithOptions:0];
        NSXMLElement *voiceAttachment = [NSXMLElement elementWithName:@"voice"];
        [voiceAttachment setStringValue:voiceStr];
        [voiceAttachment addAttributeWithName:@"voiceTime" unsignedIntegerValue:second];
        [mes addChild:voiceAttachment];
    }

    //发送消息
    [[self xmppStream] sendElement:mes];
    NSLog(@"%@", mes);
}
发送结构改好了,我们就可以填充实现代理的方法了:
- (void)composing {
    [self sendXML:@"" image:nil voice:nil time:0 isComposing:@"isTyping"];
}

- (void)endComposing {
    [self sendXML:@"" image:nil voice:nil time:0 isComposing:@""];
}
我们还要更改接受的配置:
//收到消息后把消息传递给代理
- (void)xmppStream:(XMPPStream *)sender didReceiveMessage:(XMPPMessage *)message {
    //解析xml
    NSString *composing = [[message elementForName:@"composing"] stringValue];
    composing = !composing ? @"" : composing;
    NSString *msg = [[message elementForName:@"body"] stringValue];
    msg = !msg ? @"" : msg;
    NSString *img = [[message elementForName:@"image"] stringValue];
    img = !img ? @"" : img;
    NSString *voice = [[message elementForName:@"voice"] stringValue];
    NSString *voiceTime = [[[message elementForName:@"voice"] attributeForName:@"voiceTime"] stringValue];
    if (!voice) {
        voice = @"";
        voiceTime = @"";
    }
    NSString *from = [[message attributeForName:@"from"] stringValue];

    NSMutableDictionary *dict = [NSMutableDictionary dictionary];
    [dict setObject:composing forKey:@"composing"];
    [dict setObject:msg forKey:@"msg"];
    [dict setObject:img forKey:@"photo"];
    [dict setObject:voice forKey:@"voice"];
    [dict setObject:voiceTime forKey:@"voiceTime"];
    [dict setObject:from forKey:@"sender"];

    [_messageDelegate newMessageReceived:dict];
}
这样我们能够接收到输入状态了,我们还需要对接收过来的数据进行处理:
- (void)newMessageReceived:(NSDictionary *)messageContent {
    dispatch_async(dispatch_get_main_queue(), ^{
        NSDictionary *dic = [NSDictionary dictionary];
        NSString *composing = [messageContent objectForKey:@"composing"];
        NSString *msg = [messageContent objectForKey:@"msg"];
        NSString *imageStr = [messageContent objectForKey:@"photo"];
        NSString *voiceStr = [messageContent objectForKey:@"voice"];
        NSString *voiceTimeStr = [messageContent objectForKey:@"voiceTime"];
        NSString *from = [messageContent objectForKey:@"sender"];
        if (imageStr.length > 0) {
            NSData *imgData = [[NSData alloc] initWithBase64EncodedString:imageStr options:0];
            UIImage *image = [UIImage imageWithData:imgData];
            dic = @{@"picture": image,
                    @"type": @(UUMessageTypePicture),
                    @"sender": from};
        } else if (voiceStr.length > 0) {
            NSData *voiceData = [[NSData alloc] initWithBase64EncodedString:voiceStr options:0];
            dic = @{@"voice": voiceData,
                    @"strVoiceTime": voiceTimeStr,
                    @"type": @(UUMessageTypeVoice),
                    @"sender": from};
        } else {
            dic = @{@"strContent": msg,
                    @"type": @(UUMessageTypeText),
                    @"sender": from};
        }

        if (![composing isEqualToString:@"isTyping"]) {
            [self dealTheFunctionData:dic];
            self.navigationItem.title = _chatUserName;
        } else {
            self.navigationItem.title = @"Is typing...";
        }
    });
}
这里需要注意,如果我们接收过来的是 文本,图片还有音频都为空,只有标志为”isTyping”的文本,为了防治cell显示接收到的空字符,我们还要加以过滤:
- (void)dealTheFunctionData:(NSDictionary *)dic
{
    if (![[dic objectForKey:@"strContent"] isEqualToString:@""]) {
        [self.chatModel addSpecifiedItem:dic];
        [self.chatTableView reloadData];
        [self tableViewScrollToBottom];
    }
}
好了,现在我们能够在聊天窗口显示“Is typing…”的状态了,但是我们还需要在“好友列表”中加一层过滤,不然只要接收到信息它就会显示一条未读信息,对方只是改变输入状态它都会显示一条未读信息,这样是不行的,来到“FriendListTableViewController.m”中,我们要改变其接收和显示的规则:
- (void)newMessageReceived:(NSDictionary *)messageContent {
    NSDictionary *dic = [NSDictionary dictionary];
    NSString *composing = [messageContent objectForKey:@"composing"];
    NSString *msg = [messageContent objectForKey:@"msg"];
    NSString *imageStr = [messageContent objectForKey:@"photo"];
    NSString *voiceStr = [messageContent objectForKey:@"voice"];
    NSString *voiceTimeStr = [messageContent objectForKey:@"voiceTime"];
    NSString *from = [messageContent objectForKey:@"sender"];
    if (imageStr.length > 0) {
        NSData *imgData = [[NSData alloc] initWithBase64EncodedString:imageStr options:0];
        UIImage *image = [UIImage imageWithData:imgData];
        dic = @{@"picture": image,
                @"type": @(UUMessageTypePicture),
                @"sender": from};
    } else if (voiceStr.length > 0) {
        NSData *voiceData = [[NSData alloc] initWithBase64EncodedString:voiceStr options:0];
        dic = @{@"voice": voiceData,
                @"strVoiceTime": voiceTimeStr,
                @"type": @(UUMessageTypeVoice),
                @"sender": from};
    } else {
        dic = @{@"strContent": msg,
                @"type": @(UUMessageTypeText),
                @"sender": from};
    }
    //重点来了~
    if ((![composing isEqualToString:@"isTyping"] && ![msg isEqualToString:@""]) || ![imageStr isEqualToString:@""] || ![voiceStr isEqualToString:@""]) {
        //收到消息数组
        [_messages addObject:dic];
        //每次刷新表格,就可以看到有多少条未读信息
        [self.tableView reloadData];
    }
}
OK!我们改变了它的规则,只要是”isTyping”都会被过滤掉!
好了,对方输入状态的显示的功能有了,改了我两个多小时,博客居然写了快一个小时!It’s wired…but, whatever.
改起来有些繁琐,但也算是对之前发送接收消息一个小的应用,不难理解,注意一些过滤规则就是了。


 被折叠的 条评论
为什么被折叠?


