


你真的懂Handler的消息机制吗?
作为一名Android开发人员,Handler的使用非常的普遍,但是还是有很多人经常不合理的使用,导致了一些内存泄漏等问题,这篇文章主要详细的从源码角度上再次梳理下Handler的运行机制
- 什么是Handler
- Handler的源码分析
- Handler应该注意
- 可以替代Handler的方案
Handler 是什么
Google 文档的定义是:
A Handler allows you to send and process Message and Runnable objects associated with a thread’s MessageQueue. Each Handler instance is associated with a single thread and that thread’s message queue. When you create a new Handler, it is bound to the thread / message queue of the thread that is creating it – from that point on, it will deliver messages and runnables to that message queue and execute them as they come out of the message queue.
意思大概是:Handler 发送和处理MessgeQueue关联的Message和Runnable 对象,每个Handler实例关联一个线程,当创建一个新的Handler的时候,它绑定了一个线程和消息队列,并且执行当前线程队列的消息。
Handler的源码分析
Handler 涉及到 Message、MessageQueue,Looper,Handler 这个四个类。
Message:消息实体
MessageQuque:消息队列,存储消息的单元
Looper:生成消息队列,绑定Handler,以循环的形式,来让消息跑起来
Handler:处理和发送消息
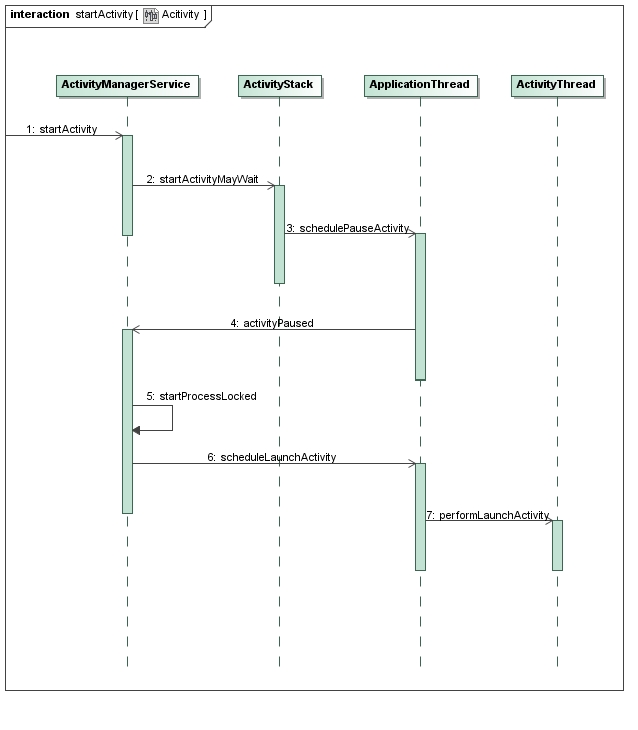
Handler的分析,Handler的创建,开始是一定要创建Looper,主线程的Looper,在ActivityThread 创建的,而ActivityThread涉及到了AMS启动Activity的过程,Activity启动过程(可以参考罗升阳https://blog.csdn.net/luoshengyang/article/details/6685853),如图所示,
在ActivityThread 里面的main函数发现
  public static void main(String[] args) {

		....
		//生成UI线程的Looper
        Looper.prepareMainLooper();

        ActivityThread thread = new ActivityThread();
        thread.attach(false);

        if (sMainThreadHandler == null) {
        	//得到Activity UI 线程的默认Hander
            sMainThreadHandler = thread.getHandler();
        }

        if (false) {
            Looper.myLooper().setMessageLogging(new
                    LogPrinter(Log.DEBUG, "ActivityThread"));
        }

        // End of event ActivityThreadMain.
        Trace.traceEnd(Trace.TRACE_TAG_ACTIVITY_MANAGER);
        //启动消息循环
        Looper.loop();

        throw new RuntimeException("Main thread loop unexpectedly exited");
    }
继续跟进Looper类的prepareMainLooper():
//对象通常被当作静态域存储
 static final ThreadLocal<Looper> sThreadLocal = new ThreadLocal<Looper>();
 public static void prepareMainLooper() {
 		//初始化Looper
        prepare(false);
        synchronized (Looper.class) {
            if (sMainLooper != null) {
                throw new IllegalStateException("The main Looper has already been prepared.");
            }
            sMainLooper = myLooper();
        }
    }


   public static void prepare() {
        prepare(true);
    }

    private static void prepare(boolean quitAllowed) {

        if (sThreadLocal.get() != null) {
            throw new RuntimeException("Only one Looper may be created per thread");
        }
        //将looper存储在ThreadLocal里面
        sThreadLocal.set(new Looper(quitAllowed));
    }
当看到new Lopper的时候,已经明白了,就是这时候先检查ThreadLocal里面是否有Looper,如果有,就抛出异常,因为每个Thread 里面只能有一个Looper, 当创建Looper对象后,这时候,消息队列也被创建出来了。
  private Looper(boolean quitAllowed) {
        mQueue = new MessageQueue(quitAllowed);
        mThread = Thread.currentThread();
    }
ThreadLocal:用于创建和管理线程的本地存储,可以为使用相同的变量的每个不同的线程创建不同的存储,意思就是,如果你有N个线程要使用Looper所表示的对象,那么线程本地存储就会生成N个用于Looper的不同存储块。ThreadLocal 对象通常被当作静态域存储.
因此,我们从上面源码可以得出,在创建一个实例化Handler之前,必须先准备好为当前线程创建一个Looper,UI线程调用Looper的prepareMainLooper再调用prepare方法,其他线程直接调用prepare静态方法 生成Looper并用sThreadLocal.set进行存储。获取Looper的方法很简单,通过sThreadLocal.get() 获取当先线程的Looper.
现在Looper有了,Handler有了,通过Handler.obtainMessage(),调用Message.obtain(this),可以看出Message是以链表形式存储。
   public static Message obtain(Handler h) {
        Message m = obtain();
       //在这里设置了下Message的target,message对象指向了所在的Handler的
        m.target = h;

        return m;
    }
    public static Message obtain() {
        synchronized (sPoolSync) {
            if (sPool != null) {
                Message m = sPool;
                sPool = m.next;
                m.next = null;
                m.flags = 0; // clear in-use flag
                sPoolSize--;
                return m;
            }
        }
        return new Message();
    }
调用Handler的sendMessage方法,依次调用sendMessage->sendMessageDelayed->sendMessageAtTime,查看Handler的sendMessageAtTime
   public boolean sendMessageAtTime(Message msg, long uptimeMillis) {
        MessageQueue queue = mQueue;
        if (queue == null) {
            RuntimeException e = new RuntimeException(
                    this + " sendMessageAtTime() called with no mQueue");
            Log.w("Looper", e.getMessage(), e);
            return false;
        }
       //将message添加到消息队列里
        return enqueueMessage(queue, msg, uptimeMillis);
    }

  private boolean enqueueMessage(MessageQueue queue, Message msg, long uptimeMillis) {
        msg.target = this;
        if (mAsynchronous) {
            msg.setAsynchronous(true);
        }
        return queue.enqueueMessage(msg, uptimeMillis);
    }
接着查看下MessageQueue里面的enqueueMessage方法
   boolean enqueueMessage(Message msg, long when) {

        if (msg.target == null) {
            throw new IllegalArgumentException("Message must have a target.");
        }
        if (msg.isInUse()) {
            throw new IllegalStateException(msg + " This message is already in use.");
        }

        synchronized (this) {
            if (mQuitting) {
                IllegalStateException e = new IllegalStateException(
                        msg.target + " sending message to a Handler on a dead thread");
                Log.w(TAG, e.getMessage(), e);
                msg.recycle();
                return false;
            }

            msg.markInUse();
            msg.when = when;
            //mMessage是链表的头
            Message p = mMessages;
            boolean needWake;
            if (p == null || when == 0 || when < p.when) {
                // New head, wake up the event queue if blocked.
                msg.next = p;
                mMessages = msg;
                needWake = mBlocked;
            } else {
                // Inserted within the middle of the queue.  Usually we don't have to wake
                // up the event queue unless there is a barrier at the head of the queue
                // and the message is the earliest asynchronous message in the queue.
                needWake = mBlocked && p.target == null && msg.isAsynchronous();
                Message prev;


                for (;;) {
                       //构建一个循环链表
                    prev = p;
                    p = p.next;
                    if (p == null || when < p.when) {
                        break;
                    }
                    if (needWake && p.isAsynchronous()) {
                        needWake = false;
                    }
                }
                //将新的message加入到循环列表中
                msg.next = p; // invariant: p == prev.next
                prev.next = msg;
            }

            // We can assume mPtr != 0 because mQuitting is false.
            if (needWake) {
                nativeWake(mPtr);
            }
        }
        return true;
    }
接下来Looper调用loop方法讲消息循环起来。
    public static void loop() {
        final Looper me = myLooper();
        if (me == null) {
            throw new RuntimeException("No Looper; Looper.prepare() wasn't called on this thread.");
        }
        final MessageQueue queue = me.mQueue;

        // Make sure the identity of this thread is that of the local process,
        // and keep track of what that identity token actually is.
        Binder.clearCallingIdentity();
        final long ident = Binder.clearCallingIdentity();

        for (;;) {
            Message msg = queue.next(); // might block
            //没有消息的情况
            if (msg == null) {
                // No message indicates that the message queue is quitting.
                return;
            }


            // This must be in a local variable, in case a UI event sets the logger
            final Printer logging = me.mLogging;
            if (logging != null) {
                logging.println(">>>>> Dispatching to " + msg.target + " " +
                        msg.callback + ": " + msg.what);
            }

            final long slowDispatchThresholdMs = me.mSlowDispatchThresholdMs;

            final long traceTag = me.mTraceTag;
            if (traceTag != 0 && Trace.isTagEnabled(traceTag)) {
                Trace.traceBegin(traceTag, msg.target.getTraceName(msg));
            }
            final long start = (slowDispatchThresholdMs == 0) ? 0 : SystemClock.uptimeMillis();
            final long end;
            try {
            	//执行Handler handleMessage的回调函数
                msg.target.dispatchMessage(msg);
                end = (slowDispatchThresholdMs == 0) ? 0 : SystemClock.uptimeMillis();
            } finally {
                if (traceTag != 0) {
                    Trace.traceEnd(traceTag);
                }
            }
           	.......

            msg.recycleUnchecked();
        }
    }
最后,我们查看下msg.recycleUnchecked方法,将message清除,链表指针指向下一个。
void recycleUnchecked() {
        // Mark the message as in use while it remains in the recycled object pool.
        // Clear out all other details.
        flags = FLAG_IN_USE;
        what = 0;
        arg1 = 0;
        arg2 = 0;
        obj = null;
        replyTo = null;
        sendingUid = -1;
        when = 0;
        target = null;
        callback = null;
        data = null;

        synchronized (sPoolSync) {
            if (sPoolSize < MAX_POOL_SIZE) {
                next = sPool;
                sPool = this;
                sPoolSize++;
            }
        }
    }
大致过程如下:

Handler应注意的地方
-
首先在创建Handler的使用,注意匿名类,成员类,容易引起内存泄漏。
-
很多人以为Handler.post(Runnable) 就一定重新开启了一个线程,这个取决于Handler在哪个线程实例化了,Runable应该被理解为Task,是搭载到Thread上才能执行。
可以替代Handler的方案
对于熟悉Rxjava的人,很多人现在使用Rxjava替代Handler作为线程之间消息接受和发送的方案。


 5693
5693

 被折叠的 条评论
为什么被折叠?
被折叠的 条评论
为什么被折叠?
 到【灌水乐园】发言


