


注:我用的angular 8
一个angular应用是由组件树组成的,changeDetection是其中比较深的部分,我也不懂哈。
angular中changeDetection中的策略有这样的描述:
总而言之,对于一个组件而言,2中changeDetection策略,默认的没啥好说的,主要说一下OnPush的情况。
如果子组件的属性的变化由输入属性决定,那么这个时候就可以启用OnPush这种变更检测策略,这样输入属性不变的时候就不用检测了,省时省力。
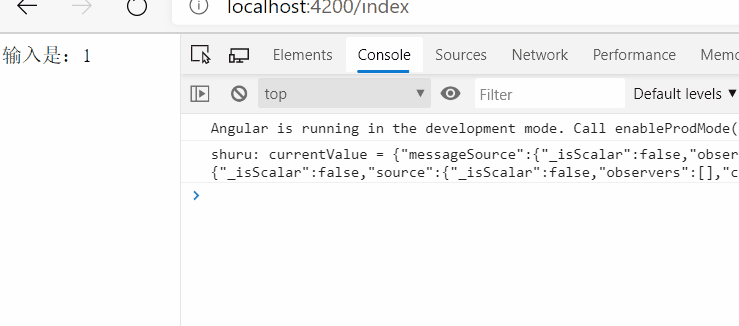
1、 输入属性为非对象的时候
index组件:
@Component({
  selector: 'app-index',
  template: '<app-abc [shuru]="shuru"></app-abc>',
})
export class IndexComponent {
  shuru = 1;
  constructor() {
    setInterval(() => {
      this.shuru++;
    }, 1111);
  }
}
abc组件:
@Component({
  selector: 'app-abc',
  template: '  输入是:{{shuru}}',
  changeDetection: ChangeDetectionStrategy.OnPush
})

export class AbcComponent implements OnChanges {
  @Input()
  shuru = 0;
  ngOnChanges(changes: SimpleChanges): void {
    for (let propName in changes) {
      let chng = changes[propName];
      let cur = JSON.stringify(chng.currentValue);
      let prev = JSON.stringify(chng.previousValue);
      console.log(`${propName}: currentValue = ${cur}, previousValue = ${prev}`);
    }
  }
}
跑一下看结果:
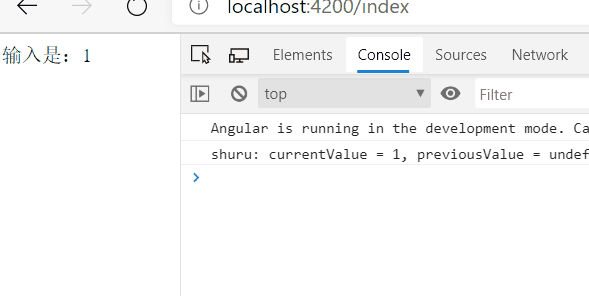
这个实在没啥好说的哈!
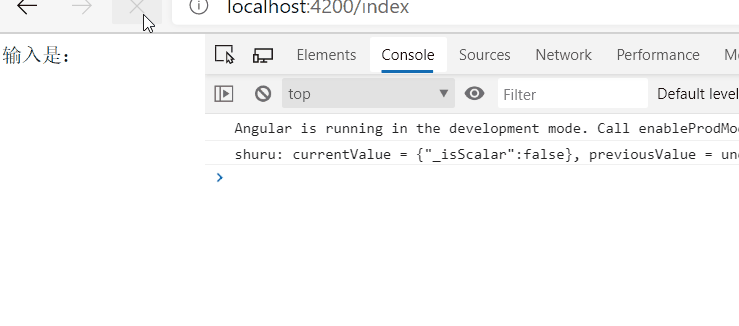
2、输入属性是一个对象的时候
修改index组件代码如下:
@Component({
  selector: 'app-index',
  template: '<app-abc [shuru]="shuru"></app-abc>',
})
export class IndexComponent {
  shuru = {
    shuru: 1
  };
  constructor() {
    setInterval(() => {
      this.shuru.shuru++;
    }, 1111);
  }
}
修改abc组件如下:
@Component({
  selector: 'app-abc',
  template: '  输入是:{{shuru.shuru}}',
  changeDetection: ChangeDetectionStrategy.OnPush
})

export class AbcComponent implements OnChanges {
  @Input()
  shuru = {shuru: 0};
  ngOnChanges(changes: SimpleChanges): void {
    for (let propName in changes) {
      let chng = changes[propName];
      let cur = JSON.stringify(chng.currentValue);
      let prev = JSON.stringify(chng.previousValue);
      console.log(`${propName}: currentValue = ${cur}, previousValue = ${prev}`);
    }
  }
}
再跑一下:
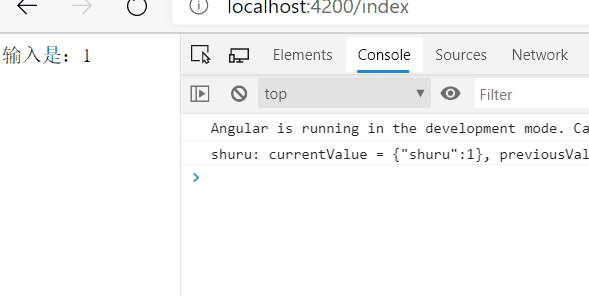
为什么abc组件里面没变化呢,因为再index组件中输入属性shuru没有变化,我们改变的只是shuru.shuru,angular比较的是shuru的reference
3、输入属性与immutable objects
2没有生效的,是因为我修改的是shuru这个对象,而不是shuru的引用;那么作为输入属性传入的每个对象本身如果是不可修改的,如果我想修改shuru的时候,重新赋值成另外一个对象就可以了。
对于2中的情况,如果我们想让他生效,这么做就好了:
index组件稍微修改下:
      this.shuru = {
        shuru : ++this.shuru.shuru
      };
      // this.shuru.shuru++;
4、OnPush与事件
除了上述3能捕获到变更检测,还有一种诡异的情况:
index组件的代码和2保持一直,修改abc组件的代码如下:
@Component({
 selector: 'app-abc',
 template: ' 输入是:{{shuru.shuru}}  <button (click)="click()">我是按钮</button>',
 changeDetection: ChangeDetectionStrategy.OnPush
})

export class AbcComponent implements OnChanges {
 @Input()
 shuru = {shuru: 0};
 // shuru: Observable<any>;

 ngOnChanges(changes: SimpleChanges): void {
   for (let propName in changes) {
     let chng = changes[propName];
     let cur = JSON.stringify(chng.currentValue);
     let prev = JSON.stringify(chng.previousValue);
     console.log(`${propName}: currentValue = ${cur}, previousValue = ${prev}`);
   }
 }
 click() {
   console.log('电力');
 }
}
跑一下:
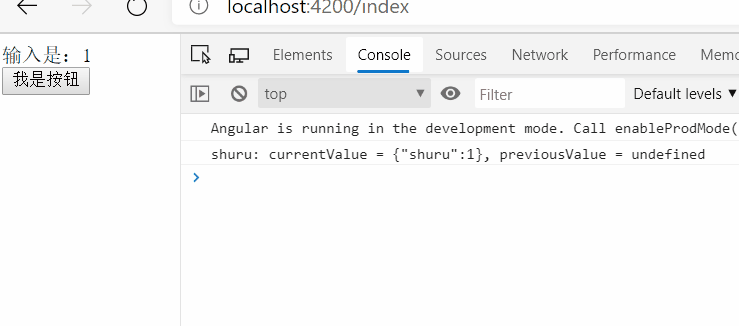
对此,我只能解释成,事件的触发,导致组件进行了变更检测;那么,我也可以自己在组件abc中手动做变更检测,所以可以像下面这样做:
5、OnPush与ngDoCheck、ChangeDetectorRef、markForCheck
When should you use ngDoCheck?
Use ngDoCheck when you want to capture changes that Angular otherwise doesn’t.
For example, if a binding references remains unchanged after a click event, ngOnChanges won’t run but ngDoCheck will.
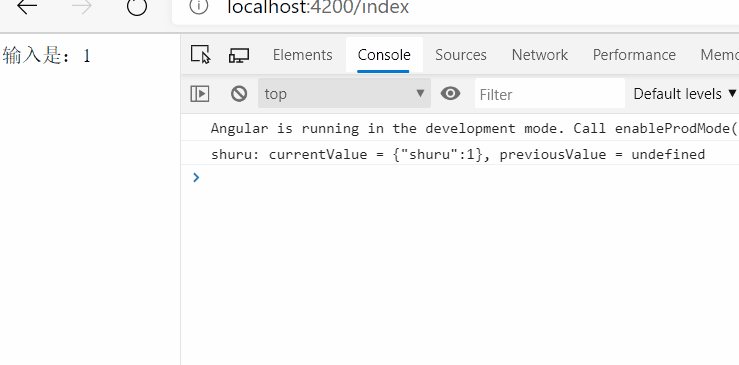
在2的基础之上进行。。。
虽然这时候ngOnChanges不执行了,但是ngDoCheck执行啊!!!
修改组件abc的代码如下:
@Component({
  selector: 'app-abc',
  template: '  输入是:{{shuru.shuru}}',
  changeDetection: ChangeDetectionStrategy.OnPush
})


export class AbcComponent implements OnChanges, DoCheck {
  @Input()
  shuru = {shuru: 0};

  constructor(private changeDetectorRef: ChangeDetectorRef,
  ) {
    /*
    Detaches this view from the change-detection tree.
    A detached view is not checked until it is reattached.
    Use in combination with detectChanges() to implement local change detection checks.
    */
    this.changeDetectorRef.detach(); // 如果detach, 那么markForCheck就不起作用了
  }

  ngOnChanges(changes: SimpleChanges): void {
    for (let propName in changes) {
      let chng = changes[propName];
      let cur = JSON.stringify(chng.currentValue);
      let prev = JSON.stringify(chng.previousValue);
      console.log(`${propName}: currentValue = ${cur}, previousValue = ${prev}`);
    }
  }

  ngDoCheck() {
    console.log('ngDoCheck', this.shuru);
    // this.changeDetectorRef.markForCheck();  // 不detach的时候,这个也可以
    this.changeDetectorRef.detectChanges(); // Checks this view and its children.
  }
}
6、当输入属性是service时候
居然还能这样!
先搞个服务处理:
@Injectable({
  providedIn: 'root'
})
export class ObsService {
  private messageSource = new BehaviorSubject(1);
  comeOneData = this.messageSource.asObservable();
  changeData(message: any) {
    this.messageSource.next(message);
  }
}
新的index组件如下:
@Component({
  selector: 'app-index',
  template: '<app-abc [shuru]="obs$"></app-abc>',
})
export class IndexComponent {
  shuru = 1;
  constructor(private obs$: ObsService) {
    setInterval(() => {
      this.obs$.changeData(this.shuru++);
    }, 1111);
  }
}
新的abc组件如下:
@Component({
  selector: 'app-abc',
  template: '  输入是:{{shuru["comeOneData"]| async | json}}',
  changeDetection: ChangeDetectionStrategy.OnPush
})

export class AbcComponent implements OnChanges {
  @Input()
  shuru: Observable<any>;

  ngOnChanges(changes: SimpleChanges): void {
    for (let propName in changes) {
      let chng = changes[propName];
      let cur = JSON.stringify(chng.currentValue);
      let prev = JSON.stringify(chng.previousValue);
      console.log(`${propName}: currentValue = ${cur}, previousValue = ${prev}`);
    }
  }
}
7、当输入属性是Observable的时候
这个其实和6有点类似的。
index组件是这样的:
@Component({
  selector: 'app-index',
  template: '<app-abc [shuru]="shuru"></app-abc>',
})
export class IndexComponent {
  observer;
  num = 0;
  shuru = Observable.create((observer) => {
    this.observer = observer;
  });

  constructor() {
    setInterval(() => {
      this.observer.next(++this.num);
    }, 1111);
  }
}
7.1 订阅方式
这个方法得多写几行代码。。。在abc组件中subscribe输入的Observable,取出来值之后自己做变更检测插入到模板中:
abc组件如下:
@Component({
  selector: 'app-abc',
  template: '  输入是:{{num}}',
  changeDetection: ChangeDetectionStrategy.OnPush
})


export class AbcComponent implements OnChanges, OnInit {
  @Input()
  shuru: Observable<any>;
  num;

  constructor(private changeDetectorRef: ChangeDetectorRef,
  ) {
  }

  ngOnInit() {
    this.shuru.subscribe((res) => {
      console.log('subscribe',res);
      this.num = res;
      this.changeDetectorRef.detectChanges();
    });
  }

  ngOnChanges(changes: SimpleChanges): void {
    for (let propName in changes) {
      let chng = changes[propName];
      let cur = JSON.stringify(chng.currentValue);
      let prev = JSON.stringify(chng.previousValue);
      console.log(`${propName}: currentValue = ${cur}, previousValue = ${prev}`);
    }
  }
}
7.2 管道
abc组件如下,少些好多代码。不用手动做变更检测了
@Component({
  selector: 'app-abc',
  template: '  输入是:{{shuru|async}}',
  changeDetection: ChangeDetectionStrategy.OnPush
})


export class AbcComponent implements OnChanges {
  @Input()
  shuru: Observable<any>;

  constructor() {}

  ngOnChanges(changes: SimpleChanges): void {
    for (let propName in changes) {
      let chng = changes[propName];
      let cur = JSON.stringify(chng.currentValue);
      let prev = JSON.stringify(chng.previousValue);
      console.log(`${propName}: currentValue = ${cur}, previousValue = ${prev}`);
    }
  }
}
参考文献
https://angular.io/api/core/ChangeDetectorRef
https://vsavkin.com/change-detection-in-angular-2-4f216b855d4c
https://blog.angular-university.io/onpush-change-detection-how-it-works/


 1415
1415


 被折叠的 条评论
为什么被折叠?
被折叠的 条评论
为什么被折叠?
 到【灌水乐园】发言


