


OpenCms中的JSP模板就是一个普通的JSP页面,在特定的位置使用标签来包含内容,在这个的例子中,我们将要开发一个简单JSP模板,这个模板只是在内容(如<html>、<body>)周围添加了一些标记。
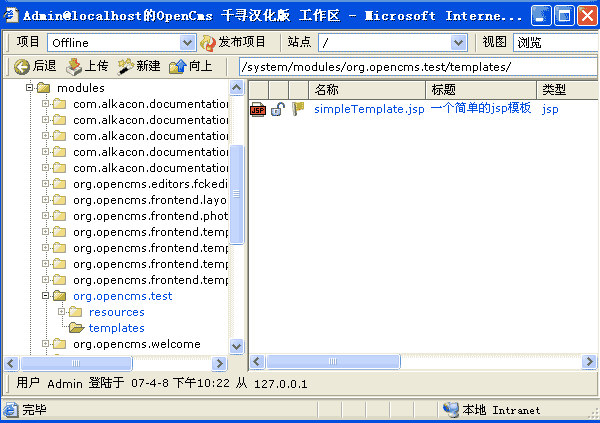
这个JSP模板位于模块下的templates子文件夹下,如/system/modules/org.opencms.test/templates/下,如图:
模板文件内容如下:
<div style="border: 0.5pt solid windowtext; padding: 4px 5.4pt; background-color: rgb(230, 230, 230); width: 672.59375px; word-break: break-all; background-position: initial initial; background-repeat: initial initial;"><img alt="" align="top" src="http://images.csdn.net/syntaxhighlighting/OutliningIndicators/None.gif" style="border: none; max-width: 100%;" /><span style="color: rgb(0, 0, 0);"><%</span><span style="color: rgb(0, 0, 0);">@ taglib prefix</span><span style="color: rgb(0, 0, 0);">=</span><span style="color: rgb(0, 0, 0);">"</span><span style="color: rgb(0, 0, 0);">cms</span><span style="color: rgb(0, 0, 0);">"</span><span style="color: rgb(0, 0, 0);"> uri</span><span style="color: rgb(0, 0, 0);">=</span><span style="color: rgb(0, 0, 0);">"</span><span style="color: rgb(0, 0, 0);">http://www.opencms.org/taglib/cms</span><span style="color: rgb(0, 0, 0);">"</span><span style="color: rgb(0, 0, 0);"> </span><span style="color: rgb(0, 0, 0);">%></span><span style="color: rgb(0, 0, 0);">
<img alt="" align="top" src="http://images.csdn.net/syntaxhighlighting/OutliningIndicators/None.gif" style="border: none; max-width: 100%;" /></span><span style="color: rgb(0, 0, 0);"><</span><span style="color: rgb(0, 0, 0);">html</span><span style="color: rgb(0, 0, 0);">></span><span style="color: rgb(0, 0, 0);">
<img alt="" align="top" src="http://images.csdn.net/syntaxhighlighting/OutliningIndicators/None.gif" style="border: none; max-width: 100%;" /></span><span style="color: rgb(0, 0, 0);"><</span><span style="color: rgb(0, 0, 0);">head</span><span style="color: rgb(0, 0, 0);">></span><span style="color: rgb(0, 0, 0);">
<img alt="" align="top" src="http://images.csdn.net/syntaxhighlighting/OutliningIndicators/None.gif" style="border: none; max-width: 100%;" /></span><span style="color: rgb(0, 0, 0);"><</span><span style="color: rgb(0, 0, 0);">title</span><span style="color: rgb(0, 0, 0);">><</span><span style="color: rgb(0, 0, 0);">cms:property name</span><span style="color: rgb(0, 0, 0);">=</span><span style="color: rgb(0, 0, 0);">"</span><span style="color: rgb(0, 0, 0);">Title</span><span style="color: rgb(0, 0, 0);">"</span><span style="color: rgb(0, 0, 0);"> </span><span style="color: rgb(0, 0, 0);">/></</span><span style="color: rgb(0, 0, 0);">title</span><span style="color: rgb(0, 0, 0);">></span><span style="color: rgb(0, 0, 0);">
<img alt="" align="top" src="http://images.csdn.net/syntaxhighlighting/OutliningIndicators/None.gif" style="border: none; max-width: 100%;" /></span><span style="color: rgb(0, 0, 0);"><</span><span style="color: rgb(0, 0, 0);">meta HTTP</span><span style="color: rgb(0, 0, 0);">-</span><span style="color: rgb(0, 0, 0);">EQUIV</span><span style="color: rgb(0, 0, 0);">=</span><span style="color: rgb(0, 0, 0);">"</span><span style="color: rgb(0, 0, 0);">CONTENT-TYPE</span><span style="color: rgb(0, 0, 0);">"</span><span style="color: rgb(0, 0, 0);"> CONTENT</span><span style="color: rgb(0, 0, 0);">=</span><span style="color: rgb(0, 0, 0);">"</span><span style="color: rgb(0, 0, 0);">text/html; CHARSET=<cms:property name=</span><span style="color: rgb(0, 0, 0);">"</span><span style="color: rgb(0, 0, 0);">content</span><span style="color: rgb(0, 0, 0);">-</span><span style="color: rgb(0, 0, 0);">encoding</span><span style="color: rgb(0, 0, 0);">"</span><span style="color: rgb(0, 0, 0);"> default=</span><span style="color: rgb(0, 0, 0);">"</span><span style="color: rgb(0, 0, 0);">UTF</span><span style="color: rgb(0, 0, 0);">-</span><span style="color: rgb(0, 0, 0);">8</span><span style="color: rgb(0, 0, 0);">"</span><span style="color: rgb(0, 0, 0);"> /></span><span style="color: rgb(0, 0, 0);">"</span><span style="color: rgb(0, 0, 0);"> </span><span style="color: rgb(0, 0, 0);">/></span><span style="color: rgb(0, 0, 0);">
<img alt="" align="top" src="http://images.csdn.net/syntaxhighlighting/OutliningIndicators/None.gif" style="border: none; max-width: 100%;" /></span><span style="color: rgb(0, 0, 0);"><</span><span style="color: rgb(0, 0, 0);">link rel</span><span style="color: rgb(0, 0, 0);">=</span><span style="color: rgb(0, 0, 0);">"</span><span style="color: rgb(0, 0, 0);">stylesheet</span><span style="color: rgb(0, 0, 0);">"</span><span style="color: rgb(0, 0, 0);"> type</span><span style="color: rgb(0, 0, 0);">=</span><span style="color: rgb(0, 0, 0);"> </span><span style="color: rgb(0, 0, 0);">"</span><span style="color: rgb(0, 0, 0);">text/css</span><span style="color: rgb(0, 0, 0);">"</span><span style="color: rgb(0, 0, 0);"> href</span><span style="color: rgb(0, 0, 0);">=</span><span style="color: rgb(0, 0, 0);">"</span><span style="color: rgb(0, 0, 0);"><cms:link>../resources/myStyle.css</cms:link></span><span style="color: rgb(0, 0, 0);">"</span><span style="color: rgb(0, 0, 0);"> </span><span style="color: rgb(0, 0, 0);">/></span><span style="color: rgb(0, 0, 0);">
<img alt="" align="top" src="http://images.csdn.net/syntaxhighlighting/OutliningIndicators/None.gif" style="border: none; max-width: 100%;" /></span><span style="color: rgb(0, 0, 0);"></</span><span style="color: rgb(0, 0, 0);">head</span><span style="color: rgb(0, 0, 0);">></span><span style="color: rgb(0, 0, 0);">
<img alt="" align="top" src="http://images.csdn.net/syntaxhighlighting/OutliningIndicators/None.gif" style="border: none; max-width: 100%;" /></span><span style="color: rgb(0, 0, 0);"><</span><span style="color: rgb(0, 0, 0);">body</span><span style="color: rgb(0, 0, 0);">></span><span style="color: rgb(0, 0, 0);">
<img alt="" align="top" src="http://images.csdn.net/syntaxhighlighting/OutliningIndicators/None.gif" style="border: none; max-width: 100%;" /></span><span style="color: rgb(0, 0, 0);"><</span><span style="color: rgb(0, 0, 0);">h2</span><span style="color: rgb(0, 0, 0);">></span><span style="color: rgb(0, 0, 0);">第一个简单模板的head</span><span style="color: rgb(0, 0, 0);"></</span><span style="color: rgb(0, 0, 0);">h2</span><span style="color: rgb(0, 0, 0);">></span><span style="color: rgb(0, 0, 0);">
<img alt="" align="top" src="http://images.csdn.net/syntaxhighlighting/OutliningIndicators/None.gif" style="border: none; max-width: 100%;" /></span><span style="color: rgb(0, 0, 0);"><</span><span style="color: rgb(0, 0, 0);">cms:include element</span><span style="color: rgb(0, 0, 0);">=</span><span style="color: rgb(0, 0, 0);"> </span><span style="color: rgb(0, 0, 0);">"</span><span style="color: rgb(0, 0, 0);">body</span><span style="color: rgb(0, 0, 0);">"</span><span style="color: rgb(0, 0, 0);">/></span><span style="color: rgb(0, 0, 0);">
<img alt="" align="top" src="http://images.csdn.net/syntaxhighlighting/OutliningIndicators/None.gif" style="border: none; max-width: 100%;" /></span><span style="color: rgb(0, 0, 0);"><</span><span style="color: rgb(0, 0, 0);">h2</span><span style="color: rgb(0, 0, 0);">></span><span style="color: rgb(0, 0, 0);">第一个简单模板的foot</span><span style="color: rgb(0, 0, 0);"></</span><span style="color: rgb(0, 0, 0);">h2</span><span style="color: rgb(0, 0, 0);">></span><span style="color: rgb(0, 0, 0);">
<img alt="" align="top" src="http://images.csdn.net/syntaxhighlighting/OutliningIndicators/None.gif" style="border: none; max-width: 100%;" /></span><span style="color: rgb(0, 0, 0);"></</span><span style="color: rgb(0, 0, 0);">body</span><span style="color: rgb(0, 0, 0);">></span><span style="color: rgb(0, 0, 0);">
<img alt="" align="top" src="http://images.csdn.net/syntaxhighlighting/OutliningIndicators/None.gif" style="border: none; max-width: 100%;" /></span><span style="color: rgb(0, 0, 0);"></</span><span style="color: rgb(0, 0, 0);">html</span><span style="color: rgb(0, 0, 0);">></span></div>
在使用OpenCms标签前一定要如下声明标签: <%@ taglib prefix="cms" uri="http://www.opencms.org/taglib/cms" %>,关于标签的详细说明,我前面有几篇文章已经作了介绍OpenCms JSP标签详解——cms:label标签 ,OpenCms JSP标签详解——cms:link标签 ,OpenCms JSP标签详解——cms:property标签 ,OpenCms JSP标签详解——cms:user标签 cms:img标签用法说明)
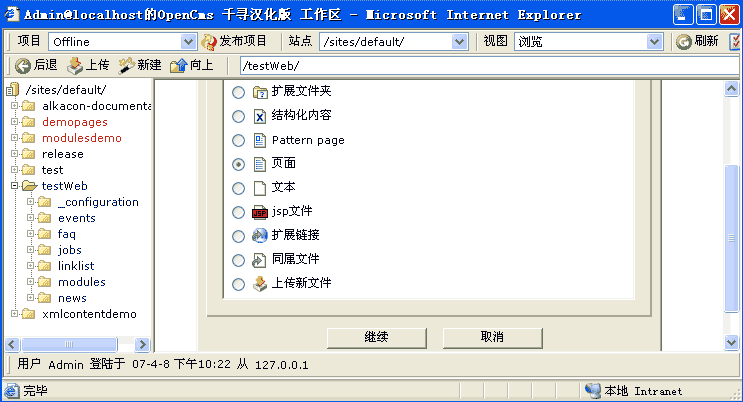
请注意:JSP模板存放的位置是在模块下的“templates”子文件夹中,只有这样做,在创建页面时模板才会出现在模板选择列表中,如下图,通过这个模板创建页面,类型选择页面:
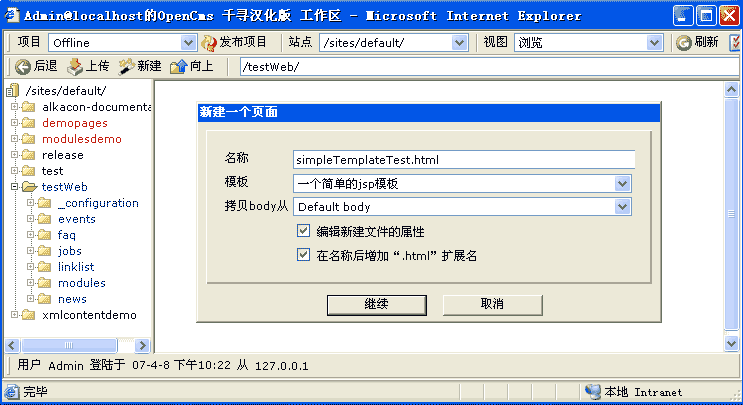
输入文件名称,再选择模板“一个简单的JSP模板”,此处显示的模板名称就是JSP模板Title属性的内容:
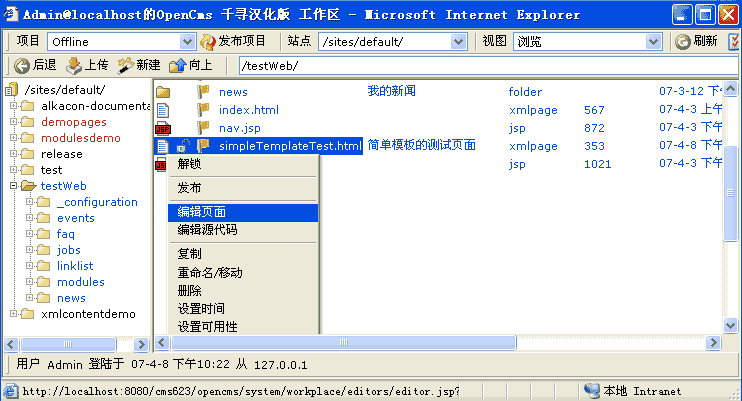
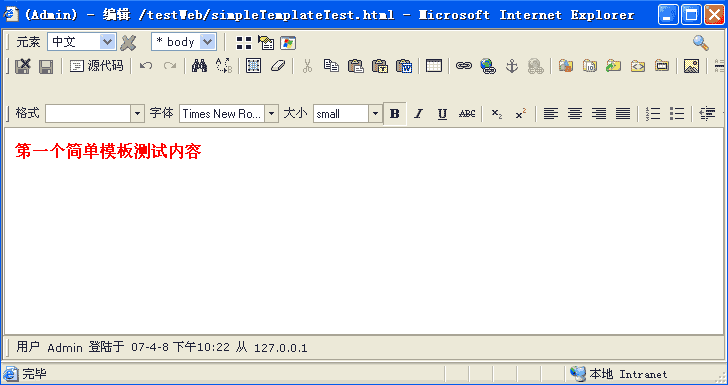
页面创建完成后,选择编辑页面,如下图:
在这里例子中,页面的标题是从OpenCms页面的“title”属性读取的,并且置于HTML的<title>标签中,页面的编码方式也是类似的定义方式。
样式表必须放置于<cms:link>标签中,在JSP模板中,模式表的路径应该是相对于模板路径的一个相对路径,在模块下创建一个resources的子文件夹用来存放属于与模板相关的样式表和图片等资源,当然,这么做是不是必须的,但它的确是一个不错的习惯。
注意:你可以在编辑器中使用css样式表,通过设置模板的“template”属性来实现,这个值一定要是样式表的一个全路径,这样做,在编辑页面时,编辑器会调用此css样式,这样,就与浏览页面时看到的样式一致了。
这个例子中最重要的一行就是“<cms:include element="body"> ”标签,它包含一个可编辑的页面元素。
编辑页面,也就是编辑页面中的“body”元素,因为JSP模板指定了css,所以此处输入的内容按css样式显示:
最后浏览此文件,如下图:
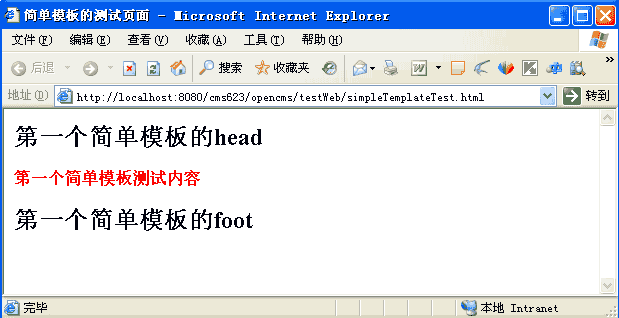
这样,就完成了一个简单JSP模板的创建过程,后面将会继续JSP模板开发的介绍……


 1万+
1万+


 被折叠的 条评论
为什么被折叠?
被折叠的 条评论
为什么被折叠?
 到【灌水乐园】发言


