


文章目录
使用JDBC
0. 学习资源
JDBC常见面试题集锦 - Ste7enF - 博客园 (cnblogs.com)
1. JDBC介绍
JDBC 指 Java 数据库连接,是一种标准Java应用编程接口( JAVA API),用来连接 Java 编程语言和广泛的数据库。
数据库访问
正常访问数据库,只能但单独访问一个数据库。如果一个数据想在不同的数据库上运行,还得单独写。
[外链图片转存失败,源站可能有防盗链机制,建议将图片保存下来直接上传(img-b00ouWlE-1652970133444)(https://mynotepicbed.oss-cn-beijing.aliyuncs.com/img/image%20(5)].png)
使用JDBC访问数据库
[外链图片转存失败,源站可能有防盗链机制,建议将图片保存下来直接上传(img-XlbNv3oe-1652970133447)(https://mynotepicbed.oss-cn-beijing.aliyuncs.com/img/image%20(6)].png)
Java与数据库的连接方式
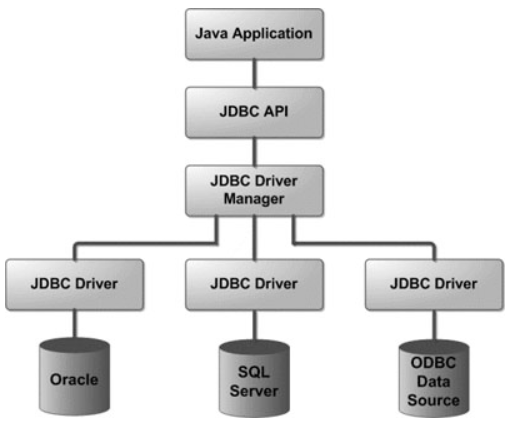
JDBC体系结构
JDBC接口(API)包括两个层次︰
- 面向应用的API : Java APl,抽象接口,供应用程序开发人员使用(连接数据库,执行SQL语句,获得结果)。
- 面向数据库的API : Java Driver API,供开发商开发数据库驱动程序用。
JDBC是sun公司提供一套用于数据库操作的接口, java程序员只需要面向这套接口编程即可。不同的数据库厂商,需要针对这套接口,提供不同实现。不同的实现的集合,即为不同数据库的驱动。——面向接口编程
JDBC程序编写步骤
[外链图片转存失败,源站可能有防盗链机制,建议将图片保存下来直接上传(img-FV06jmFv-1652970133450)(https://mynotepicbed.oss-cn-beijing.aliyuncs.com/img/image%20(7)].png)
JDBC获取数据库连接
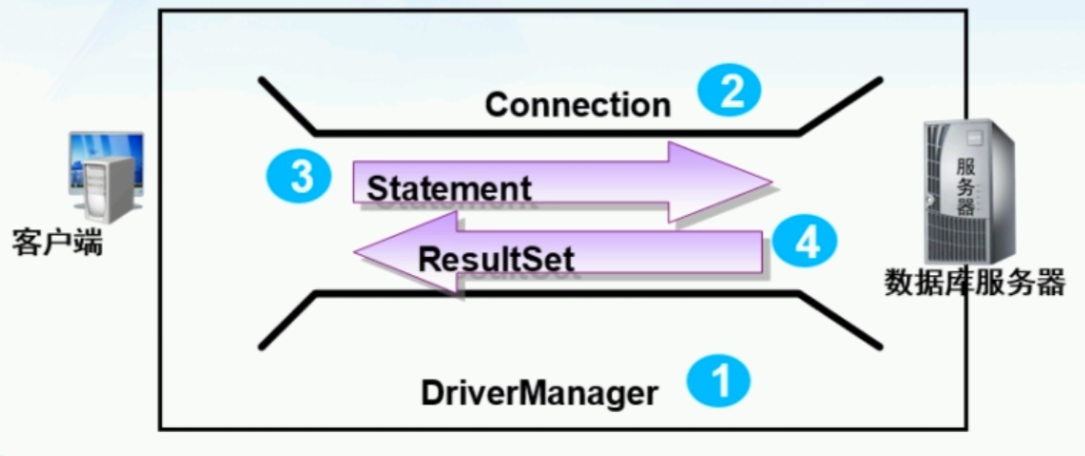
JDBC 的 API 提供了以下接口和类:
DriverManager :这个类管理一系列数据库驱动程序。匹配连接使用通信子协议从 JAVA 应用程序中请求合适的数据库驱动程序。识别 JDBC 下某个子协议的第一驱动程序将被用于建立数据库连接。
Driver : 这个接口处理与数据库服务器的通信。你将很少直接与驱动程序互动。相反,你使用 DriverManager 中的对象,它管理此类型的对象。它也抽象与驱动程序对象工作相关的详细信息。
Connection : 此接口具有接触数据库的所有方法。该连接对象表示通信上下文,即,所有与数据库的通信仅通过这个连接对象进行。
Statement : 使用创建于这个接口的对象将 SQL 语句提交到数据库。除了执行存储过程以外,一些派生的接口也接受参数。
ResultSet : 在你使用语句对象执行 SQL 查询后,这些对象保存从数据获得的数据。它作为一个迭代器,让您可以通过它的数据来移动。
SQLException : 这个类处理发生在数据库应用程序的任何错误。
2. 使用JDBC驱动
安装测试
-
下载jdbc的jar包
-
将jar包导入文件(97条消息) Idea导入jar包的两种方法_Golden_soft的专栏-CSDN博客_jar包怎么导入
-
测试使用
-
报错问题
驱动版本报错问题:Loading class com.mysql.jdbc.Driver’. This is deprecated.
https://blog.csdn.net/qq_41943867/article/details/90574135

建表语句
CREATE TABLE `tb_students_info` (
  `id` bigint(20) unsigned NOT NULL AUTO_INCREMENT COMMENT '主键id\r\n',
  `username` varchar(255) NOT NULL DEFAULT '' COMMENT '用户名',
  `password` varchar(255) NOT NULL DEFAULT '' COMMENT '密码',
  `name` varchar(255) NOT NULL DEFAULT '' COMMENT '姓名',
  `dept_id` bigint(20) unsigned NOT NULL DEFAULT '0' COMMENT '部门id',
  `age` smallint(6) unsigned NOT NULL DEFAULT '0' COMMENT '年龄',
  `sex` bit(1) NOT NULL DEFAULT b'0' COMMENT '性别  0 男  1 女',
  `height` smallint(6) unsigned NOT NULL DEFAULT '0' COMMENT '身高',
  `money` decimal(10,2) NOT NULL DEFAULT '0.00' COMMENT '存款',
  `login_date` datetime DEFAULT NULL COMMENT '登陆时间',
  PRIMARY KEY (`id`),
  KEY `name_age` (`name`,`age`)
) ENGINE=InnoDB AUTO_INCREMENT=25 DEFAULT CHARSET=utf8;

/*Data for the table `tb_students_info` */

insert  into `tb_students_info`(`id`,`username`,`password`,`name`,`dept_id`,`age`,`sex`,`height`,`money`,`login_date`) values (3,'2019002','2019002','Henry',2,100,'',185,'0.00','2021-12-08 23:27:08'),(4,'2019003','2019003','Jane',1,22,'',162,'100.00','2021-12-08 23:27:44'),(5,'2019004','2019004','Jim',6,21,'\0',175,'50.00','2021-12-08 23:27:47'),(6,'2019005','2019005','John',5,25,'',172,'50.00','2021-12-04 23:27:52'),(7,'2019006','2019006','Lily',1,0,'\0',165,'0.00','2021-11-30 23:27:57'),(8,'2019007','2019007','Susan',1,20,'',170,'0.00','2021-11-02 23:28:01'),(9,'2019008','2019008','Thomas',4,35,'\0',178,'0.00','2021-12-03 23:28:06'),(10,'2019009','2019009','Tom',3,15,'',165,'0.00','2021-12-26 23:28:10'),(11,'2019010','2019010','Jerry',1,15,'\0',170,'0.00','2021-12-08 23:27:47'),(22,'2019012','2019012','王五',1,18,'\0',178,'0.00','2021-12-11 00:00:00'),(23,'2019012','2019012','王五',1,18,'\0',178,'100.00','2021-12-11 00:00:00'),(24,'2019012','2019012','王五',1,18,'\0',178,'100.00','2021-12-12 13:56:25');
import java.sql.*;
public class JDBCConnect01 {
    public static void main(String[] args) throws SQLException, ClassNotFoundException {
        selectAll();
    }
    public static void selectAll() throws ClassNotFoundException, SQLException{
        //1. 注册数据库驱动
        Class.forName("com.mysql.cj.jdbc.Driver");
        //2. 创建数据库链接
        String url = "jdbc:mysql://localhost:3306/test_db?useUnicode=true&characterEncoding=UTF-8&userSSL=false&serverTimezone=GMT%2B8";
        // 用户名和密码
        String user = "root";
        String password = "root";
        Connection connection = DriverManager.getConnection(url, user, password);
        //3.对数据库发送请求
        Statement statement = connection.createStatement();
        //4. 查询,返回数据库数据
        ResultSet resultSet = statement.executeQuery("select  * from tb_students_info");
        while (resultSet.next()) {
                //通过列的索引获取表中的数据
                System.out.println(resultSet.getInt(1) + "-"
                        + resultSet.getString(2) + "-"
                        + resultSet.getString(3) + "-"
                        + resultSet.getString(4) + "-"
                        + resultSet.getInt(5) + "-"
                        //指定获取对象的列
                        + resultSet.getInt(6) + "-"
                        + resultSet.getBoolean(7) + "-"
                        //指定返回对象的类型
                        + resultSet.getObject(8, int.class) + "-"
                        + resultSet.getBigDecimal(9)+ "-"
                        //指定获取对象的字段名称
                        + resultSet.getDate("login_date")
                );
            }
        if (resultSet != null) resultSet.close();
        if (statement != null) statement.close();
        if (connection != null) connection.close();
    }
}
规范后
import java.sql.Connection;
import java.sql.DriverManager;
import java.sql.ResultSet;
import java.sql.SQLException;
import java.sql.Statement;

public class JDBCConnect02 {
    public static void main(String[] args) {
        selectAll();
    }
    public static void selectAll() {
		// 用于和数据库的链接
        Connection connection = null;
        // 用于发送对数据库的请求,进行数据库的增删改查的操作
        Statement statement = null;
        // 用于获取返回的数据
        ResultSet resultSet = null;
        try {
            // 1、注册驱动
            Class.forName("com.mysql.cj.jdbc.Driver");// 使用什么驱动连接数据库

            // 创建数据库连接
            // DriverManager.createConnection(url,user,password)
            // url地址
            // 写法一(驱动5.x版本):
            //url地址:jdbc:mysql://localhost:3306/数据库名
//					String url="jdbc:mysql://localhost:3306/test_db";
            // 写法二(驱动8.0x版本):编码 其中SSL默认链接 不需要,设置关闭即可
            String url = "jdbc:mysql://localhost:3306/test_db?useUnicode=true&characterEncoding=UTF-8&userSSL=false&serverTimezone=GMT%2B8";
            // 用户名和密码
            String user = "root";
            String password = "root";

            // 2、跟数据库建立连接(得到链接) DruverManager返回的事java.sql下面的 所以Connection也是用javasql下面的
            connection = DriverManager.getConnection(url, user, password);

            // 3、对数据库发生请求,进行数据库的增删改查的操作
            statement = connection.createStatement();

            // 4.查询 获取返回的数据的结果集
            resultSet = statement.executeQuery("select * from tb_students_info");// executeXXX

            // next() 用来查询有没有数据 每次调用获取一行,有数据返回true,没有返回false;
            // 和iterator遍历器有点像
           while (resultSet.next()) {
                //通过列的索引获取表中的数据
                System.out.println(resultSet.getInt(1) + "-"
                        + resultSet.getString(2) + "-"
                        + resultSet.getString(3) + "-"
                        + resultSet.getString(4) + "-"
                        + resultSet.getInt(5) + "-"
                        //指定获取对象的列
                        + resultSet.getInt(6) + "-"
                        + resultSet.getBoolean(7) + "-"
                        //指定返回对象的类型
                        + resultSet.getObject(8, int.class) + "-"
                        + resultSet.getBigDecimal(9)+ "-"
                        //指定获取对象的字段名称
                        + resultSet.getDate("login_date")
                );
            }
            // 5.操作后要进行关闭
            // 此类代码不能放到这里,因为如果上面的程序发生异常时,那么就不能进行相关的关闭,
            // 可以放入到finally、语句中。
            // if(rs!=null)rs.close();
            // if(stmt!=null)rs.close();
            // if(con!=null)con.close();

        } catch (ClassNotFoundException e) {
            e.printStackTrace();
        } catch (SQLException e) {
            e.printStackTrace();
        }
        // 上面是分别获取了抛出的异常,还可以直接获取所有的异常
        catch (Exception e) {
            e.printStackTrace();
        } finally {
            // finally语句,不管程序会不会终止,都会执行的语句
            // 此时rs会报错,显示找不到,是因为rs是在try语句中定义的,只能在try语句块中使用
            // 解决方法:将rs的声明定义再try语句块外面,再try语句块里面赋值就可以了
            //因爲每个关闭都可能造成异常,所以也需要抛出可能发生的异常
            //又因为不阻止前面异常后,后面不处理,所以分别为他们设置一个异常处理机制

            try {
                if (resultSet != null)
                    resultSet.close();
            } catch (SQLException e) {
                // TODO Auto-generated catch block
                e.printStackTrace();
            }

            try {
                if (statement != null)
                    statement.close();
            } catch (SQLException e) {
                // TODO Auto-generated catch block
                e.printStackTrace();
            }

            try {
                if (connection != null)
                    connection.close();
            } catch (SQLException e) {
                // TODO Auto-generated catch block
                e.printStackTrace();
            }
        }

    }

}
sql注入
参考:SQL注入是什么,如何避免SQL注入? (biancheng.net)
测试sql注入
- 创建登陆接口
- 输入账号和密码登陆
- 输入账号和密码登陆(使用sql注入)
接口代码:
public static void loginSystem(String uname, String upassword) {
        // 用于和数据库的链接
        Connection connection = null;
        // 用于发送对数据库的请求,进行数据库的增删改查的操作
        Statement statement = null;
        // 用于获取返回的数据
        ResultSet resultSet = null;
        try {
            // 1、注册驱动
            Class.forName("com.mysql.cj.jdbc.Driver");// 使用什么驱动连接数据库
            // 创建数据库连接
            String url = "jdbc:mysql://localhost:3306/test_db?useUnicode=true&characterEncoding=UTF-8&userSSL=false&serverTimezone=GMT%2B8";
            // 用户名和密码
            String user = "root";
            String password = "root";
            // 2、跟数据库建立连接(得到链接) DruverManager返回的事java.sql下面的 所以Connection也是用javasql下面的
            connection = DriverManager.getConnection(url, user, password);
            // 3、对数据库发生请求,进行数据库的增删改查的操作
            statement = connection.createStatement();
            // 4.查询 获取返回的数据的结果集
            String sql = "SELECT * FROM tb_students_info WHERE username='" + uname + "' AND password='" + upassword + "'";
            resultSet = statement.executeQuery(sql);
             while (resultSet.next()) {
                //通过列的索引获取表中的数据
                System.out.println(resultSet.getInt(1) + "-"
                        + resultSet.getString(2) + "-"
                        + resultSet.getString(3) + "-"
                        + resultSet.getString(4) + "-"
                        + resultSet.getInt(5) + "-"
                        //指定获取对象的列
                        + resultSet.getInt(6) + "-"
                        + resultSet.getBoolean(7) + "-"
                        //指定返回对象的类型
                        + resultSet.getObject(8, int.class) + "-"
                        + resultSet.getBigDecimal(9)+ "-"
                        //指定获取对象的字段名称
                        + resultSet.getDate("login_date")
                );
            }
        } catch (ClassNotFoundException e) {
            e.printStackTrace();
        } catch (SQLException e) {
            e.printStackTrace();
        }
        // 上面是分别获取了抛出的异常,还可以直接获取所有的异常
        catch (Exception e) {
            e.printStackTrace();
        } finally {
            try {
                if (resultSet != null)
                    resultSet.close();
            } catch (SQLException e) {
                // TODO Auto-generated catch block
                e.printStackTrace();
            }
            try {
                if (statement != null)
                    statement.close();
            } catch (SQLException e) {
                // TODO Auto-generated catch block
                e.printStackTrace();
            }
            try {
                if (connection != null)
                    connection.close();
            } catch (SQLException e) {
                // TODO Auto-generated catch block
                e.printStackTrace();
            }
        }

    }
正常登陆
    public static void main(String[] args) {
        loginSystem("2019001", "2019001 'OR' 1 '=' 1");
    }
使用SQL注入
    public static void main(String[] args) {
        loginSystem("2019001", "2019001 'OR' 1 '=' 1");
    }
防止sql注入
sql使用占位符,并使用PreparedStatement代替Statement
String sql =“select*from tb_students_info where username=?and password=?”;
PreparedStatement pstmt=con.prepareStatement(sql);
    public static void loginSystem(String uname, String upassword) {
        // 用于和数据库的链接
        Connection connection = null;
        // 用于发送对数据库的请求,进行数据库的增删改查的操作
//        Statement statement = null;
        PreparedStatement preparedStatement = null;
        // 用于获取返回的数据
        ResultSet resultSet = null;
        try {
            // 1、注册驱动
            Class.forName("com.mysql.cj.jdbc.Driver");// 使用什么驱动连接数据库
            // 创建数据库连接
            String url = "jdbc:mysql://localhost:3306/test_db?useUnicode=true&characterEncoding=UTF-8&userSSL=false&serverTimezone=GMT%2B8";
            // 用户名和密码
            String user = "root";
            String password = "root";
            // 2、跟数据库建立连接(得到链接) DruverManager返回的事java.sql下面的 所以Connection也是用javasql下面的
            connection = DriverManager.getConnection(url, user, password);

            //有sql注入问题
            // 3、对数据库发生请求,进行数据库的增删改查的操作
//            statement = connection.createStatement();
            // 4.查询 获取返回的数据的结果集
//            String sql = "SELECT * FROM tb_students_info WHERE username='" + uname + "' AND password='" + upassword + "'";
//            resultSet = statement.executeQuery(sql);

            //防止sql注入问题
            //步骤一:先创建sql查询语句
            String sql = "SELECT * FROM tb_students_info WHERE username=? AND password=?";
            //步骤二:创建PreparedStatement
            preparedStatement = connection.prepareStatement(sql);
            preparedStatement.setString(1, uname);
            preparedStatement.setString(2, upassword);
            resultSet = preparedStatement.executeQuery();
             while (resultSet.next()) {
                //通过列的索引获取表中的数据
                System.out.println(resultSet.getInt(1) + "-"
                        + resultSet.getString(2) + "-"
                        + resultSet.getString(3) + "-"
                        + resultSet.getString(4) + "-"
                        + resultSet.getInt(5) + "-"
                        //指定获取对象的列
                        + resultSet.getInt(6) + "-"
                        + resultSet.getBoolean(7) + "-"
                        //指定返回对象的类型
                        + resultSet.getObject(8, int.class) + "-"
                        + resultSet.getBigDecimal(9)+ "-"
                        //指定获取对象的字段名称
                        + resultSet.getDate("login_date")
                );
            }
        } catch (ClassNotFoundException e) {
            e.printStackTrace();
        } catch (SQLException e) {
            e.printStackTrace();
        }
        // 上面是分别获取了抛出的异常,还可以直接获取所有的异常
        catch (Exception e) {
            e.printStackTrace();
        } finally {
            try {
                if (resultSet != null)
                    resultSet.close();
            } catch (SQLException e) {
                // TODO Auto-generated catch block
                e.printStackTrace();
            }
            try {
                if (preparedStatement != null)
                    preparedStatement.close();
            } catch (SQLException e) {
                // TODO Auto-generated catch block
                e.printStackTrace();
            }
            try {
                if (connection != null)
                    connection.close();
            } catch (SQLException e) {
                // TODO Auto-generated catch block
                e.printStackTrace();
            }
        }

    }
正常登陆
    public static void main(String[] args) {
        loginSystem("2019001", "2019001 'OR' 1 '=' 1");
    }
使用SQL注入
    public static void main(String[] args) {
        loginSystem("2019001", "2019001 'OR' 1 '=' 1");
    }
3. JDBC分页查询
介绍
分页查询六要素
用户提供
- current:当前页
- size:当前页显示数据条数
- orderBy: 排序方式
服务返回
- records:返回数据
- total:数据库数据总量
- pages:总页数
原理
通过使用sql关键字 LIMIT 起始位置,个数
例如:一共50个数据,分为10页,每页五个数据
第一页 0-4 1-1*5
第二页 5-9 2-1*5
第三页 10-14 3-1*5
语句逻辑: LIMIT (页数-1)* 每页数量 , 查询个数
代码实战
    public static void main(String[] args) {
        Integer page = 1;
        Integer num = 5;
        String orderBy = "age-ASC";
        selectStudentsPage(page, num, orderBy);
    }
private static void selectStudentsPage(Integer page, Integer num, String orderBy) {
        // 用于和数据库的链接
        Connection connection = null;
        PreparedStatement preparedStatement = null;
        ResultSet resultSet = null;
        try {
            // 1、注册驱动
            Class.forName("com.mysql.cj.jdbc.Driver");// 使用什么驱动连接数据库
            // 2、创建数据库连接
            String url = "jdbc:mysql://localhost:3306/test_db?useUnicode=true&characterEncoding=UTF-8&userSSL=false&serverTimezone=GMT%2B8";
            String user = "root";
            String password = "root";
            connection = DriverManager.getConnection(url, user, password);
            //步骤一:先创建sql查询语句
            Integer row = page==1||page==0?0*num:(page-1)*num;
            String placeHolder = orderBy.split("-")[0] + ' ' + orderBy.split("-")[1];
            String sql = "SELECT * FROM tb_students_info ORDER BY " + placeHolder + " LIMIT ?,? ";
            //步骤二:创建PreparedStatement
            preparedStatement = connection.prepareStatement(sql);
            preparedStatement.setInt(1, row);
            preparedStatement.setInt(2, num);

            resultSet = preparedStatement.executeQuery();
             while (resultSet.next()) {
                //通过列的索引获取表中的数据
                System.out.println(resultSet.getInt(1) + "-"
                        + resultSet.getString(2) + "-"
                        + resultSet.getString(3) + "-"
                        + resultSet.getString(4) + "-"
                        + resultSet.getInt(5) + "-"
                        //指定获取对象的列
                        + resultSet.getInt(6) + "-"
                        + resultSet.getBoolean(7) + "-"
                        //指定返回对象的类型
                        + resultSet.getObject(8, int.class) + "-"
                        + resultSet.getBigDecimal(9)+ "-"
                        //指定获取对象的字段名称
                        + resultSet.getDate("login_date")
                );
            }
        } catch (ClassNotFoundException e) {
            e.printStackTrace();
        } catch (SQLException e) {
            e.printStackTrace();
        }
        catch (Exception e) {
            e.printStackTrace();
        } finally {
            try {
                if (resultSet != null)
                    resultSet.close();
            } catch (SQLException e) {
                // TODO Auto-generated catch block
                e.printStackTrace();
            }
            try {
                if (preparedStatement != null)
                    preparedStatement.close();
            } catch (SQLException e) {
                // TODO Auto-generated catch block
                e.printStackTrace();
            }
            try {
                if (connection != null)
                    connection.close();
            } catch (SQLException e) {
                // TODO Auto-generated catch block
                e.printStackTrace();
            }
        }
    }
问题:连续两个占位符无效
使用ORDER BY的时候,因为是两个连续的占位符,导致数据查询不出来,可以使用拼接的方式。
# 排序无效
String sql = "SELECT * FROM tb_students_info ORDER BY ? ? LIMIT ?,? ";
# 使用拼接
 String sql = "SELECT * FROM tb_students_info ORDER BY"+ placeholder + " LIMIT ?,? ";
课堂练习
public class JDBCConnect04 {
    public static void main(String[] args) {
        Integer page = 0;
        Integer size = 5;
        String orderBy = "age-ASC";
        List<Student> students = selectStudentsByPage(page, size, orderBy);
        int total = countStudents();
        System.out.println(total);
        Map<String, Object> resultMap = new LinkedHashMap<>();
        resultMap.put("page", page);
        resultMap.put("size", size);
        resultMap.put("orderBy", orderBy);
        resultMap.put("records", students);
        resultMap.put("total", total);
        for (String obj : resultMap.keySet()
        ) {
            if (obj.equals("records")) {
                List<Student> stuList = (List<Student>) resultMap.get(obj);
                stuList.forEach(System.out::println);
            } else {
                System.out.println(resultMap.get(obj));
            }

        }


    }

    public static int countStudents() {
        Connection connection = null;
        PreparedStatement preparedStatement = null;
        ResultSet resultSet = null;
        try {
            Class.forName("com.mysql.cj.jdbc.Driver");
            String url = "jdbc:mysql://127.0.0.1:3306/test_db?useUnicode=true&characterEncoding=UTF-8&userSSL=false&serverTimezone=GMT%2B8";
            String username = "root";
            String password = "root";
            connection = DriverManager.getConnection(url, username, password);
            String sql = "SELECT COUNT(*) FROM tb_students_info";
            preparedStatement = connection.prepareStatement(sql);
            resultSet = preparedStatement.executeQuery();
            while (resultSet.next()) {
                return resultSet.getInt(1);
            }
        } catch (ClassNotFoundException | SQLException e) {
            e.printStackTrace();
        } finally {
            if (resultSet != null) {
                try {
                    resultSet.close();
                } catch (SQLException throwables) {
                    throwables.printStackTrace();
                }
            }
            if (preparedStatement != null) {
                try {
                    preparedStatement.close();
                } catch (SQLException throwables) {
                    throwables.printStackTrace();
                }
            }
            if (connection != null) {
                try {
                    connection.close();
                } catch (SQLException throwables) {
                    throwables.printStackTrace();
                }
            }
        }
        return 0;
    }

    public static List<Student> selectStudentsByPage(Integer page, Integer size, String orderBy) {
        Connection connection = null;
        PreparedStatement preparedStatement = null;
        ResultSet resultSet = null;
        try {
            Class.forName("com.mysql.cj.jdbc.Driver");
            String url = "jdbc:mysql://127.0.0.1:3306/test_db?useUnicode=true&characterEncoding=UTF-8&userSSL=false&serverTimezone=GMT%2B8";
            String username = "root";
            String password = "121156";
            connection = DriverManager.getConnection(url, username, password);
            String[] condition = orderBy.split("-");
            String sql = "SELECT * FROM tb_students_info ORDER BY "+condition[0]+" "+condition[1]+" LIMIT ?,?";
            page = page <= 1 ? 0 : (page - 1) * size;
            preparedStatement = connection.prepareStatement(sql);
            System.out.println(condition);
//            preparedStatement.setString(1,condition[0]);
//            preparedStatement.setString(2, condition[1]);
            preparedStatement.setInt(1, page);
            preparedStatement.setInt(2, size);
            resultSet = preparedStatement.executeQuery();
            List<Student> studentList = new ArrayList<>();
            while (resultSet.next()) {
                Long id = resultSet.getLong(1);
                String userName = resultSet.getString(2);
                String passWord = resultSet.getString(3);
                String name = resultSet.getString(4);
                Long deptId = resultSet.getLong(5);
                //指定获取对象的列
                Integer age = resultSet.getInt(6);
                Boolean sex = resultSet.getBoolean(7);
                //指定返回对象的类型
                Integer height = resultSet.getInt(8);
                BigDecimal money = resultSet.getBigDecimal(9);
                //指定获取对象的字段名称
                Date login_date = resultSet.getDate("login_date");
                //时间格式转换
                Instant instant = new java.util.Date(login_date.getTime()).toInstant();
                LocalDateTime localDateTime = instant.atZone(ZoneOffset.ofHours(8)).toLocalDateTime();
                Student student = new Student(id, userName, passWord, name, deptId, age, sex, height, money, localDateTime);
                studentList.add(student);
            }
            return studentList;
        } catch (ClassNotFoundException | SQLException e) {
            e.printStackTrace();
        } finally {
            if (resultSet != null) {
                try {
                    resultSet.close();
                } catch (SQLException throwables) {
                    throwables.printStackTrace();
                }
            }
            if (preparedStatement != null) {
                try {
                    preparedStatement.close();
                } catch (SQLException throwables) {
                    throwables.printStackTrace();
                }
            }
            if (connection != null) {
                try {
                    connection.close();
                } catch (SQLException throwables) {
                    throwables.printStackTrace();
                }
            }
        }
        return new ArrayList<>();
    }
}
4. JDBC使用
学生类
public class Student {
    private Long id;
    private String username;
    private String password;
    private String name;
    private Long deptId;
    private int age;
    private Boolean sex;
    private int height;
    private BigDecimal money;
    private LocalDateTime login_date;

    public Student() {
    }

    public Student(Long id, String username, String password, String name, Long deptId, int age, Boolean sex, int height, BigDecimal money, LocalDateTime login_date) {
        this.id = id;
        this.username = username;
        this.password = password;
        this.name = name;
        this.deptId = deptId;
        this.age = age;
        this.sex = sex;
        this.height = height;
        this.money = money;
        this.login_date = login_date;
    }

    public BigDecimal getMoney() {
        return money;
    }

    public void setMoney(BigDecimal money) {
        this.money = money;
    }

    public Long getId() {
        return id;
    }

    public void setId(Long id) {
        this.id = id;
    }

    public String getUsername() {
        return username;
    }

    public void setUsername(String username) {
        this.username = username;
    }

    public String getPassword() {
        return password;
    }

    public void setPassword(String password) {
        this.password = password;
    }

    public String getName() {
        return name;
    }

    public void setName(String name) {
        this.name = name;
    }

    public Long getDeptId() {
        return deptId;
    }

    public void setDeptId(Long deptId) {
        this.deptId = deptId;
    }

    public int getAge() {
        return age;
    }

    public void setAge(int age) {
        this.age = age;
    }

    public Boolean getSex() {
        return sex;
    }

    public void setSex(Boolean sex) {
        this.sex = sex;
    }

    public int getHeight() {
        return height;
    }

    public void setHeight(int height) {
        this.height = height;
    }

    public LocalDateTime getLogin_date() {
        return login_date;
    }

    public void setLogin_date(LocalDateTime login_date) {
        this.login_date = login_date;
    }

    @Override
    public String toString() {
        return "Student{" +
                "id=" + id +
                ", username='" + username + '\'' +
                ", password='" + password + '\'' +
                ", name='" + name + '\'' +
                ", deptId=" + deptId +
                ", age=" + age +
                ", sex=" + sex +
                ", height=" + height +
                ", money=" + money +
                ", login_date=" + login_date +
                '}';
    }
}
增加
添加一条学生信息
//添加学生
    private static void insertStudent(Student student) {
        Connection connection = null;
        PreparedStatement preparedStatement = null;
        ResultSet resultSet = null;
        try {
            Class.forName("com.mysql.cj.jdbc.Driver");// 使用什么驱动连接数据库
            String url = "jdbc:mysql://localhost:3306/test_db?useUnicode=true&characterEncoding=UTF-8&userSSL=false&serverTimezone=GMT%2B8";
            String user = "root";
            String password = "root";
            connection = DriverManager.getConnection(url, user, password);
            String sql = "INSERT INTO tb_students_info VALUE (?,?,?,?,?,?,?,?,?,?)";
            preparedStatement = connection.prepareStatement(sql);
            preparedStatement.setObject(1, null);
            preparedStatement.setString(2, student.getUsername());
            preparedStatement.setString(3, student.getPassword());
            preparedStatement.setString(4, student.getName());
            preparedStatement.setLong(5, student.getDeptId());
            preparedStatement.setLong(6, student.getAge());
            preparedStatement.setBoolean(7, student.getSex());
            preparedStatement.setLong(8, student.getHeight());
            preparedStatement.setBigDecimal(9,student.getMoney());
            Date loginDate = new Date(Date.from(student.getLogin_date().atZone(ZoneOffset.ofHours(8)).toInstant()).getTime());
            preparedStatement.setDate(10, loginDate);
            int result = preparedStatement.executeUpdate();//返回值代表受影响的行
            System.out.println(result);
        } catch (ClassNotFoundException | SQLException e) {
            e.printStackTrace();
        }
    }
java.sql.Date和java.util.Date的区别
java.sql.Date和java.util.Date 最大的不同在于 java.sql.Date 只记录日期,而没有具体这一天的时间。
如果当前是2009-12-24 23:20,你创建一个 java.sql.Date 将只记下2009-12-24这个信息。
若需要保留时间进行JDBC操作,使用 java.sql.Timestamp 代替。
https://blog.csdn.net/zhang19903848257/article/details/118719149
课堂练习
public class JDBCConnect05 {
    public static void main(String[] args) {
        Student student = new Student(
                null,
                "2019120",
                "2019120",
                "赵六",
                5L,
                500,
                false,
                190,
                BigDecimal.valueOf(3.5),
                LocalDateTime.now()
        );
        System.out.println(addStudent(student));
    }

    public static int addStudent(Student student) {
        Connection connection = null;
        PreparedStatement preparedStatement = null;
        try {
            connection = JDBCUtils.getConnection();
            String sql = "INSERT INTO tb_students_info VALUE(?,?,?,?,?,?,?,?,?,?)";
            preparedStatement = connection.prepareStatement(sql);
            preparedStatement.setObject(1, null);
            preparedStatement.setString(2, student.getUsername());
            preparedStatement.setString(3, student.getPassword());
            preparedStatement.setString(4, student.getName());
            preparedStatement.setLong(5, student.getDeptId());
            preparedStatement.setLong(6, student.getAge());
            preparedStatement.setBoolean(7, student.getSex());
            preparedStatement.setLong(8, student.getHeight());
            preparedStatement.setBigDecimal(9, student.getMoney());
            java.sql.Date loginDate = new java.sql.Date(Date.from(student.getLogin_date().atZone(ZoneOffset.ofHours(8)).toInstant()).getTime());
            preparedStatement.setDate(10, loginDate);
            int i = preparedStatement.executeUpdate();
            return i;
        } catch (SQLException throwables) {
            throwables.printStackTrace();
        } finally {
            JDBCUtils.close(null, preparedStatement, connection);
        }
        return 0;
    }
删除
删除id为5的学生
//删除学生
    private static void deleteStudentById(Long id) {
        Connection connection = null;
        PreparedStatement preparedStatement = null;
        ResultSet resultSet = null;
        try {
            Class.forName("com.mysql.cj.jdbc.Driver");// 使用什么驱动连接数据库
            String url = "jdbc:mysql://localhost:3306/test_db?useUnicode=true&characterEncoding=UTF-8&userSSL=false&serverTimezone=GMT%2B8";
            String user = "root";
            String password = "root";
            connection = DriverManager.getConnection(url, user, password);
            String sql = "DELETE FROM  tb_students_info WHERE id=?";
            preparedStatement = connection.prepareStatement(sql);
            preparedStatement.setLong(1, id);
            int i = preparedStatement.executeUpdate();
            System.out.println(i);
        } catch (ClassNotFoundException | SQLException e) {
            e.printStackTrace();
        }
    }
修改
修改id为5的学生的年龄为18
private static void updateStudentAgeById(Long id, Integer age) {
        Connection connection = null;
        PreparedStatement preparedStatement = null;
        ResultSet resultSet = null;
        try {
            Class.forName("com.mysql.cj.jdbc.Driver");// 使用什么驱动连接数据库
            String url = "jdbc:mysql://localhost:3306/test_db?useUnicode=true&characterEncoding=UTF-8&userSSL=false&serverTimezone=GMT%2B8";
            String user = "root";
            String password = "root";
            connection = DriverManager.getConnection(url, user, password);
            String sql = "UPDATE   tb_students_info SET age = ? WHERE id=?";
            preparedStatement = connection.prepareStatement(sql);
            preparedStatement.setLong(1, age);
            preparedStatement.setLong(2, id);
            int i = preparedStatement.executeUpdate();
            System.out.println(i);
        } catch (ClassNotFoundException | SQLException e) {
            e.printStackTrace();
        }
    }
影响行数
- 更新失败 0
- 更新成功,但是更新数据与原数据重复 0
- 更新成功,且更新数据与源数据不同 1
项目开发中,可以通过判断影响行数来判断该操作是否成功。
封装JDBC工具类
创建工具类(适用所有的代码)
通过以上几个例子我们可以看出,每次查询时创建的方法里面有好多重复性的代码,这样会降低性能,我们可以把重复性的代码单独创建一个工具类,需要使用的时候调用即可
以上方的分页查询为例子
其中 Connection连接数据库和Finnally这两个代码块中的代码可以实现复用
工具类
public class JDBCUtils {
    //建设一个工具类.工具类目的是要很方便的调用里面的方法,
    //所以方法用static修饰,可以通过类名直接调用


    //创建静态常量,因为这些语句只需要在此类中使用,所以可以设置成私有的。
    private static final String connectionUrl = "jdbc:mysql://localhost:3306/test_db?useUnicode=true&characterEncoding=UTF-8&userSSL=false&serverTimezone=GMT%2B8";
    private static final String user = "root";
    private static final String passWord = "root";

    //建立数据库连接
    public static Connection getConnection() {
        try {
            Class.forName("com.mysql.cj.jdbc.Driver");
            return DriverManager.getConnection(connectionUrl, user, passWord);
        } catch (Exception e) {
            // TODO Auto-generated catch block
            e.printStackTrace();
        }
        return null;


    }

    //关闭
    public static void close(ResultSet rs, PreparedStatement pstmt, Connection con) {
        try {
            if (rs != null)
                rs.close();
        } catch (SQLException e) {
            // TODO Auto-generated catch block
            e.printStackTrace();
        }

        try {
            if (pstmt != null)
                pstmt.close();
        } catch (SQLException e) {
            // TODO Auto-generated catch block
            e.printStackTrace();
        }

        try {
            if (con != null)
                con.close();
        } catch (SQLException e) {
            // TODO Auto-generated catch block
            e.printStackTrace();
        }
    }
}
public class JDBCConnect04 {
    public static void main(String[] args) {
        Integer page = 1;
        Integer num = 5;
        String orderBy = "age-ASC";
        selectStudentsPage(page, num, orderBy);

    }

    public static void selectStudentsPage(Integer page, Integer num, String orderBy) {
        //步骤一:创建数据库链接
        Connection connection = JDBCUtils.getConnection();
        Integer row = page == 1 || page == 0 ? 0 * num : (page - 1) * num;
        String placeHolder = orderBy.split("-")[0] + ' ' + orderBy.split("-")[1];
        String sql = "SELECT * FROM tb_students_info ORDER BY " + placeHolder + " LIMIT ?,? ";
        //步骤二:创建PreparedStatement
        PreparedStatement preparedStatement = null;
        //步骤三:创建结果集
        ResultSet resultSet = null;
        try {
            preparedStatement = connection.prepareStatement(sql);
            preparedStatement.setInt(1, row);
            preparedStatement.setInt(2, num);
            resultSet = preparedStatement.executeQuery();
            while (resultSet.next()) {
                //通过列的索引获取表中的数据
                System.out.println(resultSet.getInt(1) + "-"
                        + resultSet.getString(2) + "-"
                        + resultSet.getString(3) + "-"
                        + resultSet.getString(4) + "-"
                        + resultSet.getInt(5) + "-"
                        //指定获取对象的列
                        + resultSet.getInt(6) + "-"
                        + resultSet.getBoolean(7) + "-"
                        //指定返回对象的类型
                        + resultSet.getObject(8, int.class) + "-"
                        + resultSet.getBigDecimal(9)+ "-"
                        //指定获取对象的字段名称
                        + resultSet.getDate("login_date")
                );
            }
        } catch (SQLException throwables) {
            throwables.printStackTrace();
        } finally {
            //步骤四:关闭数据库链接
            JDBCUtils.close(resultSet, preparedStatement, connection);
        }
    }
}
5. 事务
介绍
假如A和B为同一个事务操作,A操作完成时,数据库等遇到一些异常,无法完成B操作,此时系统会自动删除已完成的操作,避免造成损失。
保证数据库多个操作,要么全部成功,要么全部失败。
四大特性
- **原子性:**一个事务(transaction)中的所有操作,要么全部完成,要么全部不完成,不会结束在中间某个环节。事务在执行过程中发生错误,会被回滚(Rollback)到事务开始前的状态,就像这个事务从来没有执行过一样。
- **一致性:**在事务开始之前和事务结束以后,数据库的完整性没有被破坏。这表示写入的资料必须完全符合所有的预设规则,这包含资料的精确度、串联性以及后续数据库可以自发性地完成预定的工作。
- **隔离性:**数据库允许多个并发事务同时对其数据进行读写和修改的能力,隔离性可以防止多个事务并发执行时由于交叉执行而导致数据的不一致。事务隔离分为不同级别,包括读未提交(Read uncommitted)、读提交(read committed)、可重复读(repeatable read)和串行化(Serializable)。
- **持久性:**事务处理结束后,对数据的修改就是永久的,即便系统故障也不会丢失。
举例
**问题:**假如在一个银行管理系统中,A向B转钱,A刚转出去,此时遇到断电或者数据库崩溃,A转钱操作此时已经完成,但是B收钱操作未进行。这时候就会产生麻烦。
演示
开启事务:con.setAutoCommit(false); true自动提交 false手动提交
提交事务(手动提交):con.commit(); 开启事务与提交事务之间的操作都为事务操作,如果期间有任何操作为执行成功,则期间所有的操作都无效。
为tb_students_info添加money字段。
public static void transferAccounts(String usernameOne, String usernameTwo, int money) {
        Connection connection = null;
        PreparedStatement preparedStatementReduce = null;
        PreparedStatement preparedStatementAdd = null;
        ResultSet rs = null;
        try {
            connection = JDBCUtils.getConnection();

            connection.setAutoCommit(false);        //开启事务  true自动提交  false手动提交

            String sqlOne = "UPDATE tb_students_info SET money=money-? WHERE username=?";
            preparedStatementReduce = connection.prepareStatement(sqlOne);
            preparedStatementReduce.setInt(1, money);
            preparedStatementReduce.setString(2, usernameOne);
            preparedStatementReduce.executeUpdate();

            //假设代码进行到此处时,程序中断,这里用一个隐式异常来模拟
            //String s =null;
            //获取s索引为2的内容
            //s.charAt(2);
            //此时你会发现数据库中,转钱的人钱已减少,但是收钱的人却没有收到
            //如果要解决这种问题,就需要用到事务去避免   通过con.setAuToCommit()开启事务

            String sqlTwo = "UPDATE tb_students_info SET money=money+? WHERE username=?";
            preparedStatementAdd = connection.prepareStatement(sqlTwo);
            preparedStatementAdd.setInt(1, money);
            preparedStatementAdd.setString(2, usernameTwo);
            preparedStatementAdd.executeUpdate();

            connection.commit();//提交事务    开启事务与提交事务之间的操作都为事务操作,如果期间有任何操作为执行成功,则期间所有的操作都无效

        } catch (Exception e) {
            e.printStackTrace();
        } finally {
            //因为此时我们需要关闭两个pstmt,传递两个pstmt参数,所以我们需要完善我们的工具类
            JDBCUtils.close(connection, preparedStatementAdd, preparedStatementReduce);
        }
    }
不开启事务,转账中途遇到错误:执行程序后数据不一致。
public static void main(String[] args) {
        Integer page = 1;
        Integer num = 5;
        String orderBy = "age-ASC";
        selectStudentsPage(page, num, orderBy);
        transferAccounts("2019004", "2019005", 50);
    }
完善工具类
public static void close(Connection con, PreparedStatement... pstmts) {
        try {
            for (int i = 0; i < pstmts.length; i++) {
                if (pstmts[i] != null)
                    pstmts[i].close();
            }
        } catch (SQLException e) {
            // TODO Auto-generated catch block
            e.printStackTrace();
        }

        try {
            if (con != null)
                con.close();
        } catch (SQLException e) {
            // TODO Auto-generated catch block
            e.printStackTrace();
        }
    }
课堂练习
public class JDBCConnection006 {
    public static void main(String[] args) {
//        A("username",a);
//        B("username",a);
        transferAccounts("2019004", "2019005", BigDecimal.valueOf(50));
    }

    public static void transferAccounts(String usernameOne, String usernameTwo, BigDecimal money) {
        Connection connection = null;
        PreparedStatement preparedStatement = null;
        PreparedStatement preparedStatement1 = null;
        try {
            //转钱操作
            connection = JDBCUtils.getConnection();
            connection.setAutoCommit(false);
            String transferSql = "UPDATE tb_students_info SET money = money-? WHERE username=?";
            preparedStatement = connection.prepareStatement(transferSql);
            preparedStatement.setBigDecimal(1, money);
            preparedStatement.setString(2, usernameOne);
            preparedStatement.executeUpdate();
//            int a = 5 / 0;
            //收钱操作
            String collectMoney = "UPDATE tb_students_info SET money = money+? WHERE username=?";
            preparedStatement1 = connection.prepareStatement(collectMoney);
            preparedStatement1.setBigDecimal(1, money);
            preparedStatement1.setString(2, usernameTwo);
            preparedStatement1.executeUpdate();
            connection.commit();
        } catch (SQLException throwables) {
            throwables.printStackTrace();
        } finally {
            JDBCUtils.close(null, preparedStatement, preparedStatement1, connection);
        }
    }
}
6. 连接池
每次进行数据库的增删改查的操作时,都会先建立一个Connection链接,用完之后关闭,如果成千上万的用户进行数据的添加修改,这样很浪费性能和开发时间。其实完全可以用一个Connection进行链接和关闭,可以通过连接池来实现。
连接池:使用集合保存多个链接,后续使用时直接在链接池中取出链接使用,而不需要再重新创建,节约时间。
自定义连接池
创建连接池
使用的时候,直接调用getConnection方法即可。
public class ConnectionPoolUtils {
    private static final String connectionUrl = "jdbc:mysql://localhost:3306/test_db?useUnicode=true&characterEncoding=UTF-8&userSSL=false&serverTimezone=GMT%2B8";
    private static final String user = "root";
    private static final String passWord = "root";
    //创建一个集合,这个集合里面用来存放Connection;
    private static ArrayList<Connection> conList = new ArrayList<Connection>();

    //在整个服务器启动的时候,就直接先把链接资源创建起来,这样就不用每次使用的时候再去创建
    static {
        for (int i = 0; i <= 5; i++) {
            //通过遍历,在类的加载中先在连接池中创建了5个连接
            Connection con = createConnection();
            conList.add(con);
        }

    }

    //自动获取链接的方法
    public static Connection getConnection() {
        //在静态代码块中定义了5个链接,使用的时候,如果静态代码块中有链接,则使用。
        //如果静态代码块中的链接已经用完,则可以使用createConnection方法创建新的链接。
        if (conList.isEmpty() == false) {
            Connection con = conList.get(0);
            conList.remove(con);
            return con;
        } else {
            return createConnection();
        }
    }

    // 建立数据库连接
    public static Connection createConnection() {
        try {
            Class.forName("com.mysql.cj.jdbc.Driver");
            return DriverManager.getConnection(connectionUrl, user, passWord);
        } catch (Exception e) {
            // TODO Auto-generated catch block
            e.printStackTrace();
        }
        return null;

    }
    //归还数据库链接
    private static void closeConnection(Connection con) {
//		try {
//			if (con != null)
//				con.close();
//		} catch (SQLException e) {
//			// TODO Auto-generated catch block
//			e.printStackTrace();
//		}
		//归还链接池
		conList.add(con);
	}

}
归还连接池
我们使用完数据库链接之后,我们不关闭他,而是归还它,这样就可以节省资源。
private static void closeConnection(Connection con) {
//		try {
//			if (con != null)
//				con.close();
//		} catch (SQLException e) {
//			// TODO Auto-generated catch block
//			e.printStackTrace();
//		}
		//归还链接池
		conList.add(con);
	}
使用连接池插件
引入链接池插件
因为自己创建的连接池有许多考虑不周到的地方,所以我们可以使用别人封装好的第三方插件。
目前使用两种数据源,dbcp和c3p0,两者差异不大,后者使用较多。还有druid连接池,阿里巴巴提供的,性能好,框架阶段使用。
使用DBCP连接池
安装步骤:
- 下载jar包http://commons.apache.org/proper/commons-dbcp/download_dbcp.cgi
- 导入连接池相关jar包
使用步骤:
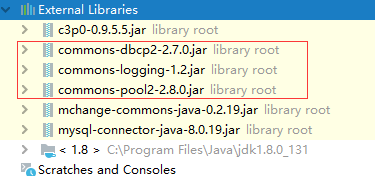
- 导入连接池 Commons dbcp和连接池插件,Commons Pool 和 Commons Logging插件
- 定义数据源 private static BasicDataSource ds;
- 定义数据源并在静态代码块里面初始化
工具类封装
public class DBCPDateSource {
	private static final String connectionUrl = "jdbc:mysql://localhost:3306/test_db?useUnicode=true&characterEncoding=UTF-8&userSSL=false&serverTimezone=GMT%2B8";
	private static final String user = "root";
	private static final String passWord = "root";
	//定义成员数据源
	private static BasicDataSource ds;

	static {
		//数据源初始化  放在静态代码块,保证最先执行
		ds = new BasicDataSource();
		ds.setDriverClassName("com.mysql.cj.jdbc.Driver");
		ds.setUrl(connectionUrl);
		ds.setUsername(user);
		ds.setPassword(passWord);

		//初始化链接的个数  这里初始化为5个
		ds.setInitialSize(5);
		//最大链接个数   创建链接时,最多同时创建二十个,如果超过二十个,会等其他链接使用完再进行创建
        //防止使用链接过多时,造成性能降低
		ds.setMaxTotal(20);
		//保证连接池里面至少有三个空闲链接  初始化为5个空闲链接,如果有4个人使用,则还有一个空闲链接,此时会自动再生成两个空闲链接做备用
		ds.setMinIdle(3);
	}

 public static Connection getConnection() {
	 try {
		return ds.getConnection();
		//通过dbcp得到的链接,不用归还,直接关闭就可以。 因为dbcp做了进一步处理,所以关闭的时候不会断开链接,而是归还给连接池
	} catch (SQLException e) {
		// TODO Auto-generated catch block
		e.printStackTrace();
	}
	 return null;
 }
 public static void close(ResultSet rs, PreparedStatement pstmt, Connection con) {
		//关闭结果集
		closeResultSet(rs);
		//关闭数据库与java的链接
		closePreparedStatement(pstmt);
		//关闭数据库链接
		closeConnection(con);
	}
	//转账操作时,需要关闭两个pstmt,因为他不需要返回结果集,所以不需要设置
	public static void close(PreparedStatement pstmtOne,PreparedStatement pstmtTwo,Connection con) {
		//遵循后使用,先关闭原则
		closePreparedStatement(pstmtTwo);
		closePreparedStatement(pstmtOne);
		closeConnection(con);

	}
	private static void closeResultSet(ResultSet rs) {
		try {
			if (rs != null)
				rs.close();
		} catch (SQLException e) {
			// TODO Auto-generated catch block
			e.printStackTrace();
		}
	}
	private static void closePreparedStatement(PreparedStatement pstmt) {
		try {
			if (pstmt != null)
				System.out.println(pstmt);
			pstmt.close();
		} catch (Exception e) {
			// TODO Auto-generated catch block
			e.printStackTrace();
		}
	}
	private static void closeConnection(Connection con) {
		try {
			if (con != null)
				con.close();
			//这里会把链接归还给jdbc连接池,并不是真正的断开链接
		} catch (SQLException e) {
			// TODO Auto-generated catch block
			e.printStackTrace();
		}

	}
}
报错信息
Exception in thread “main” java.lang.NoClassDefFoundError: Could not initialize class jdbc.DBCPDateSource
原因:DBCP是依赖于Commons Pool和Commons Logging里面的一些方法和类的,所以需要引入
Commons Pool:http://commons.apache.org/proper/commons-pool/download_pool.cgi
Commons Logging:http://commons.apache.org/proper/commons-logging/download_logging.cgi
使用C3P0连接池
安装步骤
- 下载jar包https://sourceforge.net/projects/c3p0/
- 安装jar包及相关依赖
操作步骤
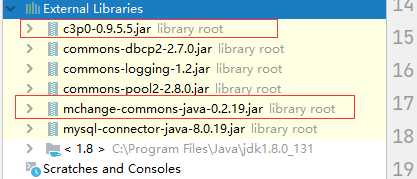
- 导入两个jar包 c3p0-0.9.5.5.jar, mchange-commons-java-0.2.19.jar
- 定义成员数据源 private static ComboPooledDataSource ds;
- 在静态代码块中进行数据源初始化
工具类封装
public class C3P0DateSource {
    private static final String connectionUrl = "jdbc:mysql://localhost:3306/web01?useUnicode=true&characterEncoding=UTF-8&userSSL=false&serverTimezone=GMT%2B8";
    private static final String user = "root";
    private static final String passWord = "root";
    //定义成员数据源
    private static ComboPooledDataSource ds;

    static {
        //数据源初始化

        try {
            ds = new ComboPooledDataSource();
            ds.setDriverClass("com.mysql.cj.jdbc.Driver");
            ds.setJdbcUrl(connectionUrl);
            ds.setUser(user);
            ds.setPassword(passWord);

            //初始连接数
            ds.setInitialPoolSize(5);
            //最大链接个数
            ds.setMaxPoolSize(20);
            //等等还有许多
        } catch (PropertyVetoException e) {
            // TODO Auto-generated catch block
            e.printStackTrace();
        }

    }
    public static Connection getConnection() {
        try {
            return ds.getConnection();
        } catch (SQLException e) {
            // TODO Auto-generated catch block
            e.printStackTrace();
        }
        return null;

    }
    public static void close(ResultSet rs, PreparedStatement pstmt, Connection con) {
        //关闭结果集
        closeResultSet(rs);
        //关闭数据库与java的链接
        closePreparedStatement(pstmt);
        //关闭数据库链接
        closeConnection(con);
    }
    //转账操作时,需要关闭两个pstmt,因为他不需要返回结果集,所以不需要设置
    public static void close(PreparedStatement pstmtOne,PreparedStatement pstmtTwo,Connection con) {
        //遵循后使用,先关闭原则
        closePreparedStatement(pstmtTwo);
        closePreparedStatement(pstmtOne);
        closeConnection(con);

    }
    private static void closeResultSet(ResultSet rs) {
        try {
            if (rs != null)
                rs.close();
        } catch (SQLException e) {
            // TODO Auto-generated catch block
            e.printStackTrace();
        }
    }
    private static void closePreparedStatement(PreparedStatement pstmt) {
        try {
            if (pstmt != null)
                System.out.println(pstmt);
            pstmt.close();
        } catch (Exception e) {
            // TODO Auto-generated catch block
            e.printStackTrace();
        }
    }
    private static void closeConnection(Connection con) {
        try {
            if (con != null)
                con.close();
            //这里会把链接归还给jdbc连接池,并不是真正的断开链接
        } catch (SQLException e) {
            // TODO Auto-generated catch block
            e.printStackTrace();
        }

    }
}
使用DRUID
步骤:
-
导入jar包druid-1.1.9.jar
-
定义配置文件:是properties形式的,可以叫任意名称,可以放在任意目录下
-
获取数据库连接池对象:通过工厂来来获取DruidDataSourceFactory
-
获取连接: getConnection
工具类
public class DRUIDDateSource {
    //1.定义成员变量 DateSource
    private static DataSource ds;

    static {
        try {
            //1.加载配置文件
            Properties pro = new Properties();
            pro.load(DRUIDDateSource.class.getClassLoader().getResourceAsStream("druid.properties"));
            ds = DruidDataSourceFactory.createDataSource(pro);
        } catch (Exception e) {
            e.printStackTrace();
        }
    }

    public static Connection getConnection() throws Exception {
  Connection connection = null;
        try {
            connection = ds.getConnection();
            return connection;
        } catch (SQLException throwables) {
            throwables.printStackTrace();
        }
        return null;
    }

    //获取链接池的方法
    public static DataSource getDataSource() {
        return ds;
    }

    //关闭数据库连接的封装,通过动态传参,将rs,pstmt,con按照顺序传进来
    public static void closeAll(AutoCloseable... closeables) {
        for (AutoCloseable closeable : closeables) {
            if (closeable != null) {
                try {
                    closeable.close();
                } catch (Exception e) {
                    // TODO Auto-generated catch block
                    e.printStackTrace();
                }
            }
        }

    }

}
配置文件
driverClassName=com.mysql.cj.jdbc.Driver
url=jdbc:mysql://localhost:3306/test_db?useUnicode=true&characterEncoding=UTF-8&userSSL=false&serverTimezone=GMT%2B8
username=root
password=root
initialSize=5
maxActive=10
maxWait=3000
报错
java.sql.SQLFeatureNotSupportedException问题原因及解决方法
https://blog.csdn.net/hp961218/article/details/100632991
测试连接池
public class PoolTest {
    public static void main(String[] args) {
        Student student = new Student(null, "2019012", "2019012", "王五", 1L, 18, false, 178, BigDecimal.valueOf(100.00), LocalDateTime.now());
        insertStudent(student);
    }

    private static void insertStudent(Student student) {
        Connection connection = null;
        PreparedStatement preparedStatement = null;
        try {
            connection = DRUIDDateSource.getConnection();
            String sql = "INSERT INTO tb_students_info VALUE (?,?,?,?,?,?,?,?,?,?)";
            preparedStatement = connection.prepareStatement(sql);
            preparedStatement.setObject(1, null);
            preparedStatement.setString(2, student.getUsername());
            preparedStatement.setString(3, student.getPassword());
            preparedStatement.setString(4, student.getName());
            preparedStatement.setLong(5, student.getDeptId());
            preparedStatement.setLong(6, student.getAge());
            preparedStatement.setBoolean(7, student.getSex());
            preparedStatement.setLong(8, student.getHeight());
            preparedStatement.setBigDecimal(9,student.getMoney());
            Date loginDate = new Date(Date.from(student.getLogin_date().atZone(ZoneOffset.ofHours(8)).toInstant()).getTime());
            preparedStatement.setDate(10, loginDate);
            int result = preparedStatement.executeUpdate();//返回值代表受影响的行
            System.out.println(result);
        } catch (SQLException e) {
            e.printStackTrace();
        } finally {
            DRUIDDateSource.closeAll(preparedStatement, connection);
        }
    }
}
7. JDBCTemplate
介绍
Spring JDBC :Spring框架对JDBC的简单封装。提供了一个JDBCTemplate对象简化JDBC的开发
步骤:
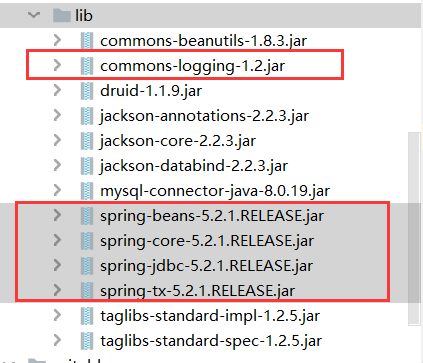
- 导入jar包
-
创建JdbcTemplate对象。 依赖于数据源DataSource JdbcTemplate template = new JdbcTemplate(ds);
-
调用JdbcTemplate的方 法来完成CRUD的操作
-
update():执行DML语句。增、删、改语句
-
queryForMap():查询结果将结果集封装为map集合
-
查询结果集的长度只能为1(一条记录) 列名为key,值为value
-
查询两条或者两条以上的记录时,使用List集合
-
-
queryForlist():查询结果将结果集封装为list集合
-
query():查询结果,T导结果封装为JavaBean对象
- 需要引入接口*BeanPropertyRowMapper<类>(类.class)*接口
-
queryForobject(sql,返回值结果的类型.class) :查询结果,将结果封装为对象
- 一半用于执行聚合函数
-
-
public class JDBCTemplate {
    public static void main(String[] args) {
        //1.导入jar包
        //2.创建JDBCTemplate对象
        JdbcTemplate template = new JdbcTemplate(DRUIDDateSource.getDataSource());
        //3.调用方法
        //将id为7的同学的年龄设置为0岁。
        String sql = "UPDATE tb_students_info SET age=? WHERE id=?";
        int update = template.update(sql, 0, 7);
        System.out.println(update);//1
    }
}
使用
相关练习
需求:
-
修改id为7的同学的年龄为0岁
-
添加一条记录
-
删除一条的记录
-
查询id为10的记录,将其封装为Map集合
-
查询所有记录,将其封装为List
-
查询所有记录,将其封装为Student对象的List集合
-
查询总记录数
-
-
public class JdbcTemplateDemo2 {
    /**
     *
     */
       //1.获取对象

    private JdbcTemplate template = new JdbcTemplate(JDBCUtils.getDataSource());
    //修改
    @Test
    public void test1(){
         //2.定义sql
        String sql = "UPDATE tb_students_info SET age=? WHERE id=?";
        //3.调用方法
        int update = template.update(sql, 0, 7);
        System.out.println(update);//1
    }
    //添加
    @Test
    public void test2(){
            String sql ="INSERT INTO tb_students_info VALUE (?,?,?,?,?,?,?,?,?,?)";
        Student student = new Student(null, "2019012", "2019012", "王五", 1L, 18, false, 178, BigDecimal.valueOf(100.00), LocalDateTime.now());
        Date loginDate = new Date(Date.from(student.getLogin_date().atZone(ZoneOffset.ofHours(8)).toInstant()).getTime());
        int update = template.update(sql,
                null,
                student.getUsername(),
                student.getPassword(),
                student.getName(),
                student.getDeptId(),
                student.getAge(),student.getSex(),student.getHeight(),student.getMoney(),loginDate);
        System.out.println(update);
    }
    //删除
    @Test
    public void test3(){
        String sql ="DELETE FROM tb_students_info WHERE id=?";
        int update = template.update(sql,3);
        System.out.println(update);
    }
    //查询所有对象,并封装成map集合
    //注意:查询结果集的长度只能为1  列名为key,值为value
    //查询两条或者两条以上的记录时,使用List集合
    @Test
    public void test4(){
        String sql ="SELECT*FROM tb_students_info WHERE id=?";
        Map<String, Object> query = template.queryForMap(sql,10);
        System.out.println(query);
    }
    //查询所有对象,并封装成List集合
    @Test
    public void test5(){
        String sql ="SELECT*FROM tb_students_info";
        List<Map<String, Object>> query = template.queryForList(sql);
        System.out.println(query);
    }
    //获取javabean对象。需要引入BeanPropertyRowMapper<User>(User.class)接口
    @Test
    public void test6(){
        String sql ="SELECT*FROM tb_students_info";
        List<Student> query = template.query(sql, new BeanPropertyRowMapper<Student>(Student.class));
        for (Student student:query) {
            System.out.println(student);
        }
    }
    //获取值的长度
    @Test
    public void test7(){
        String sql ="SELECT COUNT(*) FROM tb_students_info";
        Long longs = template.queryForObject(sql,Long.class);
        System.out.println(longs);
    }

      @Test
    public void login(String username, String password) {
        String sql = "SELECT * FROM tb_students_info WHERE username=? AND password=?";
        Student student = template.queryForObject(sql,new BeanPropertyRowMapper<Student>(Student.class),username,password);
        System.out.println(student);
    }

}
JDBC数据更新,获取更新对象的id
https://www.cnblogs.com/langtianya/p/4919866.html
使用单元测试- 导入junit jar包
- 没有返回值 void
- 方法名称自定义
- 方法没有参数
- 方法的上面加上@Test注解,方法时单独执行,不使用main方法
8. 释放资源
注意:
释放资源时遵循后使用,先关闭原则。
对于ResultSet,Statement,Connection的关闭有这样一种关系:关闭一个Statement会把它的所有的ResultSet关闭掉,关闭一个Connection会把它的所有的Statement关闭掉。
但推荐先从小的关ResultSet–>Statement–>Connection
为什么要释放资源
https://my.oschina.net/zjllovecode/blog/1618446
释放资源的封装
//关闭数据库连接的封装,通过动态传参,将rs,pstmt,con按照顺序传进来
	public static void closeAll(AutoCloseable...closeables) {
		for(AutoCloseable closeable:closeables) {
			if(closeable!=null) {
				try {
					closeable.close();
				} catch (Exception e) {
					// TODO Auto-generated catch block
					e.printStackTrace();
				}
			}
		}

	}
为什么不能只关闭connection
https://www.cnblogs.com/beyonce5888296/p/3628297.html
在查询或是其它操作中,如果只关闭Connection,不作ResultSet 和 Statement 的关闭的话,对系统性能是否会有影响呢。或者是其它方面的不良影响。

如果你不使用连接池,那么就没有什么问题,一旦Connection关闭,数据库物理连接就被释放,所有相关Java资源也可以被GC回收了。    但是如果你使用连接池,那么请注意,Connection关闭并不是物理关闭,只是归还连接池,所以PreparedStatement和ResultSet都被持有,并且实际占用相关的数据库的游标资源,在这种情况下,只要长期运行,往往就会报“游标超出数据库允许的最大值”的错误,导致程序无法正 常访问数据库。
9. 优秀博客
jdbc链接sqlserver数据库
(98条消息) JDBC连接Sqlserver数据库配置与教程(零基础)_野比带雄的博客-CSDN博客_jdbc连接数据库步骤sqlserver
jdbc操作步骤
https://www.cnblogs.com/xiaofu007/p/10508032.html
为什么不能只关闭connection(一定要看这篇博文)
https://www.cnblogs.com/beyonce5888296/p/3628297.html
10. 好的封装
sql语句绑定参数的封装
//调用
UtilityClass.chuanParmas(pstmt, parmas);

//封装的方法
public static void chuanParmas(PreparedStatement pstmt,Object ...parmas) {
		 for(int a =0;a<parmas.length;a++) {
			 try {
				pstmt.setObject(a+1, parmas[a]);
			} catch (SQLException e) {
				// TODO Auto-generated catch block
				e.printStackTrace();
			}
		 }

	}
关闭资源的封装
//调用
UtilityClass.closeAll(pstmt, conn);

//封装的方法
public static void closeAll(AutoCloseable...closeables) {
		for(AutoCloseable closeable:closeables) {
			if(closeable!=null) {
				try {
					closeable.close();
				} catch (Exception e) {
					// TODO Auto-generated catch block
					e.printStackTrace();
				}
			}
		}

	}
建立数据库连接的封装
//基础准备

private static String driver;
	private static String url;
	private static String user;
	private static String password;
	static {
		driver = "com.mysql.cj.jdbc.Driver";
		url="jdbc:mysql://localhost:3306/stu?useUnicode=true&characterEncoding=UTF-8&userSSL=false&serverTimezone=GMT%2B8";
		user="root";
		password="root";
		//加载数据库
		try {
			Class.forName(driver);
		} catch (ClassNotFoundException e) {
			// TODO Auto-generated catch block
			e.printStackTrace();
		}

//调用
			conn = UtilityClass.getConnection();

//获取链接
public static Connection getConnection() {

		try {
			return DriverManager.getConnection(url,user,password);
		} catch (SQLException e) {
			// TODO Auto-generated catch block
			e.printStackTrace();
		}
		return null;
	}
综合例子
//m
public class DruidTest01 {
    public static void main(String[] args) {
//        A("username",a);
//        B("username",a);
        transferAccounts("2019004", "2019005", BigDecimal.valueOf(50));
    }

    public static void transferAccounts(String usernameOne, String usernameTwo, BigDecimal money) {
        Connection connection = null;
        PreparedStatement preparedStatement = null;
        PreparedStatement preparedStatement1 = null;
        try {
            //转钱操作
            connection = DRUIDDateSource.getConnection();
            connection.setAutoCommit(false);
            String transferSql = "UPDATE tb_students_info SET money = money-? WHERE username=?";
            preparedStatement = connection.prepareStatement(transferSql);
            Object[] object1 = {money, usernameOne};
            DRUIDDateSource.chuanParmas(preparedStatement, object1);
            preparedStatement.executeUpdate();
//            int a = 5 / 0;
            //收钱操作
            String collectMoney = "UPDATE tb_students_info SET money = money+? WHERE username=?";
            preparedStatement1 = connection.prepareStatement(collectMoney);
            Object[] object2 = {money, usernameTwo};
            DRUIDDateSource.chuanParmas(preparedStatement1, object2);
            preparedStatement1.executeUpdate();
            connection.commit();
        } catch (SQLException throwables) {
            throwables.printStackTrace();
        } finally {
            DRUIDDateSource.closeAll(preparedStatement, preparedStatement1, connection);
        }
    }
}

// 数据源
public class DRUIDDateSource {
    //1.定义成员变量 DateSource
    private static DataSource ds;

    static {
        try {
            //1.加载配置文件
            Properties pro = new Properties();
            pro.load(DRUIDDateSource.class.getClassLoader().getResourceAsStream("druid.properties"));
            ds = DruidDataSourceFactory.createDataSource(pro);
        } catch (Exception e) {
            e.printStackTrace();
        }
    }

    public static Connection getConnection() throws SQLException {
      return  ds.getConnection();
    }

    //获取链接池的方法
    public static DataSource getDataSource() {
        return ds;
    }

    //关闭数据库连接的封装,通过动态传参,将rs,pstmt,con按照顺序传进来
    public static void closeAll(AutoCloseable... closeables) {
        for (AutoCloseable closeable : closeables) {
            if (closeable != null) {
                try {
                    closeable.close();
                } catch (Exception e) {
                    // TODO Auto-generated catch block
                    e.printStackTrace();
                }
            }
        }

    }


    public static void chuanParmas(PreparedStatement pstmt, Object ...parmas) {
        for(int a =0;a<parmas.length;a++) {
            try {
                pstmt.setObject(a+1, parmas[a]);
            } catch (SQLException e) {
                // TODO Auto-generated catch block
                e.printStackTrace();
            }
        }

    }
}


 1351
1351


 被折叠的 条评论
为什么被折叠?
被折叠的 条评论
为什么被折叠?
 到【灌水乐园】发言


