


一: 准备工作
1.首先将MySql的jar包导入项目文件中,在进行连接。(Build path--> Add)
2.写好配置文件(dbinfo.properties)
3.
4.创建相应的类进行。
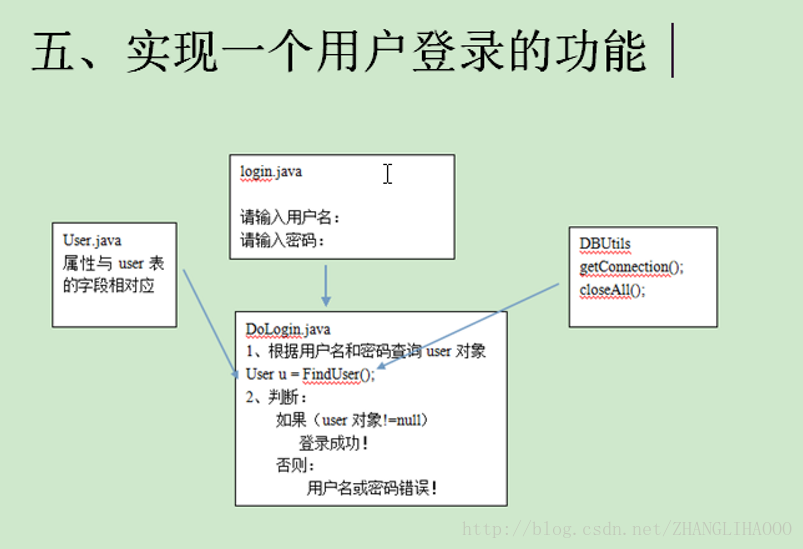
二:具体实现
1:登录界面
public class DengLu {

	public static void main(String[] args) {

		Scanner sc = new Scanner(System.in);
		System.out.println("请输入帐号:");
		String name = sc.nextLine();

		System.out.println("请输入密码:");
		String pwd  = sc.nextLine();

		DoDengLu dl = new DoDengLu();
		User   user   = dl.findUser(name, pwd);
		if(user!=null)
		{
			System.out.print("welcome to  "+user.getName());
		}
		else
			System.out.print("输入错误");

	}

}
2.与数据库实现交互
public class DoDengLu {

	public User findUser(String name,String pwd)
	{
		Connection conn = null;
		PreparedStatement stmt = null;
		ResultSet rs = null;
		User u  =null;
		try{
			conn  = DBUtils.getConnection();

			String Sql = "select * from stu28 where NAme=? and password=?"; // 预编译

			stmt = conn.prepareStatement(Sql);
			// 给问号赋值
			stmt.setString(1,name);
			stmt.setString(2,pwd);
//			String sql ="select * from stu28 where Name = '"+name+"' AND PASsword = '"+pwd+"'";
			// 这样写会导致SQL注入问题    就是后面   or   '1'='1

			rs  = stmt.executeQuery();
			if(rs.next())
			{
				u  =  new User();
				u.setId(rs.getInt(1));
				u.setName(rs.getString(2));
				u.setPassword(rs.getString(3));
				u.setEmail(rs.getString(4));
				u.setBirthday(rs.getDate(5));
			}
		}
		catch(Exception e)
		{
			e.printStackTrace();
		}
		finally
		{
			DBUtils.closeAll(rs, stmt, conn);
		}
		return u;
	}
}
3.帮助工具
public class DBUtils {

		private static String DriverClass;
		private static String url;
		private static String user;
		private static String password;
		// 静态代码块   类只要加载,直接执行
		 // 就是将配置文件加载;
		static{
			ResourceBundle rb  = ResourceBundle.getBundle("dbinfo");
			// 进行赋值操作;
			DriverClass   = rb.getString("DriverClass");
			url  = rb.getString("url");
			user = rb.getString("user");
			password = rb.getString("password");
			try {
				Class.forName(DriverClass);
			} catch (ClassNotFoundException e) {
				// TODO Auto-generated catch block
				e.printStackTrace();
			}
		}


		// 创建两个方法:    // yi :得到连接的方法
		public static Connection getConnection() throws Exception{

			return  DriverManager.getConnection(url,user,password);


		}
		// 二 : 关闭资源
		public static void closeAll(ResultSet rs,Statement stmt,Connection conn)
		{
			if(rs!=null)
			{
				try{
					rs.close();
				}
				catch(Exception e){
					e.printStackTrace();
				}
			}


			if(stmt!=null)
			{
				try{
					stmt.close();
				}
				catch(Exception e){
					e.printStackTrace();
				}
			}


			if(conn!=null)
			{
				try{
					conn.close();
				}
				catch(Exception e){
					e.printStackTrace();
				}
			}

		}


	}
public class User {
	private int id;
	private String name;
	private String password;
	private String email;
	private Date birthday;
	public int getId() {
		return id;
	}
	public void setId(int id) {
		this.id = id;
	}
	public String getName() {
		return name;
	}
	public void setName(String name) {
		this.name = name;
	}
	public String getPassword() {
		return password;
	}
	public void setPassword(String password) {
		this.password = password;
	}
	public String getEmail() {
		return email;
	}
	public void setEmail(String email) {
		this.email = email;
	}
	public Date getBirthday() {
		return birthday;
	}
	public void setBirthday(Date birthday) {
		this.birthday = birthday;
	}

}
5.配置文件
 // 根据自己修改
DriverClass = com.mysql.jdbc.Driver
url = jdbc:mysql:///JDBC28
user = root
password =root


 1910
1910

 被折叠的 条评论
为什么被折叠?
被折叠的 条评论
为什么被折叠?
 到【灌水乐园】发言


