


1.@Order

@Order注解可应用于类、方法和字段属性上;
@Order注解定义了Spring IOC容器中Bean的执行顺序的优先级,而不是定义Bean的加载顺序,Bean的加载顺序不受@Order或Ordered接口的影响(个人理解:在项目启动的时候会将所有的bean进行注入,注入后我们调用所需要的bean的先后顺序不会受到这@Order注解的影响)。
简单的应用:
package com.example.practice.service.impl;

import com.example.practice.service.IUserService;
import org.springframework.stereotype.Service;

@Service
public class UserServiceImpl implements IUserService {


    @Override
    public void getUserInfo() {
        System.out.println("成功获取用户信息");
    }
}
package com.example.practice.service.impl;

import com.example.practice.service.ICarService;
import org.springframework.stereotype.Service;

@Service
public class CarServiceImpl implements ICarService {


    @Override
    public void getCarInfo() {
        System.out.println("成功获取车辆信息");
    }
}
package com.example.practice.anno;

import com.example.practice.service.impl.UserServiceImpl;
import org.springframework.context.annotation.Bean;
import org.springframework.context.annotation.Configuration;
import org.springframework.core.annotation.Order;

@Configuration
@Order(1)
public class AConfig {

    @Bean
    public UserServiceImpl aUserService() {
        System.out.println("UserServiceImpl加载完成");
        return new UserServiceImpl();
    }

}
package com.example.practice.anno;

import com.example.practice.service.impl.CarServiceImpl;
import org.springframework.context.annotation.Bean;
import org.springframework.context.annotation.Configuration;
import org.springframework.core.annotation.Order;

@Configuration
@Order(2)
public class BConfig {

    @Bean
    public CarServiceImpl aCarService() {
        System.out.println("CarServiceImpl加载完成");
        return new CarServiceImpl();
    }

}
测试方法:
package com.example.practice.MainTest;

import org.springframework.context.annotation.AnnotationConfigApplicationContext;

public class Main {

    public static void main(String[] args) {
        AnnotationConfigApplicationContext context =
                new AnnotationConfigApplicationContext("com.example.practice.anno");
    }

}
运行结果为:

可见,@Order注解中的数字越小,优先级越高。
2.ImportBeanDefinitionRegistrar接口的调用
在实际业务中,当我们需要注入某个bean的时候可以采用@Component、@Service等注解进行注入或者通过xml文件进行注入。但是存在一些情况,在不使用Spring注解的情况下,也可以进行注入,此时就需要利用Spring提供的直接注入的方法 -》 实现ImportBeanDefinitionRegistrar接口
ImportBeanDefinitionRegistrar基本介绍:
1>ImportBeanDefinitionRegistrar类只能通过其他类@Import的方式来加载,通常是启动类或配置类。
2>使用@Import,如果括号中的类是ImportBeanDefinitionRegistrar的实现类,则会调用接口方法,将其中要注册的类注册成bean。
3>实现该接口的类拥有注册bean的能力。
package com.example.practice.conf;

import org.springframework.context.annotation.Import;

import java.lang.annotation.*;

@Target({ElementType.TYPE})
@Retention(RetentionPolicy.RUNTIME)
@Inherited
@Documented
@Import({MyImportBeanDefinitionRegistrar.class})
public @interface ImportBean {

    /**
     * 要注入的class集合
     */
    Class<?>[] value() default {};

}
package com.example.practice.domain;

import lombok.AllArgsConstructor;
import lombok.Builder;
import lombok.Data;
import lombok.NoArgsConstructor;


@Data
@NoArgsConstructor
@AllArgsConstructor
@Builder
public class User {

    private String userName;

    private Integer age;

    @Override
    public String toString() {
        return "User{" +
                "userName='" + userName + '\'' +
                ", age=" + age +
                '}';
    }
}
package com.example.practice.conf;

import org.springframework.beans.MutablePropertyValues;
import org.springframework.beans.factory.support.BeanDefinitionRegistry;
import org.springframework.beans.factory.support.BeanNameGenerator;
import org.springframework.beans.factory.support.RootBeanDefinition;
import org.springframework.context.annotation.ImportBeanDefinitionRegistrar;
import org.springframework.core.annotation.AnnotationAttributes;
import org.springframework.core.type.AnnotationMetadata;

public class MyImportBeanDefinitionRegistrar implements ImportBeanDefinitionRegistrar {


    @Override
    public void registerBeanDefinitions(AnnotationMetadata importingClassMetadata, BeanDefinitionRegistry registry, BeanNameGenerator importBeanNameGenerator) {
        // 获取注解ImportBean的属性
        AnnotationAttributes annotationAttributes = AnnotationAttributes.fromMap(importingClassMetadata.getAnnotationAttributes(ImportBean.class.getName()));
        Class<?>[] classValues = annotationAttributes.getClassArray("value");
        // 注入BeanDefinition
        for (Class classValue : classValues) {
            RootBeanDefinition beanDefinition = new RootBeanDefinition(classValue);
            MutablePropertyValues propertyValues = beanDefinition.getPropertyValues();
            propertyValues.add("userName","god");
            propertyValues.add("age",18);
            // 注册bean
            registry.registerBeanDefinition("user",beanDefinition);
        }

    }
}
package com.example.practice;

import com.example.practice.conf.ImportBean;
import com.example.practice.domain.User;
import org.springframework.boot.SpringApplication;
import org.springframework.boot.autoconfigure.SpringBootApplication;
import org.springframework.boot.autoconfigure.jdbc.DataSourceAutoConfiguration;

@SpringBootApplication(exclude= DataSourceAutoConfiguration.class)
@ImportBean({User.class})
public class PracticeApplication {

    public static void main(String[] args) {
        SpringApplication.run(PracticeApplication.class, args);
    }

}
package com.example.practice.controller;

import com.example.practice.domain.User;
import lombok.Getter;
import org.springframework.web.bind.annotation.PostMapping;
import org.springframework.web.bind.annotation.RequestMapping;
import org.springframework.web.bind.annotation.RestController;

import javax.annotation.Resource;

@RestController
@RequestMapping("/test")
@Getter
public class UserController {


    @Resource
    private User user;

    @PostMapping(value = "/getUser")
    public void getUser() {
        System.out.println(user.toString());
    }

}
运行结果为:

采用注解的方式,可以随时确定哪些bean需要进行注入。
3.HandlerInterceptor接口的调用
拦截器是在面向切面编程中应用的,就是在你的service或者一个方法前调用一个方法,或者在方法后调用一个方法。是基于JAVA的反射机制。
1.拦截器(Interceptor)执行顺序:
1>请求到达 DispatcherServlet
2>DispatcherServlet 发送至 Interceptor ,执行 preHandle
3>请求达到 Controller
4> 请求结束后,postHandle 执行
2.拦截器(Interceptor)和过滤器(Filter)的执行顺序
过滤前->拦截前->Action处理->拦截后->过滤后
3.使用方法
1>预处理preHandle()方法
用户发送请求时,先执行preHandle()方法。会先按照顺序执行所有拦截器的preHandle方法,一直遇到return false为止,比如第二个preHandle方法是return false,则第三个以及以后所有拦截器都不会执行。若都是return true,则执行用户请求的url方法。
2>后处理postHandle()方法
调用了Service并返回ModelAndView,但未进行页面渲染,可以在这里继续修改ModelAndView
3>返回处理afterCompletion()方法
已经渲染了页面,在afterCompletion中,可以根据ex是否为null判断是否发生了异常,进行日志记录。
注:一般使用preHandle这个拦截器进行预处理,对url进行请求拦截
自定义拦截器:
package com.example.practice.interceptor;

import org.springframework.stereotype.Component;
import org.springframework.web.servlet.HandlerInterceptor;
import org.springframework.web.servlet.ModelAndView;

import javax.servlet.http.HttpServletRequest;
import javax.servlet.http.HttpServletResponse;


@Component
public class TestInterceptor implements HandlerInterceptor {

    @Override
    public boolean preHandle(HttpServletRequest request, HttpServletResponse response, Object handler) throws Exception {
        System.out.println("preHandle方法执行");
        return HandlerInterceptor.super.preHandle(request, response, handler);
    }

    @Override
    public void postHandle(HttpServletRequest request, HttpServletResponse response, Object handler, ModelAndView modelAndView) throws Exception {
        System.out.println("postHandle方法执行");
        HandlerInterceptor.super.postHandle(request, response, handler, modelAndView);
    }

    @Override
    public void afterCompletion(HttpServletRequest request, HttpServletResponse response, Object handler, Exception ex) throws Exception {
        System.out.println("afterCompletion方法执行");
        HandlerInterceptor.super.afterCompletion(request, response, handler, ex);
    }
}
注册拦截器:
package com.example.practice.interceptor;

import org.springframework.beans.factory.annotation.Autowired;
import org.springframework.context.annotation.Configuration;
import org.springframework.web.servlet.config.annotation.InterceptorRegistry;
import org.springframework.web.servlet.config.annotation.WebMvcConfigurer;

@Configuration
public class TestInterceptorAdapterConfig implements WebMvcConfigurer {

    @Autowired
    private TestInterceptor testInterceptor;


    public TestInterceptorAdapterConfig() {}

    @Override
    public void addInterceptors(InterceptorRegistry registry) {
        registry.addInterceptor(this.testInterceptor).excludePathPatterns(new String[]{"*.html"});
    }
}
执行结果如下:

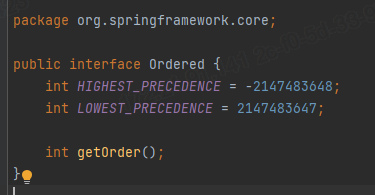
4.ImportSelector接口的调用
在@Configuration标注的Class上可以使用@Import引入其它的配置类,其实它还可以引入org.springframework.context.annotation.ImportSelector实现类。ImportSelector接口只定义了一个selectImports(),用于指定需要注册为bean的Class名称。当在@Configuration标注的Class上使用@Import引入了一个ImportSelector实现类后,会把实现类中返回的Class名称都定义为bean。
自定义实体类:
package com.example.practice.domain;


public class Depart {

    private Integer depId;

    private String depName;

    public Integer getDepId() {
        return depId;
    }

    public void setDepId(Integer depId) {
        this.depId = depId;
    }

    public String getDepName() {
        return depName;
    }

    public void setDepName(String depName) {
        this.depName = depName;
    }
}
定义Configuration类:
package com.example.practice.importBean;

import org.springframework.context.annotation.Configuration;

@Configuration
public class TestImportSelectorConfiguration {
}
package com.example.practice.controller;

import com.example.practice.AOP.TestAnno;
import com.example.practice.domain.Depart;
import com.example.practice.domain.User;
import com.example.practice.service.IUserService;
import lombok.Getter;
import org.springframework.beans.factory.annotation.Autowired;
import org.springframework.web.bind.annotation.PostMapping;
import org.springframework.web.bind.annotation.RequestMapping;
import org.springframework.web.bind.annotation.RestController;

import javax.annotation.Resource;

@RestController
@RequestMapping("/test")
@Getter
public class UserController {

    @Resource
    private Depart depart;

    @PostMapping(value = "/getDepart")
    public void getDepart() {
        System.out.println(depart.toString());
    }

}
项目启动报错:
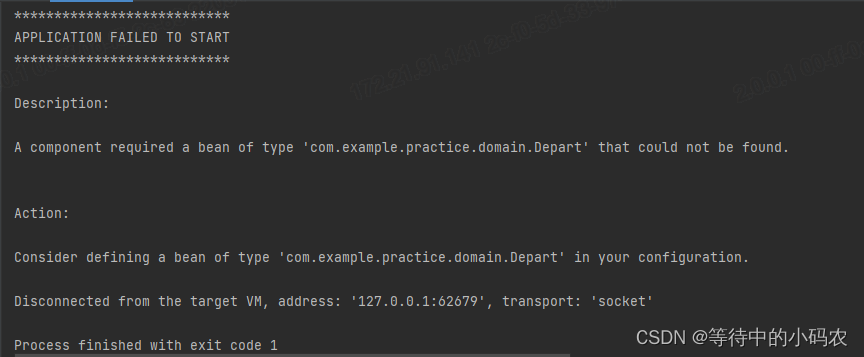
解决方案:
1.通过@Import进行Depart类的引入:
package com.example.practice.importBean;

import com.example.practice.domain.Depart;
import org.springframework.context.annotation.Configuration;
import org.springframework.context.annotation.Import;

@Configuration
@Import(Depart.class)
public class TestImportSelectorConfiguration {
}
运行结果为:

2.通过ImportSelector进行引入:
package com.example.practice.importBean;

import org.springframework.context.annotation.ImportSelector;
import org.springframework.core.type.AnnotationMetadata;

public class TestImportSelector implements ImportSelector {

    public TestImportSelector() {}

    @Override
    public String[] selectImports(AnnotationMetadata importingClassMetadata) {
        return new String[]{"com.example.practice.domain.Depart"};
    }
}
package com.example.practice.importBean;

import org.springframework.context.annotation.Configuration;
import org.springframework.context.annotation.Import;

@Configuration
@Import(TestImportSelector.class)
public class TestImportSelectorConfiguration {
}
运行结果为:

上面的例子是有关实体bean的,那接口的呢?
1.接口的定义
public interface HelloService {
    void sayHello();
}

public class HelloServiceA implements HelloService {
    @Override
    public void sayHello() {
        System.out.println("Hello A");
    }
}

public class HelloServiceB implements HelloService {
    @Override
    public void sayHello() {
        System.out.println("Hello B");
    }
}
2.selector的定义
public class HelloImportSelector implements ImportSelector {
    @Override
    public String[] selectImports(AnnotationMetadata importingClassMetadata) {
//        return new String[]{HelloServiceA.class.getName(), HelloServiceB.class.getName()};
        //1.获取扫描的包路径
        String[] basePackages = null;
        if (importingClassMetadata.hasAnnotation(ComponentScan.class.getName())) {
            Map<String, Object> annotationAttributes = importingClassMetadata.getAnnotationAttributes(ComponentScan.class.getName());
            basePackages = (String[]) annotationAttributes.get("basePackages");
        }
        // 默认扫描当前路径
        // ComponentScan的basePackages默认为空数组
        if (basePackages == null || basePackages.length == 0) {
            String basePackage = null;
            try {
                basePackage = Class.forName(importingClassMetadata.getClassName()).getPackage().getName();
            } catch (ClassNotFoundException e) {
                e.printStackTrace();
            }
            basePackages = new String[] {basePackage};
        }
        ClassPathScanningCandidateComponentProvider scanner = new ClassPathScanningCandidateComponentProvider(false);
        //3.需要的是接口HelloService的实现类
        TypeFilter helloServiceFilter = new AssignableTypeFilter(HelloService.class);
        scanner.addIncludeFilter(helloServiceFilter);
        Set<String> classes = new HashSet<>();
        //4.扫描包路径下接口HelloService的实现类
        for (String basePackage : basePackages) {
            scanner.findCandidateComponents(basePackage).forEach(beanDefinition -> classes.add(beanDefinition.getBeanClassName()));
        }
        return classes.toArray(new String[classes.size()]);
    }

    @Override
    public Predicate<String> getExclusionFilter() {
        return ImportSelector.super.getExclusionFilter();
    }
}
3.configuration的定义
@Configuration
@ComponentScan("com.example.springbootpractice.service")
@Import(HelloImportSelector.class)
public class HelloConfiguration {
}
4.测试类
@SpringBootTest
@ContextConfiguration(classes= HelloConfiguration.class)
public class HelloImportSelectorTest {
@Autowired
private List<HelloService> helloServices;
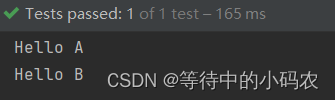
@Test
public void test() {
this.helloServices.forEach(HelloService::sayHello);
}
}
ImportSelector真正的作用到底是什么呢?
其实Spring公司既然这么设计,那肯定是有用的。那么有什么用呢?设想这样一个场景,如果有些功能我们并不需要Spring在一开始就加载进去,而是需要Spring帮助我们把这些功能动态加载进去,这时候这个ImportSelector的作用就来了。我们完全可以把实现这个接口的类做成一个开关,用来开启或者关闭某一个或者某些功能类。
@Retention(RetentionPolicy.RUNTIME) //开启运行时加载
@Import(HelloImportSelector.class)
public @interface EnableHelloSelector {
}

```java
@Configuration
@ComponentScan("com.example.springbootpractice.service")
@EnableHelloSelector
public class HelloConfiguration {
}
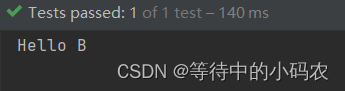
DeferredImportSelector接口是ImportSelector子类,直接翻译就是延时加载ImportSelector,用法和ImportSelector功能基本一样。
public class HelloDeferredImportSelector implements DeferredImportSelector {

    @Override
    public String[] selectImports(AnnotationMetadata importingClassMetadata) {
        return new String[]{HelloServiceA.class.getName()};
    }

    @Override
    public Predicate<String> getExclusionFilter() {
        return null;
    }


    @Override
    public Class<? extends Group> getImportGroup() {
        // 这个返回值决定调用DeferredImportSelector.selectImports  如果null则还是调用Group.selectImports
        return  MyGroup.class;
    }

    // 如果getImportGroup返回自定义Group , 会调用自定义Group的process方法
    // 如果getImportGroup返回 null,会调用DefaultDeferredImportSelectorGroup的process方法,即调用selectImports
    private static class MyGroup
            implements DeferredImportSelector.Group{

        AnnotationMetadata metadata;
        @Override
        public void process(AnnotationMetadata metadata, DeferredImportSelector selector) {
            this.metadata=metadata;
        }

        @Override
        public Iterable<Entry> selectImports() {
            List<Entry> list=new ArrayList<>();
            list.add(new Entry(this.metadata,HelloServiceB.class.getName()));
            return  list;
        }
    }

}


 2万+
2万+


 被折叠的 条评论
为什么被折叠?
被折叠的 条评论
为什么被折叠?
 到【灌水乐园】发言


