


一 、spring和mybatis
1.需要导入的包

2.在src目录下增加applicationContext.xml ,mybatis-config.xml 配置文件,并在applicationContext.xml 中定义dataSource 和sqlSessionFactory 的bean

3.编写与数据库表对应的实体类
4.编写dao数据库操作接口和对应的SqlMap.xml


5 。定义mapperdao bean 或者利用扫描将mapperdao 扫描进来;
在使用MapperFactoryBean时,有一个Mapper就需要定义一个对应的MapperFactoryBean,当Mapper比较少时可以,但遇到大量Mapper是就需要使用mybatis-spring.jar提供的MapperScannerConfigurer组件,通过这个组件会自动扫描各个Mapper接口,并注册对应的MapperFactoryBean对象
MapperFactoryBean方式:

MapperScannerConfigurer方式

使用MapperScannerConfigurer将指定package下的所有Mapper映射器批量生产实现对象,对象id默认用接口名首字母小写
如果指定的package下并不完全是我们定义的Mapper接口,此时使用MapperScannerConfigurer的两个属性缩小搜索和注册范围
一个是annotationClass ,一个是makerInterface;
annotationClass :用于指定指定一个注解标记,当指定了annotationClass是,MapperScannerConfigurer将只注册使用了该注解标记的接口
makerInterface:用于指定一个接口,当指定了makerInterface时,MapperScannerConfigurer将只注册继承自该接口的接口;
6.编写测试类测试

二 、spring和struts2整合
1.导包

2.配置struts2前端控制器FC和ContextLoaderListener(作用容器启动时实例化ApplicationContext)
<filter>
<filter-name>struts</filter-name>
<filter-class>org.apache.struts2.dispatcher.ng.filter.StrutsPrepareAndExecuteFilter</filter-class>
</filter>
<filter-mapping>
<filter-name>struts</filter-name>
<url-pattern>/*</url-pattern>
</filter-mapping>
<context-param>
<param-name>contextConfigLocation</param-name>
<param-value>classpath:applicationContext.xml</param-value>
</context-param>
<listener>
<listener-class>org.springframework.web.context.ContextLoaderListener</listener-class>
</listener>
3.在src目录下添加applicationContext.xml 和struts.xml
applicationContext.xml
<?xml version="1.0" encoding="utf-8"?>
<beans xmlns="http://www.springframework.org/schema/beans"
xmlns:xsi="http://www.w3.org/2001/XMLSchema-instance" xmlns:tx="http://www.springframework.org/schema/tx"
xmlns:context="http://www.springframework.org/schema/context"
xsi:schemaLocation="http://www.springframework.org/schema/beans
http://www.springframework.org/schema/beans/spring-beans-3.0.xsd
http://www.springframework.org/schema/tx
http://www.springframework.org/schema/tx/spring-tx-3.0.xsd
http://www.springframework.org/schema/context
http://www.springframework.org/schema/context/spring-context-3.0.xsd">
<bean id="helloAction" scope="prototype" class="com.jack.action.HelloAction"></bean>
</beans>
struts.xml (action 的class属性值是applicationContext.xml定义的bean的ID)
<?xml version="1.0" encoding="utf-8"?>
<!DOCTYPE struts PUBLIC
"-//Apache Software Foundation//DTD Struts Configuration 2.1.7//EN"
"http://struts.apache.org/dtds/struts-2.1.7.dtd">
<struts>
<package name="hello" namespace="/hello" extends="struts-default">
<action name="h1" class="helloAction">
<result name="success">/h1.jsp</result>
</action>
</package>
</struts>
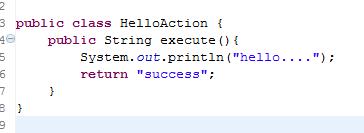
4.编写action类

5.部署,访问测试
三、spring和hibernate3整合
1.导包

2.src目录下添加applicationContext.xml
<?xml version="1.0" encoding="utf-8"?>
<beans xmlns="http://www.springframework.org/schema/beans"
xmlns:xsi="http://www.w3.org/2001/XMLSchema-instance"
xmlns:tx="http://www.springframework.org/schema/tx"
xmlns:context="http://www.springframework.org/schema/context"
xsi:schemaLocation="http://www.springframework.org/schema/beans
http://www.springframework.org/schema/beans/spring-beans-3.0.xsd
http://www.springframework.org/schema/tx
http://www.springframework.org/schema/tx/spring-tx-3.0.xsd
http://www.springframework.org/schema/context
http://www.springframework.org/schema/context/spring-context-3.0.xsd">
<bean id="dataSource" class="org.apache.commons.dbcp.BasicDataSource">
<property name="driverClassName" value="com.mysql.jdbc.Driver"></property>
<property name="url"
value="jdbc:mysql://localhost:3306/test?useUnicode=true&characterEncoding=utf8"></property>
<property name="username" value="root"></property>
<property name="password" value="zwwy"></property>
<property name="initialSize" value="5"></property>
<property name="maxActive" value="100"></property>
<property name="maxIdle" value="10"></property>
<property name="minIdle" value="2"></property>
</bean>
<bean id="sessionFactory"
class="org.springframework.orm.hibernate3.LocalSessionFactoryBean">
<property name="dataSource" ref="dataSource"></property>
<property name="hibernateProperties">
<props>
<prop key="hibernate.dialect">org.hibernate.dialect.MySQLDialect</prop>
<prop key="hibernate.show_sql">true</prop>
<prop key="hibernate.format_sql">true</prop>
<prop key="hibernate.cache.use_second_level_cache">true</prop>
<prop key="hibernate.cache.use_query_cache">true</prop>
<prop key="hibernate.cache.provider_class">org.hibernate.cache.EhCacheProvider</prop>
</props>
</property>
<property name="mappingResources">
<list>
<value>com/jack/entity/user.hbm.xml</value>
<value>com/jack/entity/role.hbm.xml</value>
</list>
</property>
</bean>
<bean id="userdaohibernate" class="com.jack.dao.hibernate3.UserDAOImpl">
<property name="sessionFactory" ref="sessionFactory"></property>
</bean>
</beans>
3.编写实体类和对应的hbm.xml文件
com.jack.entity.User
package com.jack.entity;
public class User {
private int id;
private String username;
private String password;
private String realName;
private String sex;
private Role role;
public int getId() {
return id;
}
public void setId(int id) {
this.id = id;
}
public String getUsername() {
return username;
}
public void setUsername(String username) {
this.username = username;
}
public String getPassword() {
return password;
}
public void setPassword(String password) {
this.password = password;
}
public String getRealName() {
return realName;
}
public void setRealName(String realName) {
this.realName = realName;
}
public Role getRole() {
return role;
}
public void setRole(Role role) {
this.role = role;
}
public String getSex() {
return sex;
}
public void setSex(String sex) {
this.sex = sex;
}
}
user.hbm.xml
<?xml version="1.0" encoding="utf-8"?>
<!DOCTYPE hibernate-mapping PUBLIC
"-//Hibernate/Hibernate Mapping DTD 3.0//EN"
"http://hibernate.sourceforge.net/hibernate-mapping-3.0.dtd" >
<hibernate-mapping package="com.jack.entity">
<typedef name="String" class="java.lang.String"></typedef>
<class table="t_user" name="User">
<id name="id" column="id" type="int">
<generator class="identity"></generator>
</id>
<property name="username" column="username" type="String"></property>
<property name="password" column="password" type="String"></property>
<property name="realName" column="realname" type="String"></property>
<property name="sex" column="sex" type="String"></property>
<many-to-one name="role" column="role_id" class="Role">
</many-to-one>
</class>
</hibernate-mapping>
4.编写dao和用HibernateDaoSupport实现dao
5.编写测试代码


 724
724

 被折叠的 条评论
为什么被折叠?
被折叠的 条评论
为什么被折叠?
 到【灌水乐园】发言


